↑ Back to top
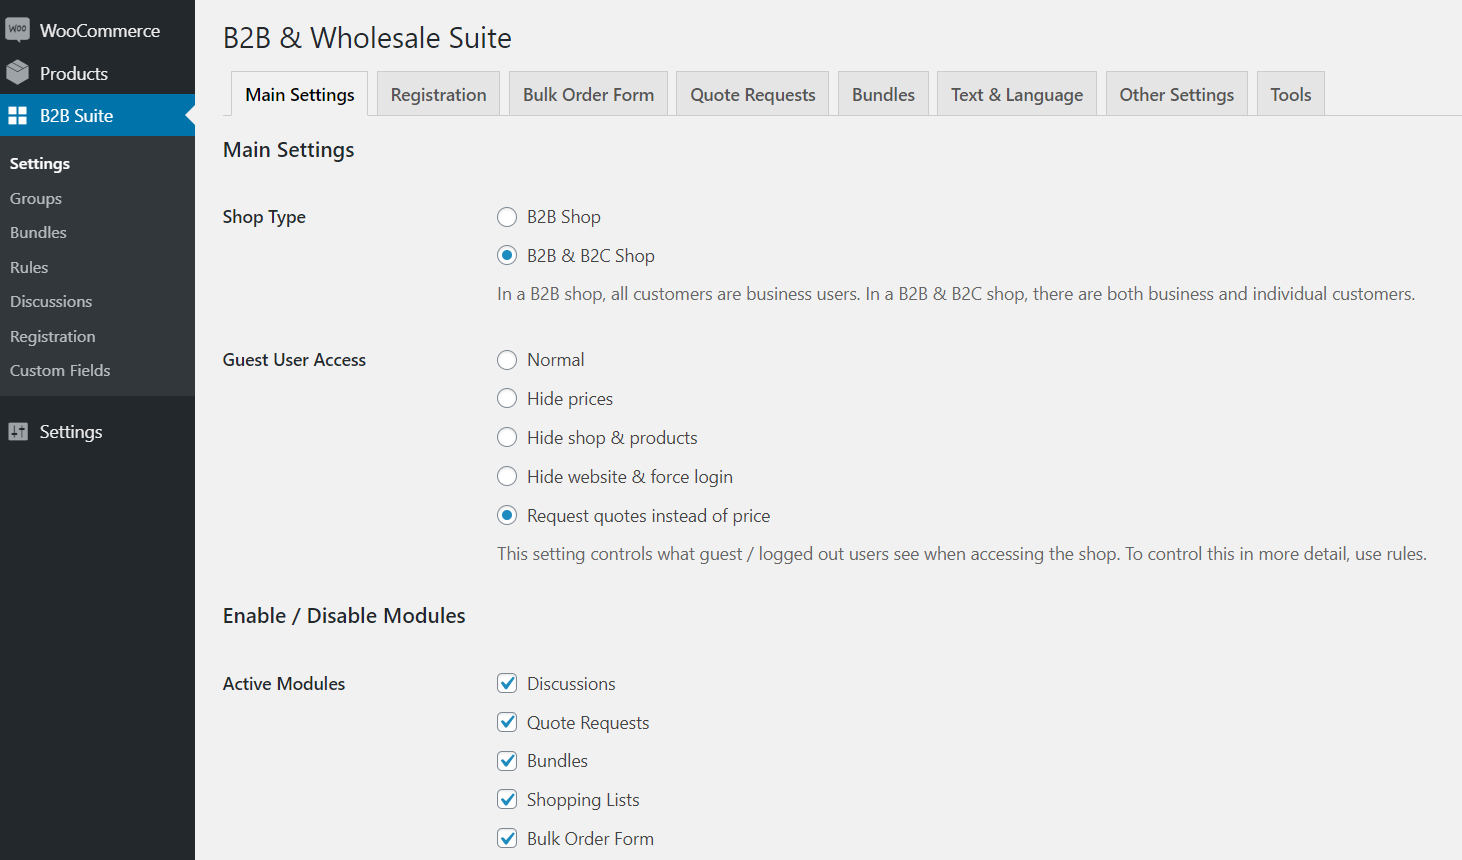
Choose between B2B Shop and B2B+B2C Shop types.
The main difference between the two: There are B2B – only functionalities such as Messages or Shopping lists that are visible in users’ My Account panels. If the shop type is B2B, all users are considered B2B and will see these. Otherwise, only selected users will see them.
↑ Back to top
This setting controls what guest (logged out) users see when they open your site. There are 5 main options:
Normal (disabled)
Hide prices – Users will see a message instead of prices. You can control the message in B2B Suite > Settings > Language & Text. To hide prices by category or by item in complex configurations, set up “Hidden Price” rules in B2B Suite > Rules.
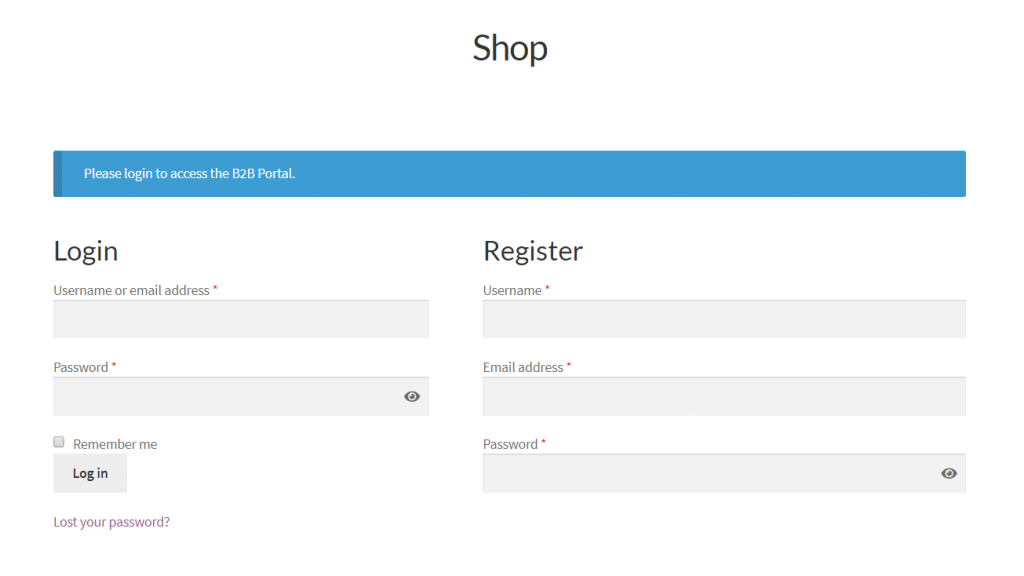
Hide shop & products – Users will see a login panel instead of the shop. Customize message in B2B Suite > Settings > Language & Text
Hide website & force login – This option forces login, but will not show a registration panel. It is an option for intranets and totally private membership stores. It is not suitable for most websites.
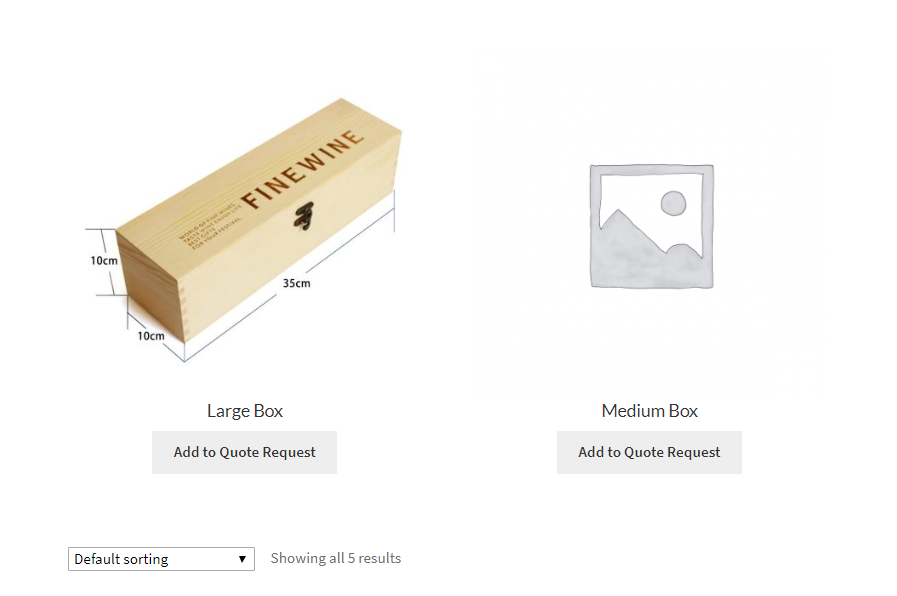
Request quotes instead of price – Users cannot see prices and cannot order. The Cart is replaced with a Quote Request System. If you would like to request quotes for other users than guest users (e.g. logged in users, or a specific business group), you can configure this through Dynamic Rules.
↑ Back to top
Enable or disable plugin modules based on your needs. When you disable a module, it is removed from the interface, making configuration cleaner and simpler for you. So we recommend you disable everything you don’t need.
There are 8 optional modules:
Discussions (messaging with buyers)
Quote Requests
Bundles (product bundles and packages)
Shopping Lists (users can save lists for later usage, e.g. stock resupply)
Bulk Order Form
Multi Accounts (multi user accounts / employee accounts with permissions)
Product Visibility (hide products or categories from certain users or groups)
Payment & Shipping Control (control available payment shipping methods by group or user)
↑ Back to top
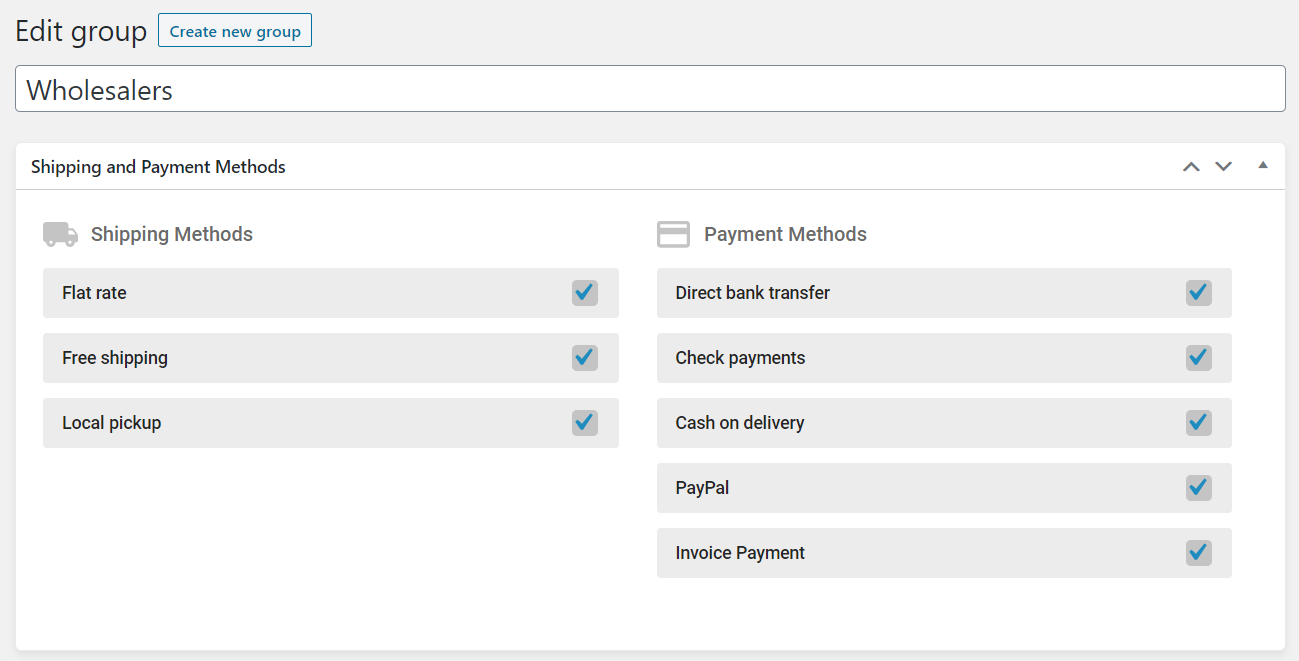
Payment Methods, Prices, Tax, Content, etc. are shown differently in the plugin based on the user’s group. Groups are therefore the primary organization structure in the plugin.
You can create an unlimited number of groups in B2B Suite > Groups. Depending on your settings you may also be able to configure shipping and payment methods by group.
Shipping and Payment Methods control by Group
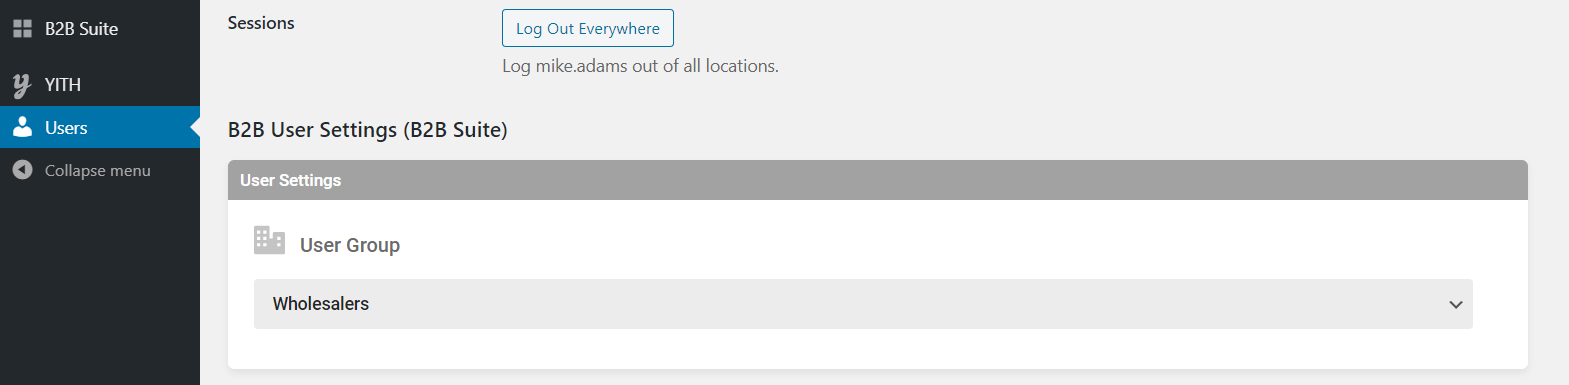
To add a user to a group, go the user’s profile page in Users > click on Username. Here you can choose the user’s group and then save the user.
User Group in Profile Page
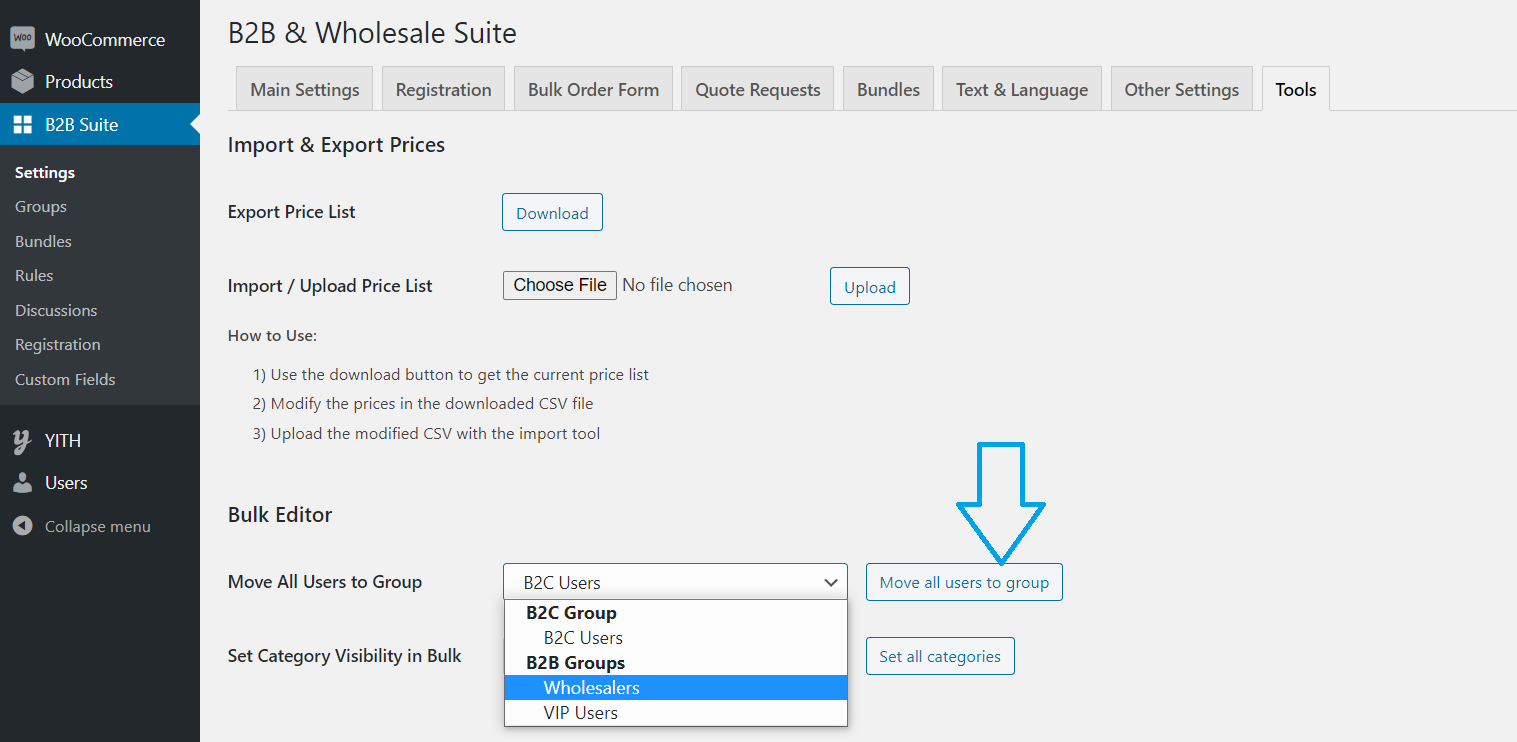
If you have a large number of users, you can also configure user group in BULK, by using our Bulk tool in B2B Suite > Settings> Tools.
Bulk Move Users to Group
With this tool, you can add all move all users to a specific group.
If you require a more in-depth configuration, or to set group programmatically, with a 3rd party tool, or with a script, here are the relevant details:
To set a user’s group all you have to do is set 2 meta keys:
b2bwhs_b2buser – Value should be yes for b2b users and no for b2c or other users
b2bwhs_customergroup – Value should be the group id (e.g. 253, 13, 19, etc).
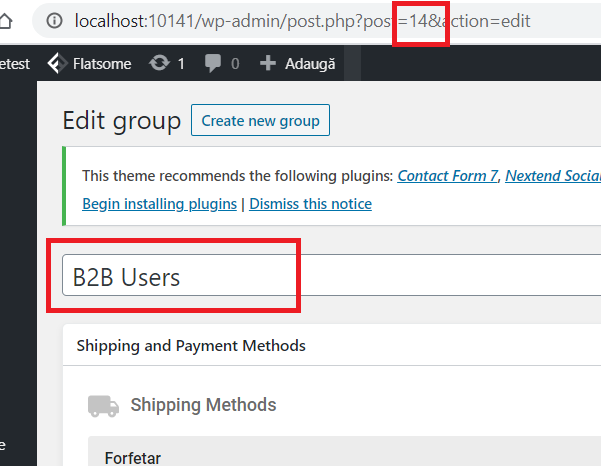
You can get the group ID by going to B2BSuite > Groups and Clicking on the group. The Number in the URL is the group ID. For example, the group below has the ID 14
This is useful if you are importing a large number of users. For example if you are importing users with a tool such as WP ALL IMPORT, you can set these 2 meta keys during import and the users will be added to the appropriate group.
↑ Back to top
Registration settings can be controlled in B2B Suite > Settings > Registration.
Here you can find 3 main options:
Extend normal registration, which adds the extension’s custom fields to the normal registration in places such as My Account
Extend checkout registration, which does the same as the previous option, for stores that have checkout registration enabled.
Manual approval for all, which enables a manual approval process for all users, regardless of how they register.
The specific options available to users when they register are controlled in B2B Suite > Registration. Unlimited options can be created there, and existing default options can be renamed, edited, or deleted.
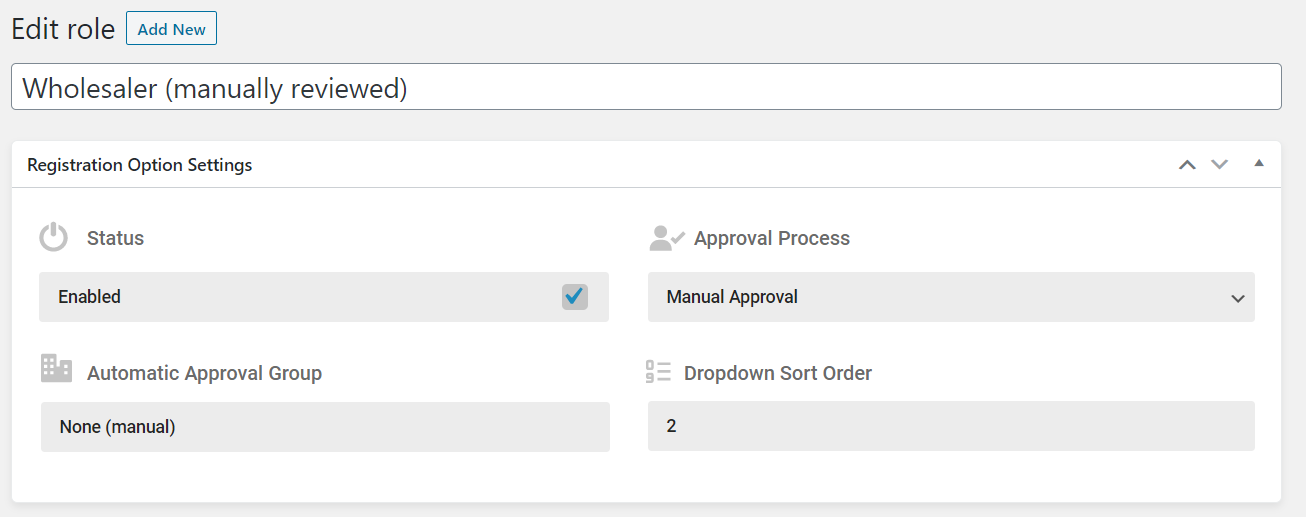
By clicking on an option or creating a new one, an option setting panel opens where for each option you can set manual or automatic approval.
In B2B Suite > Fields, there are several default fields for companies. Custom fields can also be added. For VAT validation, a custom VAT field with a billing connection of “VAT” must be created.
2.5.1 Configuring separate B2B / B2C registration pages
You can completely separate the two types of registration in 3 steps:
Step 1. In B2B Suite ->Settings > Registration , disable “Extend Normal Registration”.
Step 2. Create a new WordPress page for B2B registration
Step 3. Insert one of the following shortcodes in the newly created page:
[b2bwhs_b2b_registration] for Login + Registration forms
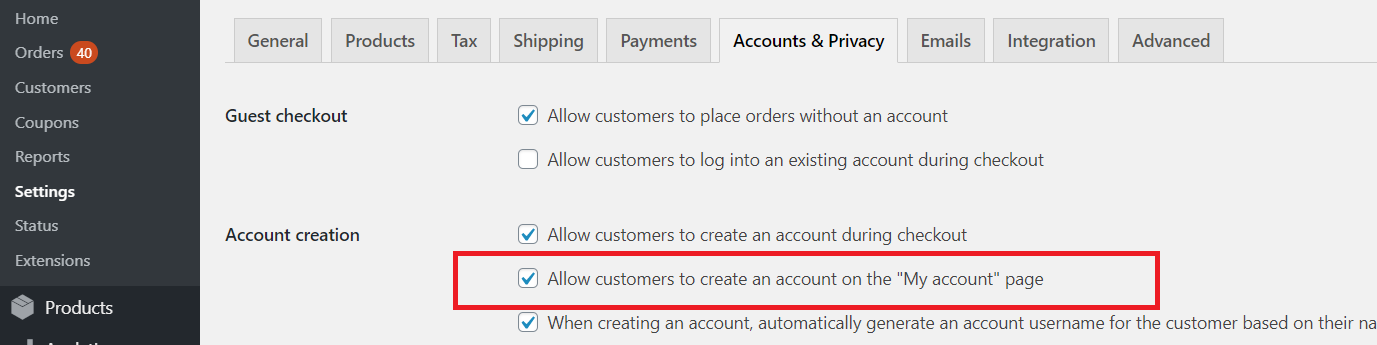
In order to see the registration form, and not just login, the following setting needs to be enabled: In WooCommerce->Settings->Accounts you need to enable “Allow customers to create an account on the “My account” page”.
[b2bwhs_b2b_registration_only] for only the Registration form
The registration shortcode has the following parameters:
You can use the parameter registration_option_id, which has the following effects:
Shows only fields of that particular registration option
Hides the User Type dropdown
Usage example:
[b2bwhs_b2b_registration_only registration_option_id=454]
To get the role go to B2B Suite > Registration and click on the particular registration option (B2B, Individual, Reseller, etc.). The number in the URL (e.g. post.php?post=4225466&action=edit) is the option ID (here referred to as role ID)
↑ Back to top
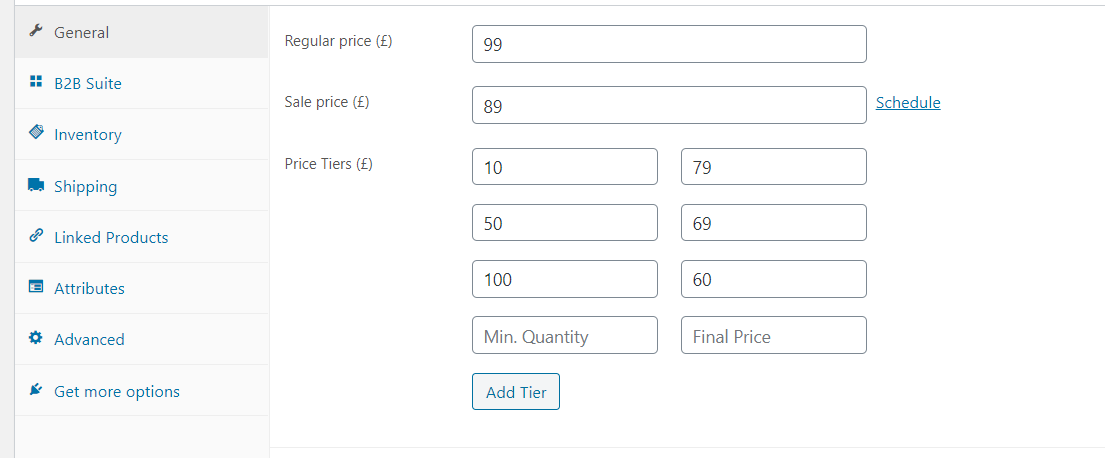
Pricing can be controlled for each group directly in the product page backend. Tiered pricing can also be set up here by specifying the minimum quantity and the final price.
In the above example, regular users will see a price of $88, discounted from $99. However, if they log in as a B2B user ( a user that is part of the B2B Users group), they will see a price of $55, discounted from $77.
Unlimited groups can be created through the plugin, and each of the groups can have its own pricing.
CSV Price Import and Export in Bulk
In order to set prices by import or export, you can use the built-in plugin tool that you can find in B2B Suite > Settings > Tools.
How to Use:
Use the download button to get the current price list
Modify the prices in the downloaded CSV file
Upload the modified CSV with the import tool
To configure tiered pricing, simply add the min. quantity and final price tiers for all users, or for each separate group.
Tiered Pricing Backend
In the example above, you can see how the price becomes progressively better as the quantity increases. While the first price is $89, the price becomes $79 for purchases of min. 10 units, $69 above 50 units, and finally $60 for purchases of more than 100 units.
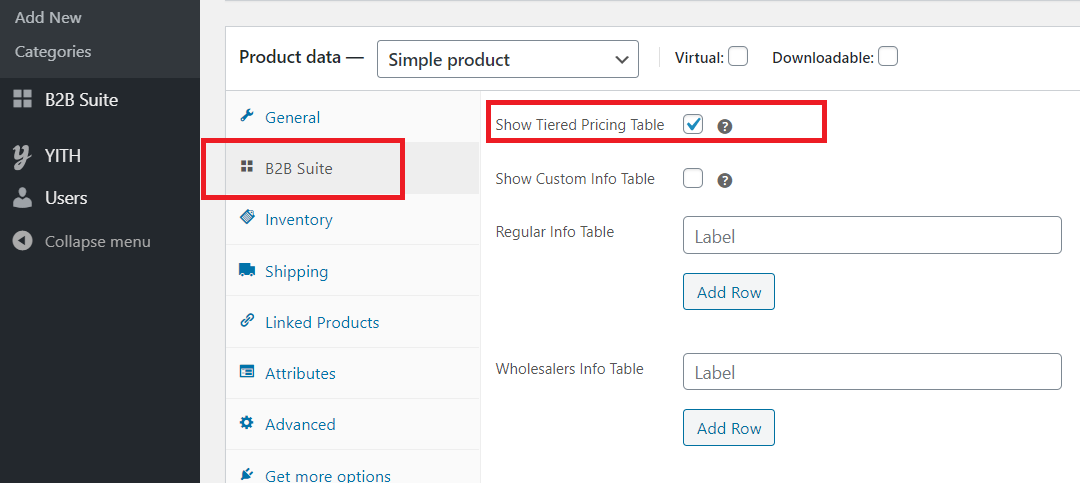
The above configuration can also generate a pricing table automatically (enabled by default). Simply enable or disable this table in the product page > B2B Suite > Show Tiered Pricing Table.
Show Tiered Pricing Table Checkbox
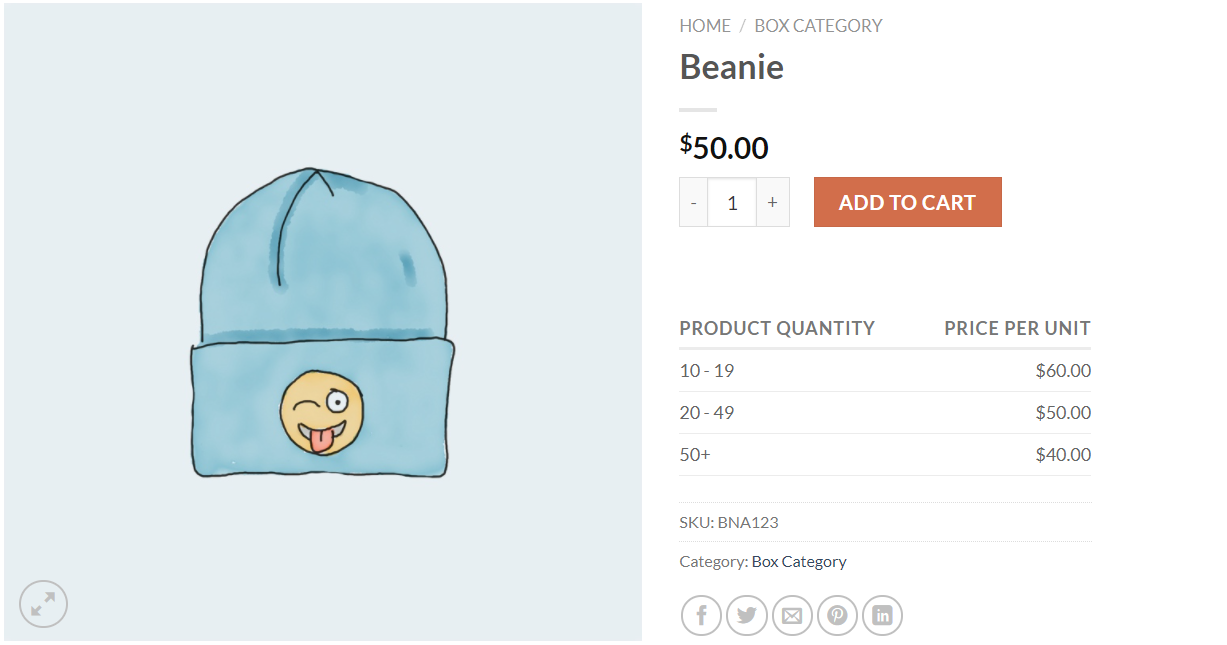
If you keep this enabled, a pricing table is automatically generated. The pricing table design adapts to any theme natively.
Here is an example with the Flatsome theme:
Tiered Pricing Table with Flatsome Theme
↑ Back to top
Bulk Order Form settings are controlled in B2B Suite > Settings > Bulk Order Form.
There are 4 configurable settings:
Search by SKU
Search Product Description
Search Each Variation
Show Accounting Subtotals
The last 3 options enable a more in-depth search, but they also affect performance. Performance of the form will go down as the number of products in the store increases.
To add the bulk order form in a separate page, use the shortcode: [b2bwhs_bulkorder]
↑ Back to top
Quote Request settings are controlled in B2B Suite > Settings > Quote Requests.
The 3 main settings are:
“Request a Quote” in Cart – controls which users are able to request a custom quote in cart.
Quote Fields – controls which fields are part of the form and which data is collected. Available options are “Name”, “Email Address”, “Phone”, and “Message”.
Integrate with Discussions – if this checkbox is enabled, quote requests start a new discussions. If not, quotes are sent as an email to the shop admin.
2.8.1 How to enable Quote Requests for a user or category of users
To enable quote requests for logged out users:
Go to B2B Suite > Settings > Main Settings, and choose “Request quotes instead of price”
To enable quote requests for any other category, user, role, or country
Go to B2B Suite > Rules, and create a “Quote Request System” rule.
Example 1: Enabling quote requests for logged in users
You would create a rule with the configuration below:
Quote Requests for Logged In Users
2.8.2 How the Quote Request System works and its effects
The quote request system has the following effects:
It replaces the “Add to Cart” button with an “Add to Quote Request” button
It replaces the Cart with a Quote Basket
It hides prices
It enables a customizable Quote Request Form
It sends email notifications via email OR it creates discussions based on your settings
↑ Back to top
The first step in using product visibility is activating the Product Visibility module in B2B Suite > Settings > Main Settings
Once this is activated, you will see a category visibility panel, and a product visibility panel for each category and product in their backend pages.
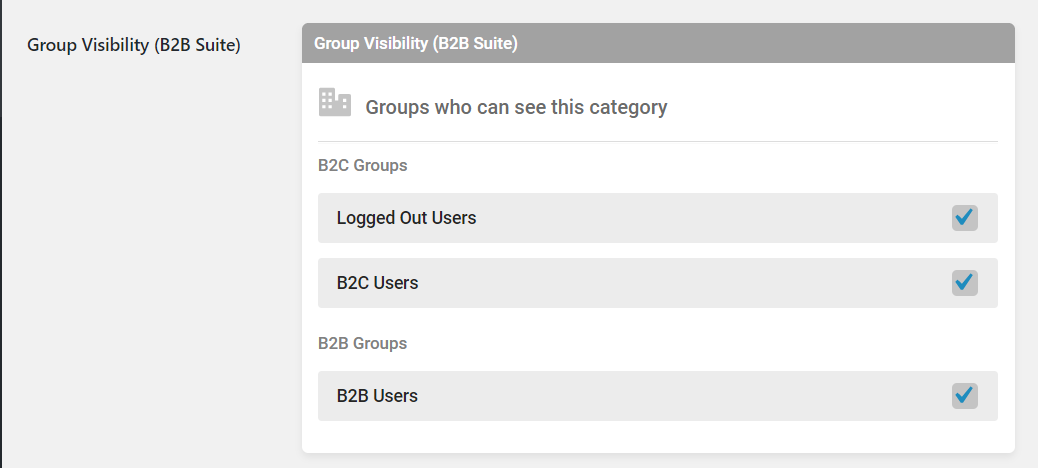
Through this panel’s checkboxes and fields you can set which groups can see the category or product, as well as add individual usernames.
In the category group visibility panel above, all options are enabled, meaning that all users would be able to see this category and its products.
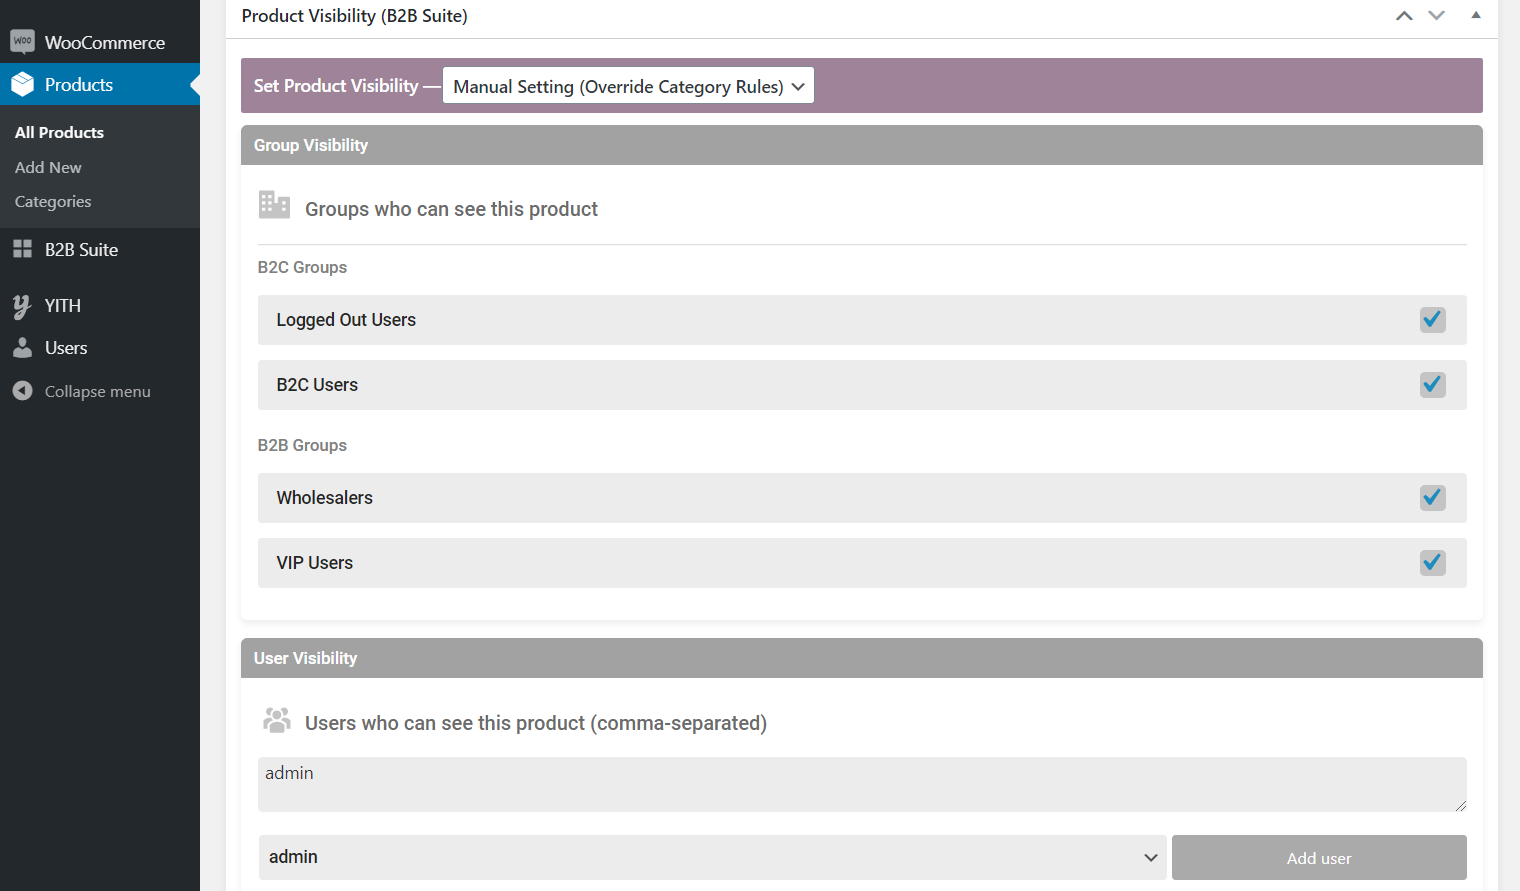
You can also go into the product page and choose to use a “Manual Setting” instead of Following Category rules. This way you can set visibility for each product individually.
Manual Product Visibility in the Product Page
As shown in the image above, visibility can be configured by group for each product, as well as by individual user. You can add users that are able to view the product, comma separated, by username.
Product Visibility Settings
You can find settings in B2B Suite > Settings > Other Settings > Product Visibility.
Available settings are:
Hidden has priority
Enable visibility cache
By default if a product is part of multiple categories, having 1 visible category is enough to make the product visible. By enabling ‘hidden has priority’, this behavior is reversed. Having 1 hidden category is now enough to make the product hidden.
The plugin has an in-built product visibility cache. This can make the site faster, but it can also create issues or conflicts. In certain situations like WPML product translation, OR using other caching plugins, we recommend disabling this visibility cache.
↑ Back to top
To control available payment and shipping methods, the first step is enabling this module in B2B Suite > Settings > Main Settings.
Once the module is enabled, you can control methods by group, by going into the groups panel in B2B Suite > Groups.
Methods can also be controlled in each user’s profile page in the dedicated methods panel. To do that, you would switch from “Follow group rules” to “Manual” mode.
↑ Back to top
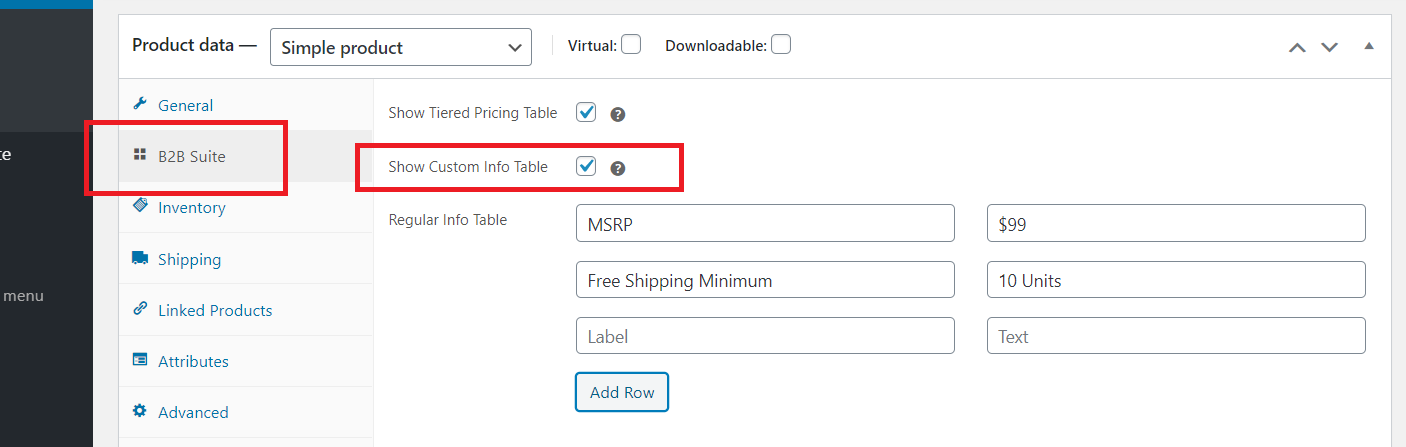
Through the product information table, you can display custom information for each product. Examples are: MSRP, Stock resupply date, Product dimensions, Minimum Order Thresholds, etc.
You can create Rules for required quantity step, free shipping, or minimum orders and display these rules to users easily through the information table.
To create the table:
Go to the product page backend and go to the “B2B Suite” panel.
Product Information Table Backend
Enable the “Show Custom Info Table” checkbox. Then you can create unlimited rows, for all users (in the regular table), or for specific users in each group’s table.
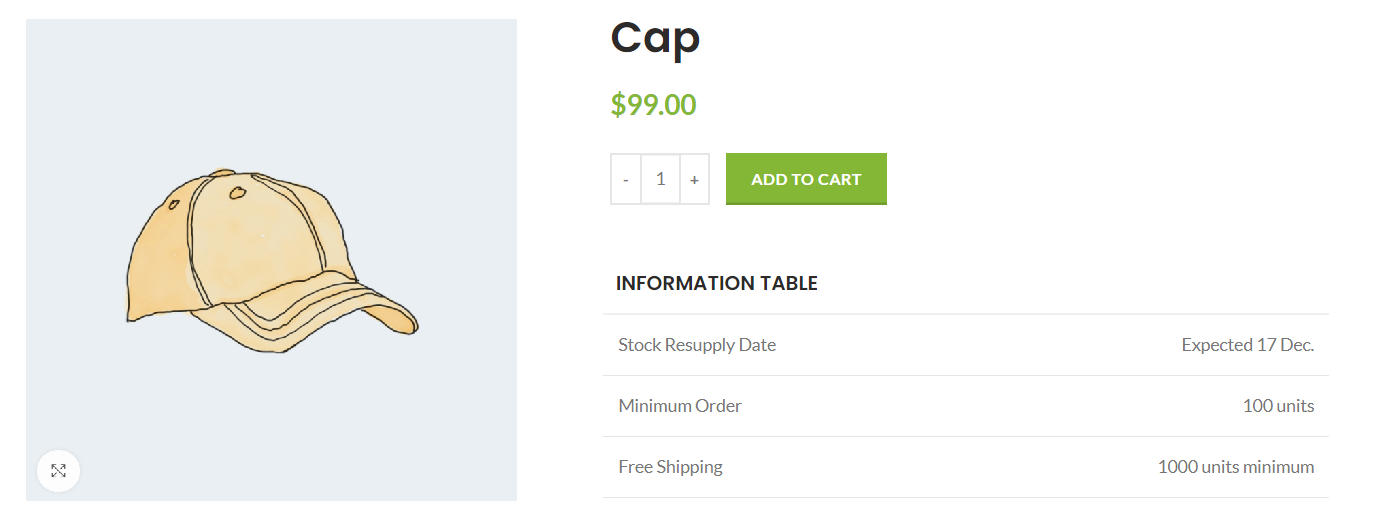
The table design adapts to any theme:
Information Table with WoodMart Theme
↑ Back to top
In B2B Suite > Settings > Text & Language you can control the default texts in the plugin. (e.g. Login to View Prices).
You can also configure the “Shopping Lists Language”. Shopping lists use a different mechanism for language so they need this setting for translation. However, to translate the rest of the plugin, you will need to use a translation plugin such as Loco Translate or WPML.
To translate the plugin with Loco Translate, we recommend using this guide here for WooCommerce, that also applies to B2B Suite:
↑ Back to top
B2B & Wholesale suite allows you set up complex free shipping rules based on conditions.
Examples of what you can do with the free shipping rule:
Offer free shipping to all users for orders of at least $2000
Offer free shipping if users purchase at least 5 pieces of a particular item
Offer free shipping if users order at least $1000 of products in a particular category
Offer free shipping to B2B users only if they purchase at least 100 Computers
Offer free shipping to Resellers if they include 1 particular item in their order
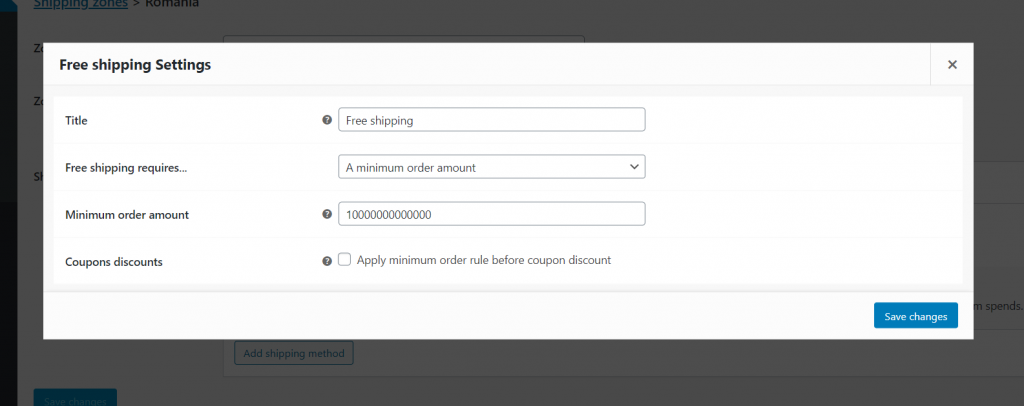
To configure free shipping rules:
1. Enable Free Shipping as a method in WooCommerce->Settings->Shipping with a very high minium order.
The plugin cannot apply free shipping if the method is disabled in the main WooCommerce Settings. So to get around this issue, you can enable Free Shipping but set a very high minimum order such as 999999999999.
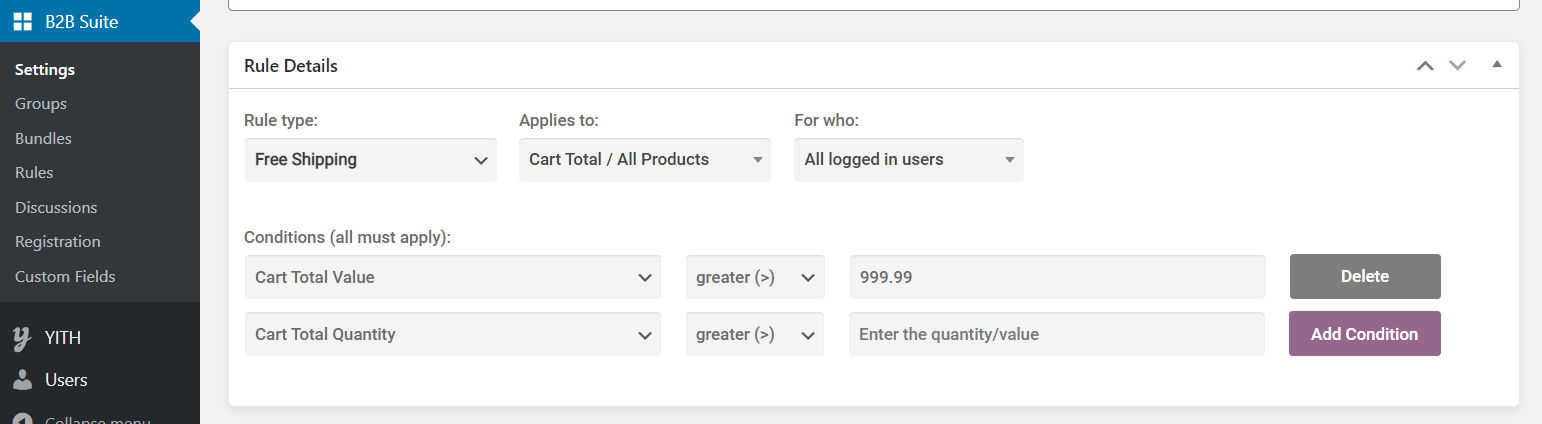
2. Create a Free Shipping rule
In the example above, free shipping is available for all orders above $1000.
3.2.1 Adding VAT to Registration and VIES Validation
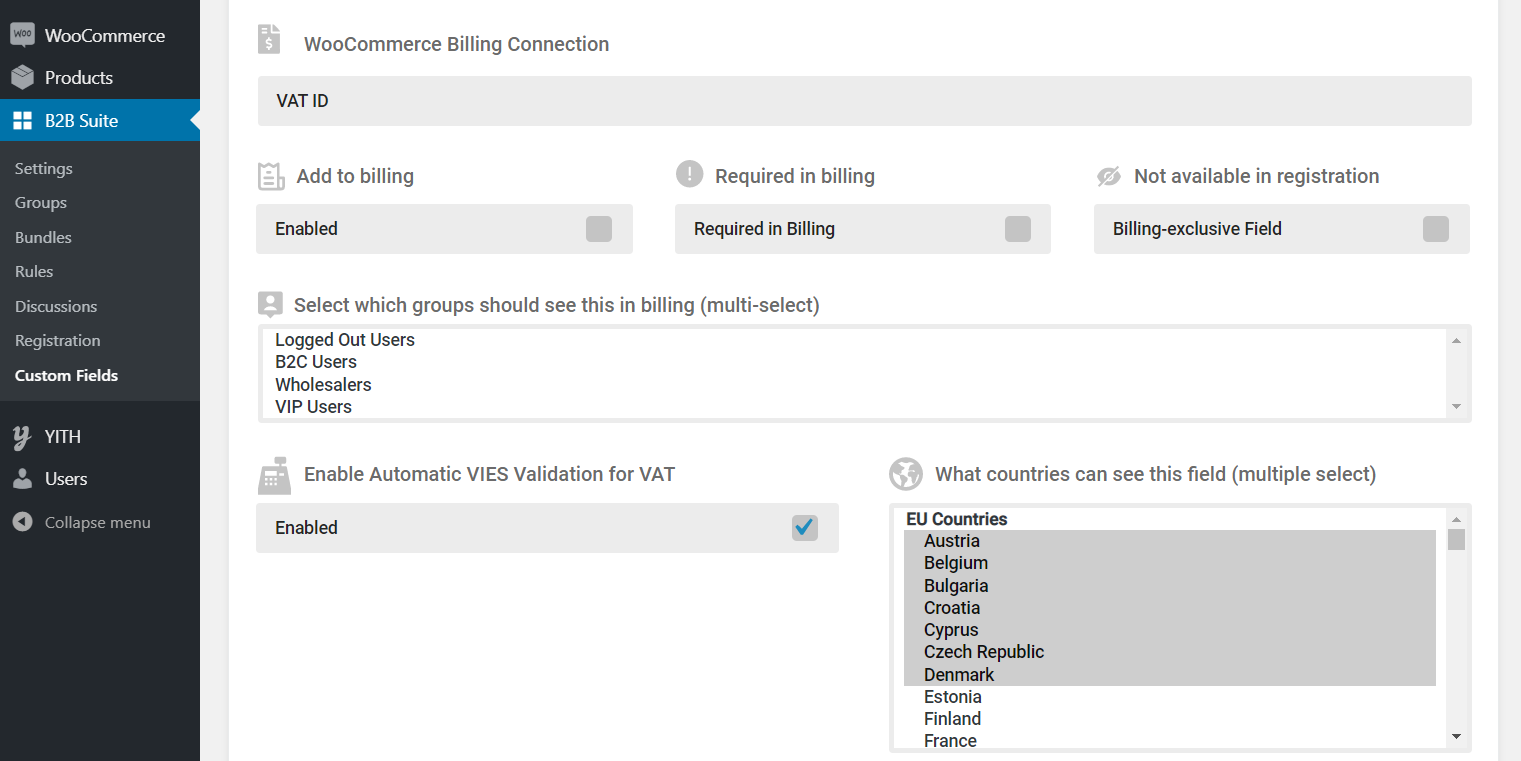
To configure VAT, go to B2B Suite > Custom Fields and Create a field with a “VAT” billing connection.
VAT Field in Registration
In the example above, you can see that VAT will be visible only for users in a few countries. VIES Validation is also enabled.
What VIES validation does: it connects to the Europa.eu server and checks that a VAT number is authenticated in the European Union (there is usually a special registration procedure companies must adhere to so that this check works)
If VIES is enabled here, users will not be able to register without a valid number. If not enabled, any number can be used, and you can manually check it later during registration approval.
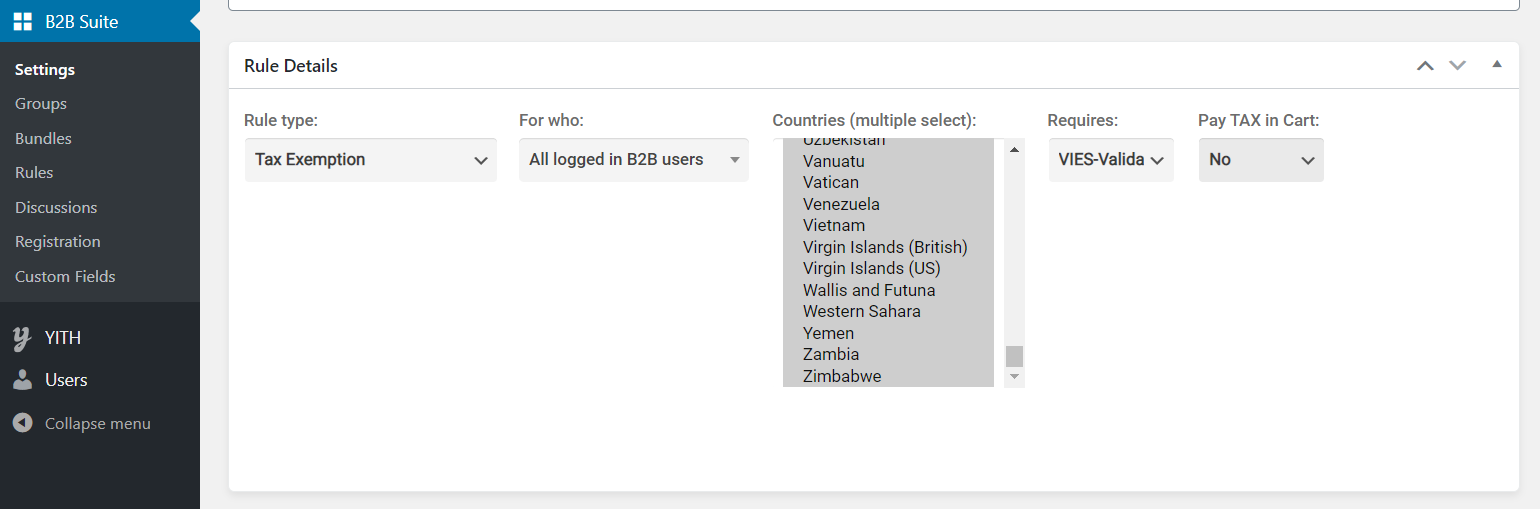
3.2.2 Configuring Tax Exemptions
To configure tax exemptions, you can create Tax Exemption rules in B2B Suite > Rules.
For example, a common setup is:
All B2B Users are VAT Exempt
In this example, all B2B users will be VAT exempt. Make sure to add users to any Business group so that exemptions apply to them.
Configurable Settings:
Requires: Nothing OR VIES-Validated VAT ID
If you choose “nothing”, all B2B users will be vat-exempt. If you choose the VIES option, only users that provided a VIES-valid VAT number during registration will be exempted.
Pay TAX in CART: No, Yes
A common setup is displaying prices WITHOUT VAT in the shop, but paying the price WITH VAT in the checkout. To set this up, choose “YES” in the “Pay Tax In Cart” dropdown.
3.2.3 Display Prices Including or Excluding Tax
To display pricing excluding tax for B2B and including tax for B2C, the first step is to make the following WooCommerce settings in WooCommerce-> Settings-> Tax:
Display prices including tax in cart
Display prices including tax in shop pages
Enter prices inclusive of tax
The above configuration in combination with a Tax Exemption will ensure prices are displayed including or excluding tax.
↑ Back to top
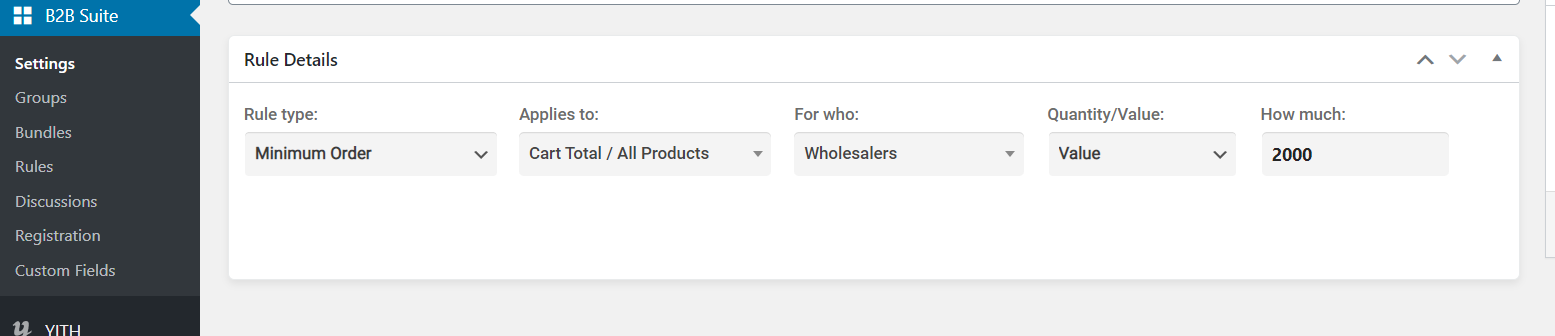
You may want to set different minimum order thresholds for different users or groups. Here’s how to do it.
Go to B2B Suite > Create 2 Minimum Order Rules.
For example:
Minimum Order Rule
The rule above requires a $2000 minimum order for all users in the Wholesalers group.
Minimum Order Rule per Category
The rule above does the following: IF users in the VIP group purchase any items in the Wines category, they must purchase a minimum of 100 units. If they don’t purchase items in that category, this rule does not apply.
↑ Back to top
If you use the plugin’s tax exemption feature, and a user is VAT exempt, some themes will automatically set a inc. VAT / excl. VAT suffix.
However, if your theme does not, here’s how you can configure this with a code snippet.
The code below sets “excl. VAT” for b2b users and “incl. VAT” for b2c users as suffixes:
// get if user is b2b
$user_is_b2b = get_user_meta(get_current_user_id(),'b2bwhs_b2buser', true);

if ($user_is_b2b === 'yes'){
    add_filter( 'woocommerce_get_price_suffix', 'add_price_suffix', 99, 4 );

    function add_price_suffix( $html, $product, $price, $qty ){
        $html = '<small class="woocommerce-price-suffix"> excl. VAT</small>';
        return $html;
    }
} else {
    add_filter( 'woocommerce_get_price_suffix', 'add_price_suffixtwo', 99, 4 );

    function add_price_suffixtwo( $html, $product, $price, $qty ){
        $html = '<small class="woocommerce-price-suffix"> incl. VAT</small>';
        return $html;
    }
}
To use the snippet above, you can add it to your functions.php file or to a Snippets plugin.
↑ Back to top
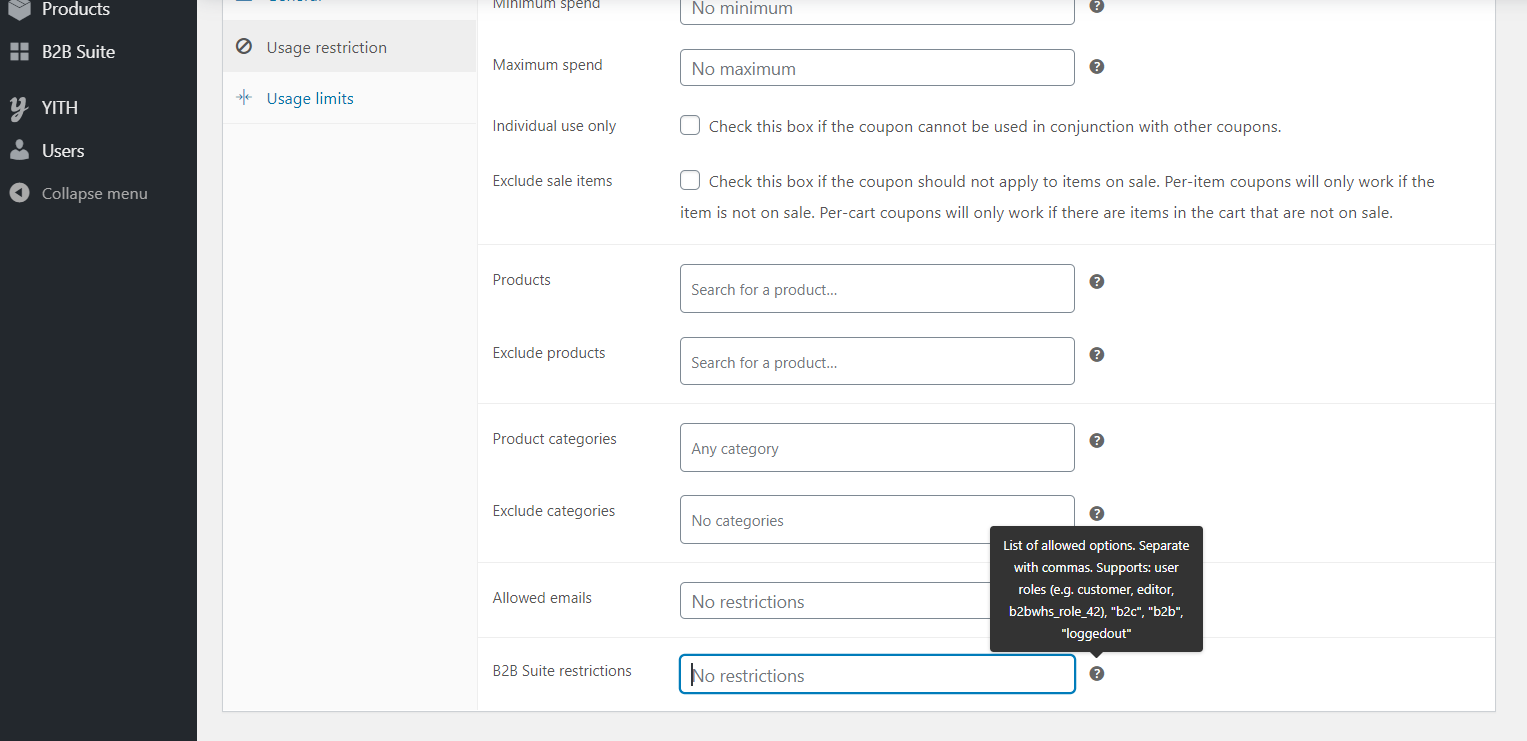
If you would like to make a coupon available for B2B or B2C users only, here’s how to configure this:
Go to the Coupons panel and in the coupon page, go to “Usage Restriction”. At the bottom of the page you have “B2B Suite” restriction where you can enter allowed coupon options.B2B Suite Coupon Restrictions
You can use the following options, comma-separated:
“b2b“, “b2c“, “loggedout” as well as user roles.
If you want to restrict coupons by group, you have to use the role. In the plugin, each group has its own role.
Therefore to allow users in the group with ID 42, simply add b2bwhs_role_42 here
To get the group ID, you can go to B2B Suite > Groups and click on the group. The number in the URL is the group ID.
↑ Back to top
This article will show you how to set different shipping costs based on whether the user is b2b or b2c, or based on order value or order quantity.
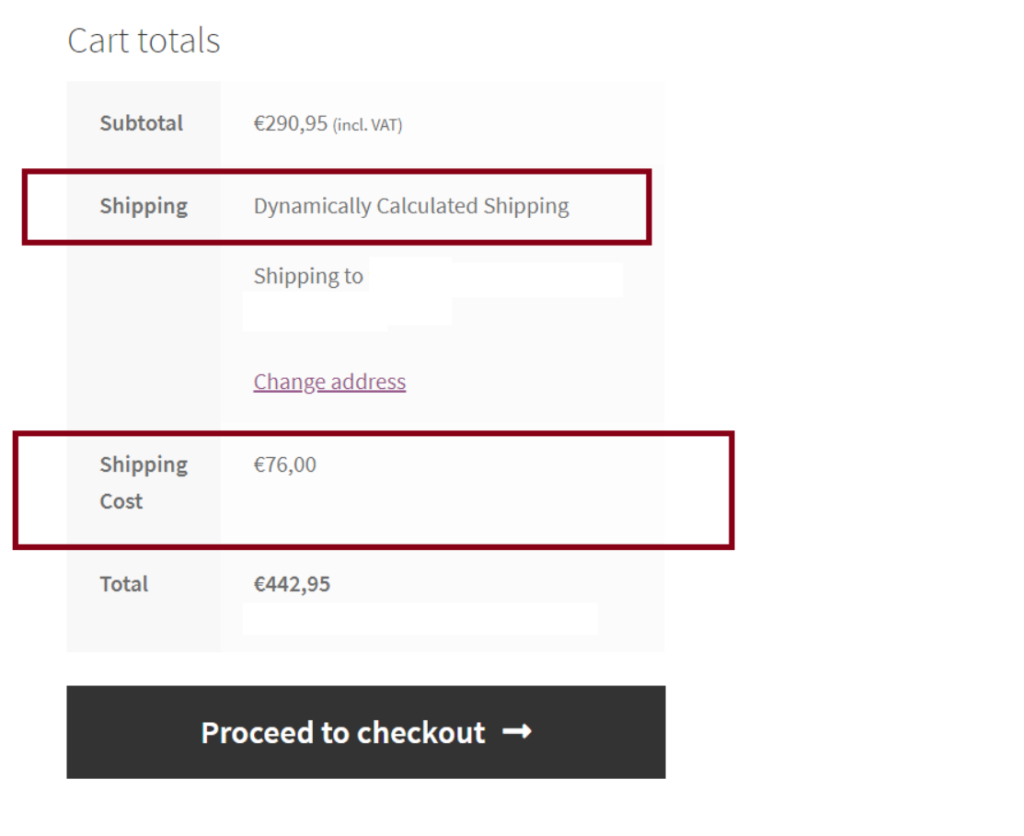
Here’s what the end result looks like:
And here’s how to set it up:
1) Go to WooCommerce->Settings->Shipping, select a zone, and in Shipping methods disable all methods, and keep only Free Shipping.
2) Click “Edit” on “Free Shipping” and rename it to “Dynamically Calculated Shipping”. That way users would see “Dynamically Calculated Shipping” as costing 0, and then the actual shipping cost below.
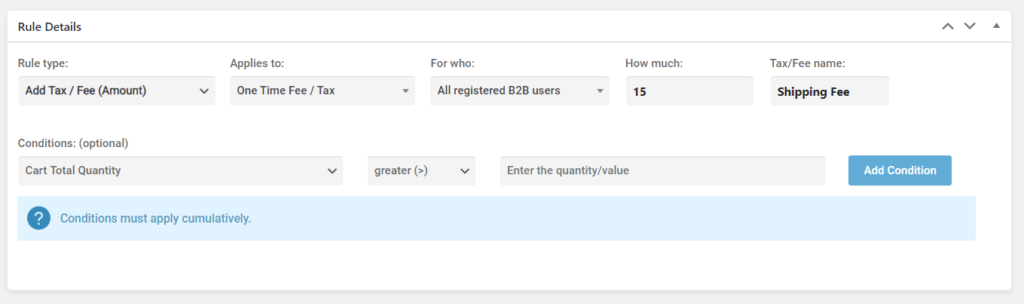
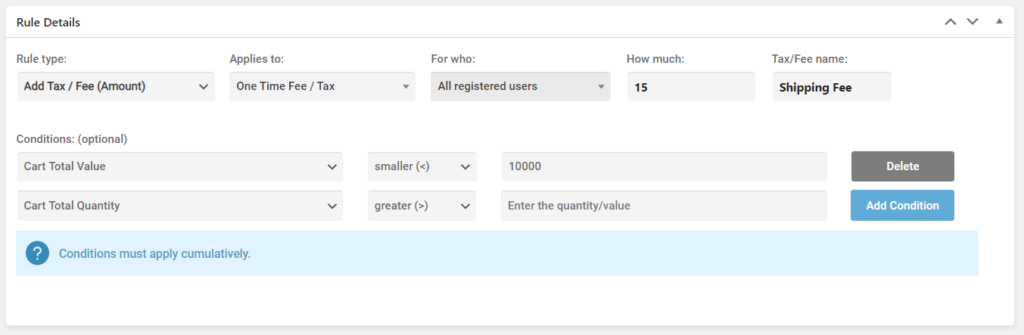
3) Create custom “add tax/fee” rules and name them “shipping cost” depending on whether the user is B2B or B2C. You could create multiple “Add Tax” rules, all named “Shipping Cost”, and set conditions such as <500 , >500 AND <1500, >1500, etc to set a different shipping cost based on the order value.
Here’s an example of setting shipping cost to $15 for B2B users:
$15 shipping fee for b2b usersHere’s an example of setting shipping cost $10 for orders < $1000:$10 shipping fee for orders < $10000 for all users
↑ Back to top
This feature allows you to show different content to different users by wrapping it inside a shortcode. This should work everywhere in the frontend area of the site, including pages, posts, and product descriptions.
To use the shortcode, simply wrap your content (text, images or anything else) in the following way:
[b2bwhs_content show_to=]Your content here[/b2bwhs_content]
The parameter show_to is required, and it supports the following options:
loggedin
loggedout
user roles (e.g: editor, administrator, reseller)
usernames (e.g: john.mike23, companyllc10)
Here are a few usage examples to illustrate the functionality:
Example 1[b2bwhs_content show_to=reseller]Minimum order quantity is 100[/b2bwhs_content][b2bwhs_content show_to=vendor]Minimum order quantity is 200[/b2bwhs_content]
In this example, customers with the user role “reseller” would see 100, while customers with the user role “vendor” would see 200 instead.
Example 2[b2bwhs_content show_to=loggedout,companyllc10]Content here…[/b2bwhs_content]
In this example, the content would only be visible to logged out users, and to the user “companyllc10”. All other users would not see it.
Example 3[b2bwhs_content show_to=loggedin]Private membership content here…[/b2bwhs_content]
In this example, this content would be hidden from guest users and only visible to users that are logged in.
This issue is usually caused by Permalinks not having correctly refreshed. The easiest way to fix this is to go to B2B Suite > Settings > Other Settings and enable “Force Permalinks Rewrite”.
I am not seeing a VAT field, such as the one in the demo.
Since VAT setup is different depending on your country, business and laws, we have not added this field by default. To add it, please go to B2B Suite > Custom Fields > and create a New Field. In “Billing Connection” choose “VAT ID” and configure countries and roles according to your needs.
I have configured VAT but I can’t see it in registration!
In B2B Suite > Custom Fields > VAT, you configured the countries for which VAT is visible. The user must first select the country during registration, and based on this selection, VAT will be hidden or shown. Make sure to add a Country + State field in registration.
Free Shipping rule is not working
The free shipping rule requires a special configuration. Please see above how to configure it.
No available payment or shipping methods
B2B & Wholesale Suite controls payment methods by group and by user. If you don’t need this functionality, you can disable it by going to B2B Suite > Settings > Active Modules and disabling “Payment & Shipping Control”.
If you are using the functionality, make sure to enable methods in B2B Suite > Groups, for each available group.
Registration is not visible when using “Hide shop & products”
In order to see the Registration section, you must enable the following setting:
WooCommerce > Settings > Accounts & Privacy > Allow customers to create an account on the “My account” page
↑ Back to topWhat themes is this extension compatible with?
B2B & Wholesale Suite was built to be compatible with all themes in the market, and has been tested with the most popular ones today.
 To set up your store with B2B and Wholesale Suite:

 By clicking on an option or creating a new one, an option setting panel opens where for each option you can set manual or automatic approval.
In B2B Suite > Fields, there are several default fields for companies. Custom fields can also be added. For VAT validation, a custom VAT field with a billing connection of “VAT” must be created.
By clicking on an option or creating a new one, an option setting panel opens where for each option you can set manual or automatic approval.
In B2B Suite > Fields, there are several default fields for companies. Custom fields can also be added. For VAT validation, a custom VAT field with a billing connection of “VAT” must be created.


 In the category group visibility panel above, all options are enabled, meaning that all users would be able to see this category and its products.
You can also go into the product page and choose to use a “Manual Setting” instead of Following Category rules. This way you can set visibility for each product individually.
In the category group visibility panel above, all options are enabled, meaning that all users would be able to see this category and its products.
You can also go into the product page and choose to use a “Manual Setting” instead of Following Category rules. This way you can set visibility for each product individually.
 In the example above, free shipping is available for all orders above $1000.