
AWeber for WooCommerce by Kestrel allows you to subscribe to customers and users to your AWeber Lists and through AWeber Web Forms on your WooCommerce store.
- Subscribe the customers to different (and multiple) AWeber lists depending on the products they purchase during checkout.
- Add or remove AWeber subscriber tags depending on the purchased products.
- Add a custom-designed AWeber Web Form to any widget area on your WooCommerce store without editing coding.
- Subscribe to the customers to your newsletter when they register in your store.
You can also track abandoned carts and tag your subscribers with the products they added to their carts, recover abandoned carts by using a recovery link and track when a cart has been recovered. All these actions modify the subscriber tags to allow you to trigger specific emails or campaigns.
Requirements
↑ Back to top- WooCommerce 3.7+
- An AWeber account.
Installation
↑ Back to top- Download the .zip file from your WooCommerce account.
- Go to “WordPress Admin > Plugins > Add New” and “Upload Plugin” with the file you downloaded with “Choose File”.
- Install Now and Activate the extension.
More information at Install and Activate Plugins/Extensions.
Updating from an older version
↑ Back to topIf you already have installed an older version of the extension, you might see an admin notice requiring a database update. Just run the updater, and the extension will import your previous configuration.

Authenticate
↑ Back to topIf this is the first time using the extension, you will need to authorize WooCommerce to access your AWeber account. The process is very easy. Just click the “Authorize” button in the AWeber settings (WooCommerce > Settings > AWeber)
You will be redirected out of your store to the AWeber authorization form.
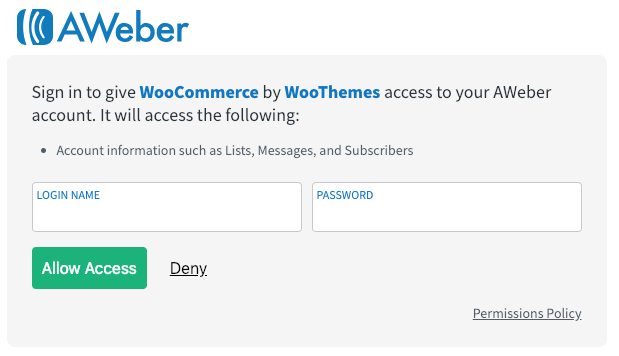
Enter your AWeber account and follow the steps. When you finish the process, AWeber will redirect you to your store, and you can start configuring the extension.
Setup and Configuration
↑ Back to topOnce you have authorized our extension to connect with your AWeber account, you can proceed to configure it. To access the settings page, go to “WooCommerce > Settings > AWeber”. You can also access it directly by clicking on the link “Settings” on the plugins page.
Abandoned carts
↑ Back to topOur extension includes support for Abandoned carts, if you are interested in this feature, we have a detailed article explaining how it works and how to set it up properly.
Otherwise, if you want to start subscribing to your customers to your newsletter, continue reading this article.
Checkout settings
↑ Back to topThis section controls the visual aspects and the rules to subscribe the customers to the AWeber lists during checkout.
- Subscribe label: The label used for the subscription field in the checkout form. If empty, the placeholder value will be used instead.
- Checkout location: Sets where the subscription checkbox will be displayed on the checkout page. Default is after the Terms and Conditions.
- Subscribe checked: Makes the subscription field checked by default. Unchecked by default. Be careful with your country’s laws. For example, this practice is not allowed in European Union countries.
- Subscribe on order statuses: A list of order statuses. If none is selected, your customer will be subscribed when the order is created, whatever the status is by default. Multiple statuses can be selected to subscribe to the customer only when the order passes through one of them. For example, if only “Completed” is selected, your customer will be subscribed (depending on the Checkout rules) when the order is marked as “Completed”.
- Checkout rules: This is the most important setting. It defines the rules to subscribe the customers to the AWeber lists during checkout. Due to its complexity, we’ve created a special section for it.
Registration settings
↑ Back to topThis section controls the subscription to AWeber when the customers register in your store.
- Registration list: The list to subscribe to the customers when they register into your store. Select an AWeber list from the dropdown to enable this feature. Leave it empty to deactivate it.
- Add tags: The tags to add to the customers when they are subscribed to. E.g.: registered.
- Remove tags: You can also remove any previous tags from the subscriber data. E.g.: prospect.
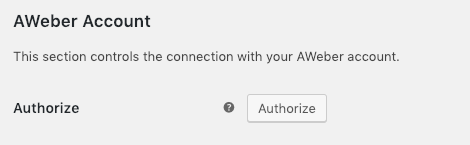
AWeber account
↑ Back to topThis section controls the connection with your AWeber account. Currently, there is only a setting to revoke access to your account.
Checkout rules
↑ Back to topThis setting allows you to subscribe to the customers to different AWeber lists depending on the products they purchase during checkout.
A checkout rule can be optional or mandatory depending on the “Auto subscribe” option. If enabled, customers will be subscribed to the AWeber list even if they didn’t mark the subscription field during checkout.
You can also tag your customers in AWeber with custom tags or with the products they purchase.
Before defining the checkout rules, it’s important to take into consideration the following tips:
- Multiple rules can be applied if their conditions match the order data.
- The rules are applied in the same order they are defined. Higher positions go first.
- Sort the rules if necessary.
- It’s recommended to define the less specific rules first.
- The rules with the same AWeber list will combine their tags.
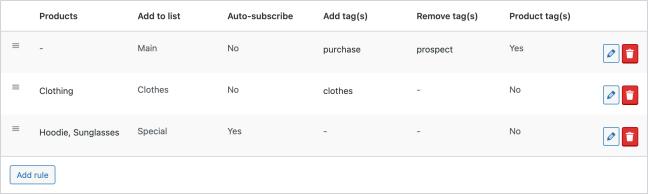
Defining a checkout rule
↑ Back to topClicking on the “Add rule” button. You will be redirected to the “Checkout rule” form. This form contains the following settings:
- Products: The products to apply this rule. You can select simple or variable products. If you select the parent of a variable product, the rule will be applied to all its variations.
- Product categories: The product categories (or subcategories) to apply this rule. If you select a category, the rule will be applied to all its subcategories.
- Add to list: Required. The AWeber list the customer will be subscribed to.
- Auto subscribe: Automatically subscribe customers to the list.
- Add tags: The tag to be added to the subscribers.
- Remove tags: The tags to be removed from the subscribers’ data.
Note: You can add unlisted tags using the comma as a separator.
The rule will be applied to an order if it contains at least one item registered in the “Products” or “Product categories” fields. If both fields are empty, the customer will be subscribed to the list no matter what he buys.
If the customer is already subscribed to the specified list, his profile and tags will be updated.
Combining tags
↑ Back to topMultiple rules with the same AWeber list are applied as one after combining their tags. The order the rules are applied is very important. The easiest way to understand how it works is with an example:
Rule 1:
- Products: All (The “Products” and “Product categories” fields are empty).
- List: Test 1,
- Add tags: purchase, default-products.
- Remove tags: prospect.
Rule 2:
- Products: Clothing.
- List: Test 1,
- Add tags: clothes.
- Remove tags: default-products.
After checkout, the customer will be subscribed to the list “Test 1” with the following tags:
- purchase
default-products(Added by Rule 1 and removed by Rule 2)prospect(Removed by Rule 1)- clothes
In this way, you can classify your customers according to what they buy and create campaigns segmented by product.
In our example, you can know what users have become a customer with the tag “purchase” and additionally, who have bought clothes with the tag “clothes”.
Product tags
↑ Back to topIn addition to the custom tags mentioned before, you can also tag your subscribers with the products they purchase. To do so, just enable the option “Product tags” in the checkout rule settings form.
By default, the product slug will be used as the tag, but you can customize these tags thanks to the option “Product tag format“. E.g.: product-{product-slug}.
Note: Only the products that match the Checkout rule criteria will be tagged.
Tip: If you want to tag your subscribers with all the products they purchase, just create a checkout rule without product restrictions. That means leaving empty the fields “Products” and “Product categories“.

Subscribe on checkout
↑ Back to topOnce you have defined your checkout rules, a checkbox field will be displayed after the “Terms and conditions” in the checkout form.

This field appears only when necessary. That means if the cart items don’t match the criteria of any checkout rules, then the subscription field won’t appear.
Additionally, the checkout rules with the “Auto subscribe” option enabled don’t need the subscription field because no confirmation is required from the customer.
So, the subscription field will only appear when there is at least one optional checkout rule applicable to the current cart.
After placing the order, the customer will be subscribed to all applicable checkout rules with the “Auto subscribe” option enabled. Additionally, if (s)he marked the subscription field, (s)he will be subscribed to the optional checkout rules too.
Subscribe on register
↑ Back to topCustomers can be subscribed to one of your AWeber lists when they register in your store. To do so, enable the different settings under the section. “WooCommerce > Accounts & Privacy > Account Creation“.
The ways to register are the following:
On My Account
↑ Back to topBy enabling the setting “Allow customers to create an account on the “My account” page“, a registration form will appear on this page.
If you select a list in the “Registration list” setting of this extension, a checkbox field for subscribing to the newsletter will appear.

On checkout
↑ Back to topCustomers can also create an account when placing an order. Just enable the setting “Allow customers to create an account during checkout“.
After that, a section called “Create an account?” will appear in the checkout form. By filling in these fields and checking the subscription checkbox, the customer will be subscribed to the registration list.

Note: In addition to the registration list, customers will also be subscribed to the lists defined in the checkout rules if their conditions are satisfied.
Widgets
↑ Back to topIn addition to the checkout settings. The extension includes a series of widgets to display a subscription form in any widget area registered in your theme. E.g.: Your sidebar.
Web Form widget
↑ Back to topIt adds an AWeber Web Form, also called “Sign Up Form” in the AWeber dashboard, to your store.

The setup is very easy.
- In your WordPress dashboard, go to “Appearance > Widgets“.
- Drag the “WooCommerce AWeber Web Form” widget to the widget area you would like it to display.
- Select a “Web Form” from the list.
- Optionally, edit the title or leave it empty to remove it.
Please, note that only In-Line Web Forms will display at the widget location you specified, Pop-Over and Lightbox will display in the center of your website over the content, and Pop-Out will open a new window to display the Web Form.
HTML Form widget
↑ Back to topYou can also add a native subscription form. The outputted HTML by this widget will inherit the styles of your theme. So it will require less customization to fit the design of your store. Optionally, you can customize its appearance with your own CSS styles directly on your site.
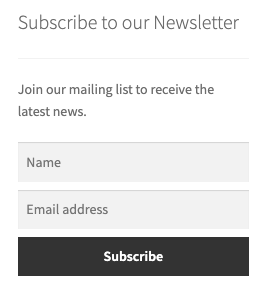
To set up a new HTML form:
- In your WordPress dashboard, go to “Appearance > Widgets“.
- Drag the “WooCommerce AWeber Newsletter Subscription” widget to the widget area you would like it to display.
- Select a “List” from the selector.
- You can edit the Title and Message of your HTML form (optional).
Dashboard widget
↑ Back to topWe also have added a dashboard widget called “WooCommerce AWeber Subscribers“. Go to “Dashboard > Home” and take a look.
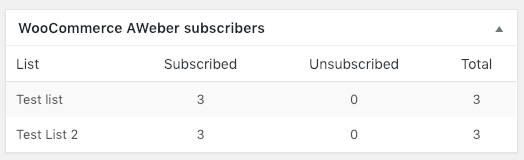
This widget contains a resume of the subscriber for each AWeber list used by the extension. For more detailed stats, visit your AWeber dashboard.
FAQ
↑ Back to topSomething doesn’t work properly
↑ Back to topIf you are experiencing any errors with our extension that aren’t listed in the “Troubleshooting” section, feel free to submit us a support ticket explaining your problem. To give you a solution as fast as possible, it would be very useful for us if you could attach a screenshot of the error log.
Where can I find the error log?
↑ Back to topThis extension creates a log to store all the errors related to the AWeber API. To find it, go to “WooCommerce > Status > Logs” and select the file “wc_aweber_api_errors“.
Troubleshooting
↑ Back to topThe checkbox doesn’t appear in the checkout form
↑ Back to topThe main reason the subscription checkbox doesn’t appear in the checkout form is that there are no Checkout Rules to apply to the current cart. Please, go to the plugin settings page and define at least one checkout rule. More info here.
The email is not added to the list
↑ Back to topThere are a few reasons why a customer is not subscribed to the AWeber list:
- The customer didn’t mark the subscription field during checkout.
- The purchased products don’t match any checkout rule.
- The Order has not reached the status to subscribe to the customer yet. Check the setting Subscribe on order statuses.
- The entered email address is blocked by AWeber. More info here.
If none of these reasons are the cause, check the logs generated by our extension to get more details about the reason why the email was not added to the list.
Expired timestamp
↑ Back to topIf, after reviewing the “wc_aweber_api_errors” log, you find an error like this, it means that your server clock is not configured properly. For security reasons, AWeber API doesn’t allow requests from servers whose clock has a difference bigger than (+/- 5 minutes) with respect to UTC time. We recommend you contact your hosting provider to set the server clock properly. They can get more info about the issue here.
An unexpected error occurred
↑ Back to topIf you see this error during authentication. Probably there was an error related to the AWeber API connection. Please, take a screenshot of the “wc_aweber_api_errors” log and submit us a support ticket with it.
Privacy Policy
↑ Back to topCheck the Privacy Policy of this extension.
Questions & Feedback
↑ Back to topHave a question before you buy it? Please fill out this pre-sales form.
Already purchased and need some assistance? Get in touch with the developer via the Help Desk.