Installation
↑ Back to top- Download the .zip file from your WooCommerce account.
- Go to: WordPress Admin > Plugins > Add New and Upload Plugin with the file you downloaded with Choose File.
- Install Now and Activate the extension.
Setup and Configuration
↑ Back to top

Configure Earning of Points
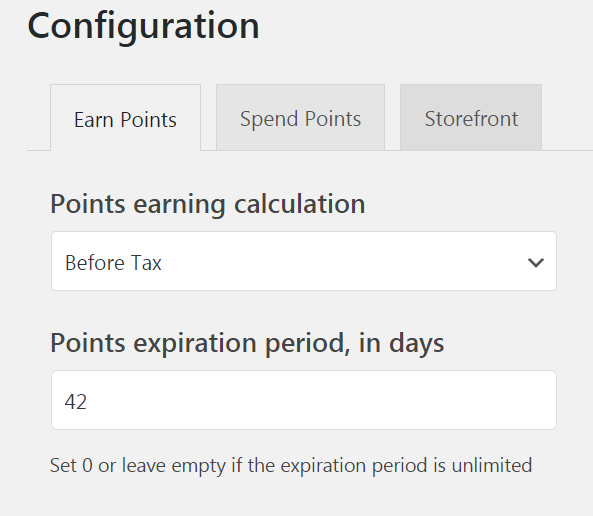
↑ Back to top- ‘Points earning calculation’ – a selector with the two options: Before Tax, which is a default option, and After Tax. Select Before Tax to exclude tax fees from the points calculation formula (F1 below). Select After Tax to include tax fees into the points calculation formula (F2 below).
- ‘Points expiration period, in days’ – a whole numeric value to indicate the number of days to be counted down from the most recent purchase made by the Customer towards the points expiration date. The date of points expiration comes when no purchases were made during the point expiration period. On reaching the points expiration date, all points earned from subsequent purchases, which were made from the previous expiration date, expire. By default, on installation of the plugin, the text-box to contain the value of the expiration period is empty.
To have the expiration period unlimited, set the Points expiration period to 0 or leave the text-box empty.The date of points expiration is re-calculated with every update to the Points Balance, made within the expiration period, according to the formulae F3 or F4: F3. Date of Points Expiration = Date of Purchase + Points Expiration Period F4. Date of Points Expiration = Date of Points Balance Update by Admin + Points Expiration Period
The Admin can change the expiration period at any time. Points, which have been earned against the transactions which in turn happened before the change, will be subject to the expiration period as of the date of the most recent transaction. A new transaction to a Customer Points Balance will invoke the update of the expiration period as per the F3 or F4 formula.
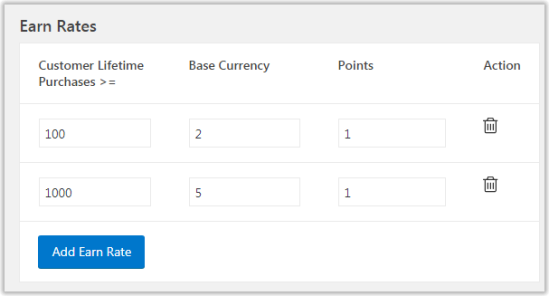
- ‘Earn rates’ – a table of configurable parameters to set multiple Earn Rates to reward customers with points with regard to their lifetime purchases.
The Lifetime Purchases variable here is the total sum of invoiced to and completed by the Customer orders (excluding refunded or cancelled orders).The Earn Rate table features the following columns:
-
- Customer Lifetime Purchases >= – a whole numeric value to indicate a sum of the lifetime purchases of the Customer specific to each earn rate.
- Base Currency – a whole numeric to indicate a value in the base currency of the store – the numerator (top part) of the Earn Rate ratio.
- Points – a whole numeric to indicate a value in points – the divisor (bottom part) of the Earn Rate ratio.
- Action – the Trash icon containing the on-click action to delete the row.
 To save the configuration of the points earning mechanism and proceed to the next tab, click on the Save Changes button at the bottom of the page.
Configure Spending of Points
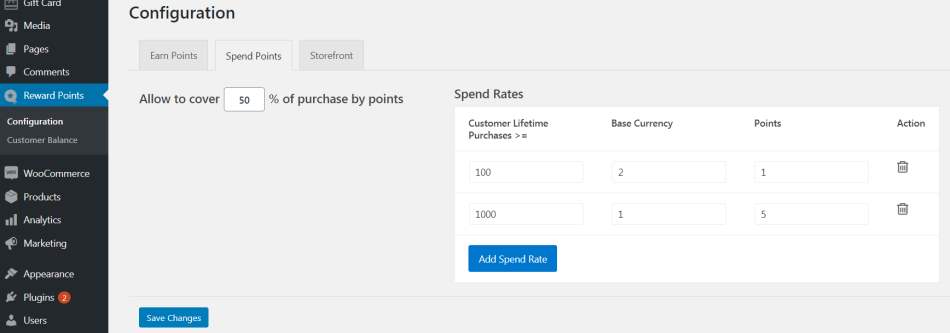
↑ Back to top- ‘Allow to cover X % of purchase by points’ where X is a whole numeric value to indicate the % of the total order value which can be paid off in points.
On installation of the module the ‘Allow to cover X % of purchase by points’ field is empty. Empty field herein equals to the 100% value.
- ‘Spend rates’ – a table of configurable parameters to set multiple Spend Rates for the use of points towards purchases with regard to the values of Customer Lifetime Purchases.
-
- Customer Lifetime Purchases >= – a whole numeric to indicate a sum of the lifetime purchases of the Customer specific to each earn rate.
- Base Currency – a whole numeric to indicate a value in the base currency of the store – the divisor (bottom part) of the Spend Rate ratio.
- Points – a whole numeric to indicate a value in points – the numerator (top part) of the Spend Rate ratio.
- Action – a Trash icon to delete the row.
 To save the configuration of the points spending mechanism and proceed to the next tab, click on the Save Changes button at the bottom of the page.
Configure Storefront
↑ Back to top- NO – by default;
- YES.
- ‘On the Cart and Checkout page’ hint – the place where the display of points earnings occurs.
- ‘Promo text’ – the editable text which is shown on the Cart and Checkout page. ‘Complete this purchase and get <total amount> points’ – the default text where ‘<total amount>’ is the total number of points that can be earned by the Customer according to products at Cart and earning rates.
The field cannot be left empty.
 To save the configuration of the points earnings display mechanism and proceed to the next tab, click on the Save Changes button at the bottom of the page.
Monitoring and Updating Points
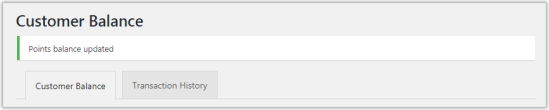
↑ Back to topCustomer Balance Tab
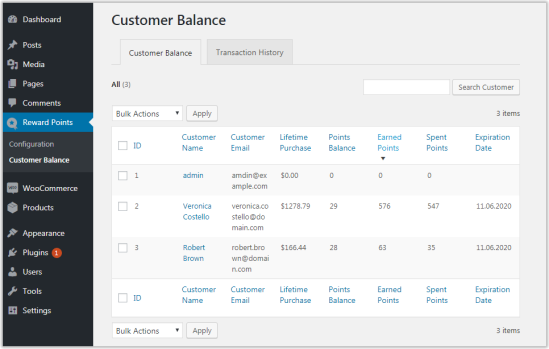
↑ Back to top- ID – the identification number of the balance
- Customer Name – the name of the Customer
- Customer Email – the email of the Customer
- Lifetime Purchase – the value of the lifetime purchases of the Customer in the base currency of the store
- Points Balance – the difference between the values of Earned Points and Spent Points
- Earned Points – the total number of points earned by the Customer
- Spent Points – the total number of points spent by the Customer
- Expiration Date – the date when points balance will be cleared
The name of a customer in the Customer Name column is an active link to redirect you to the Transactions History grid, where data will be filtered by the chosen customer.The Customer Balance grid has some standard WordPress features, namely:
- Screen options (pagination, hide/show columns)
- Search Customer (by Customer Name and by Customer Email)
- Sorting by column
It is a particular feature of this plugin that the Admin can voluntarily update the balance of points of the Customer. Such action can also be applied to multiple customers at once. To update the balance of points, follow the steps below:
- Tick the checkboxes next to the chosen customers;
- Click on the Bulk Actions folding list at the top of the grid;
- Select the Update Balance option;
- Click on the Apply button on the right;
- Suggest data to the mandatory fields in the popup;
- Click on the Apply button at the bottom of the popup;
- Wait for the page to reload.
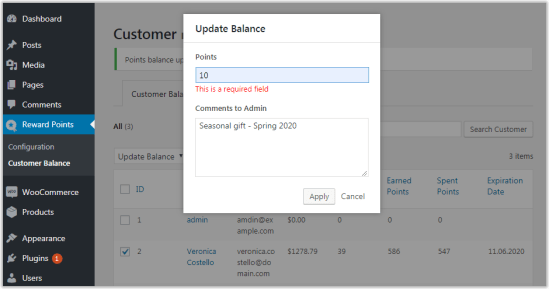
Update Balance Popup
↑ Back to top- Points – indicate a whole numeric value to be added to the points balance
- Comments to Admin – suggest a comment which explains the change
Customer points balance can not be negative. If the absolute value of the negative number, indicated within the Points field of the Update Balance popup, is greater than that of the current balance of points, then “0” (zero) is assigned to the balance of points.Clicking on the Cancel button in the popup will close the popup. No changes will be made to the current customer balance of points.
Transaction History Tab
↑ Back to top- ID – the identification number of the transaction
- Customer Name – the name of the customer
- Customer Email – the email of the customer
- Comment to Admin – the comment to the transaction as it was left in the Update Balance popup
- Transaction Description – the description of the transactions to the points balance. Possible alternatives:
- Balance is expired
- Points are earned for order #
- Points are spent on order #
- Balance is updated by Admin
- Order # is refunded
- Order # is cancelled
- Order # is pending
- Order # is on-hold
- Balance Change – a whole numeric value (positive – in green, negative – in red) to indicate the increase or decrease of the points balance as per the transaction
- Balance – the value of the current points balance
- Transaction Date – the date of the transaction
- Expiration Date – the date when the points balance will be cleared off
- Screen options (pagination, hide/show columns)
- Search Customer (by Customer Name and by Customer Email)
- Sorting by column
Points Movement on Change of Order Status
↑ Back to top- The Bulk Actions dropdown on top of the Orders grid. Only Processing, On-Hold and Completed statuses are available. Tick the desired orders, select an action from the Bulk Actions dropdown and click the Apply button next to the dropdown to apply the changes.

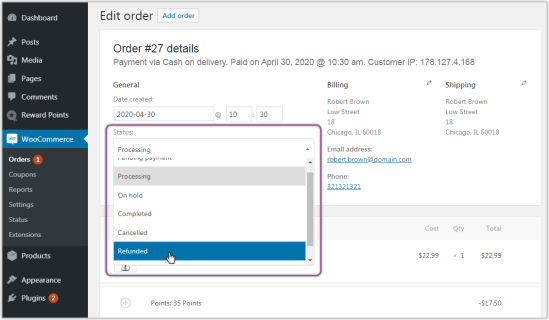
- The Status dropdown on the Order # Details page. All statuses are available in the dropdown. When on the Orders page, click on the name of the desired order in the grid. You will be redirected to the Order # Details page. Find the Status dropdown in the General block of order details.
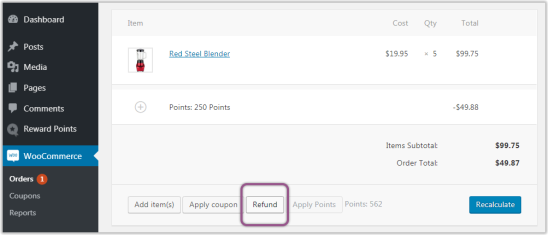
- The Refund button on the Order # Details page. When on the Order # Details page scroll down to the Item list to find the Refund button below the list, next to the Apply Coupon and Recalculate buttons. Clicking on the button will change the status of the order only to that of “Refunded”.
 To learn more on managing orders and changing order statuses, refer to the official WooCommerce user guide.
Processing/Completed > On Hold, Payment Pending, Cancelled
↑ Back to topProcessing/Completed > Refunded
↑ Back to top“Refunded” via Status Dropdown
Select Refunded in the Status dropdown and click on the Update button. The page will get reloaded and the order will be refunded, as a whole. Points spent towards the purchase will be added back to the points balance, and points earned from the purchase will be deducted from the points balance of the customer.“Refunded” via Refund Button
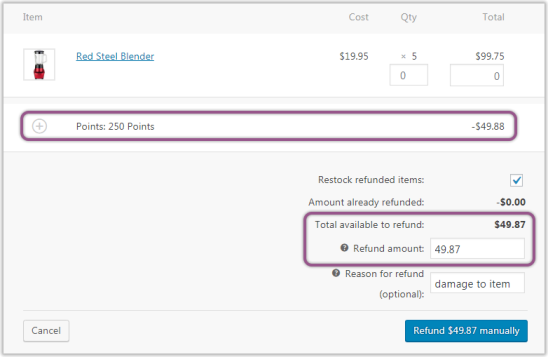
Click on the Refund button. You will be suggested to indicate the following:- the quantity of each product on the list
- the total sum towards refund for each product on the Item list
- the amount of the shipping fee towards refund
- the total amount for the refund
- the comment to support the refund (for internal use).
When partial refund is applied, no points are returned or deducted from the points balance. It is only when you refund the final item on the order list, or return the total order value available for refund, that the points spent towards the purchase and the points earned from the purchase are respectively returned to and distracted from the points balance of the customer! Shipping fee, included, excluded or partially refunded, will not affect the calculations of the returned and distracted points.To refund the order totally, leave all the available fields with the default “0” value, but for the Refund Amount field. Enter the value of the given “total available to refund” amount into this field. Click on the Refund X Manually button to finalize the operation. The page will get reloaded and the status of the order will turn “Refunded”.
 Points spent towards the purchase will be added back to the points balance, and points earned from the purchase will be deducted from the points balance of the customer.
You will then be able to see the amounts returned to and deducted from the balance of points of the Customer in the Transaction History grid.
Points spent towards the purchase will be added back to the points balance, and points earned from the purchase will be deducted from the points balance of the customer.
You will then be able to see the amounts returned to and deducted from the balance of points of the Customer in the Transaction History grid.
Applying Points from Backend
↑ Back to topIt is important that when the quantity of an item is updated you click on the Save button before applying the points anew. When products are deleted or added – you click on the Recalculate button before applying points anew.To remove the points applied, hover the cursor over the Points row in the Item list and click on the X icon on the right of the row.
No more than available to the Customer points within the customer points balance can be applied to an order. Admins can not specify how many points they would like to use towards the purchase. Admins can either use the whole number of available points (but no more than the limit [link to the Configure Spending Points]) or no points at all.Note the difference in the sequence of applying coupons and points from the Backend:
- When coupon code is applied first, then the number of points available towards purchase is calculated from the remaining order subtotal (excluding the discounted sum).
- When points are used first, then coupon discounts are applied to the remaining order subtotal.
Points earnings display
↑ Back to top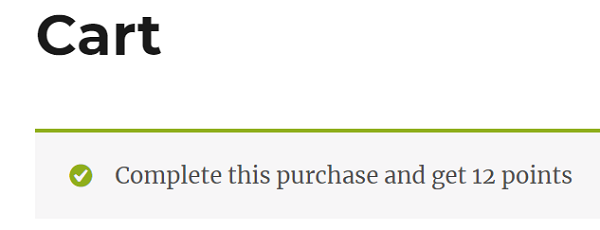
The message is updated once the Cart is updated.
Spending Points
↑ Back to top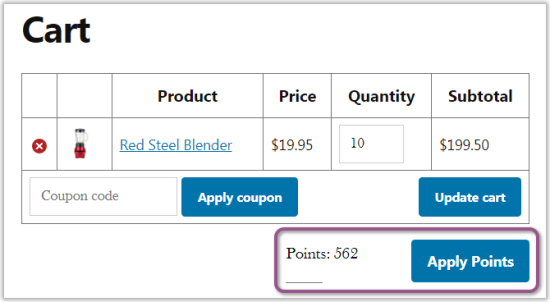 Points are spent according to the formulae F6 or F7 (see above).
Points can be used alongside other discounts and promo codes.
On clicking the Apply Points button, the Cart page is reloaded and all relevant totals are recalculated. The Apply Points button is now substituted with the Remove Points button, and the balance is cut short by the number of points applied. To remove points from the calculations, click on the Remove Points button. The page will be reloaded again.
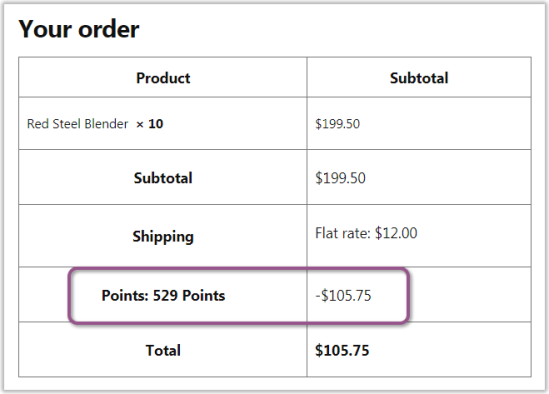
When points have been applied to the order subtotal, the Cart Totals summary will feature the number of points deducted from the Customer’s point balance as well as an equivalent of the discount in base currency.
Points are spent according to the formulae F6 or F7 (see above).
Points can be used alongside other discounts and promo codes.
On clicking the Apply Points button, the Cart page is reloaded and all relevant totals are recalculated. The Apply Points button is now substituted with the Remove Points button, and the balance is cut short by the number of points applied. To remove points from the calculations, click on the Remove Points button. The page will be reloaded again.
When points have been applied to the order subtotal, the Cart Totals summary will feature the number of points deducted from the Customer’s point balance as well as an equivalent of the discount in base currency.
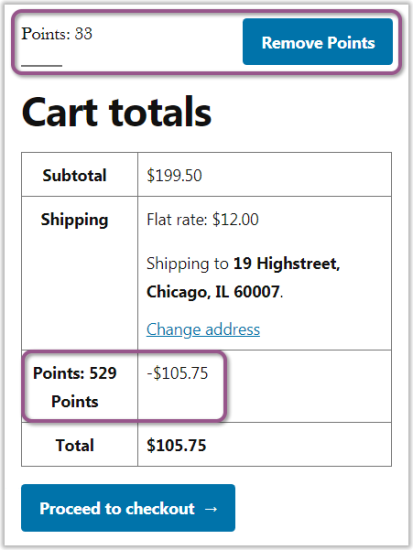 Same entry will be found on the Checkout page in the order summary.
Points cannot be redeemed as real money, they can only be used towards purchase on the store. Points cannot be exchanged or given to third parties as gifts.
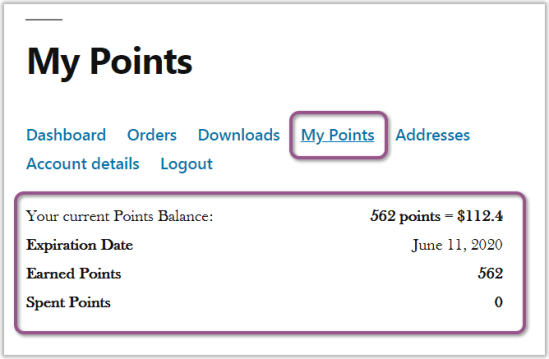
Monitoring Points
↑ Back to top- Your current Points Balance – the balance of points and the equivalent in base currency;
- Expiration date – the date when the points will expire, and the balance will be cleared;
- Earned Points – the total number of points earned over the history of Customer shopping experience;
- Spent Points – the total number of points spent over the history of Customer shopping experience.
 Sample Reward Mechanism Configuration
The following configuration of the reward mechanism was used to showcase the functionality of the present extension in the documentation:
Earn Points:
Sample Reward Mechanism Configuration
The following configuration of the reward mechanism was used to showcase the functionality of the present extension in the documentation:
Earn Points:
- Points Earning Calculation: Before Tax (tax excluded from the points calculation formula)
- Points Expirations Period: 42 days
- Earn Rate 1*: Customer Lifetime Purchases > = 100, Base Currency = 2, Points = 1
- Earn Rate 2*: Customer Lifetime Purchases > = 1000, Base Currency = 5, Points = 1
- Customers are allowed to cover 50% of purchase price with points.
- Spend Rate 1*: Customer Lifetime Purchases >= 100, Base Currency = 1, Points, = 2
- Spend Rate 2*: Customer Lifetime Purchases >= 1000, Base Currency = 1, Points, = 5
Questions and Feedback
↑ Back to top