Popup Pro allows your WooCommerce store to draw customers’ attention to various promo offers by means of highly customizable popups.
The present version of the extension (1.0.1) enables two types of popups:
- Linked Products
- Subscriptions
- Download the .zip file from your WooCommerce account.
- Go to: WordPress Admin > Plugins > Add New and Upload Plugin with the file you downloaded with Choose File.
- Install Now and Activate the extension.
More information at: Install and Activate Plugins/Extensions.
The extension comes ready-made and requires no initial setup. At the same time the use of the popups requires configuration which will follow below.
To create a popup go to Popup Pro > Create New Popup. Two options will be available: Linked Products and Subscriptions. Click the relevant icon to start configuring the popup.
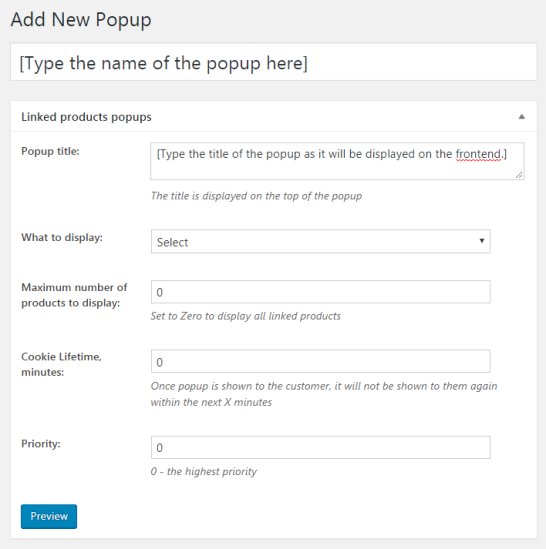
 To create a Linked Products Popup click on the corresponding icon on the Create Popup page.
The page will show the following parameters (all mandatory) for configuration:
To create a Linked Products Popup click on the corresponding icon on the Create Popup page.
The page will show the following parameters (all mandatory) for configuration:
- Name of the popup – the name of the popup as it will appear on the backend;
- Popup title – the title of the popup as it will appear on top of the popup on the frontend;
- What to display – a dropbox with three options to choose from: Up-sells, Cross-sells, Related Products;
- Maximum number of products to display – a whole number to indicate how many products will be displayed in the popup (Set to Zero to display all linked products).
- Cookie Lifetime – a whole number to indicate the time in minutes to separate each consecutive popup after first show-up.
- Priority – a whole number to indicate the priority of show-up of the popups of the same kind.
Note: When Cookie Lifetime is set to 0, each refreshing of the (relevant) page will return the popup without delay.
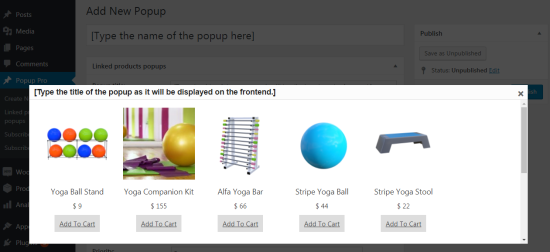
 The extension allows previewing the popup before saving the configuration. To do so click the Preview button below the configuration fields. No redirection or page reload will happen, but for the popup show-up. To return to the configuration you can then close the popup clicking X in the top right corner.
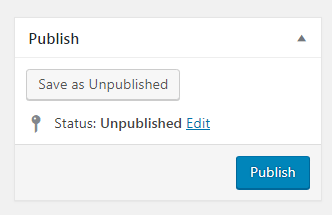
 To complete the configuration and save the popup consider the two native WP options: Save as Unpublished or Publish. The Publish block with relevant buttons is to the right of the popup configuration fields.
 To create a Subscription Popup click on the corresponding icon on the Create Popup page.
As in the previous example, the Add New Popup page will first ask you to state the Name of the popup (as it will appear on the backend).
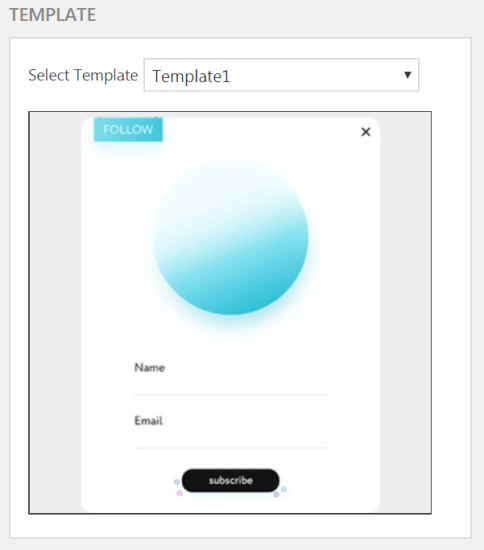
Other settings herein for convenience reasons will be split into four blocks: Template, Content, Settings and Design. All fields within the blocks are mandatory.
The Template block features a dropbox to select one of the seven prearranged templates and a window to display the image of the template.
To create a Subscription Popup click on the corresponding icon on the Create Popup page.
As in the previous example, the Add New Popup page will first ask you to state the Name of the popup (as it will appear on the backend).
Other settings herein for convenience reasons will be split into four blocks: Template, Content, Settings and Design. All fields within the blocks are mandatory.
The Template block features a dropbox to select one of the seven prearranged templates and a window to display the image of the template.
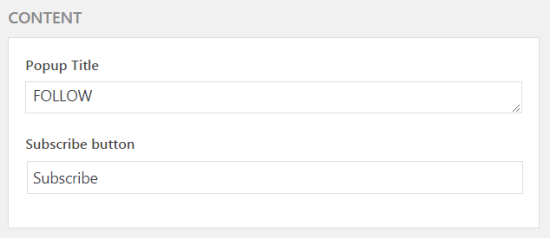
 The Content block features the following two parameters for configuration:
- Popup title – the title of the popup as it will appear on top of the popup on the frontend;
- Subscribe button – a string line to name the call to action as it will appear on the button.
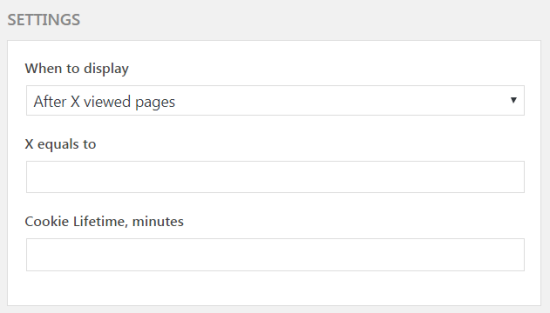
 The Settings block contains the following parameters:
- When to display – a dropbox with two alternatives to choose from: After X viewed pages or X minutes after the visit;
- X equals to – a whole number to state the value of the X variable in the above conditional statement;
- Cookie Lifetime – a whole number to indicate the time in minutes to separate the show-up of each consecutive popup.
Note: When Cookie Lifetime is set to 0, the show-up of the popup is governed by the conditional statement only.
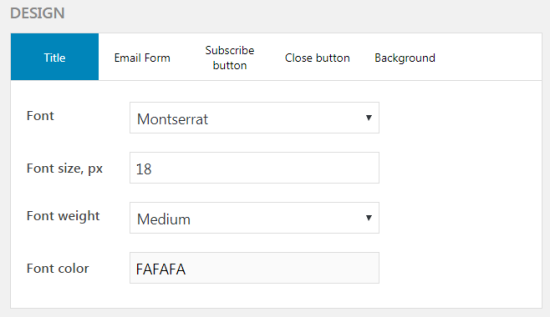
 The Design block allows tweaking some features of design of the following elements within the popup: title, email form, subscribe button, close button and background.
The Title and Email Form elements are tweakable against:
The Design block allows tweaking some features of design of the following elements within the popup: title, email form, subscribe button, close button and background.
The Title and Email Form elements are tweakable against:
- Font
- Font size, px
- Font weight
- Font color.
The Subscribe Button will add Border radius (px) and Button color to the above.The Close Button features Button color and size only, and the Background tab – Background color and image. Supported file types are jpeg, jpg, png, bmp, gif; resolution is different for each template (see hint below the Upload Image button).
 To complete configuring the popup click Save as Unpublished or Publish to the right of the popup configuration fields.
It is important to understand what events trigger the popups, and where the latter are displayed.
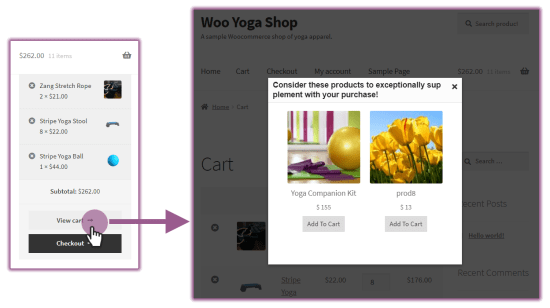
The Linked Products popups will appear either on clicking the Add to Cart button (up-sells and related products) or on load of the Cart page (cross-sells).
The popups will feature the image of the product, price and title, alongside the clickable Add to Cart button. It is the only case for the popup not to show up when the Add to Cart button is clicked on the popup.
To complete configuring the popup click Save as Unpublished or Publish to the right of the popup configuration fields.
It is important to understand what events trigger the popups, and where the latter are displayed.
The Linked Products popups will appear either on clicking the Add to Cart button (up-sells and related products) or on load of the Cart page (cross-sells).
The popups will feature the image of the product, price and title, alongside the clickable Add to Cart button. It is the only case for the popup not to show up when the Add to Cart button is clicked on the popup.

 The Subscription popups are triggered against the preconfigured settings (see Create Subscription Products above).
All popups are displayed in the center of the page.
Depending on the logic behind the message, the popups are displayed on different pages.
The Linked Products popups are displayed on the Cart page (to promote the cross-sells) or on any page on clicking the Add to Cart button (to sell more with up-sells and related products).
The Subscription popups can be displayed on any page of the store without restrictions.
The extension features two grids with various statistics on all the active popups available on the store. The statistics are collected and calculated for popups within each category separately. To reach the grids go to Popup Pro > Linked products popups or Popup Pro > Subscribe popups.
The grids combine data into the following columns:
The Subscription popups are triggered against the preconfigured settings (see Create Subscription Products above).
All popups are displayed in the center of the page.
Depending on the logic behind the message, the popups are displayed on different pages.
The Linked Products popups are displayed on the Cart page (to promote the cross-sells) or on any page on clicking the Add to Cart button (to sell more with up-sells and related products).
The Subscription popups can be displayed on any page of the store without restrictions.
The extension features two grids with various statistics on all the active popups available on the store. The statistics are collected and calculated for popups within each category separately. To reach the grids go to Popup Pro > Linked products popups or Popup Pro > Subscribe popups.
The grids combine data into the following columns:
- ID – the identification number of the popup;
- Name – the name of the popup as configured for the backend use;
- Priority – the whole number to indicate the priority of the popup showup against the popups of the kind;
- Status – the status of the popup: Published or unpublished;
- Published Date – the date of publishing of the popup;
- Views – the whole integer to indicate the number of show-ups of the popup;
- Clicks – the whole integer to indicate the number of clicks customers made on the Add to Cart button on the popup;
- CTR (click-through-rate) – the rate to indicate the efficacy of the popup (a ratio of clicks to views in %).
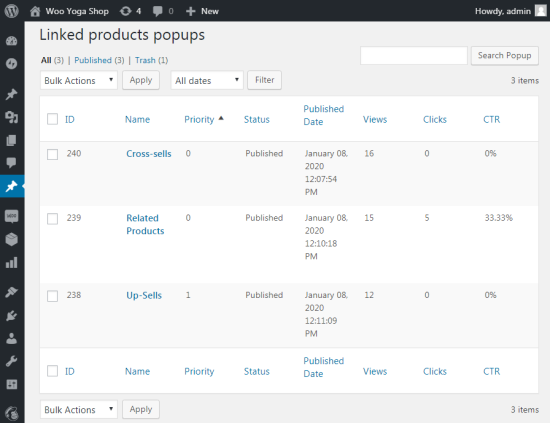 The name of each column herein is clickable, and is used in this way to sort the table. Click the name again to change the sorting order.
The legend right above the grid shows the number of popups in Trash, as well as in the two categories relating to the status of the popups.
The name of each column herein is clickable, and is used in this way to sort the table. Click the name again to change the sorting order.
The legend right above the grid shows the number of popups in Trash, as well as in the two categories relating to the status of the popups.
 The names of the categories here are active links, acting like filters to the grid. Furthermore, you can filter the grid against the date selected from the All dates dropbox next to the Filter button.
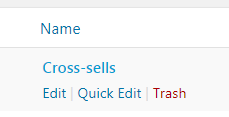
In the grids, the name of the popup is an active link to the Edit / Add New Popup page. Hovering the cursor over the name of the popup, there will appear three native WP alternatives for editing: Edit, Quick Edit and Trash.
The names of the categories here are active links, acting like filters to the grid. Furthermore, you can filter the grid against the date selected from the All dates dropbox next to the Filter button.
In the grids, the name of the popup is an active link to the Edit / Add New Popup page. Hovering the cursor over the name of the popup, there will appear three native WP alternatives for editing: Edit, Quick Edit and Trash.
 Clicking the Quick Edit active link will for a time substitute data in the corresponding row with the two options for alterations:
- Update title – a text-box containing the present title ready for update;
- Status – the dropbox featuring the present status ready for update.
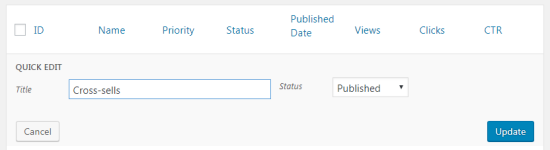 Click Cancel in the bottom left to cancel alterations, Update on the right – to confirm. The grid will get back to its original layout.
Clicking the Trash active link will take the popup to the Trash bin, and will update the grid automatically.
Finally, bulk-editing is available for the items in the grid. For bulk editing tick the check-boxes next to the IDs of the chosen items and opt for one of the actions in the Bulk actions dropbox over the grid. There are four actions on the list:
Click Cancel in the bottom left to cancel alterations, Update on the right – to confirm. The grid will get back to its original layout.
Clicking the Trash active link will take the popup to the Trash bin, and will update the grid automatically.
Finally, bulk-editing is available for the items in the grid. For bulk editing tick the check-boxes next to the IDs of the chosen items and opt for one of the actions in the Bulk actions dropbox over the grid. There are four actions on the list:
- Edit
- Move to trash
- Published
- Unpublished
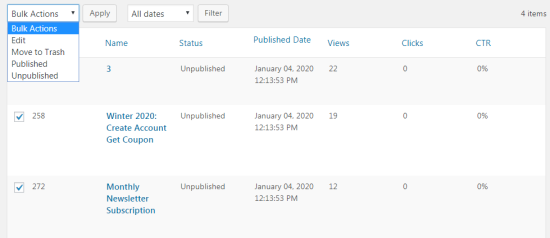
Click Apply next to the dropbox to apply the action.
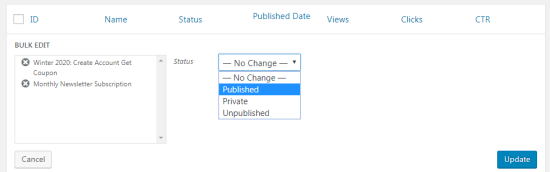 When Edit is chosen in the Bulk Editing dropbox, the rows of the chosen popups will get substituted with the Bulk Edit list, containing the names of the popups, and the Status change dropbox. You can delete the items from the list by clicking the X next to the name. The Status dropbox will feature four statuses available for update: Published, Private and Unpublished.
To cancel the changes click Cancel below the options, to update – Update below on the right.
Subscriptions popups are meant to collect customer subscriptions. These are brought together in the Subscribers List found in Popup Pro > Subscribers.
The list contains data within the following columns:
When Edit is chosen in the Bulk Editing dropbox, the rows of the chosen popups will get substituted with the Bulk Edit list, containing the names of the popups, and the Status change dropbox. You can delete the items from the list by clicking the X next to the name. The Status dropbox will feature four statuses available for update: Published, Private and Unpublished.
To cancel the changes click Cancel below the options, to update – Update below on the right.
Subscriptions popups are meant to collect customer subscriptions. These are brought together in the Subscribers List found in Popup Pro > Subscribers.
The list contains data within the following columns:
- Name – the name of the subscriber as indicated by the customer in the popup;
- Email – the email of the subscriber as indicated by the customer in the popup;
- Subscribed on – the date of subscription;
- Popup ID – the ID of the popup to the customer responded to with a subscription.
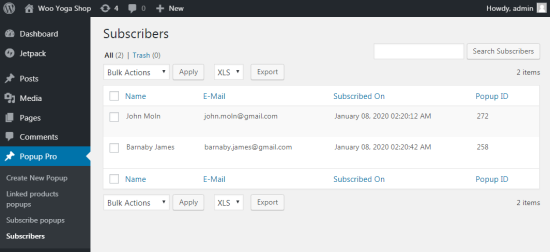 The essential functionality about the grid includes: sorting by name of the column, individual and bulk editing, searching subscribers and exporting to XLS or CSV. The latter is possible with the help of the relevant dropbox and button above the grid.
Note: The details of the newly subscribed customers are copied to your MailChimp lists should you have an account alongside the module installed on the store.
This can be due to the length of the field name. Try to reduce the field name length or contact your hosting company to increase the value of post.max_name_length.
If you uploaded an image as a background to a template, make sure the resolution is correct (see hint below the Upload image button).
Too long popup subtitles may also be the reason for the clumsy look of the popup. Try a shorter subtitle. Alternatively, you can opt for a smaller size of the font, or a different font face.
This might well be because the customer is logged into the shop. In this case the fields will contain the name and the email of the present customer. The subscription popups are meant for new customers only.
No, the rules for display come from the concept of each type of the popup. It is best for conversion reasons to have up-sells and related products shown on Add to Cart click. These popups suggest alternatives to increase the order total by advertising similar goods with higher profit. Showing the cross-sells popup in Cart helps increasing the number of items in the order, as additional products are being offered.
Have a question before you buy or need customization? Get in touch with us.
The essential functionality about the grid includes: sorting by name of the column, individual and bulk editing, searching subscribers and exporting to XLS or CSV. The latter is possible with the help of the relevant dropbox and button above the grid.
Note: The details of the newly subscribed customers are copied to your MailChimp lists should you have an account alongside the module installed on the store.
This can be due to the length of the field name. Try to reduce the field name length or contact your hosting company to increase the value of post.max_name_length.
If you uploaded an image as a background to a template, make sure the resolution is correct (see hint below the Upload image button).
Too long popup subtitles may also be the reason for the clumsy look of the popup. Try a shorter subtitle. Alternatively, you can opt for a smaller size of the font, or a different font face.
This might well be because the customer is logged into the shop. In this case the fields will contain the name and the email of the present customer. The subscription popups are meant for new customers only.
No, the rules for display come from the concept of each type of the popup. It is best for conversion reasons to have up-sells and related products shown on Add to Cart click. These popups suggest alternatives to increase the order total by advertising similar goods with higher profit. Showing the cross-sells popup in Cart helps increasing the number of items in the order, as additional products are being offered.
Have a question before you buy or need customization? Get in touch with us.