
Account Funds for WooCommerce by Kestrel allows customers to deposit funds into their accounts and use them to purchase items in your store with ease.
Using funds to pay for an order is really fast because there’s no need to wait for checks to clear and for cards to be authorized. Additionally, store owners can reward customers for depositing and using funds by giving discounts.
Account Funds also works with partial payments and recurring payments with subscriptions.
Requirements
↑ Back to top- WooCommerce 4.0+
- PHP 7.0+
Installation
↑ Back to top- Download the .zip file from your WooCommerce account.
- Go to: WordPress Admin > Plugins > Add New and Upload Plugin with the file you downloaded with Choose File.
- Install Now and Activate the extension.
More information at Install and Activate Plugins/Extensions.
Setup and Configuration
↑ Back to topOnce the plugin is installed and activated, you can proceed to configure it. You will find the settings in “WooCommerce > Settings > Account Funds”.
Most of the settings are self-explained by their descriptions, but let’s take a look at some of them in more detail:
Funds name
↑ Back to topUse this setting to change the name to refer to the Account Funds. After setting a different value, all references in the plugin texts will be updated automatically.
Partial payment
↑ Back to topChoose whether to allow partial payments, so customers can use Account Funds to pay order totals in part and then use a payment gateway to pay off the balance.
Funds on register
↑ Back to topAllow customers to start with a funds amount when creating their accounts in your store. Leave ‘N/A’ if none.
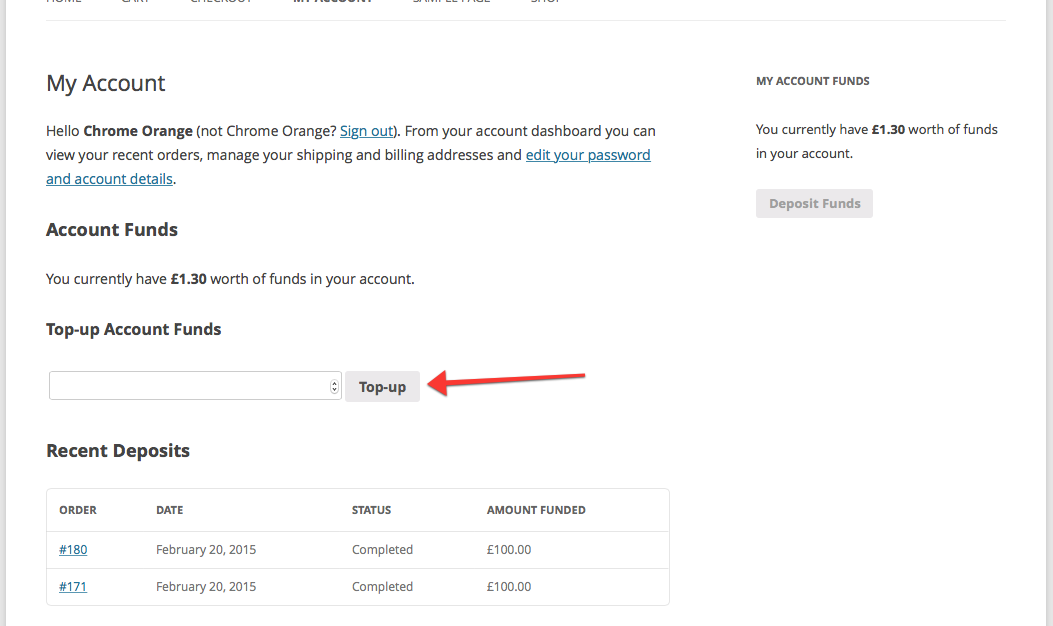
Top-up funds
↑ Back to topChoose whether to allow customers to top-up in their My Account area.
- Tick the Enable My Account Top-Up checkbox.
- Enter a number value for Minimum. Leave ‘0’ if none.
- Enter a number value for Maximum. Leave ‘N/A’ if none.
Customers can now add funds via the Top-up field on the My Account page.
Give discount
↑ Back to topChoose whether to give a discount to customers when paying with funds during checkout.
- Tick the Give Discount checkbox.
- Select Fixed Price or Percentage from the Discount Type dropdown.
- Enter a number value in Discount Amount. No symbol or percent sign is required.
- Save changes.
Selling funds
↑ Back to topAs the store owner, you can sell funds in two ways: by creating a Deposit product or with a Top-up form.
Top-up form
↑ Back to topNote: Enable the setting “My Account” Top-up to offer this option.
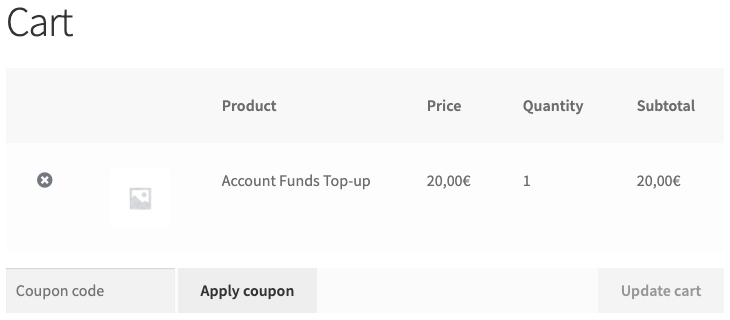
In addition to the deposit product, customers can purchase funds by using the “Top-up” form on the “My Account > Account Funds” page.
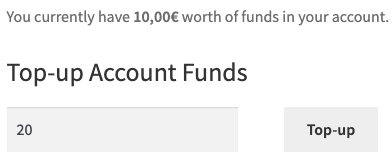
The difference between the Top-up form and the Deposit product is that in the first one, the customer is free to enter the number of funds he wants to purchase.
After entering the funds’ amount and clicking on the “Top-up” button, the product will be added to the cart and the customer can proceed to checkout.
Deposit product
↑ Back to topYou can directly sell funds in your store by creating a Deposit product. To do so:
- Go to “Products > Add Product“.
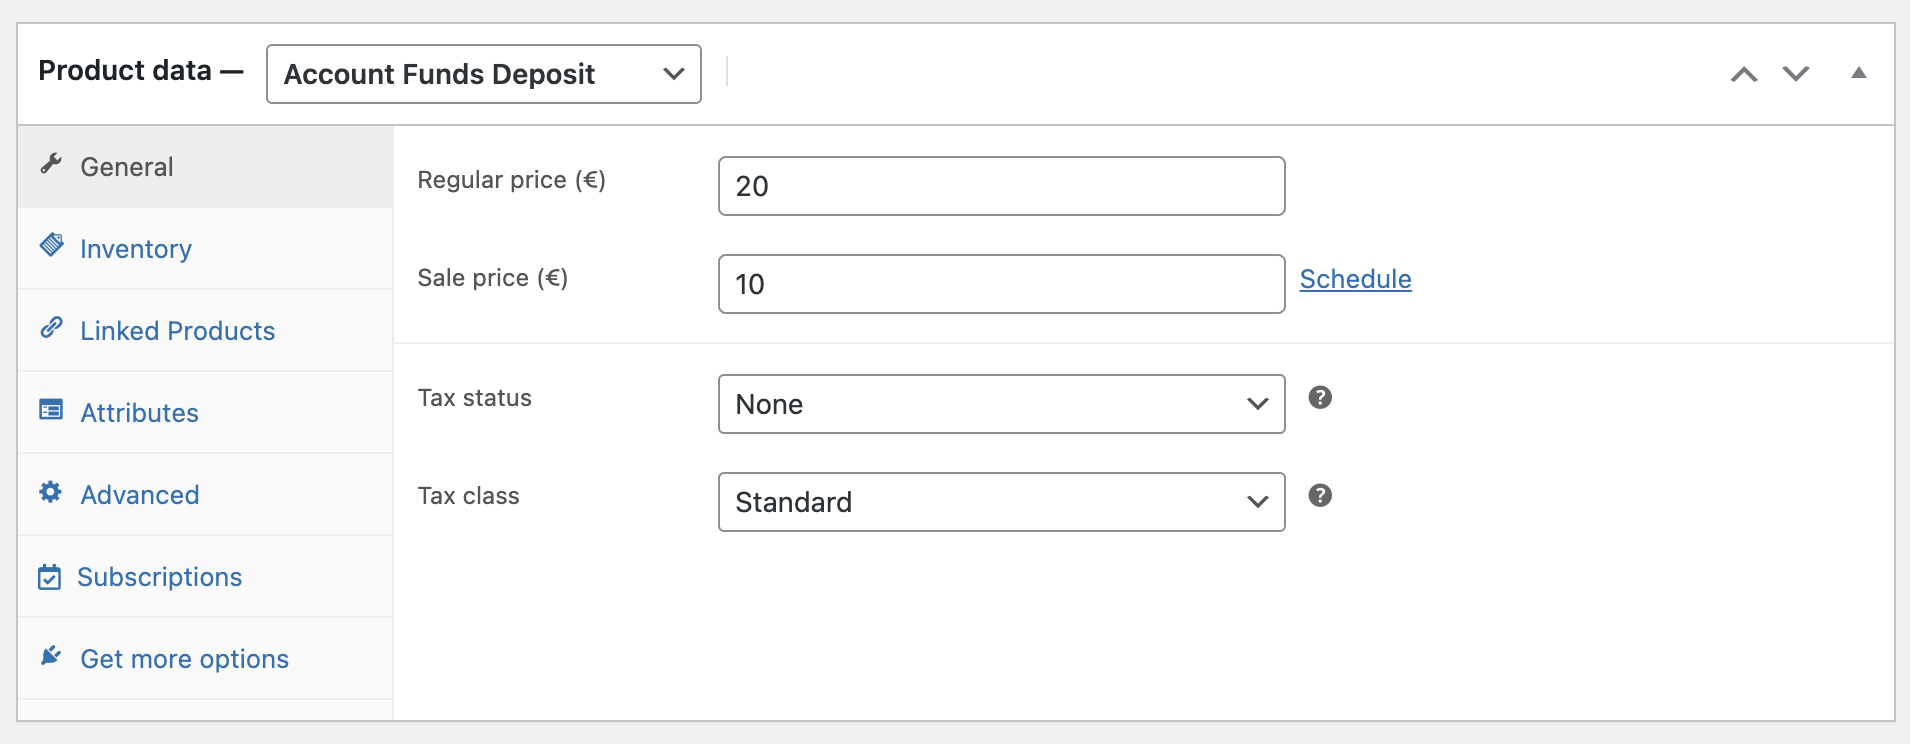
- In the Product Data metabox, select Account Funds Deposit as the product type.
- Fill in the rest of the product fields, including the title, description, and price.
- Publish the product.
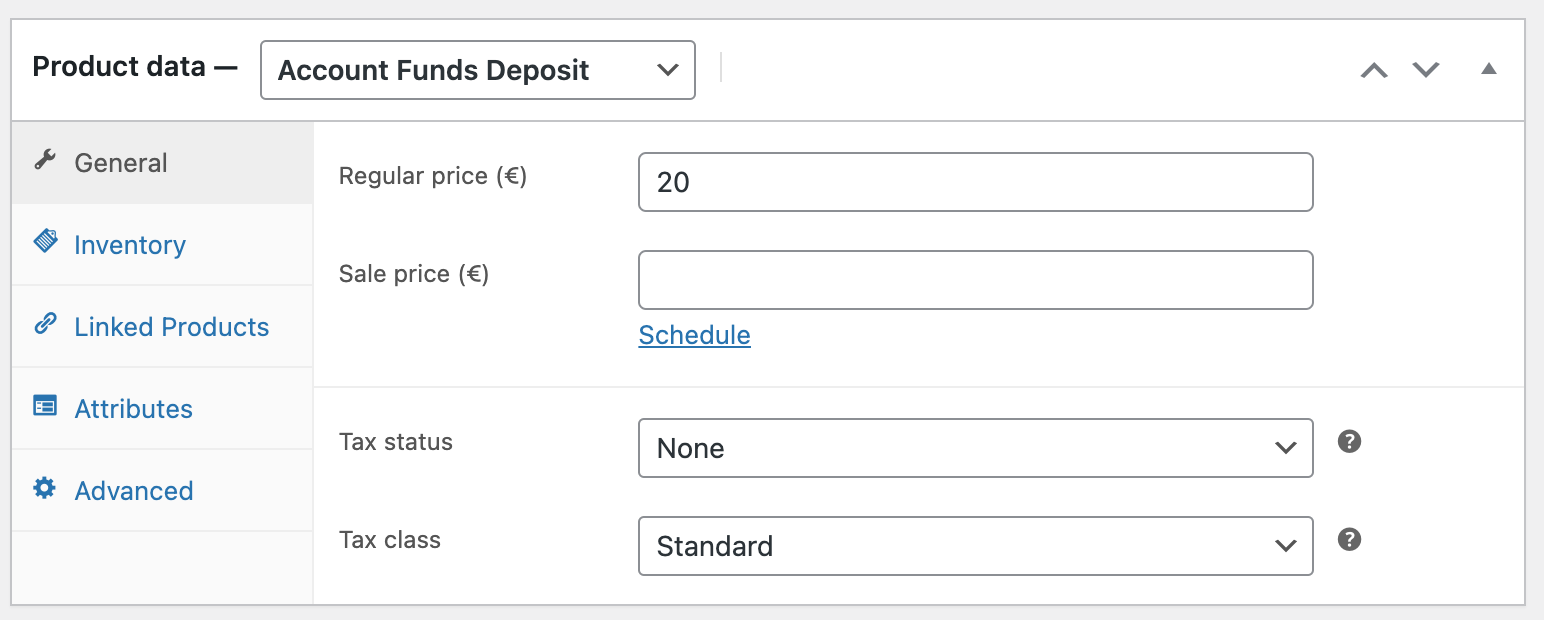
Note: As you’re selling funds that will be used as money during checkout, you’ll probably want this product not to be taxable. So it’s recommended to set the option “Tax status” to “none“.
You can also add a Sale price to your product. When your customer purchases it, they will receive the regular price as funds.
Once you have created a deposit product, this one will appear in the product list and search like any other product.
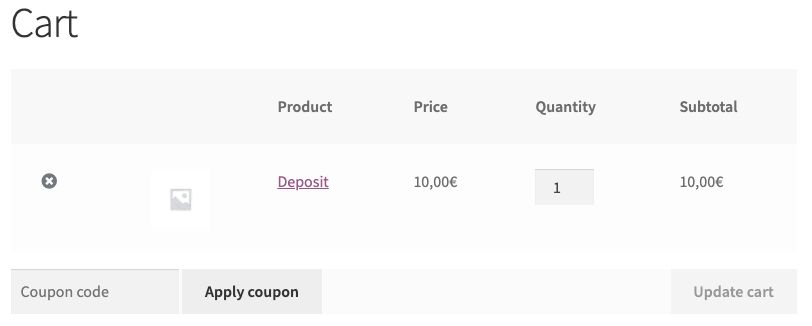
To purchase a deposit product, just add it to the cart and proceed to checkout.
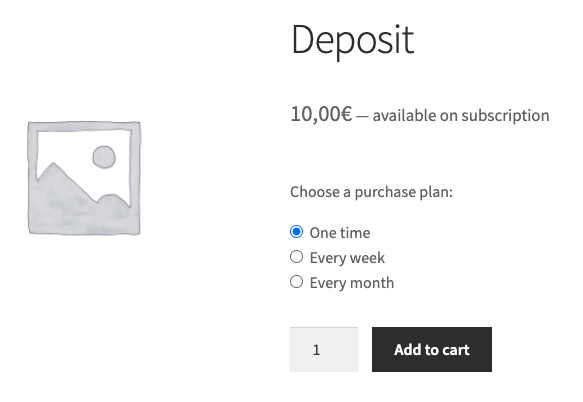
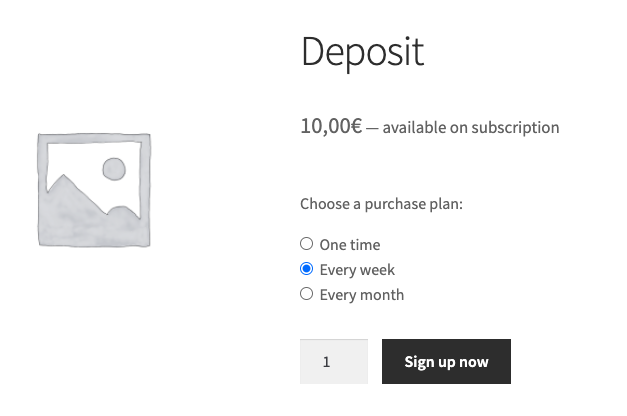
Recurring Deposit Product
↑ Back to topAccount Funds is compatible with the extension All products for WooCommerce Subscriptions. That means that it allows your customers to make purchases to increase their funds in a more recurring way or as a one-time purchase.
Once you have a deposit product, in the Subscriptions section add as many plans as you want to the product and if it is a one-time purchase product or not.
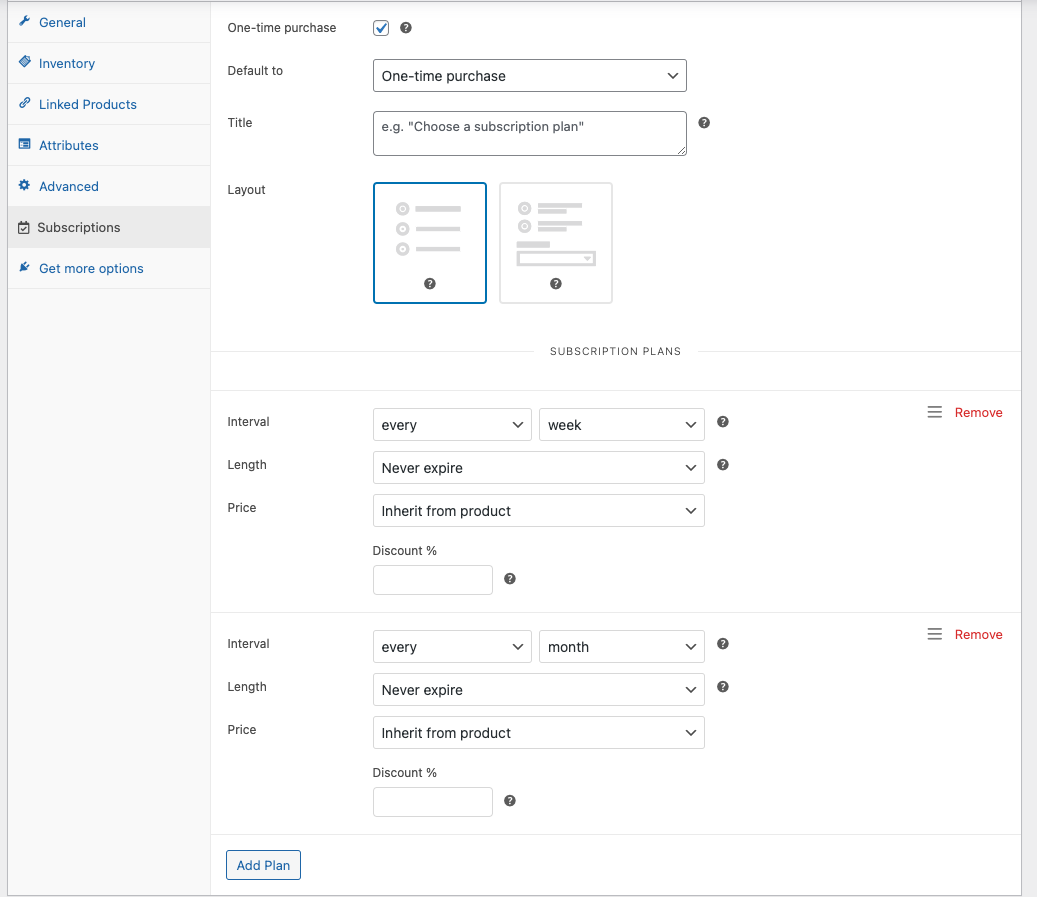
If you need more information about subscription plans, we recommend visiting the All Products for WooCommerce Subscriptions plugin documentation. You can do it from here.
Funds purchase
↑ Back to topOnce the customer adds a Deposit or a Top-up product to the cart, the final step is to place the order and complete the funds’ purchase.
Note: When an order contains Deposit or Top-up products, the current funds of the customer cannot be used as a payment method.
As the funds need to be associated with a customer account, the user will be asked to log in or create an account during checkout. Even if the WooCommerce settings “Accounts & Privacy > Account creation” are not enabled.
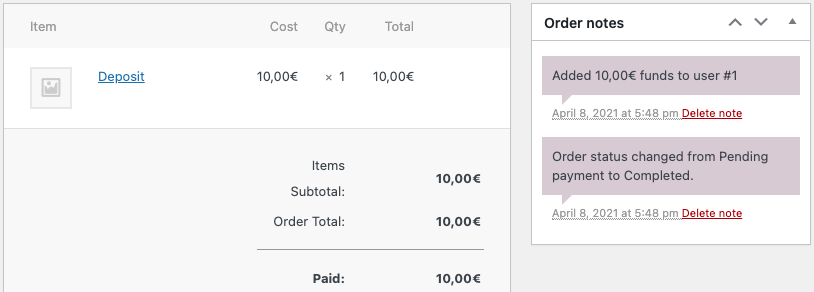
The Deposit and Top-up products don’t need to be processed. That means if the cart only contains these kinds of products, the order will be marked as Completed once the payment is received. Otherwise, the status will be set to Processing. With additional products in the cart or not, the funds will be added to the customer’s account once the order reaches one of these two statuses.
Using the funds
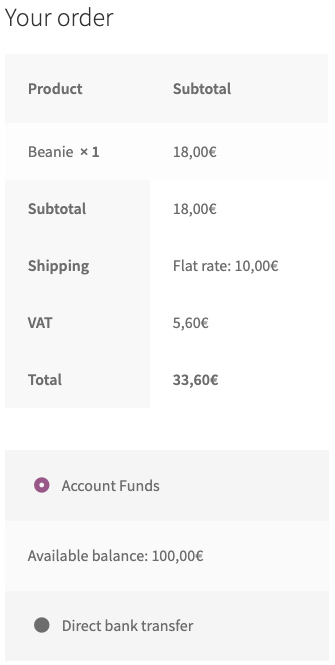
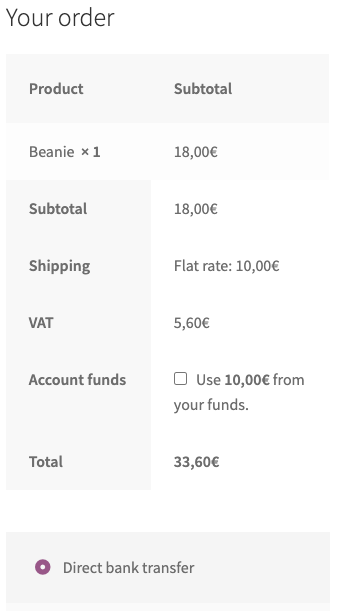
↑ Back to topThe customers can use their funds in two different ways: as a payment gateway or as a partial payment.
Note: In both cases, customers need to log in to the store to use their funds.
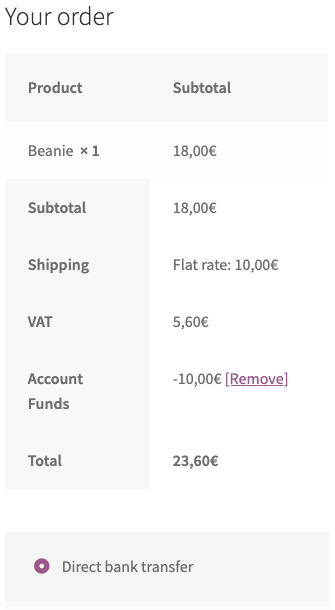
As a payment gateway
↑ Back to topIn order to use funds as a payment gateway, the customer must have enough funds to pay for the whole order. That means the funds’ amount must be higher or equal to the order total. Otherwise, the “Account funds” payment gateway won’t be available during checkout.
Note: Be sure the “Account Funds” payment gateway is enabled in the section “WooCommerce > Settings > Payments“.
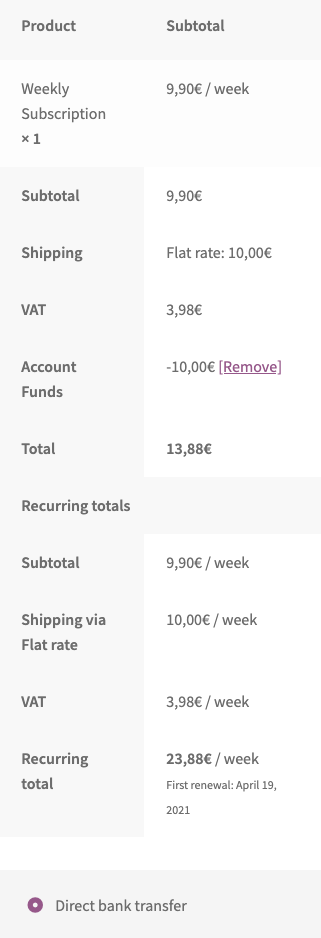
As a partial payment
↑ Back to topIf you have enabled the option “Partial funds payment” and the funds don’t cover the entire order total, you can use the funds to partially pay the order and pay the remaining amount with a different method like PayPal or Stripe.

Giving a discount
↑ Back to topIf you enable the settings for giving a discount when using the Account funds, a discount will be applied automatically to the cart when the customer uses his funds.
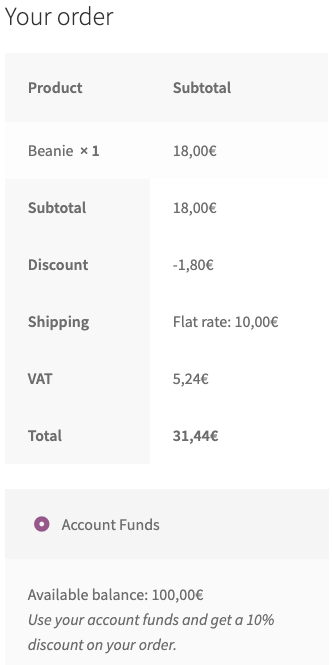
Note: The discounted amount is calculated on the amount of funds used and not on the order total.
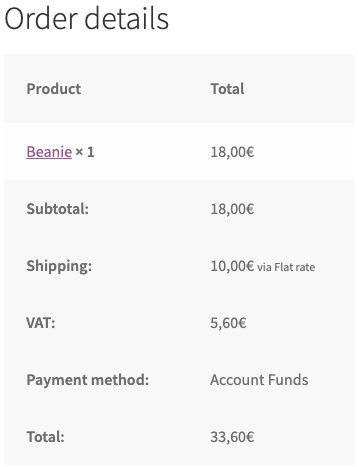
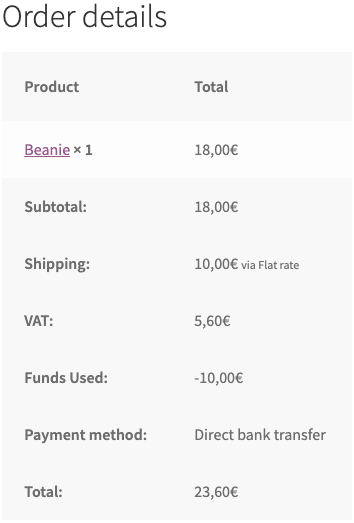
Order details
↑ Back to topThe orders paid with funds, fully or partially, will include the funds used in their details and emails.
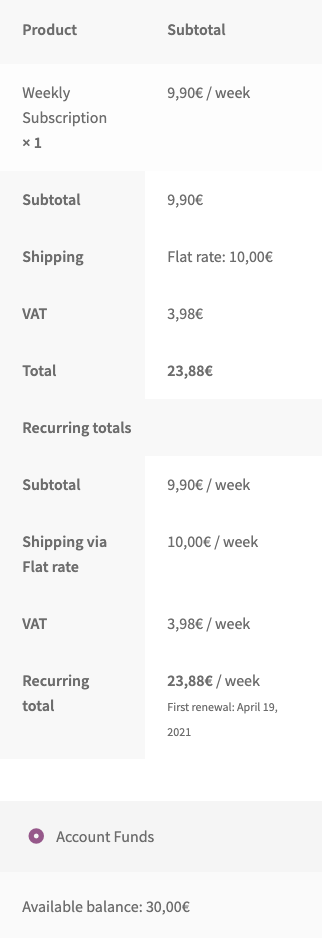
Subscriptions
↑ Back to topAccount Funds is compatible with the extension WooCommerce Subscriptions. That means customers can use their funds as a payment method for purchasing a subscription and continue using them in order renewals.
Purchase with funds
↑ Back to topThe process of purchasing a subscription with funds is the same as purchasing an Order. If the customer has enough funds to fully pay the order, the “Account funds” payment gateway will be available. Otherwise, he will be able to make a partial payment and select a different payment gateway for renewals.
Renewals
↑ Back to topWhen renewing a subscription whose payment gateway is “Account Funds“, the customer’s funds will be used to pay the renewal order. If the customer has enough funds to fully pay the order, the renewal will be processed automatically.
On the other hand, if there are not enough funds, the Order status will be set to Failed and the subscription status will change to On-hold.
In this case, the customer will need to renew the Order manually. He can opt to top-up his funds and pay the order with them to reactivate the subscription with the “Account funds” payment gateway, or can just use his funds as a partial payment and change the subscription payment method.
Change payment method
↑ Back to topCustomers can change the payment method of their subscriptions anytime. If they have enough funds to pay the next renewal, the “Account funds” payment gateway will be available.
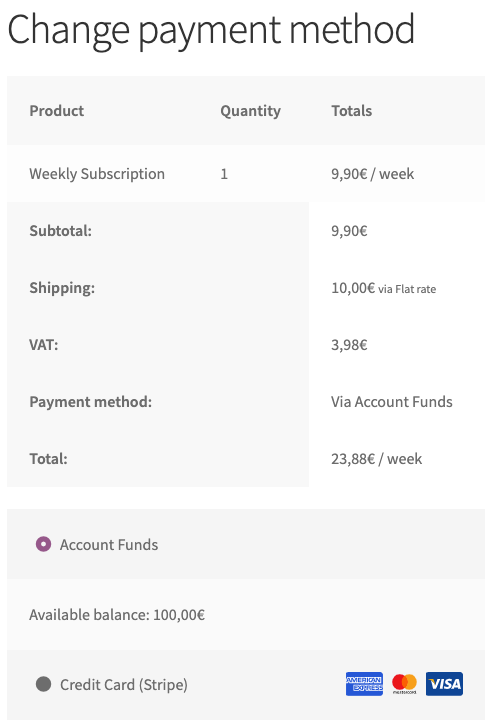
Once the subscription is renewed, the selected payment method will be used for the following renewals.
Funds management
↑ Back to topAs the store owner, you can control how the funds are used in your store and track their usage.
Customer funds
↑ Back to topIf you want to know the number of funds a customer has available, just go to the user list and check the column “Account funds” for the specified customer.
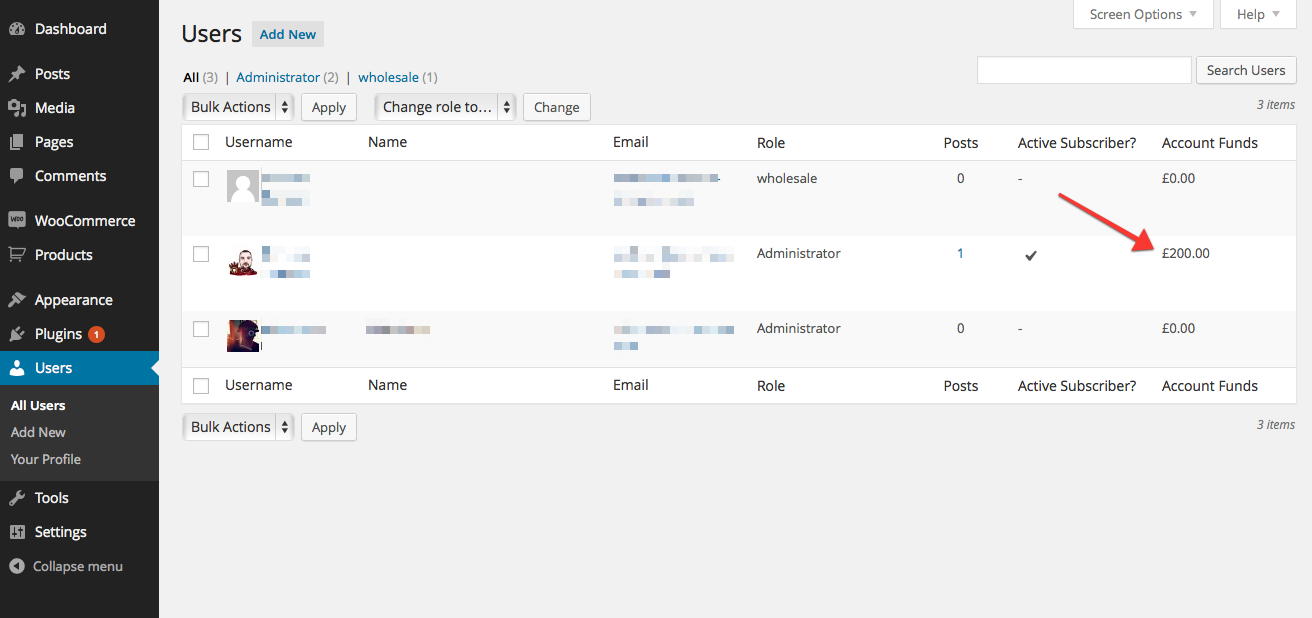
Note: If the “Account Funds” column is not available in this view, click on the right-top tab called “Screen Options” and enable it.
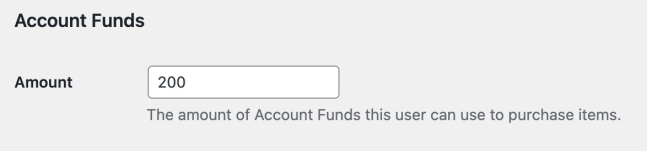
If you need to edit the funds of a customer, visit his profile and change the value of the “Amount” field in the “Account Funds” section.
Manual orders
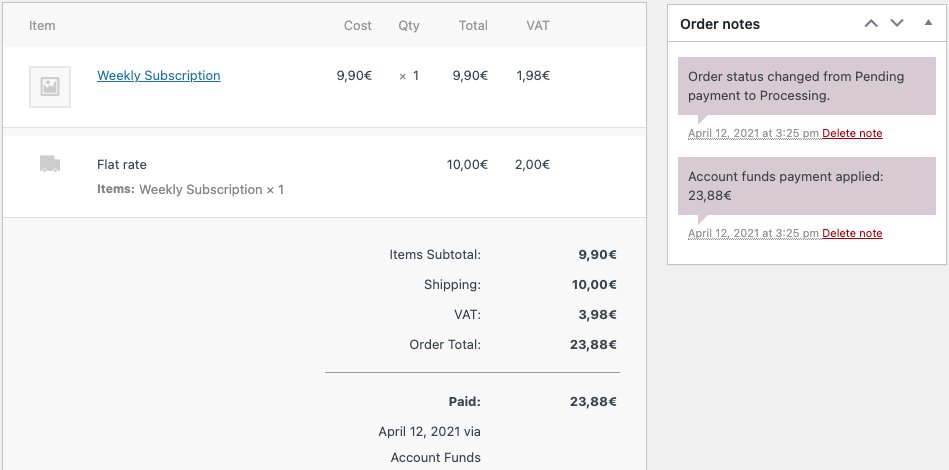
↑ Back to topWhen creating an order manually in your WooCommerce dashboard, you can select the “Account funds” gateway as a payment method.
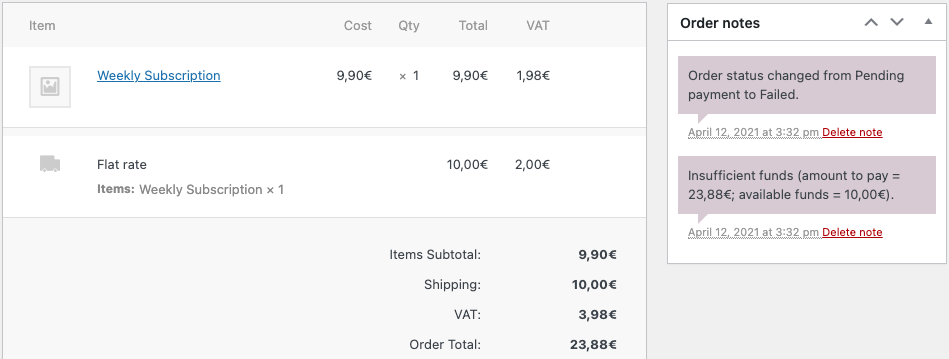
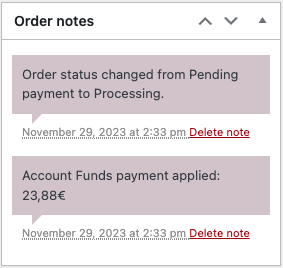
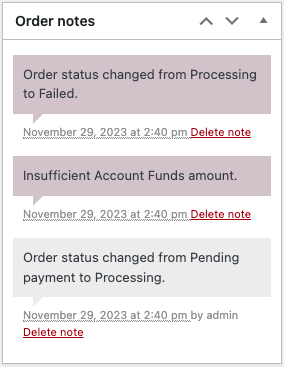
If the order is assigned to a registered customer, and this one has enough funds to pay the order, funds will be deducted automatically from its account when updating the order status to “Processing” or “Completed“.
On the other hand, if the customer doesn’t have enough funds, the order status will be changed to “Failed“, and no funds will be deducted. In this case, you can try to update the customer’s funds or choose a different payment gateway before changing the order status again.
In both cases, internal notes will be added to the order to track the actions.
Refunds
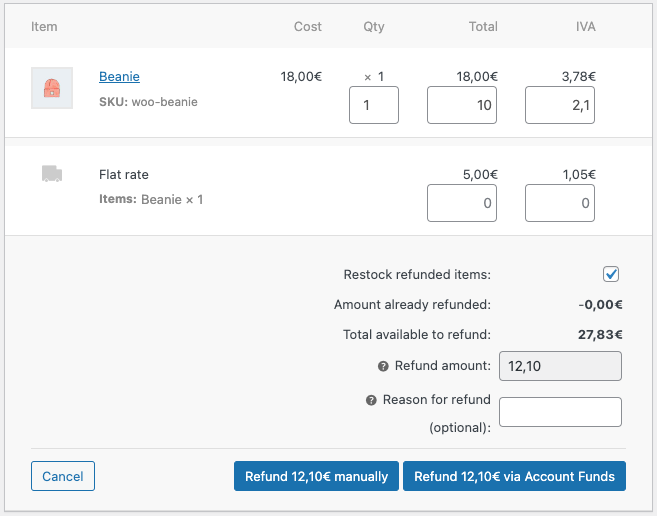
↑ Back to topYou can process a partial or full refund for orders paid with funds or any other payment gateway. The refunded amount will be automatically restored to the customer’s account. To do so, follow these steps:
- Click on the “Refund” button in the bottom-left corner of the order details.
- Select the order items to refund.
- Click on the button “Refund X via Account Funds“.
- Confirm the action.
Important: The partial refund via “Account Funds” requires WC 6.8+ when the order payment gateway differs from “Account Funds“. Additionally, the order must have been paid from a logged-in user and not contain Deposit or Top-up products.
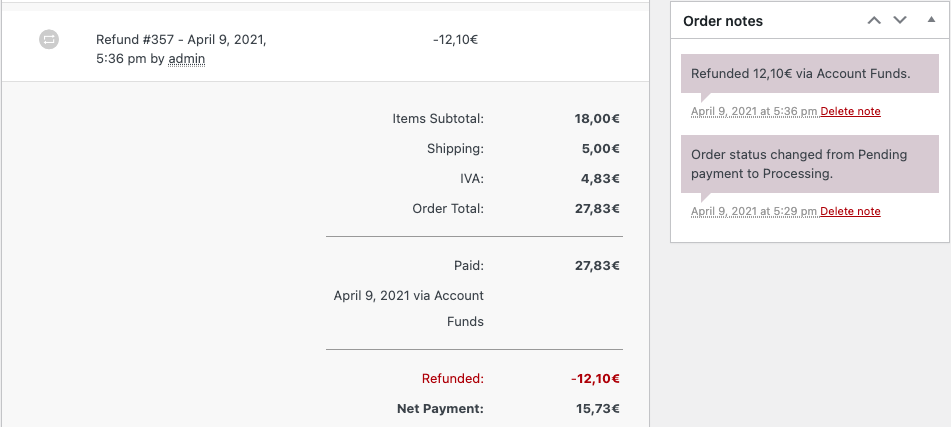
Besides, the funds will be automatically restored to the customer’s account when marking the order as canceled. Only the remaining funds will be restored if you already did a partial refund.
Note: Since version 2.6.2, setting the order status to “Refunded” won’t restore the funds automatically to the customer’s account. Please, use the refund process described above for this purpose. Once you refund the whole order, the status “Refunded” will be reached automatically.
Finally, when removing a partial refund placed via “Account Funds” on an order whose payment method is different from “Account Funds“, the refund amount will be deducted from the customer account if possible. Otherwise, a note will be added to the order, and the merchant must decide how to proceed with the customer’s funds.
Widgets
↑ Back to topIf your theme supports widgets:
Go to: Appearance > Widgets and drag the My Account Funds widget to any of your containers.
Use this shortcode to display in posts/pages:
[get-account-funds]
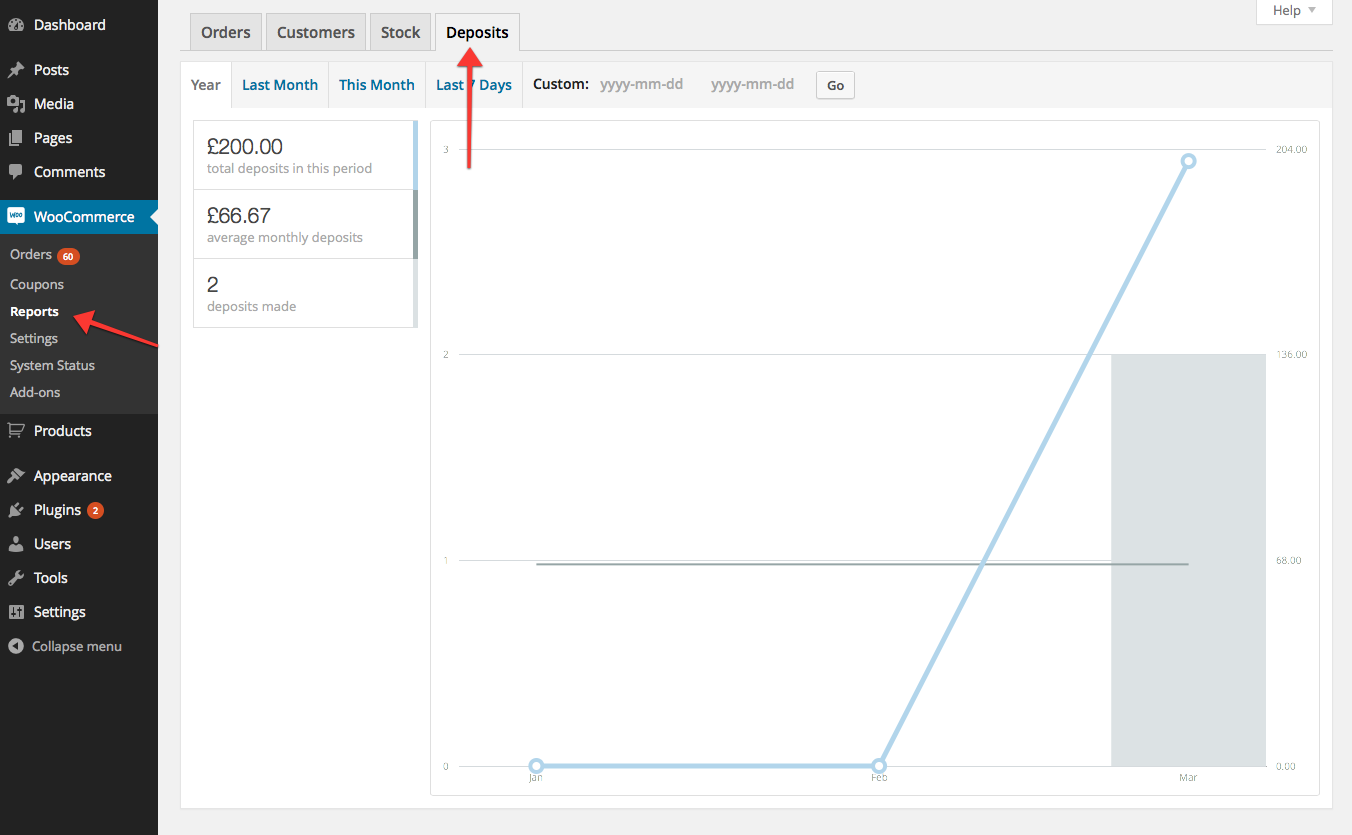
Reports
↑ Back to topAccount Funds include reports that show the admin how many deposits have been made and total funds. To view reports, go to WooCommerce > Reports > Deposits.
FAQ
↑ Back to topAm I required to give discounts?
↑ Back to topAbsolutely not. You can enable or disable the discounts by going to the settings page on WooCommerce > Account Funds.
Who can use Account Funds?
↑ Back to topOnly registered and logged-in members are able to deposit funds in their accounts and use those funds to pay for an order.
Can I rename the payment method on the checkout page?
↑ Back to topYes!
1. Go to WooCommerce > Settings > Payment Gateways.
2. Select Account Funds to show settings.
3. Change the Title.
4. Save.
Where can I see my members’ account funds?
↑ Back to topGo to the Users page (Users > All Users) and view a column for Account Funds for every member of your store.
Can I add/deduct funds from a member?
↑ Back to topGo to Users > All Users and search for a member to edit. Click Edit, and scroll down to the Account Funds section to a textbox with the member’s current account funds and adjust. Select Update User to save.
Can I set sale prices to the funds?
↑ Back to topYes. In addition, your clients will receive the regular price as funds in their accounts. More information here.
Can I set subscription plans to get recurring funds?
↑ Back to topYou can create deposit products and establish plans for your customers to fund their accounts. More information here.
Questions and Feedback
↑ Back to topHave a question before you buy? Please fill out this pre-sales form.
Already purchased and need some assistance? Get in touch with a Happiness Engineer via the Help Desk.