Google address autofill for WooCommerce let your customers autofill the address on checkout using Google map suggestions. Admin can also autocomplete the user address on order detail page.
Installation
↑ Back to top- Download Google Autofill Customer Addresses for WooCommerce and have your .zip file
- At the WordPress admin panel, go to the Plugins section, and click ‘Add New’ to upload and install the plugin you recently downloaded from WooCommerce.com.
- Upload the .zip file to proceed with the installation.
- Wait until the plugin installs. After successful installation, activate the plugin, and move on to configuration settings.
Configurations
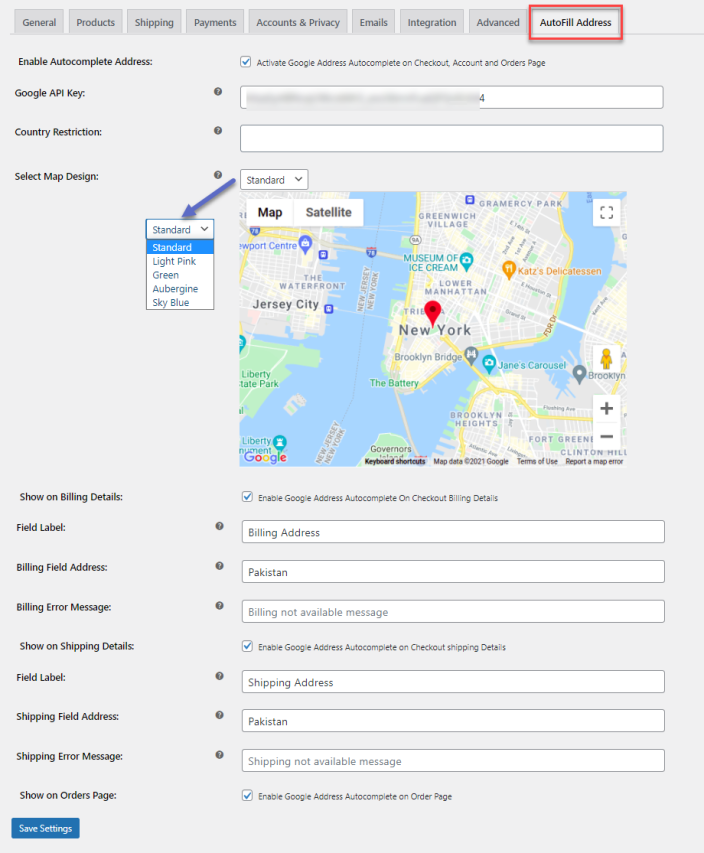
↑ Back to topAt the admin panel go to WooCommerce > Settings and click Autofill Address tab to configure this extension.
Here you can set the followings.
- Enable Address Autocomplete:(Check this to enable autocomplete feature)
- Google API Key:(Enter Google API key here)
- Country Restriction:(Select country to hide map on checkout & orders page)
- Select Map Design:(Select map design to show on checkout & orders page)
- Show on Billing Details:(Check this option to enable for Billing Details)
- Field Label: (Set billing autocomplete field label)
- Billing Field Address: (Select billing address you want to display by default)
- Billing Error Message: (Enter the error message for billing when customers select the restricted country)
- Show on shipping Details:(Check this option to enable Google map for Shipping Details)
- Field Label: (Set autofill billing field label)
- Shipping Field Address: (Select shipping address you want to display by default)
- Shipping Error Message: (Enter the error message for shipping when selling is not available on selected country)
- Show on Orders Page:(Check this option to enable for Order Details Page at Admin Panel)
How to Create Google Map API
↑ Back to topFollow this step-by-step guide on how to create Google Map API.
- Go to https://console.cloud.google.com/getting-started
- Click on “My Google Map API” next to the top search bar and click on the “New Project” button.
- Fill in project details including project name, organization, and location.
- After filling in the required information, click the “Create” button.
- After creating the project, go to the notifications bar and click the “Select Project” button for your project.
- Scroll down to the “Quick Access” section and click on the “API & Services” button.
- After that, click on “credentials” from the side menu.
- Click on the “+ Create Credentials” button from the top menu bar and select “API Key” from the dropdown menu.
- A popup will appear for the API created. Copy this API key and use it in your application.
- Before adding the copied API to your application, close the popup and click on the “Enabled APIs” button from the sidebar.
- Click on the “+ Enable APIs and Services” in the top menu bar and a new page will load. Here click on the “View All” button to see all the APIs.
- Enable the following APIs:
- Places API (New)
- Places API (Enable both places API)
- Maps JavaScript API
- Geocoding API
- Once you have enabled all these APIs, paste the API key to your application.
Your Google Map API will now be successfully created.
If you need to learn how to create Google Map API, watch this video Here
FAQs
- How does the WooCommerce address autocomplete plugin autofill the address?
The Google address autocomplete for WooCommerce plugin makes use of Google API to autofill the address. When a customer enters the location on the map, the address is automatically fetched by Google API including Country, City, State, Zipcode, and other key details.
- On which pages can the customer autofill the address?
Autocomplete address WooCommerce plugin enables your customers to autofill the address on the order details page and my account page. This ease the whole buying process for each customer.
- Can I restrict maps for specific countries?
You can restrict maps for specific countries with the address autocomplete WooCommerce plugin. Map for selected countries will be invisible to customers on the checkout page.