The Slack for WooCommerce extension by Kestrel brings your WooCommerce store into the heart of Slack channel conversations allowing you and your team to easily stay current on what’s happening in your store with minimal effort.
Requirements
↑ Back to top- WooCommerce 4.0+
- PHP 7.0+
- An account on Slack with a free or paid plan
Installation
↑ Back to top- Download the extension from your WooCommerce.com downloads page
- Go to Plugins > Add New > Upload and select the .zip file you downloaded
- Click Install Now, and then click Activate
For more information on installing and managing plugins see here
Setup and Configuration
↑ Back to topThe Slack API now uses OAuth 2.0 to validate all connections.
If you had previously set up authenticated integrations (legacy tokens) these will continue to work, but are discouraged. Switching to OAuth 2.0 is recommended.
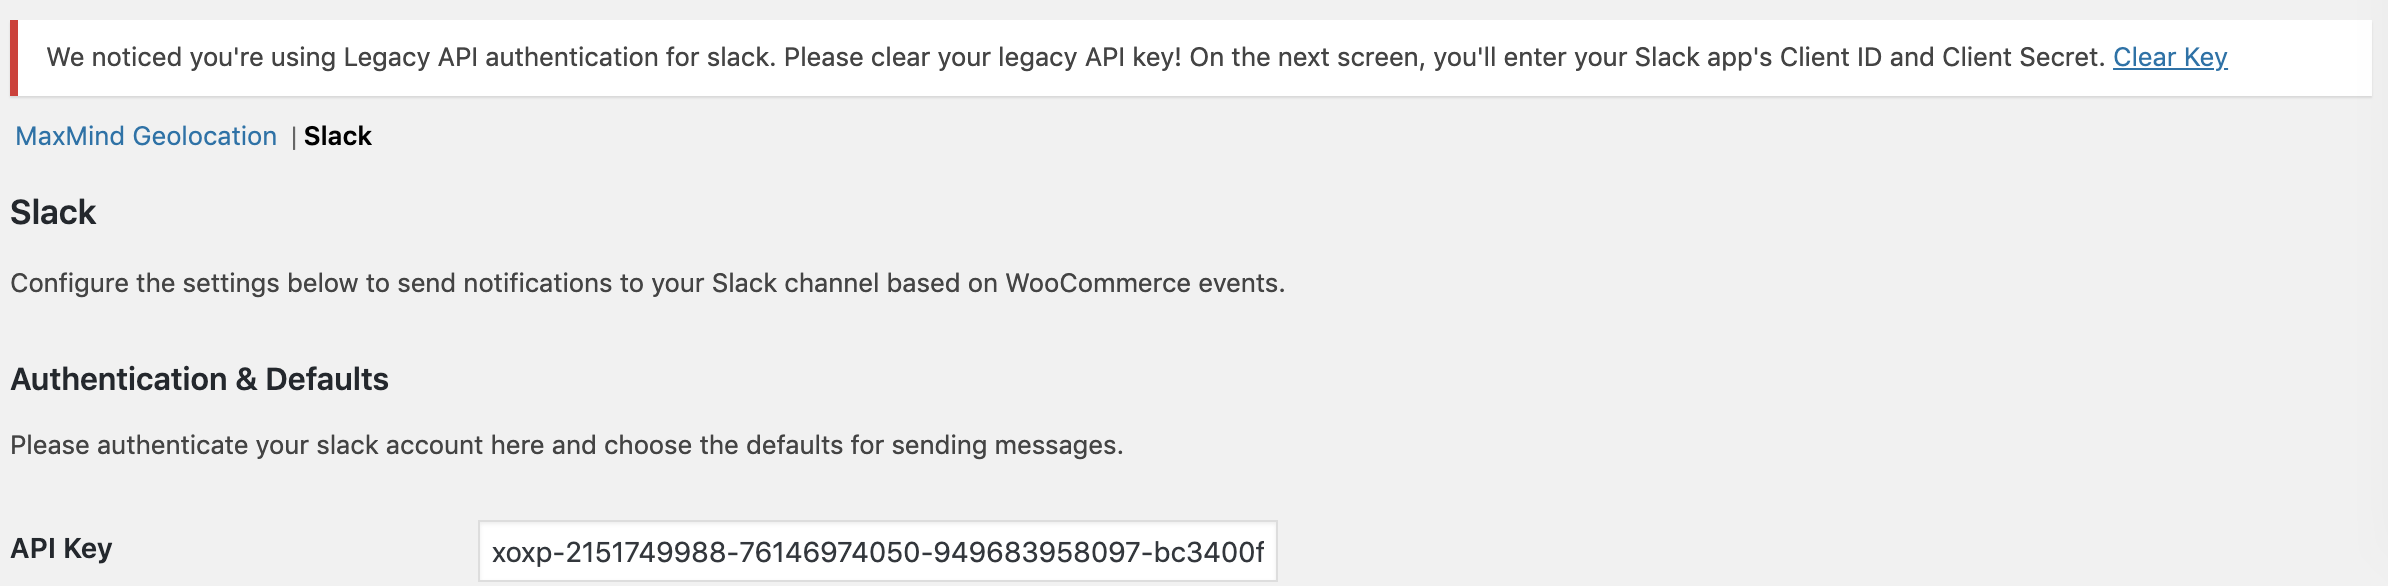
To migrate to the new OAuth 2.0 integration, delete the old API keys from your settings by clicking on Clear Key on the notice, and follow the instructions below. The migration will happen automatically.[/box]
To set up the connection between your WooCommerce store and Slack account, there are two steps:
- Create a Slack application in the Slack dashboard
- Connect your application via the WooCommerce Slack extension settings
Create a Slack App
↑ Back to topStep 1: Create a Slack application in the Slack dashboard
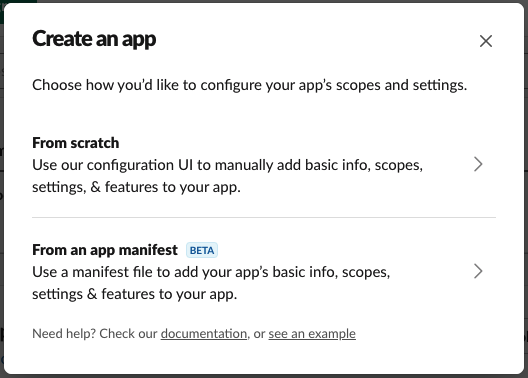
Go to the Slack’s applications ( you may need to log in using your Slack.com credentials ) section and click on the “Create an App” button:

Upon logging and clicking the “Create an App” button, you will be presented with the following screen asking how you’d like to create the app, either From scratch or From an app manifest, please select From Scratch (no code required):
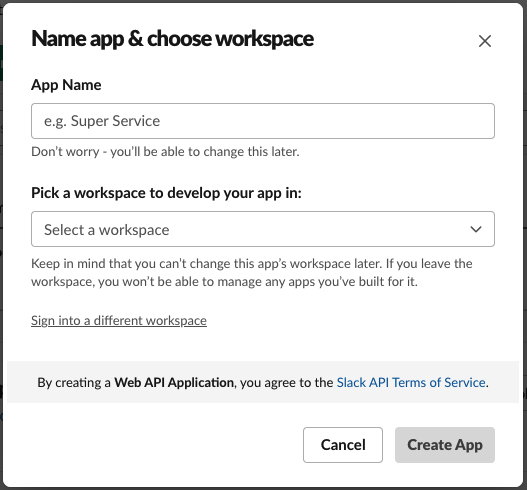
In the next screen, fill in the form, then click Create App:
- App Name – this is the name of your application, choose a name that is easy to remember
- Development Slack Workspace – Workspace to which the notifications should be sent

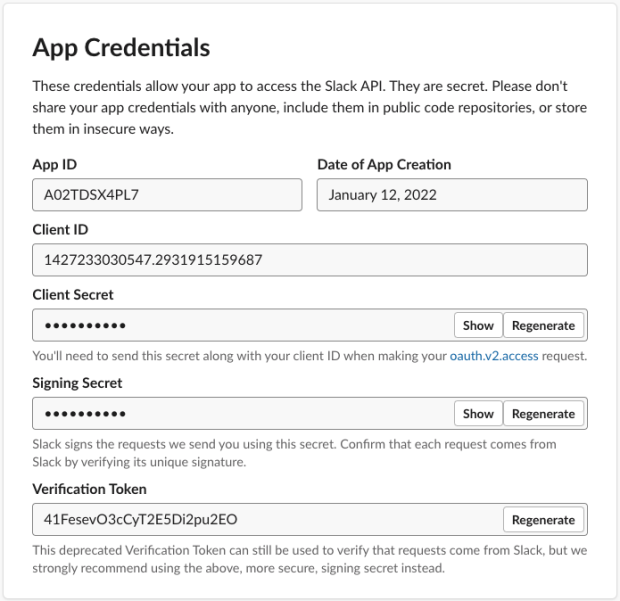
Now all you need to do is scroll down a bit, where you’ll see App Credentials detail:
Your Slack application is now created. Don’t close this page yet you will need it for the next step.
Step 2: Connect your Slack application to WooCommerce
- Copy the Client ID, go back to your WooCommerce Slack admin settings page
- Paste it into the Client ID field
- Next, go back to your Slack application and click Show under Client Secret.
- Copy the secret and paste it in the Client Secret field
- Scroll down and click “Save changes”
As a note, if you are installing the Slack extension for the first time, you will see this screen:
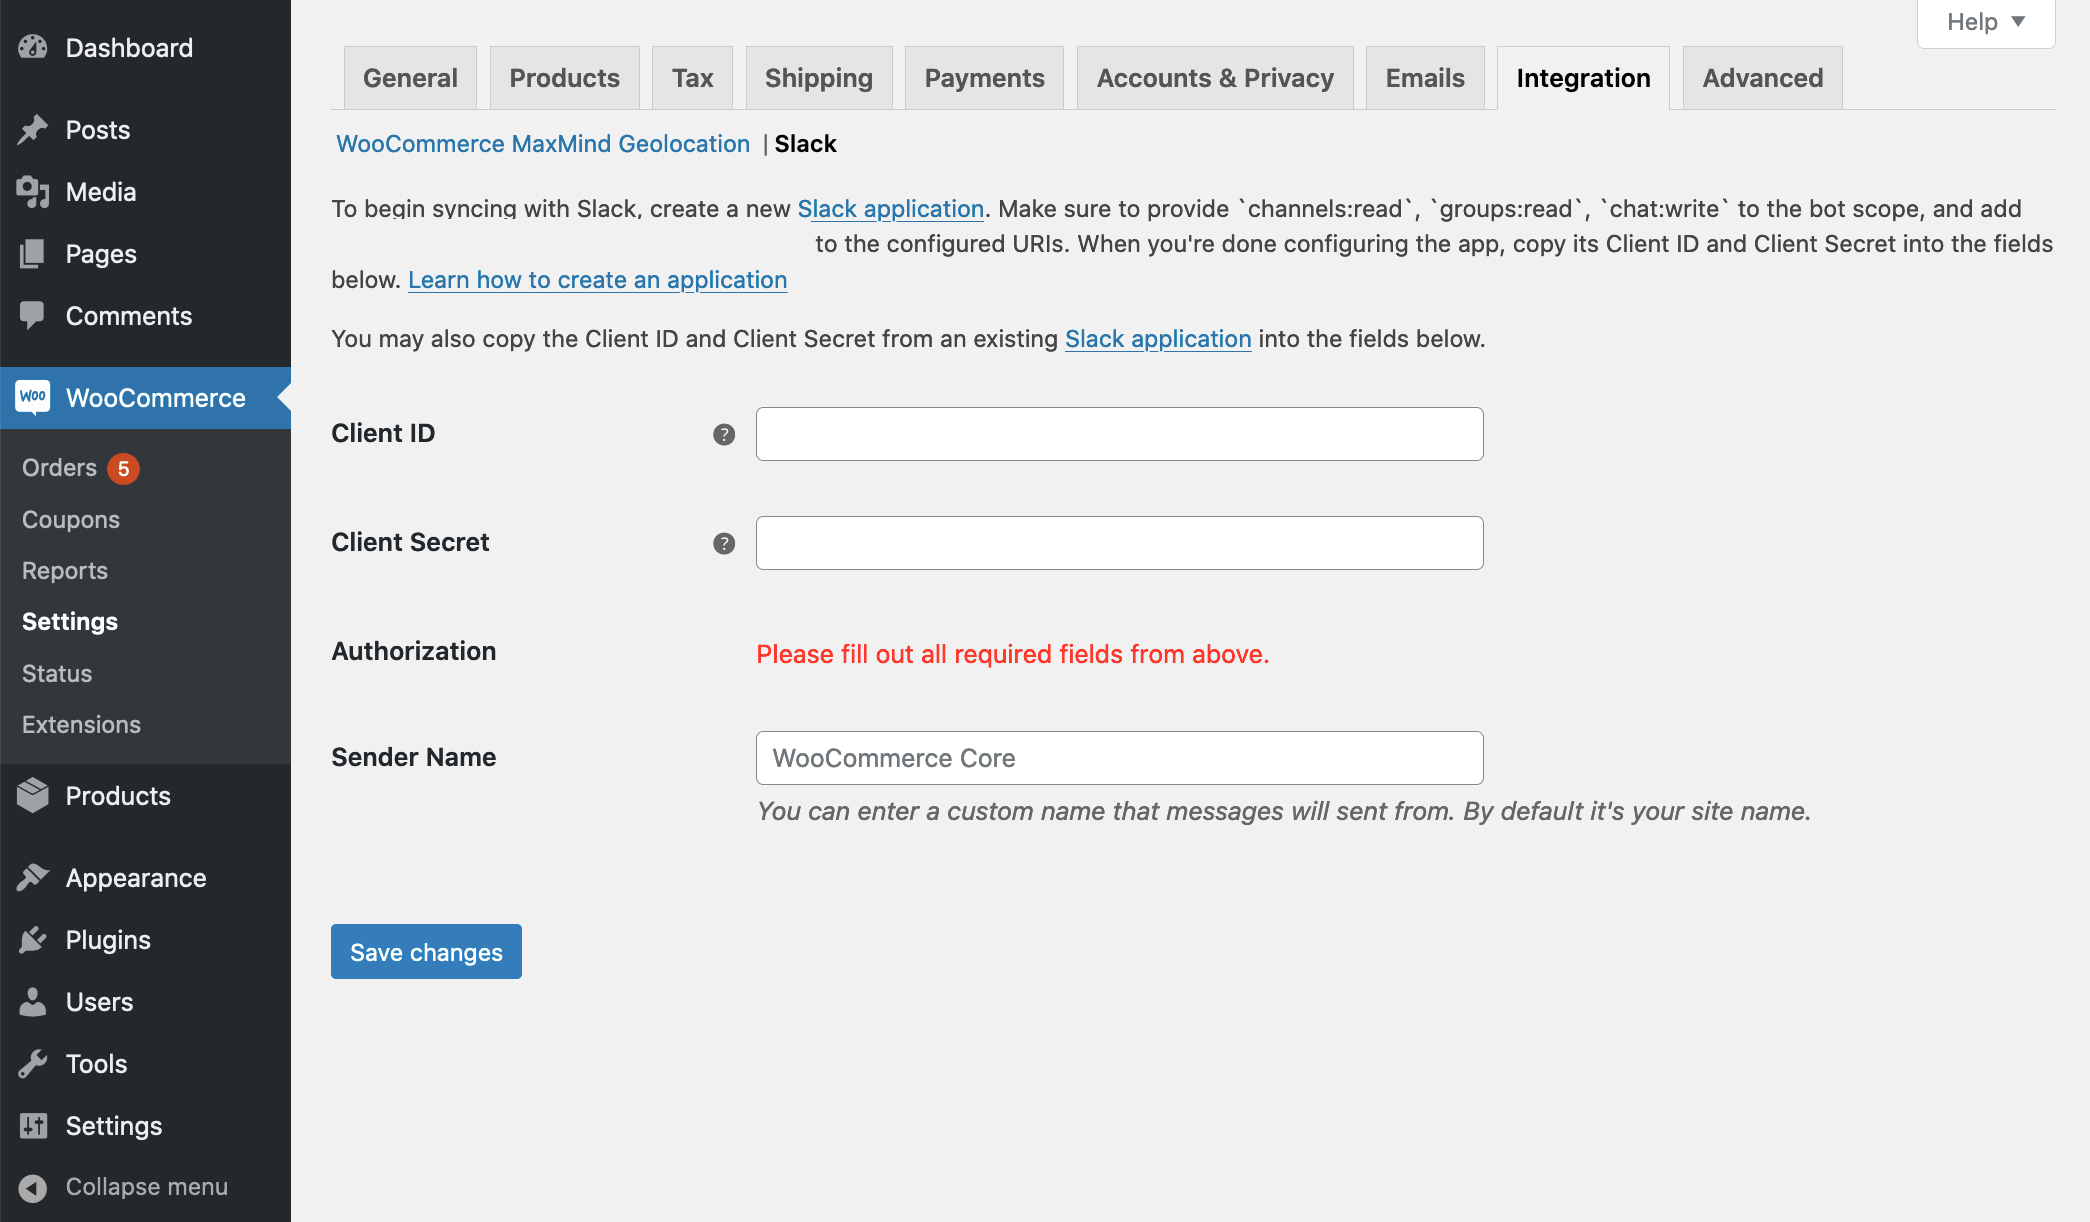
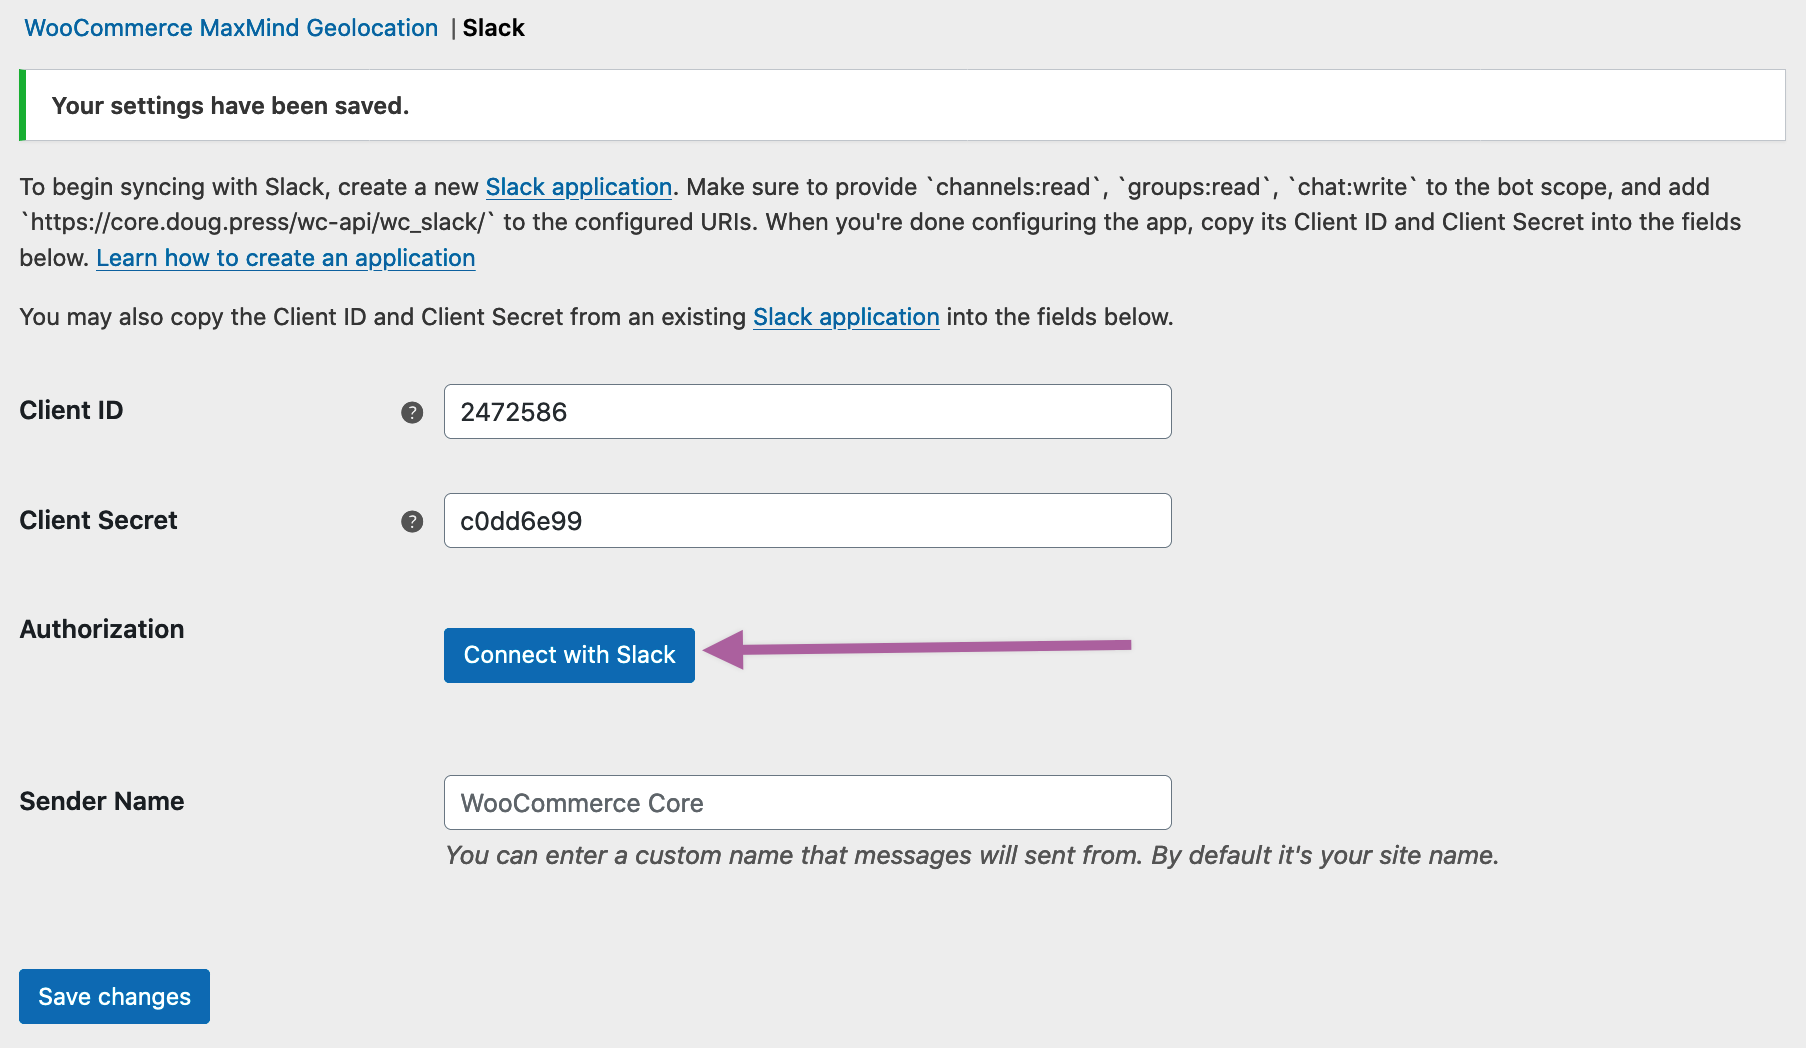
You should now see that the “Connect with Slack” button is now Active – but before you click the button you must set permissions for the application, explained below.
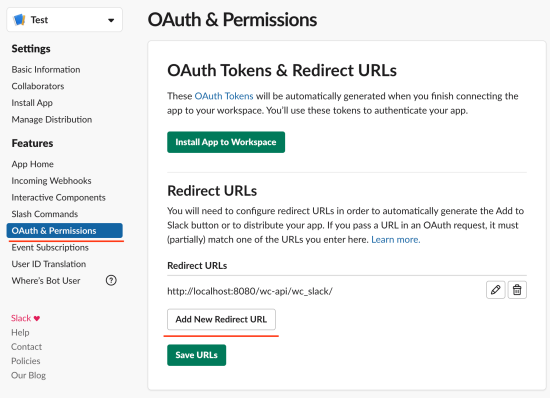
To set permissions, for the application, navigate to “OAuth & Permissions” from the menu on the left on the Slack dashboard.
Copy and paste the Redirect URL into the Redirect URLs field, then click Add New Redirect URL (in the above example is https://core.doug.press/wc-api/wc_slack/) and click Save URLs.
Now you can go back to the previous Slack setting on WooCommerce and click Connect with Slack.
You should see the following screen:
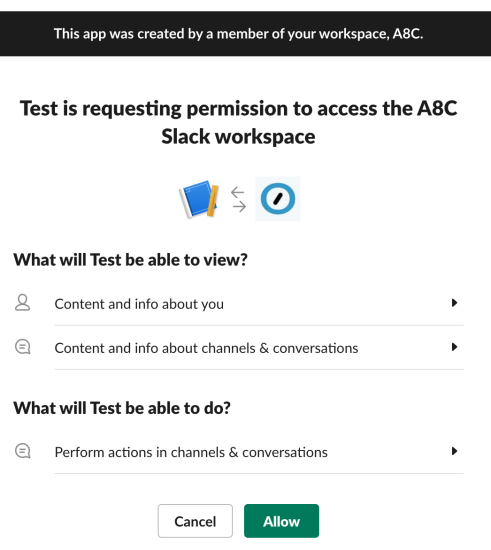
After clicking “Allow” you will be taken back to the WooCommerce Slack settings page that will confirm the status of the connection with “Successfully authenticated” and the button changed to “Disconnect”.
Extension setup
↑ Back to topWith the site authenticated with your Slack account, more details and settings are presented to set up the extension to your needs:
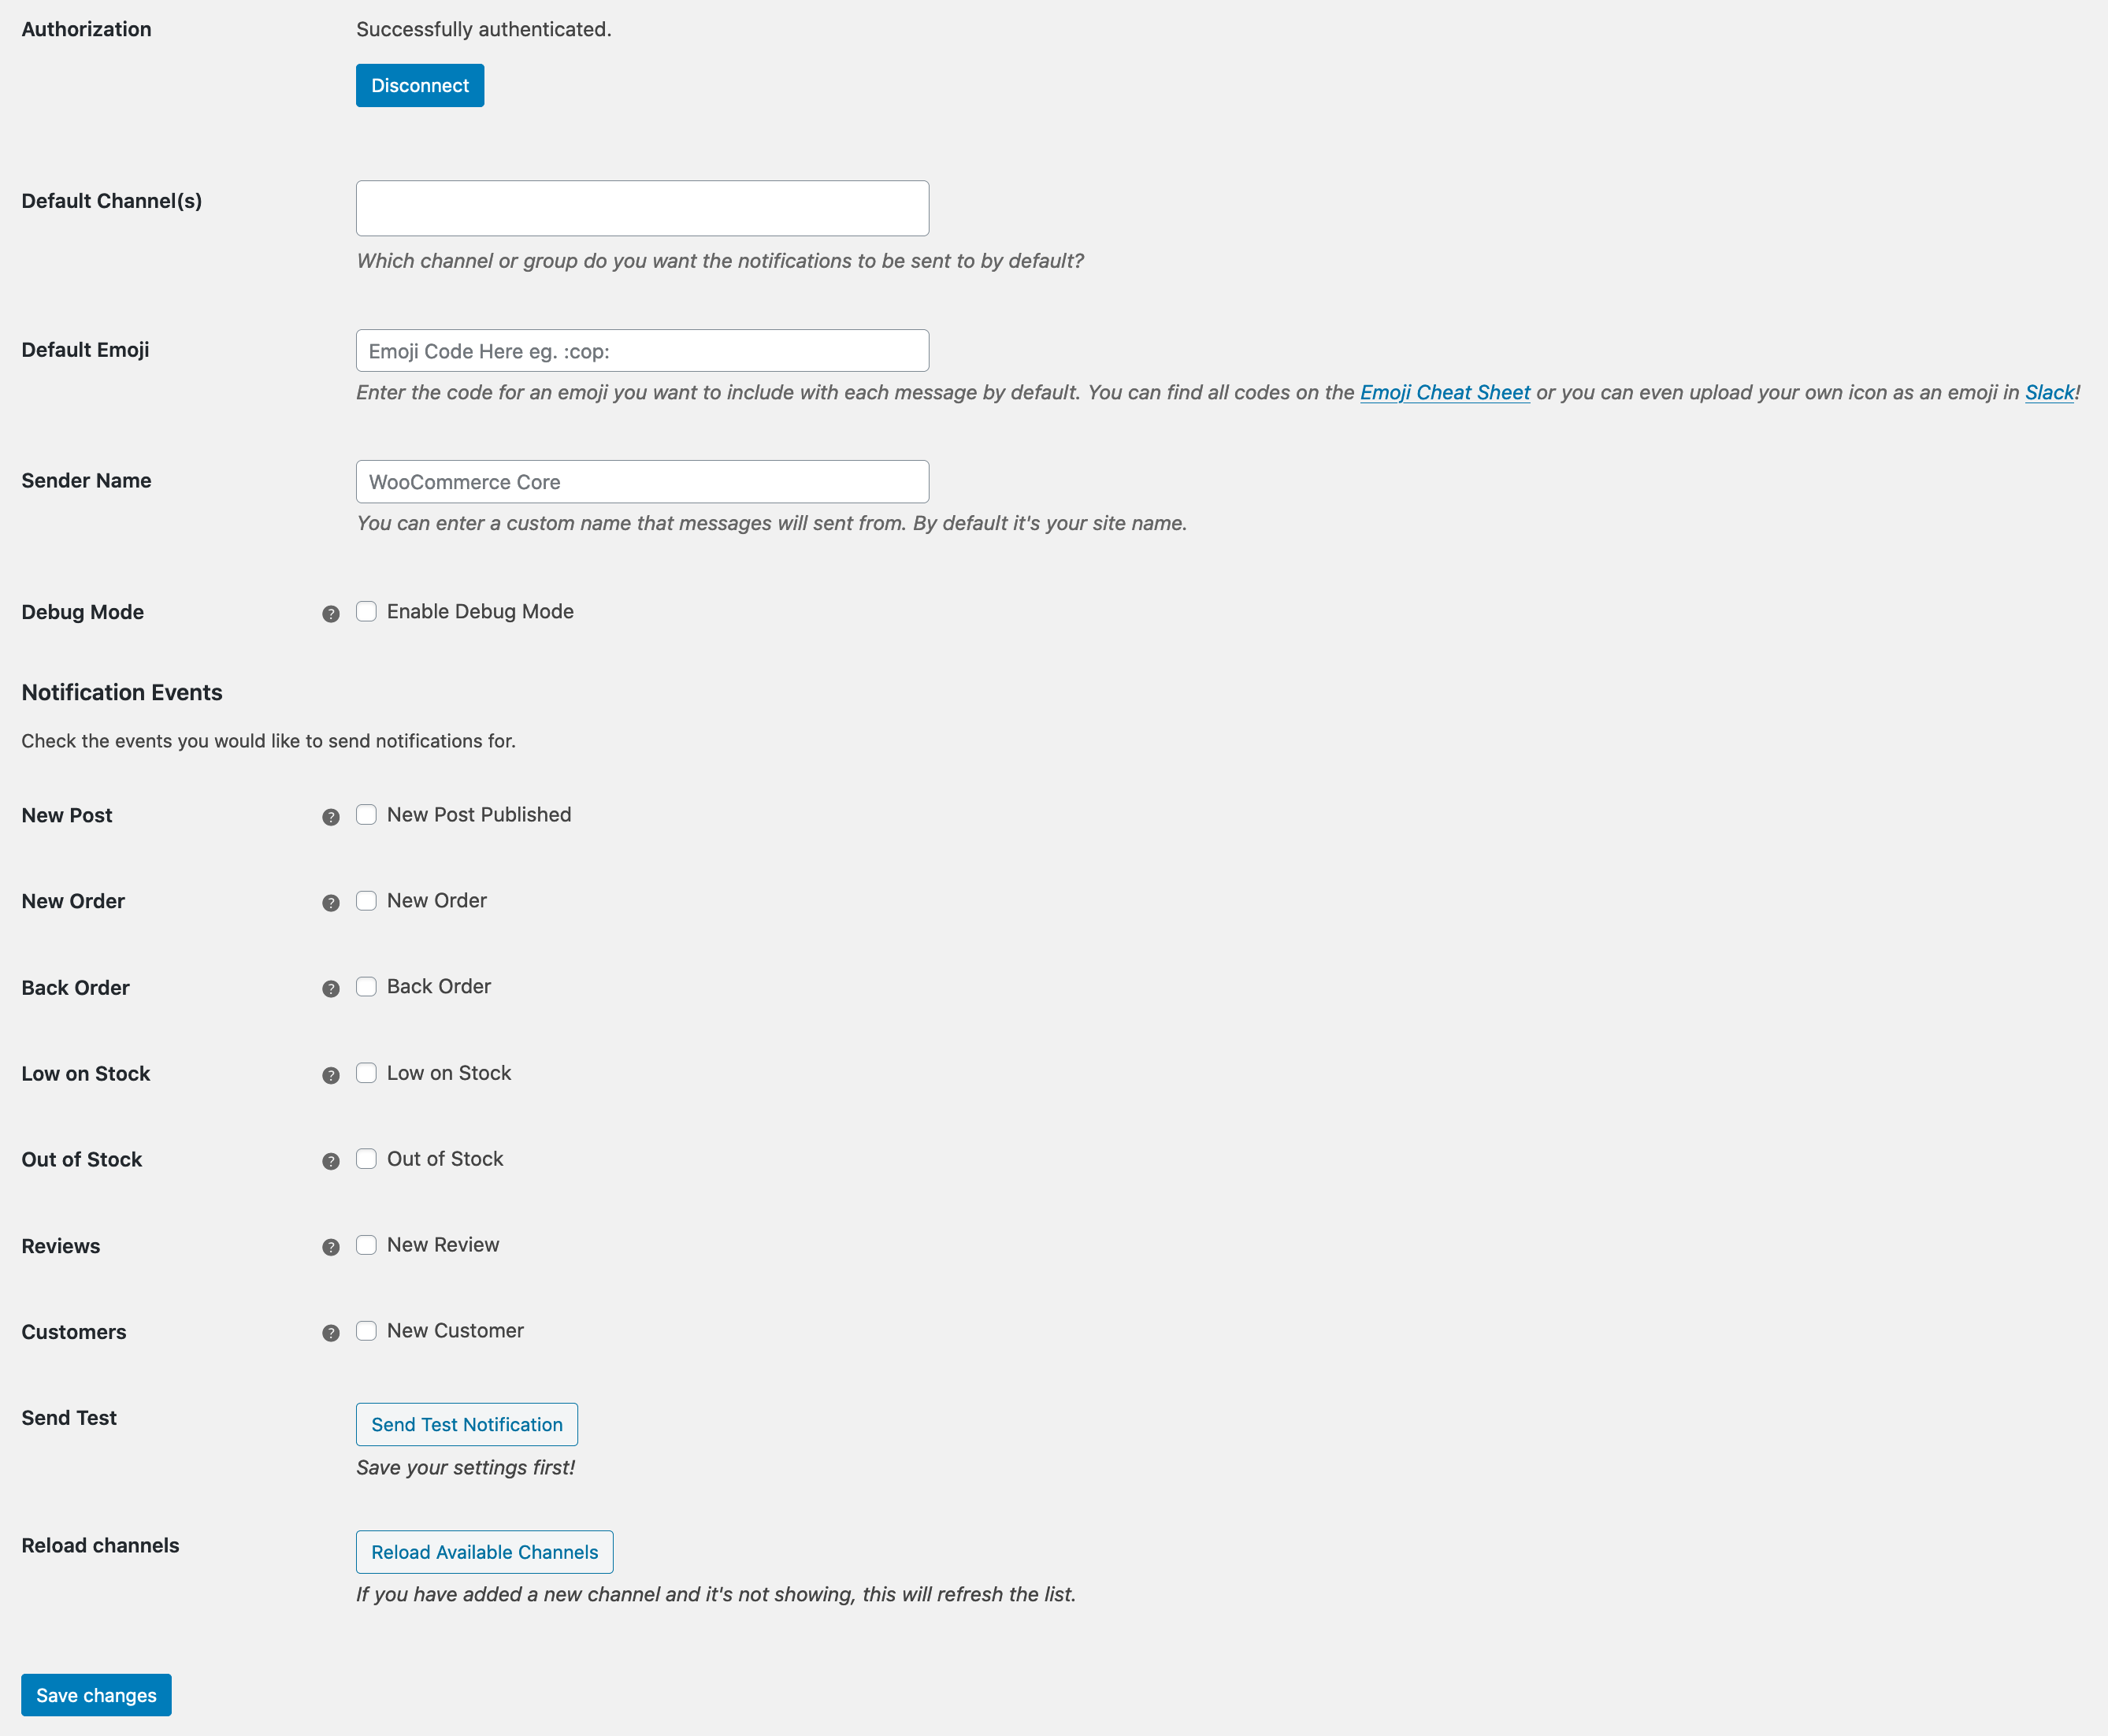
To proceed with setting up WooCommerce Slack on your site, click on “Reload Available Channels” at the bottom – This will refresh the Channel list from your Slack workspace.
- Default Channel(s) – Choose a Channel or Channels for notifications to be sent under the “Default Channel(s)” option.
- Default Emoji. More info in the Emojis section below.
- Sender Name – by default, this is your site name.
- Debug mode – debug logs are stored when the “Enable Debug Mode” box is checked
- This is useful for troubleshooting purposes. Otherwise, leave it disabled.
- Logs are found via WooCommerce > Status > Logs.
- Notification Events
- Select preferences for seven Notifications. More info in the Notifications section below.
- Send Test – clicking “Send Test Notification” will send a Test Message to the Channel(s) selected under Default Channel(s).
- More details in the Testing section below.
- Select Reload channels if you have added new channels to Slack and they’re not showing.
Emojis
↑ Back to topSlack allows you to use any of the many emojis available. If an emoji exists in your Slack Workspace then the code can be used here. You can find the shortcodes via a site like Emoji Searcher. They can also be used as your notification “icons”!
Note that Slack has a 5 minute lock on icons, which means if you have different icons set up for different notifications, you will only see the icons as long as the notifications are 5+ minutes apart. If not, the new notification will be nested under the old icon.
Set a default one:

You can also set different emojis for specific notifications:
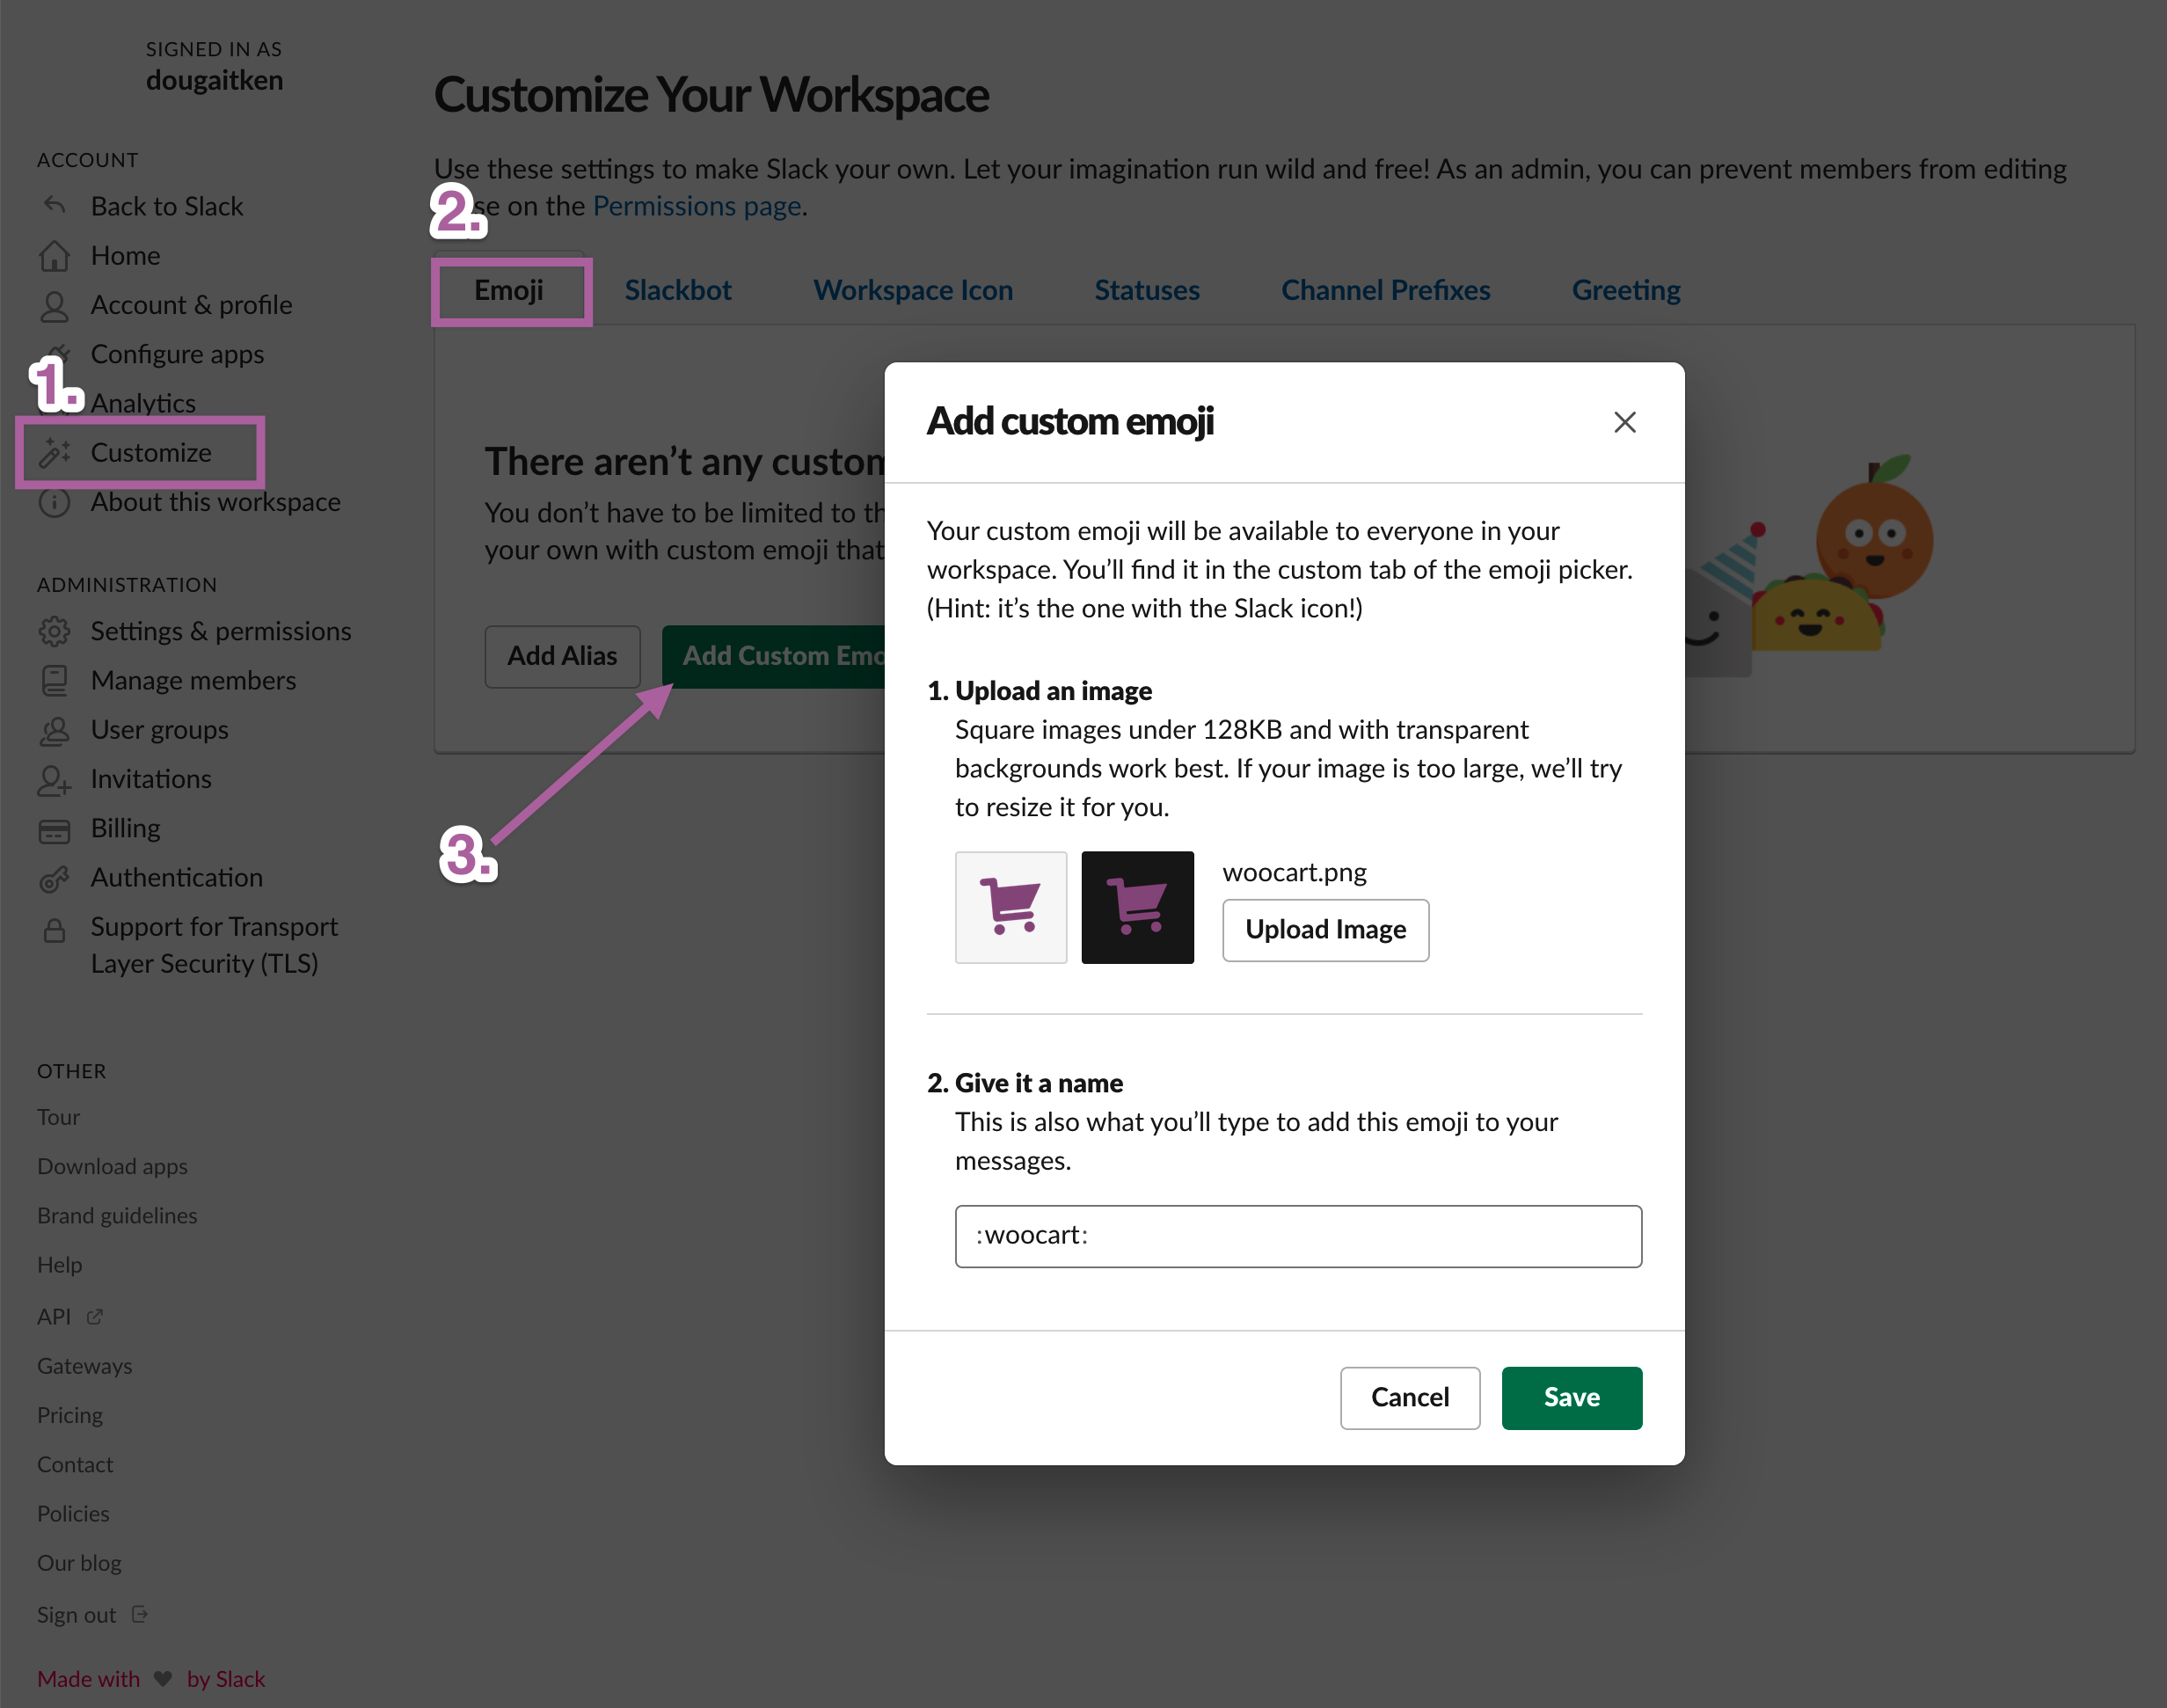
Custom Emojis
Slack has a feature to add Custom Emoji that can be used in your account’s chat and in WooCommerce Slack.
Assign a new shortcode to use the emoji, like :woocart:, and then use it in your WooCommerce Slack settings!
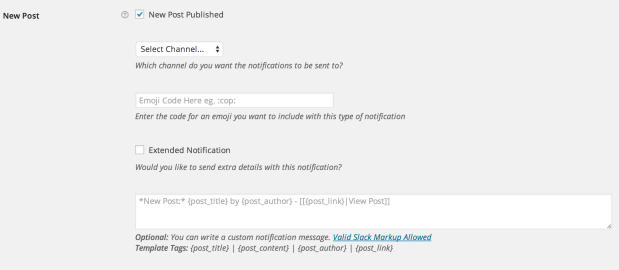
Notifications
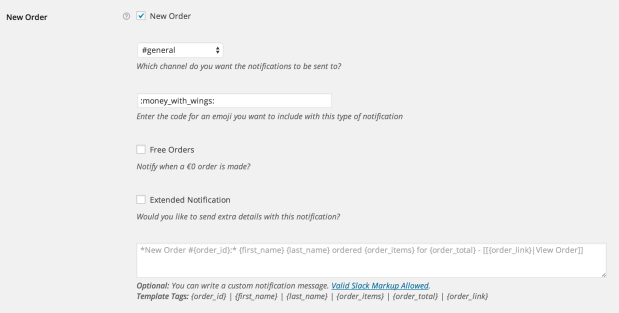
↑ Back to topThere are seven (7) notification events that can be enabled. All notifications have options that appear after being enabled. All are optional:
- Channel – Specific channel to send this notification to
- Emoji – Specific emoji of this notification
- Custom Notification Message – Custom message to use for this notification, made using the notification’s unique template tags
- Extended Notification – Some notifications, have the option to send more detailed, several row notifications (like new order notifications with line item information).
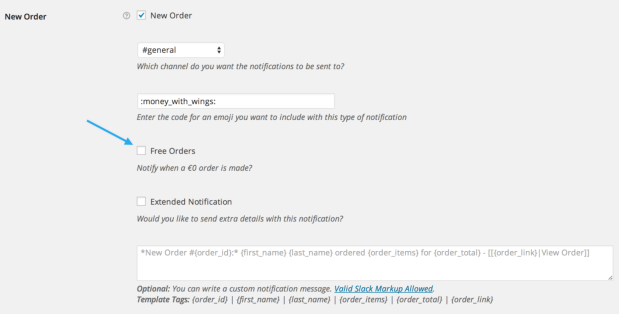
New Order Notification
There is also an extra option for the new order notification:
- Free Orders – If you select this option, notifications are also sent for free orders.
Custom Notifications
It’s possible to build your own custom notification messages for each notification type. Underneath each notification, the available template tags are listed. They’re straightforward to use but keep in mind that {xxxxx_link} provides the URL itself. Special ‘Slack Formatting’ is allowed, like:
- Bold: Wrap in *. eg. *some bold text*
- Italic: Wrap in _. eg. _some italic text_
- Links: Wrap in [[ & ]], with the format [[url|text to display]]. eg. [[https://woocommerce.com/|just view the Woo website!]]


Testing
↑ Back to topTo send a Test Notification, go to WooCommerce > Settings > Integration > Slack and click the Send Test Notification button. This will send a test notification to the Default Channel(s).

Frequently Asked Questions
↑ Back to topI added/removed a channel from my Slack account, but it’s not showing up.
↑ Back to topTo save your site resources, the extension caches your Channels. Click the Reload Available Channels button at the bottom of the settings page and any changes will show in the Channel list:

Customization
↑ Back to topThere are many filters that can be used to customize the extension and its notification messages:
includes/class-wcslack-events.php:			$allowed_post_types = apply_filters( 'wcslack_post_publish_types', array( 'post', 'page' ) );
includes/class-wcslack-events.php:			$prefix = apply_filters( 'wcslack_new_post_prefix', __( 'New Post:', 'woocommerce-slack' ) );
includes/class-wcslack-events.php:			$author_name = apply_filters( 'wcslack_new_post_author', esc_attr( $author_data->display_name ) );
includes/class-wcslack-events.php:			$title = apply_filters( 'wcslack_new_post_title', get_post_field( 'post_title', $post->ID ) );
includes/class-wcslack-events.php:			$post_content =apply_filters( 'wcslack_new_post_content', get_post_field( 'post_content', $post->ID ) );
includes/class-wcslack-events.php:			$url = apply_filters( 'wcslack_new_post_url', esc_url( get_permalink( $post->ID ) ) );
includes/class-wcslack-events.php:			$message = apply_filters( 'wcslack_new_post_message', $message );
includes/class-wcslack-events.php:			$fields = apply_filters( 'wcslack_new_post_attachment', array(
includes/class-wcslack-events.php:			$prefix = apply_filters( 'wcslack_new_order_prefix', sprintf( __( 'New Order #%d:', 'woocommerce-slack' ), $order_id ) );
includes/class-wcslack-events.php:			$message = apply_filters( 'wcslack_new_order_message', $message );
includes/class-wcslack-events.php:			$fields = apply_filters( 'wcslack_new_order_attachment', array(
includes/class-wcslack-events.php:			$prefix = apply_filters( 'wcslack_back_order_prefix', __( 'Back Order:', 'woocommerce-slack' ) );
includes/class-wcslack-events.php:			$message = apply_filters( 'wcslack_back_order_message', $message );
includes/class-wcslack-events.php:			$prefix = apply_filters( 'wcslack_low_stock_prefix', __( 'Low on Stock:', 'woocommerce-slack' ) );
includes/class-wcslack-events.php:			$message = apply_filters( 'wcslack_low_stock_message', $message );
includes/class-wcslack-events.php:			$prefix = apply_filters( 'wcslack_out_stock_prefix', __( 'Out of Stock:', 'woocommerce-slack' ) );
includes/class-wcslack-events.php:			$message = apply_filters( 'wcslack_out_stock_message', $message );
includes/class-wcslack-events.php:			$reviewer = apply_filtes( 'wcslack_new_review_reviewer_name', $comment_data->comment_author );
includes/class-wcslack-events.php:			$product_name = apply_filters( 'wcslack_new_review_product_name', $product_data->post_title );
includes/class-wcslack-events.php:			$rating_star = apply_filters( 'wcslack_new_review_rating_star', ':star:' );
includes/class-wcslack-events.php:			$review_content = apply_filters( 'wcslack_new_review_content', $comment_data->comment_content );
includes/class-wcslack-events.php:			$prefix = apply_filters( 'wcslack_new_review_prefix', __( 'New Review:', 'woocommerce-slack' ) );
includes/class-wcslack-events.php:			$url = apply_filters( 'wcslack_new_review_url', get_comment_link( $comment_data ) );
includes/class-wcslack-events.php:			$message = apply_filters( 'wcslack_new_review_message', $message );
includes/class-wcslack-events.php:			$fields = apply_filters( 'wcslack_new_review_attachment', array(
includes/class-wcslack-events.php:			$user_name = apply_filters( 'wcslack_new_customer_name', $user_data->display_name );
includes/class-wcslack-events.php:			$prefix = apply_filters( 'wcslack_new_customer_prefix', __( 'New Customer:', 'woocommerce-slack' ) );
includes/class-wcslack-events.php:			$url = apply_filters( 'wcslack_new_customer_url', esc_url( admin_url( 'user-edit.php?user_id=' . $customer_id ) ) );
includes/class-wcslack-events.php:			$message = apply_filters( 'wcslack_new_customer_message', $message );
includes/class-wcslack-events.php:			$_product = apply_filters( 'woocommerce_order_item_product', $order->get_product_from_item( $item ), $item );
includes/class-wcslack.php:                             $locale = apply_filters( 'plugin_locale', get_locale(), $domain );
includes/class-wcslack-slack.php:			$user = ( $wrapper['name'] ) ? $wrapper['name'] : apply_filters( 'wcslack_message_username', get_bloginfo( 'name' ) );
Questions and Support
↑ Back to topHave a question before you purchase? Please fill out this pre-sales form. Already purchased and need some assistance? Get in touch with a Happiness Engineer via the Help Desk.