Setup and Configuration
↑ Back to topYou can find the setup guide on the WooCommerce Shipping & Tax page.
Set Up Shipping Labels
↑ Back to top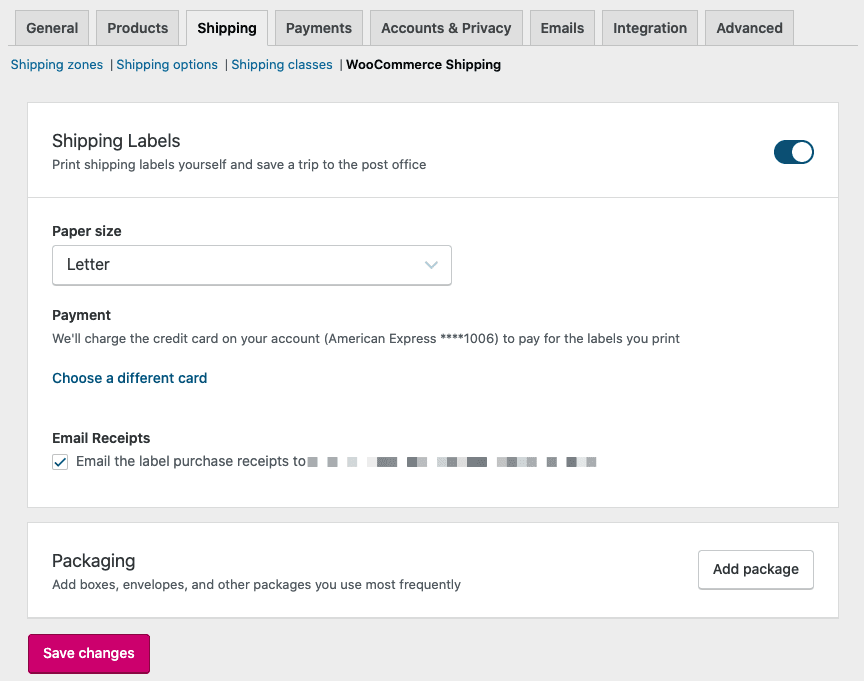
To set up Shipping Labels:
- Go to WooCommerce > Settings > Shipping > WooCommerce Shipping & Tax > Shipping Labels.
- Select a Paper size from the dropdown.
- Payment.
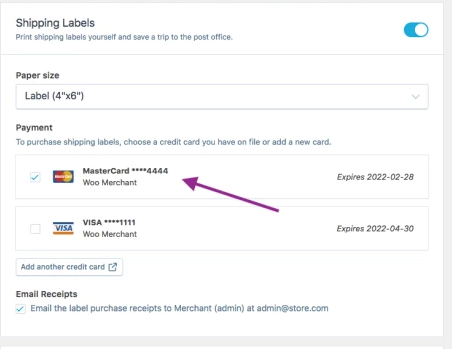
- Add a credit card, if one is not already stored on your WordPress.com account. A method of payment must be on file if you wish to print labels.
- Choose a different card, if one is on file at your WordPress.com account and you wish to use another.
- Skip this step: It’s also possible to bypass and enter nothing, and be prompted to add a payment method later when you’re ready to Print Shipping Labels (below).
- Tick or untick the box for Email Receipts.
- Save changes.
Manage Packages
↑ Back to topWooCommerce Shipping allows you to select carrier’s boxes, or define custom boxes, envelopes, and other packaging that you use for shipping.
Custom packaging
- Go to WooCommerce > Settings > Shipping > WooCommerce Shipping & Tax > Packages.

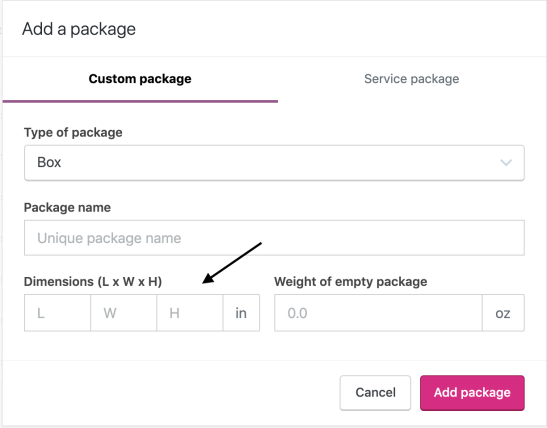
- Select Add package. The Add a Package screen displays.
- Select Type of package from the dropdown.
- Enter a Package name to identify it.
- Enter Dimensions and Weight.
- Add package.
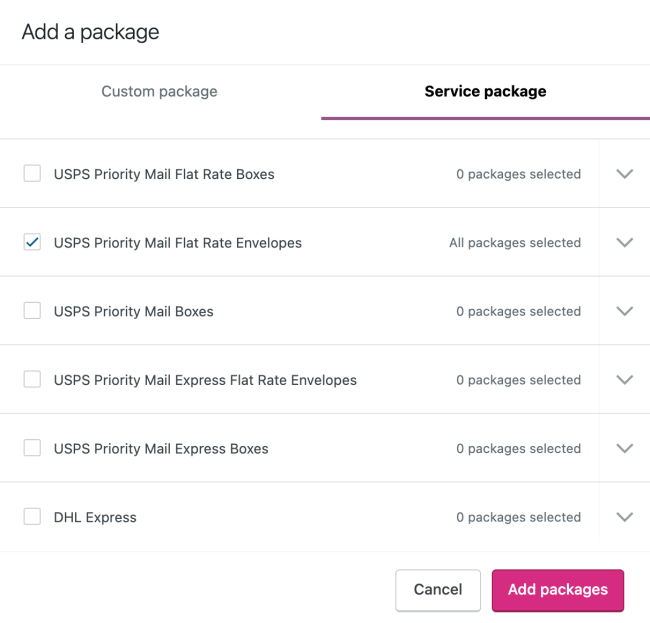
Carrier-provided packaging
You can opt to use the boxes and envelopes provided by carriers. Many carriers offer those supplies for free.
- Go to WooCommerce > Settings > Shipping > WooCommerce Shipping & Tax > Packages.
- Select Add package. The Add a Package screen displays.
- Select Service package and tick the box of one or more of the options available from the courier.
- Add packages.
Print Shipping Labels
↑ Back to topWooCommerce Shipping supports printing USPS and DHL Express Worldwide labels. A user with an Admin or Shop Manager role can create shipping labels with a payment method added to their respective WordPress.com account or by adding a new payment method as suggested here.
To print a shipping label.
- Go to WooCommerce > Orders and select an order to fulfill. On the order details screen is a Shipping Label metabox at the top:
 Most WooCommerce shipping method extensions show the rate chosen by the customer and packaging information below the order details:
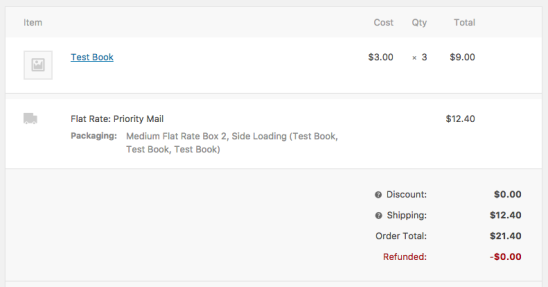
- Select Create shipping label
- Enter the full address you’re shipping from, if it’s the first time printing a shipping label. This can be a street address or PO box. Note: Typically PO boxes are only supported by postal services (such as USPS) and not by carriers (such as DHL Express). If the originating or destination addresses is a P.O. box, those carriers won’t be available as an option when printing a label. Returns to sender often cannot be done if using a PO box.
NOTE: As of March 15th, 2023, WooCommerce Shipping requires that the origin address contain the shipper’s phone number. This is a USPS and federal government requirement in identifying the individual(s) responsible for shipping a package on behalf of the organization they represent. We must register each user that prints a shipping label through WooCommerce Shipping. If the phone number is not present, merchants may see a message like:Error: The WooCommerce Shipping & Tax server returned: Bad Request Phone Number must be provided in the 'Origin address' tab. (400).
The error may be resolved by entering a phone number for the origin address as in the screenshot below:
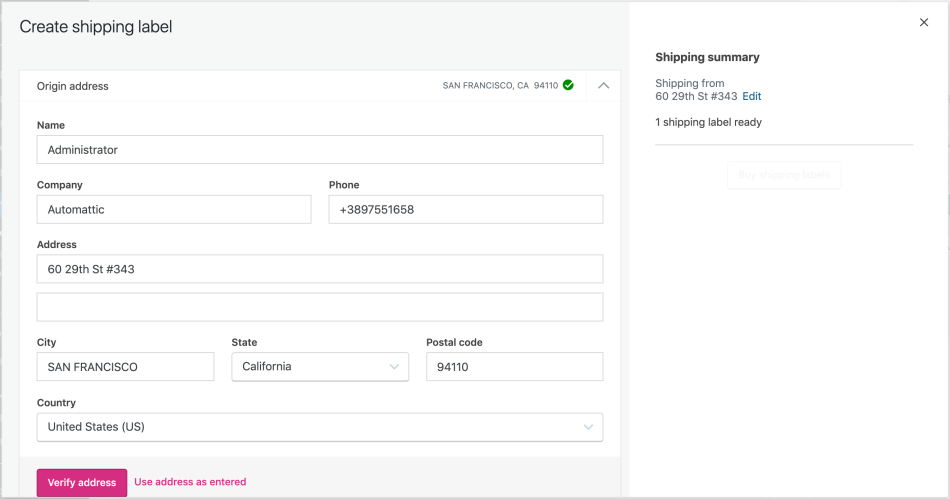
- Confirm the origin and shipping addresses, then select Verify address.
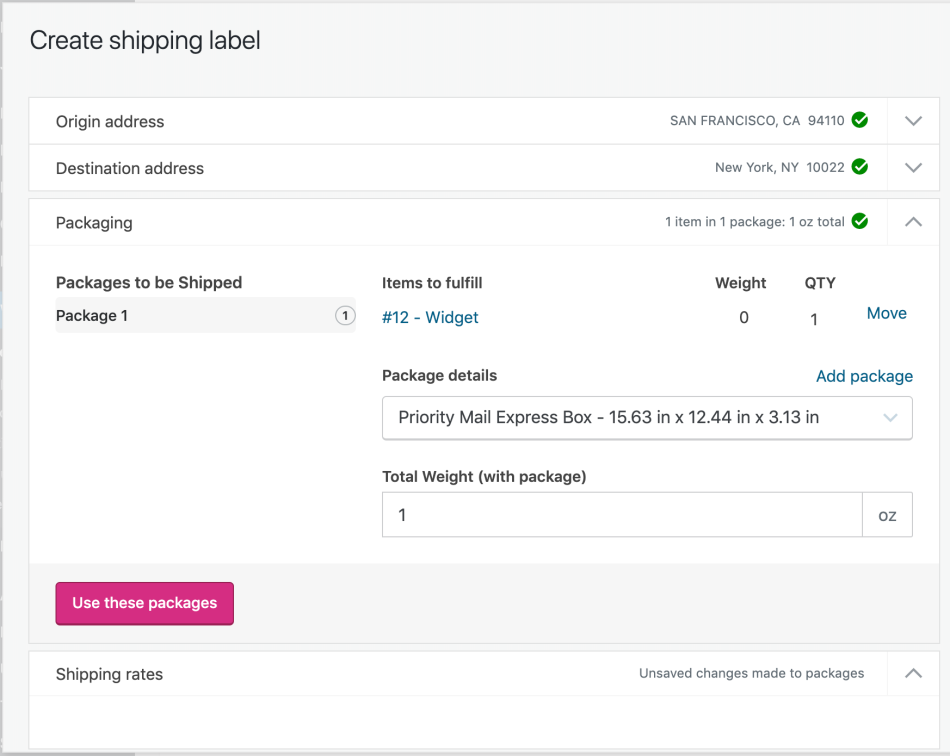
- If the order requires multiple packages, click the Move button to the right of the product(s) that should be moved to a separate package. Select between Add to a New package, Ship in original packaging, or another package (if already created), and click Submit to move the item. Confirm the Package details, or select packaging from the dropdown. Then select Use these packages.
 As of July 9th, 2023, USPS has implemented new regulations that require merchants to identify shipments of hazardous materials (HAZMAT). To ensure compliance, please follow these steps: If your shipment includes hazardous materials, choose the ‘Yes’ option under the ‘Are you shipping dangerous goods or hazardous materials?‘ question. Next, select the specific type of hazardous material from the provided dropdown menu. If you’re uncertain whether the product you’re shipping falls under the HAZMAT category, please use USPS’s search tool. WooCommerce Shipping does not currently support HAZMAT shipments through DHL Express.
 - Select Shipping Rate and whether an Adult signature is required (optional).
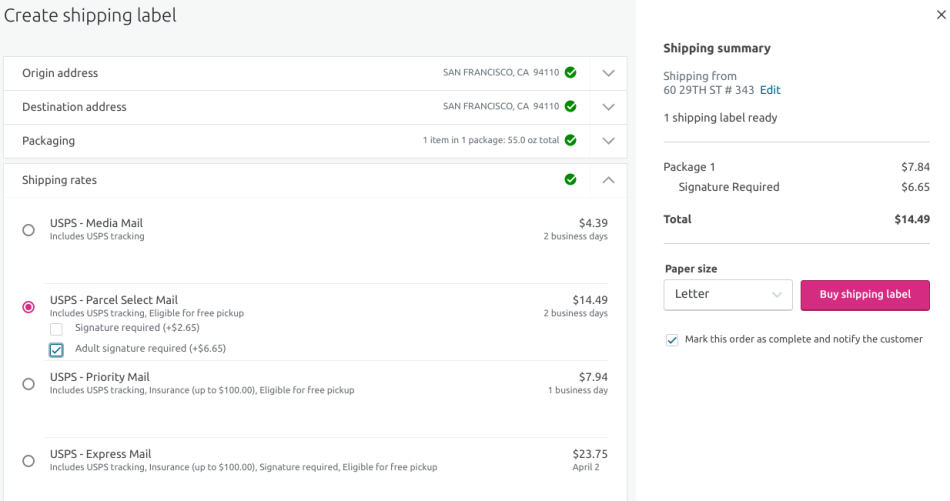
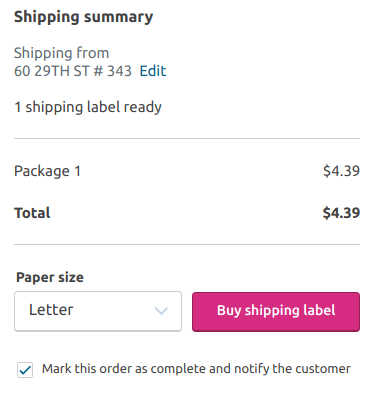
- Buy shipping labels or Add credit card. What you see depends on if you previously entered a payment method.
- Buy shipping labels: This means that you previously had a payment method on file at WordPress.com or added a credit card during setup above. You’re ready to proceed to the next step.
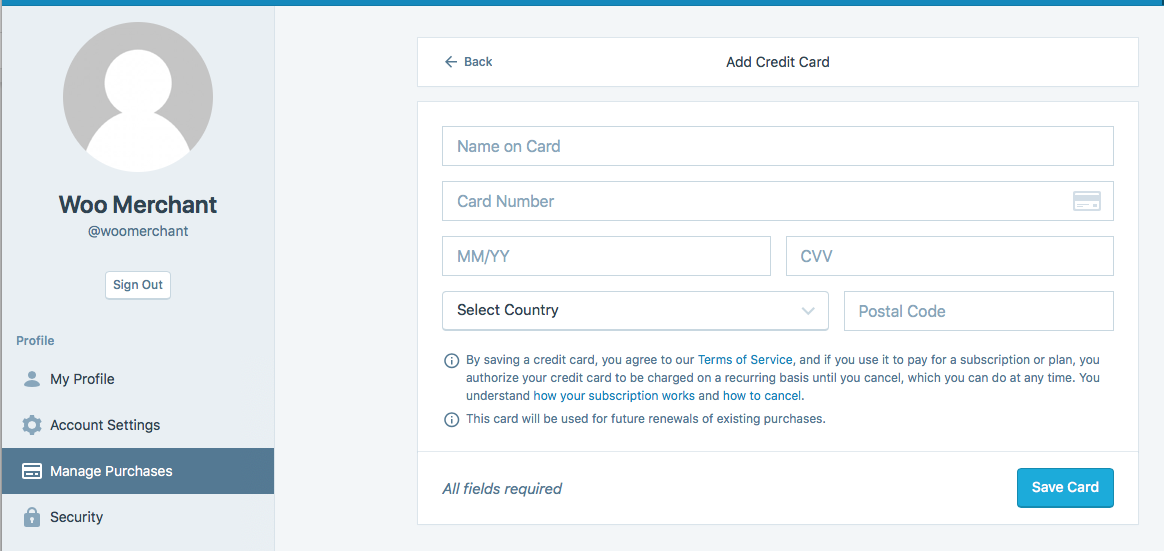
- Add credit card: This means you did not have a payment method on file at WordPress.com and skipped adding a credit card during setup.
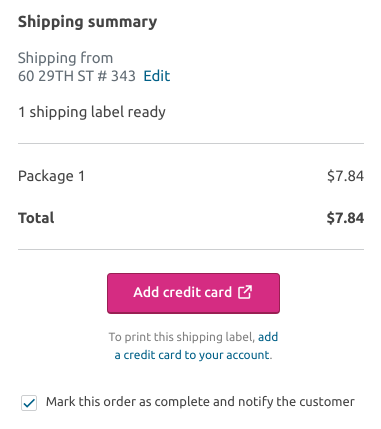
You will be taken to the Add Credit Card screen to complete all required fields and Save Card. Once a payment method is entered, the button changes to Buy shipping labels and you’re ready to proceed.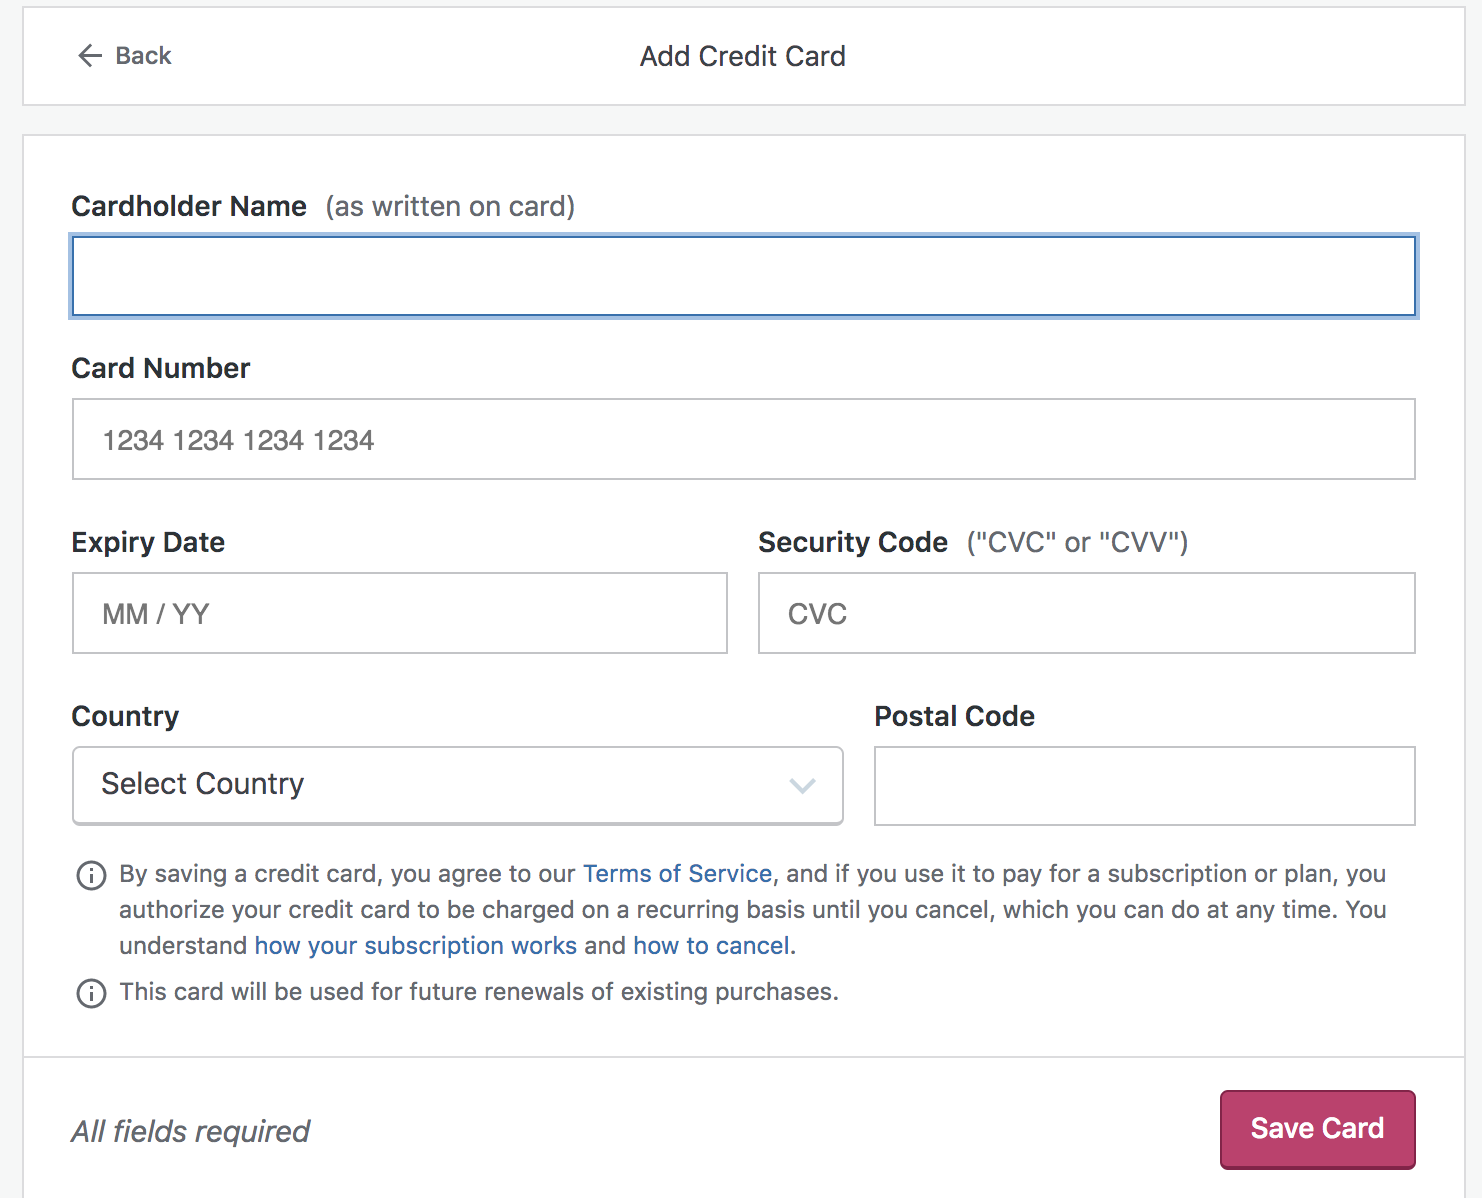
Should you change your mind later, you can Delete Card.
- Buy shipping labels: This means that you previously had a payment method on file at WordPress.com or added a credit card during setup above. You’re ready to proceed to the next step.
- View the shipping label in Print mode, after selecting Buy shipping labels and a display automatically appears. Note: Some browsers require you to select the Print button.
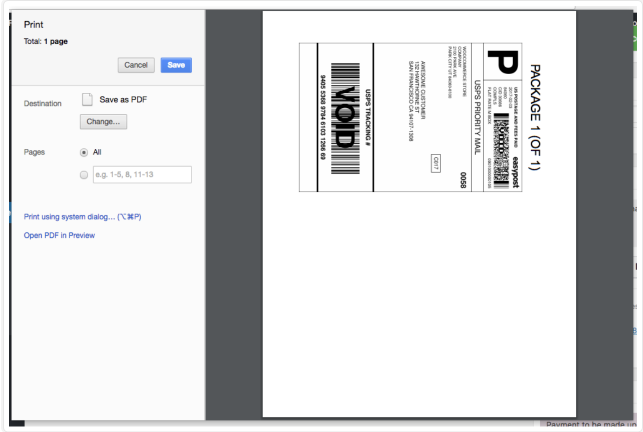
9. Print. Or Save this label and repeat the process for all Orders you’re fulfilling, then Print all at once.
Printing a label if the shipping is international
↑ Back to topIf you’re sending an international shipment there will be an extra step after you’ve selected the package size.
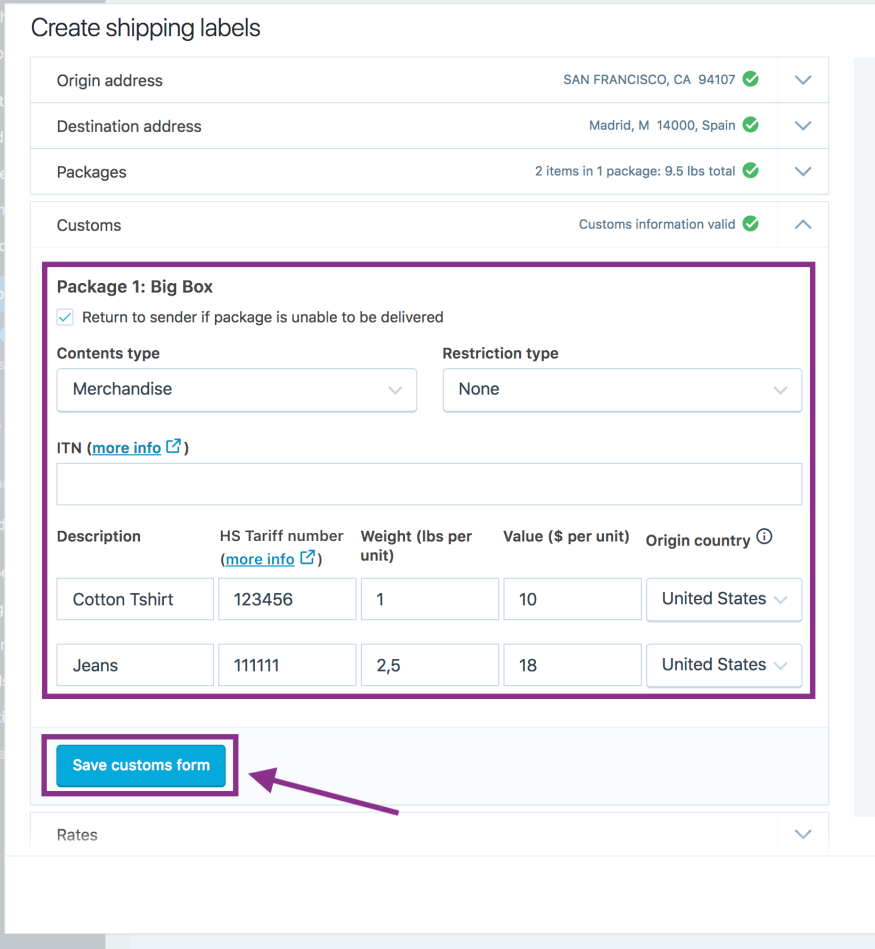
If a customs form is required, you’ll be prompted to fill the relevant information for each of the items you’re shipping, which could include the HS Tariff numbers:
Some shipments will require that you print separate customs documents.
- USPS – For certain USPS international shipments, a single shipping label will be split into three parts (proof of payment, customs declaration, and dispatch note). In those cases, you’ll need to put the three parts, in order, inside a USPS-provided window pocket.
- DHL – For countries’ non-supported countries by DHL’s Paperless Trade, you need to print the customs documents. You’ll be prompted to print the custom document right after printing your label. You can always find and print the custom documents from your order page. Select the three ellipsis menu in the Shipping Label metabox. For countries supported by DHL’s Paperless Trade, WooCommerce Shipping automatically submits your customs information electronically for supported countries. You only need to print the shipping label.
Once the custom documents printed, you’ll need to attach the documents to the package using a plastic sleeve. You can order these plastic sleeves for free from DHL and USPS (or pick them up from the post office).
Tracking information
↑ Back to topYou can find the tracking number a few ways:
- In Shipping Label metabox on the top of your order page, click on the Track Package button to find the tracking number and link.
- The Shipping Label metabox on the right display of your order page displays the tracking number for your shipment.
- The tracking number(s) will be included in the email sent to your customer when the order is marked “completed.”

First Class Mail envelopes are untracked and the label will be in a different format:
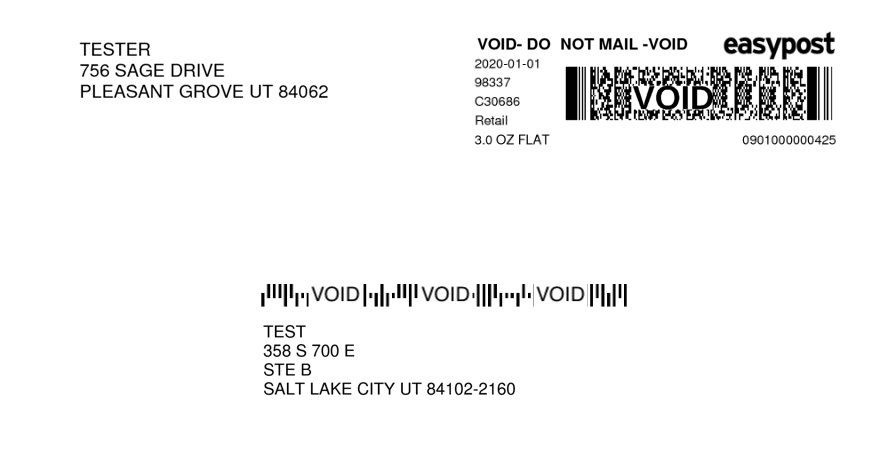
USPS First Class Mail is an untracked service, meaning that USPS won’t give anyone (not even us) tracking data on the movement of First Class Mail envelopes (including Large Envelope/Flat). However, packages include tracking. Anything with a height over 3/4 inch is considered a package by USPS.
Increasing the height of an envelope to over 3/4 inch would be a little more expensive but would include tracking.
Reprint Shipping Labels or Request Refund
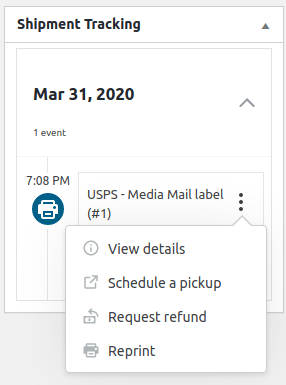
↑ Back to topReprint your label or request a refund, if necessary. When editing an order select the three ellipsis menu to see those options.
Refunds
By selecting Request refund, it will submit a request for a refund from the carrier. The carrier must approve the refund.
You can only request a refund for labels that haven’t been shipped and are still in the pre-transit (the carrier hasn’t received the package). Carriers won’t refund labels that have inducted into their network. Refunds can only be processed within 30 days of the labels being created.
Refunds will take at least 14 days to process for USPS and at least 31 days for DHL. Carriers will monitor its network for a period of time to ensure that the label didn’t end up in the mail stream.
You can find more information on USPS’s refund policy on the USPS site.
Schedule a pickup
↑ Back to topAfter printing a shipping label, in the order details look for the “Shipment tracking” box that displays your label purchase and contains the tracking number for your shipment. Select the three ellipses menu to see the options and choose “Schedule a pickup”. This will link you out to the carrier’s website where you can schedule a time.
- USPS – Free for packages when scheduled at the same time your mail is delivered by your letter carrier. For scheduling a pickup at a select time and day, you can opt for USPS’s Pickup on Demand® for a fee.
- DHL Express – Free
Label Reports
↑ Back to topReview your label purchases in one place at: WooCommerce > Reports > Shipping Labels.
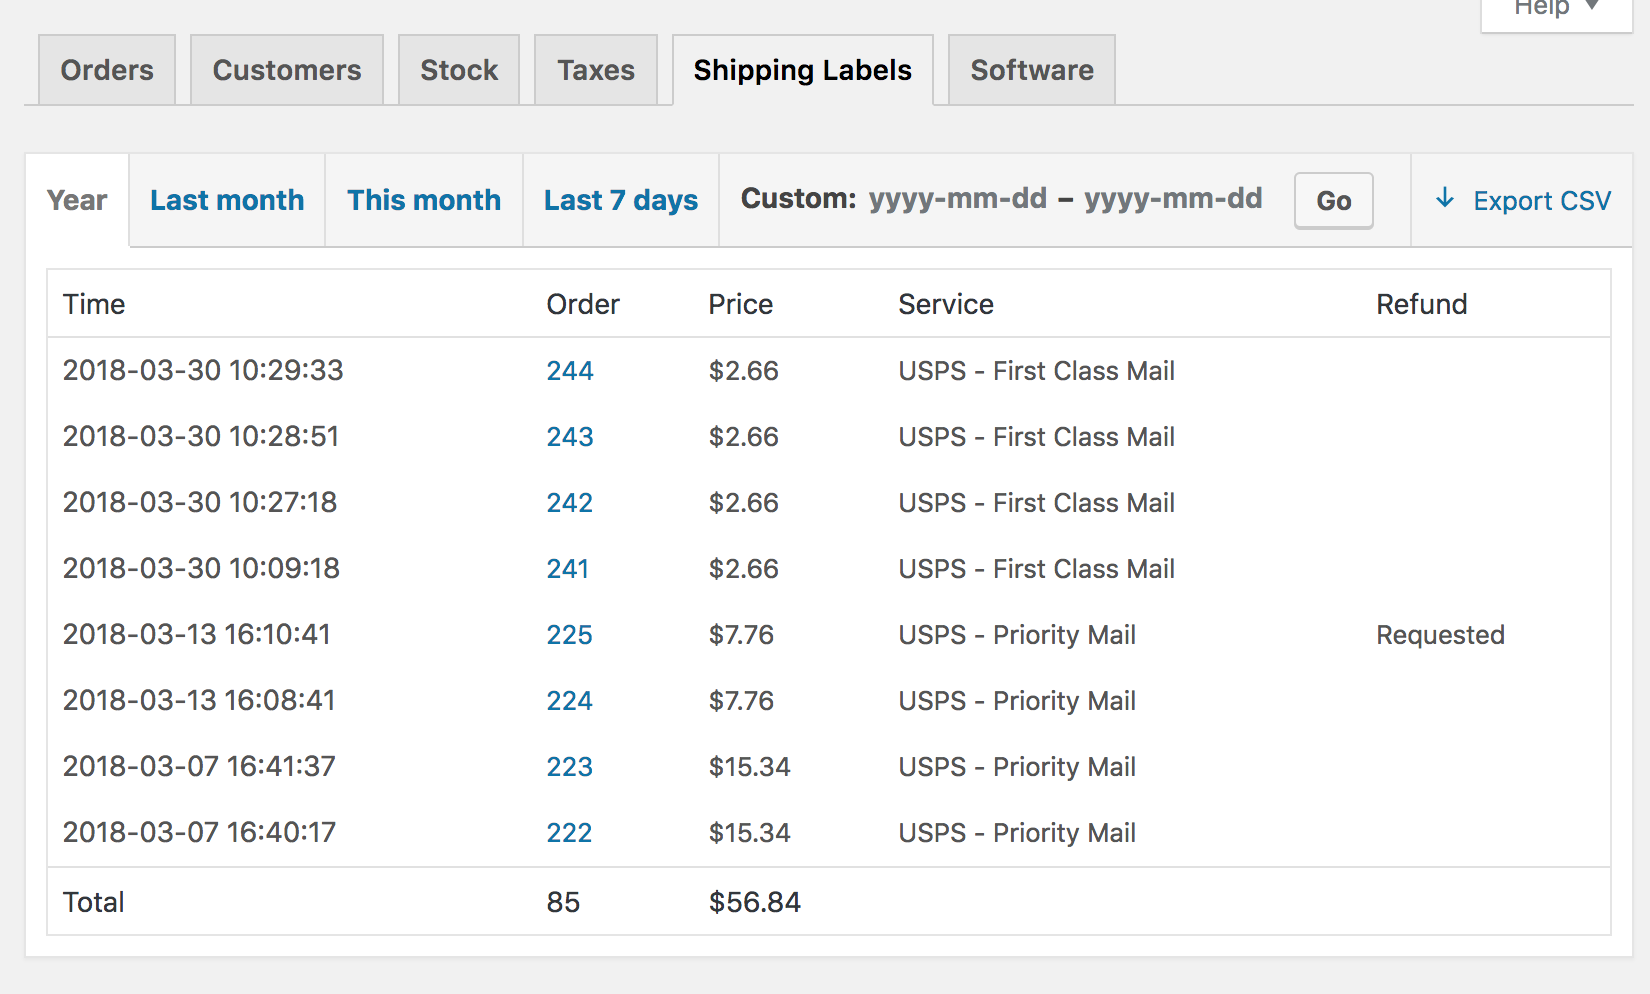
On that page, you can specify a time range for which a report should be generated and export the report as a .CSV file.
Live Shipping Rates (discontinued)
↑ Back to topLive shipping rating requires that non-virtual products have weights and dimensions set. More info at: Adding Dimensions and Weights to Products for Shipping.
To enable USPS or Canada Post live shipping rates:
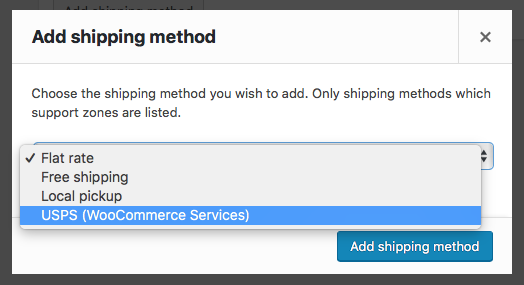
- Go to: WooCommerce > Settings > Shipping.
- Add a USPS or Canada Post shipping method to an applicable zone.
 Note: USPS is only available for stores accepting US Dollars, and Canada post is only available for stores accepting Canadian Dollars.
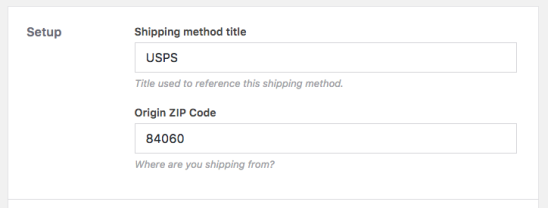
 - Name the shipping method to be displayed for your use, and enter the post code you are shipping from. The origin ZIP code will default to the value set in WooCommerce > Settings.
- Select the carrier services you want to offer. By default, Priority Mail services are selected. Enter any price adjustments, if applicable. Price adjustments can be useful to help cover your costs for shipping supplies. This will add an additional cost to the final shipping price, shown as one price to your customer.
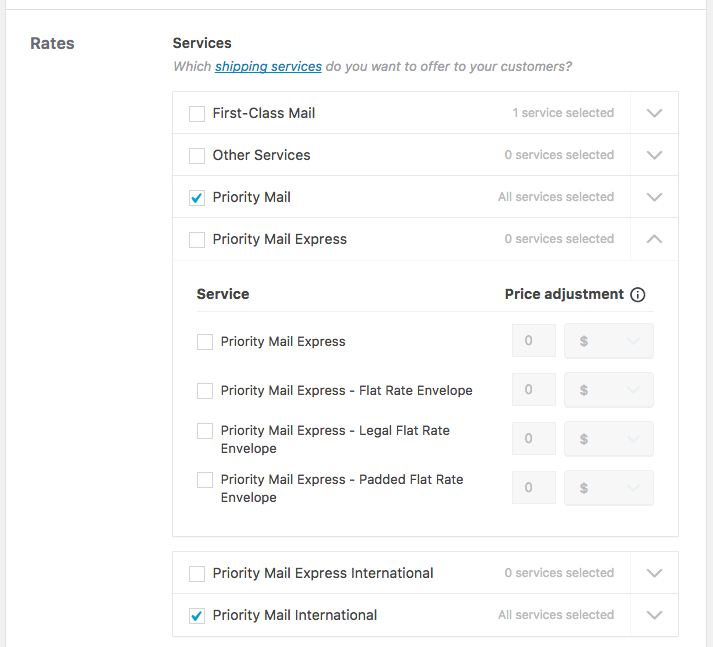
- Select which rates to offer customers.
- Enter a fallback shipping cost (optional) and what rate class you want to charge. This will allow the customer to check out if USPS can not return rates, charging the fallback rate instead.
USPS offers two shipping class rates: Retail and Commercial.
- Retail rates are the standard rates that USPS charges for shipping. This is what you would pay if you take your package to a USPS post office for shipping.
- Commercial rates are the discounted rates available via a special agreement with USPS. If you select Commercial rates, your customers are charged the agreed-upon discounted rate.
Select which rate to offer.


Select the method of box packing to use.
Troubleshooting
↑ Back to topTo diagnose issues with your WooCommerce Shipping, go to WooCommerce > System Status > WooCommerce Shipping & Tax.
If you’re experiencing issues, enable debug and/or logging.
The system status page displays issues that could cause WooCommerce Shipping stop functioning and contains helpful debug information, plus links to get further assistance.

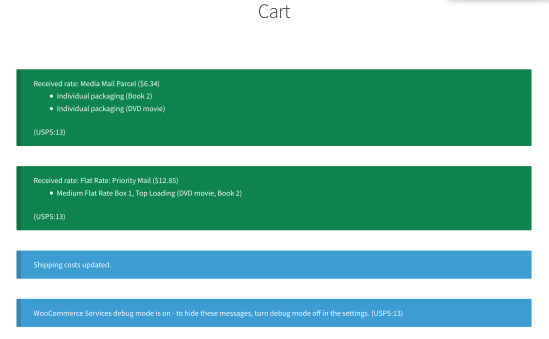
When debug is enabled, you’ll see helpful troubleshooting messages on the Cart and Checkout:
I’m asked to add a credit card to purchase labels, even though I’ve got a credit card on file.
↑ Back to topMake sure you’re logged into the correct WordPress.com account where you’ve added the credit card via WooCommerce > Settings > Shipping > WooCommerce Shipping. If you need to change the WordPress.com account connected to your site, follow this guide from our WooPayments documentation as the process is the same. You can then reconnect with the correct WordPress.com account in WooCommerce > Settings.
“Unauthorized Invalid token” error
↑ Back to top01-10-2018 @ 14:09:18 - Received (401): {"statusCode":401,"error":"Unauthorized","message":"Invalid token","attributes":{"error":"Invalid token"}}
01-10-2018 @ 14:09:21 - wcc_server_error_response Error: The WooCommerce Services server returned: Unauthorized Invalid token ( 401 ) (fetch_service_schemas_from_connect_server)
Reset the connection to WordPress.com by following this guide from our WooPayments documentation as the process is the same.
Unable to connect through Firewall
↑ Back to topIf you are using a security plugin or have a firewall, it’s possible that connections to our servers are being blocked.
An example of this case is when you encounter Unexpected server error notice when trying to print a shipping label.
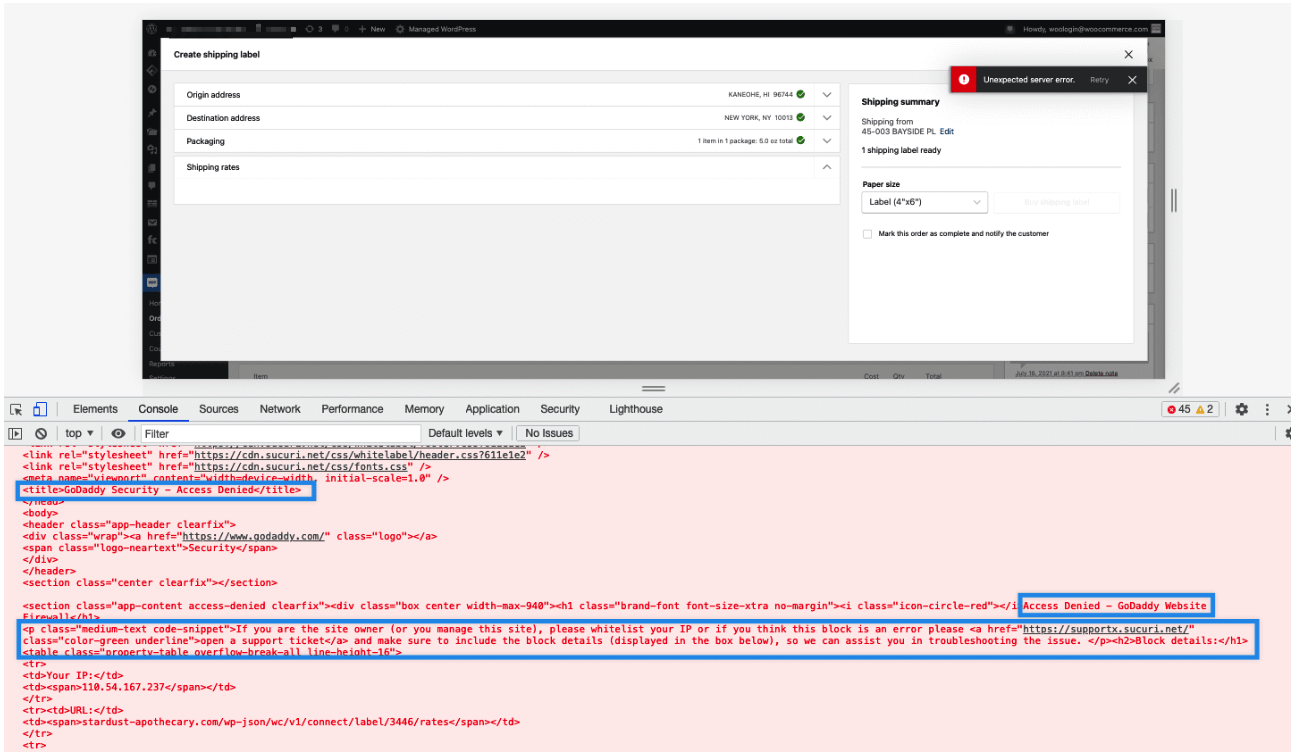
When you encounter such an error, you can usually find the reason for the error by opening the browser console window, as in the above example, Sucuri blocks the request to our server.
To resolve this, you can whitelist our server. Outgoing requests from WooCommerce Shipping & Tax plugin are only made to api.woocommerce.com, this is currently the IP address: 192.0.96.246.
If you’re unsure how to do that, you can reach out to the security plugin developer or your hosting support to ensure that our IP address is whitelisted.
The Create Shipping Label button is missing from the Order Details screen.
↑ Back to topThe “Create shipping label” button will show if the following is true:
- Your store is in the United States (including Puerto Rico, Virgin Islands, and other U.S. territories)
- Your store currency is US Dollars
- At least one product in the order “needs shipping” according to WooCommerce (typically means a non-virtual product)
If your order meets the criteria outline above and you still aren’t seeing the “Create shipping label” button, please create a ticket containing the relevant order data so we can help diagnose the issue.
This address is not recognized. Please try another.
↑ Back to top
You may encounter this error when printing shipping labels. This means that we were unable to verify the address with USPS – it may have been entered incorrectly, or isn’t considered “deliverable” by the post office.
Use the USPS zip code lookup tool to verify the address. If it’s not recognized, we recommend reaching out to your customer.
If the tool recognizes the address there may be an issue with WooCommerce Shipping. Please open a ticket with the relevant address information so we can look into it.
Shipping Rates are not returned
↑ Back to top
Several things can prevent shipping rates from being calculated, including problems with the USPS API service. Most issues can be diagnosed by looking at the Debug Log at WooCommerce > Status > WooCommerce Shipping & Tax.
Product is missing weight or dimensions
↑ Back to top
01-15-2018 @ 18:15:49 - Error. Unable to get shipping rate(s) for wc_services_usps instance id 25. (calculate_shipping)
01-15-2018 @ 18:15:49 - product_missing_weight Product ( ID: 37 ) did not include a weight. Shipping rates cannot be calculated. (calculate_shipping)
Solution: Ensure that your products have weight and dimensions, then try again.
USPS or Canada Post shipping method is missing.
↑ Back to top
If you don’t see the USPS or Canada Post shipping methods when adding a method to a zone, check your store’s currency setting. USPS is restricted to stores using US Dollars, and Canada Post is restricted to stores using Canadian Dollars.
Note: you may need to refresh your WooCommerce Shipping data after changing currencies. Go to WooCommerce > Status > WooCommerce Shipping & Tax and click Refresh.
No USPS service available to Nigeria and Ghana.
↑ Back to topThe USPS PC provider that WooCommerce Shipping uses restricts shipments to Nigeria and Ghana. However other carriers don’t have these restrictions. You can also ship to these countries by going directly to the post office.
Frequently Asked Questions
↑ Back to topWhy do I need to connect to WordPress.com?
↑ Back to topWe connect to your WordPress.com account to authenticate your site and user account so we can securely charge the payment method on file for any labels purchased. You can read our Terms of Service here.
Why do I need to enter my credit card?
↑ Back to topWooCommerce Shipping requires a credit card to purchase shipping labels.
Do I need special paper or a specific printer to print labels?
↑ Back to topNot at all! You can print shipping labels via WooCommerce Shipping on any 8.5 x 11 in paper, and then attach it directly to your package. Or if you have a thermal printer setup you can use those 4 x 6 in labels.
Any printer will work for printing labels on 8.5 x 11 in paper. You can also use a thermal printer to print on 4 x 6 in labels but it’s not necessary for printing shipping labels with WooCommerce Shipping.
How do I order free supplies from carriers?
↑ Back to topMany carriers offer free shipping supplies to be used when shipping with them. For your convenience, many of those packages are already prepopulated in the WooCommerce Shipping settings.
USPS – You can order free shipping supplies directly from USPS’s website.
DHL – You can order free shipping supplies by clicking here – it will open a template email for you to complete and send your order to DHL Express.
Check the carrier’s usage policy as some packaging is for a specific shipping service or associated with a set flat-rate.
How to provide customers with a return shipping label for products to be returned
↑ Back to topWhile the plugin does not include an option to specifically print a “return label”, you can print multiple labels from within the same order.
To create a return shipping label you will have to get in touch with the customer to get their address, which will be the new origin address for the package. It is also important that you get the correct dimensions and weight of the package that the customer will use to send you back the products, as that will influence the price that you pay for shipping.
Once you have those details, on the order page, select to print a new label. Then follow the steps described in the following section to update the origin address, which is where you will enter the address provided by the customer. The destination address has to be the address where you will receive the returned package.
How to update Origin Address
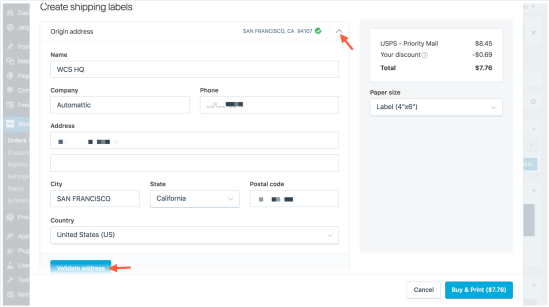
↑ Back to topOn the order details page, click Create shipping label

The label appears pre-filled. Click the arrow to expand the section at the top, Origin address
Update your details, and click Validate address to save. These details will be saved for use on future purchases.
Bulk actions cannot be selected.
↑ Back to topThis is a result of WooCommerce Shipping not being fully configured yet. Enable Jetpack and connect the site to have bulk actions enabled again.
Is it possible to auto-create a USPS manifest?
↑ Back to topAt this time, no. It would need to be compiled manually. Postal service workers requesting a manifest typically happens in December, prompted by the holidays when sending/delivering packages is at its height, and speed in processing becomes central.
What are the HS Tariff Numbers?
↑ Back to topHS (Harmonized System) is an internationally standardized system of names and numbers to classify products. It’s used by Customs agencies all over the world. You can fill in the HS tariff number for every product on every international shipment you make.
Although the HS Tariff number is not usually required, we recommend using the tariff codes to avoid certain scenarios, especially if you are shipping to a country that follows European Union (EU) customs rules:
- Delays: Not classifying your products will cause the importing country to spend time manually classifying them on their end.
- Denials: Each importing government has its own unique restrictions in place to protect local markets. While there are some products that are perfectly fine to export in one market, they might very well be denied in another.
To fill in the HS Tariff numbers on your Customs declaration, you’ll need to look up the tariff numbers associated with whatever products you are shipping. You can search for them on hts.usitc.gov. Though some codes may be longer, you only need to include the first six digits.
Can I buy and print shipping labels for US domestic and international packages?
Yes! You can buy and print USPS shipping labels for domestic destinations and USPS and DHL shipping labels for international destinations. Shipments need to originate from the U.S.
Can I get discounts on labels?
↑ Back to topYes. You automatically get the cheapest USPS shipping rates (up to 90% off retail rates) and heavily discounted DHL shipping rates (up to 65% off retail rates). These rates will automatically be available when buying labels via WooCommerce Shipping.
DHL: Undelivered and unacceptable shipments
↑ Back to topA shipment might be unacceptable or undelivered if they don’t follow DHL Express terms and conditions of Carriage. There are several conditions that make a shipment unacceptable:
- required customs declaration isn’t made
- it contains prohibited items
- its packaging is defective or inadequate
- receiver fails to pay owed duties and taxes – Your customer will receive an email notification if duties and taxes are owed on the package.
- its shipping address is incorrect or not properly marked – DHL Express will contact your customer or you for more information.
What items are prohibited from being ship?
↑ Back to topCarriers prohibit and restrict certain items to be shipped, and it will vary by carrier and destination. It’s your responsibility to review those regulations.
- USPS Domestic or International Shipping Prohibitions & Restrictions
- DHL Express Terms and Conditions of Carriage (see section 2: Unacceptable Shipments)
How do I submit an insurance claim for lost or damaged shipments?
↑ Back to topFor USPS shipments, you can submit a claim directly with USPS. For DHL shipments, you can submit a claim by emailing us all of the following information:
- Tracking number.
- Copy of the waybill, if available.
- Documentation supporting the amount claimed- e.g. a vendor/supplier invoice and a retail invoice.
- If an item was purchased or sold via the Internet, documentation of that transaction is required e.g a PayPal receipt.
- Serial numbers, identifying marks, or other information unique to the specific item(s) claimed.
- Indicate if the claim is for missing content, lost shipment or damaged item.
- Description of the missing content, lost shipment or damage (attach photos if available). Include, the serial number or identifying mark, the number of units, and the claim amount for each item.
Note that DHL insurance coverage is limited and outlined in DHL’s Terms and Conditions.
Questions and Support
↑ Back to topDo you still have questions and need assistance?
- Get in touch with a Happiness Engineer via our Help Desk. We provide support for extensions developed by and/or sold on WooCommerce.com, and Jetpack/WordPress.com customers.
- If you are not a customer, we recommend finding help on the WooCommerce Support Forum or hiring a WooExpert agency. They are trusted agencies with a proven track record of building highly customized, scalable online stores. Learn more about WooExpert agencies.