Heads up! We’re merging this plugin with our WooCommerce Customer / Order / Coupon Export plugin, which supports both XML and CSV exports. Click here to learn more about this plugin.
If you are a current WooCommerce Customer / Order XML Export Suite user and want to migrate now, please contact WooCommerce support to request an early migration to the new plugin.
Want to export your orders to the Stamps.com desktop client? Check out the Stamps.com XML File Export extension instead!
↑ Back to top
The WooCommerce Customer / Order XML Export extension exports customers or orders into an XML file. Export individual orders, multiple orders with a bulk action, or even all orders with the bulk export tool. Customers can be exported via the manual export tool as well.
Orders and customers can be automatically exported to XML and uploaded to a remote server via FTP, HTTP POST, or sent via email, which is helpful for fulfillment systems that require automated uploads. Export processes take place asynchronously on your site, meaning you can export thousands of records at once, and you can continue with site management while your export happens in the background.
This plugin requires WordPress 4.4 or newer to export data from WooCommerce.
↑ Back to top
You can use a built-in export format for your order or customer records, or you can create a custom format for your XML file by selecting which information should be included.
Below are some sample XML files generated by the extension so you can see the built-in export formats available and compare formats.
Legacy Formats represent formatting for all versions prior to 2.0 for backwards compatibility.
The extension is very flexible and the output can be customized or replaced entirely with your own specific format. Learn more in the developer documentation.
↑ Back to top
Both order and customer XML exports are processed asynchronously in the background on your site. This means that you can begin an export, and it will process as you continue to work on other things. These exports are batch-processed to prevent timeouts, letting an export churn through thousands of records while you continue working on your site. You can even leave your site completely and exports will continue to process, waiting for you to return to download them.
If you start a manual export, you’ll be notified of it beginning, and can wait for the process to complete if desired. Typically for exports of a couple hundred rows or less, this process will occur quickly (less than 10 seconds).
If you wait for the export process to complete, your file download will begin automatically, and you’ll see a notification that the process has completed.
If you don’t want to wait for the export, that’s okay too! You can leave the page to continue working, or leave the site completely. As soon as the export has completed, you’ll receive a notification that your file is ready, and can be downloaded from the “Exports List”. If you’ve left the site, this will be shown to you upon your return.
Export Completed Notice
You can then access any manually or automatically-generated file export from the “Exports List” to download or transfer it. You’ll also see jobs in progress or queued if they’re ready to begin, and see the transfer status of automatic exports.
Export List
This list will keep export records for 14 days, after which they’ll automatically be removed.
If your site is not capable of processing exports in the background, this is due to your hosting configuration, and you’ll need to reach out to your hosting provider to resolve this. You’ll see a notice on the plugin settings to inform you of this.
You will not be able to process automated exports if your host does not support background processing. In the meantime, you can enable the “Batch Processing” setting. This will require you to stay on the page for manual exports, but will provide an alternate way of exporting orders and customers until your host resolves background processing on the site.
↑ Back to top
Both customer and order XML exports can allow you to set a custom export format, or use a built-in format instead. Custom formats are useful if you need to re-order fields, remove fields, or add fields for order or user meta. You can then use this format for your manual and automatic exports.
To use a custom format, be sure this format is selected under the “Export Format” settings for orders or customers.
You can view your custom formats settings from WooCommerce > XML Export > Custom Format, and switch between the “Orders” and “Customers” section to customize your format for each.
Build Custom Format
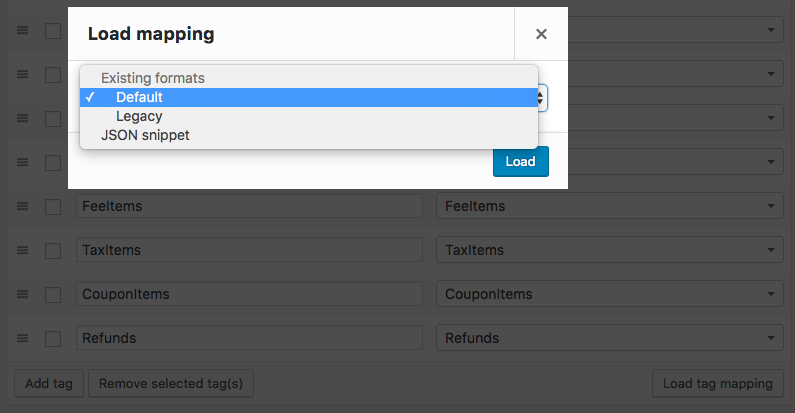
You can build this format manually, or you can click Load Column Mapping in the bottom-right corner. This will let you load one of the pre-built order or customer formats as a starting point, which you can then modify.
Load Built-in format
↑ Back to top
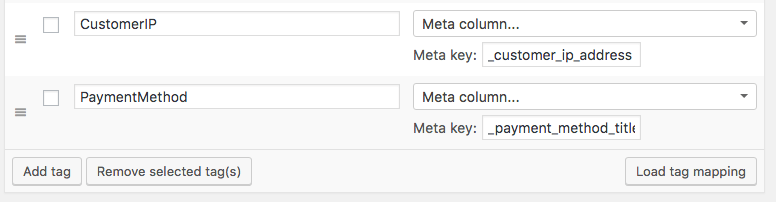
You can add columns for meta to both custom order and customer formats (advanced usage). This can let you add dedicated columns for order meta, or for user meta in customer exports.
You must know the correct meta key for the data and use it when adding a column for meta.
If you’re not sure, running an export with “add all meta” enabled will add columns for each meta key, which should help you determine the meta key for the data you want (it will be the column name).
Add Custom Meta Tags
↑ Back to top
You can also add columns for static information to custom order and customer formats, which will allow you to add blank columns, or columns with a set value for all rows, such as store name.
To add a static value, select “Static value” for the data source, then enter the information that should appear in each row of the export.
Add static values
↑ Back to top
The custom export formats do have some settings you can configure as well.
Indent output – Enable this to pretty print the XML with indents. Useful if a human is reading the XML instead of a machine, can be disabled otherwise.
Include all meta – Enable this to add all order or user meta to the export, one tag per meta key (this will include hidden meta)
After configuring settings, you can load or add the fields as desired for each custom export format.
↑ Back to top
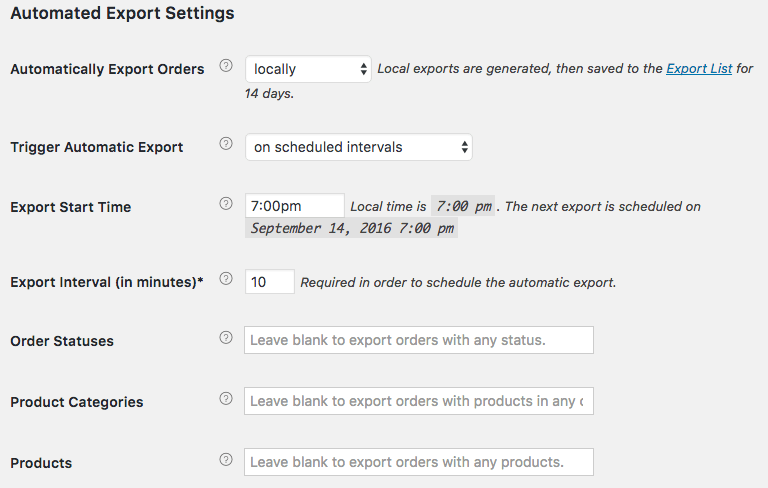
Go to WooCommerce > XML Export > Settings > Orders to configure order export settings and optionally setup your FTP, HTTP POST, or email export information for automated exports.
Order export settings
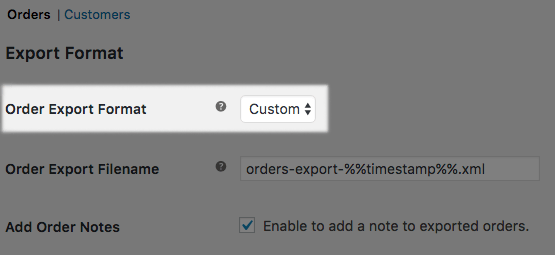
Export Format – Change the format for your order exports. The export formats are:
Default – This format was added in version 2.0 and includes detailed order export information.
Legacy – This format was used in the plugin prior to version 2.0; we recommend using the default for new installations.
Custom – This format will use the field mapping you’ve created under the “Custom Formats” tab for the order export.
You can view sample export files for formatting to choose the best export format for your needs.
Order Export Filename – Change the name of the filename that is exported. You can use %%timestamp%% to represent the date / time (in YYYY_MM_DD_H_S format), and %%order_ids%% to include a dash-separated list of the order IDs exported in the file.
Add Order Notes – Enable this to add a note to orders when they’re exported. This note will only be added the first time an order is exported, and is not added for subsequent exports.
Batch Processing – Uses batch processing for manual order exports instead of processing these asynchronously. Can be used when background processing is not supported, but requires you to keep the page open while running an export.
You can also determine if you’d like to set up automated order exports from this settings.
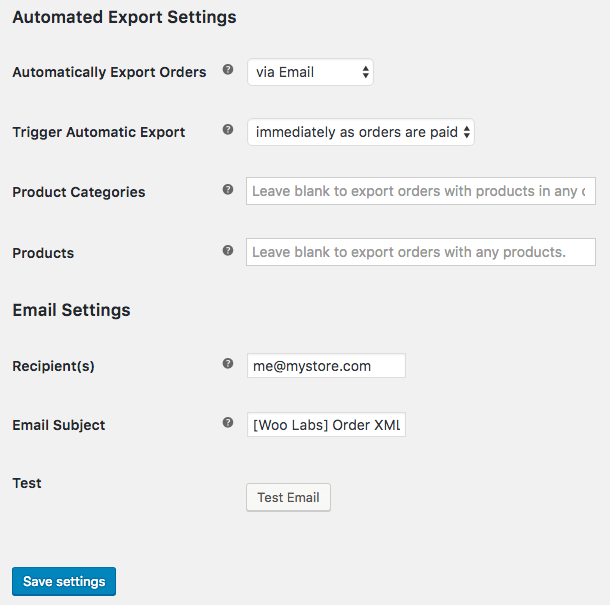
Automatically Export Orders – Select an auto-export method to automatically export un-exported orders on the recurring interval set. Auto exports only include “new” (non-exported) orders with each run.
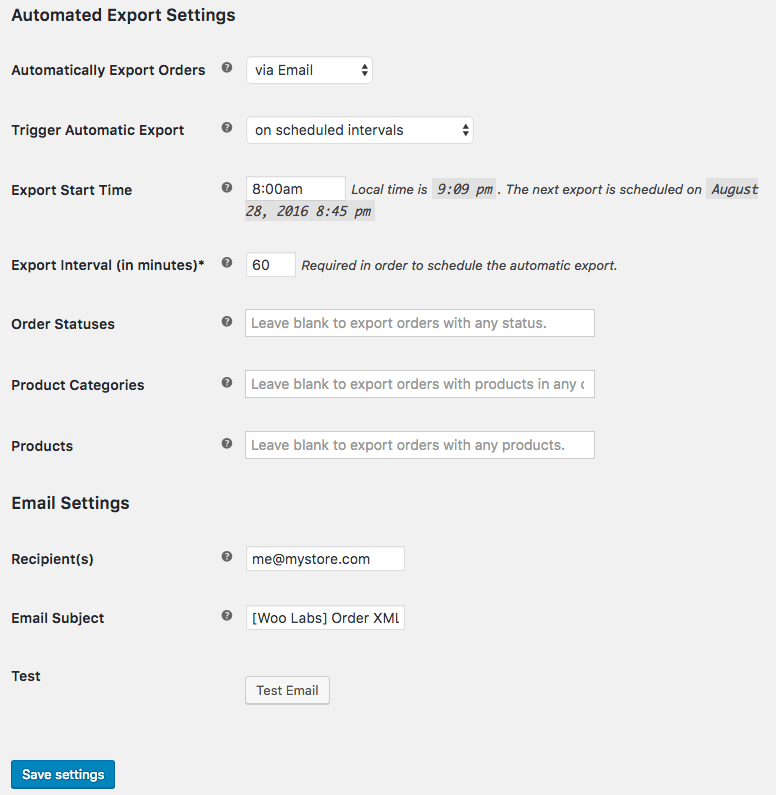
Trigger Automatic Export – Determine whether auto-exports should happen for each order after it’s marked “paid”, or if exports should happen on a defined schedule.
Export Start Time – (If exports are scheduled) Choose the start time for automatic order exports. The next export will run at the chosen time and continue on the recurring interval set.
Export Interval – (If exports are scheduled) Choose the interval for automatic order exports. The default is 30 minutes.
Order Statuses – Select the order statuses that should be automatically exported. For example, if you only want processing and completed orders to be exported, use the multi-select box and click on “Processing” and “Completed”. Leave this blank to export new orders with any status.
Product Categories – Select product categories for automated exports. This will only include orders that contain products from the selected categories. Leave this blank to export new orders with any product category.
Products – Select products for automated exports. This will only include orders that contain the selected products. Leave this blank to export new orders with any product.
Email Settings (Orders)
Recipient(s) – Enter recipient email address(es) to receive the XML export. Separate multiple addresses with commas. Defaults to site admin email.
Email Subject – Enter the subject of the Export email. Defaults to [Store Name] Order XML Export.
Test – Once you save your email settings, you can send a test email with a dummy XML file to check your settings.
Local Exports (Orders)
Local auto-exports have no specific settings; these files are generated and simply saved for 14 days in your “Export List” without being transferred.
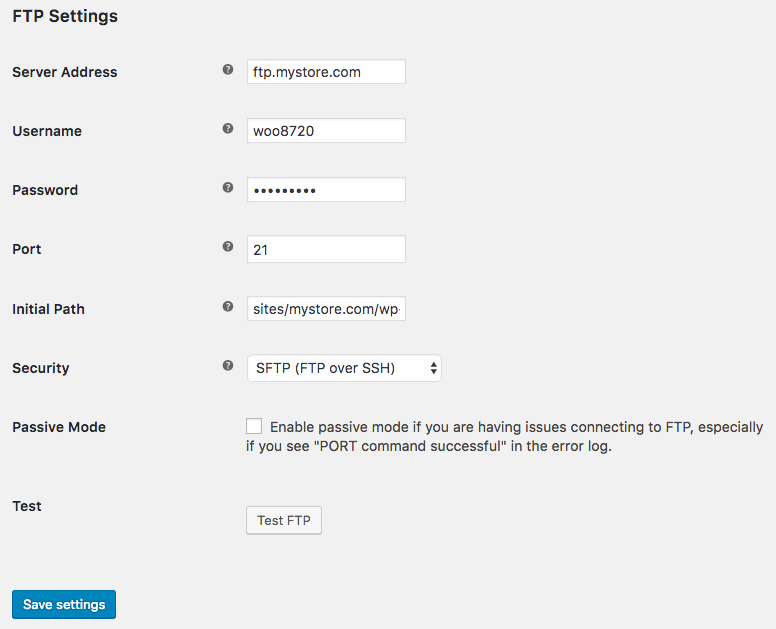
FTP Settings (Orders)
Server Address – Enter either an IP address or hostname for the FTP server
Username – Enter the username for the FTP server
Password – Enter the password for the FTP server
Port – Enter the port to connect to for FTP. This should be port 21 for regular FTP, 22 for SFTP, and 990 for FTP with Implicit SSL
Initial Path – Enter the initial path to change to before uploading the export file. The initial path already includes a leading slash so do not include one. It does require trailing slash. For example, to upload to a “test” folder, you would enter test/. If you are connecting via SFTP, the initial path needs to be a full path to the folder if the username you are connecting with does not default to the HOME directory
Security – Choose the type of security for the FTP server. Ask your FTP provider if you’re unsure what to select.
Passive Mode – Enable this to turn on passive mode for FTP connections. This should be unchecked unless you are having issues connecting, especially if you are seeing the “PORT command successful” message followed by a timeout in the error log
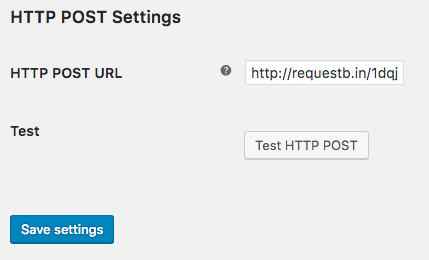
HTTP POST Settings (Orders)
HTTP POST URL – Enter the URL to which you want to POST the exported CSV.
↑ Back to top
Go to WooCommerce > XML Export > Settings > Customers to configure customer export settings and optionally setup your FTP, HTTP POST, or email export information for automated exports.
Customer export settings
Customer Export Format – Select the format for your customer exports. The export formats are:
Default – This format was added in version 2.0 and includes detailed customer export information.
Legacy – This format was used in the plugin prior to version 2.0; we recommend using the default for new installations.
Custom – This format will use the field mapping you’ve created under the “Custom Formats” tab for the customer export.
Customer Export Filename – Change the name of the filename that is exported. You can use %%timestamp%% to represent the date / time (in YYYY_MM_DD_H_S format).
Batch Processing – Uses batch processing for manual order exports instead of processing these asynchronously. Can be used when background processing is not supported, but requires you to keep the page open while running an export.
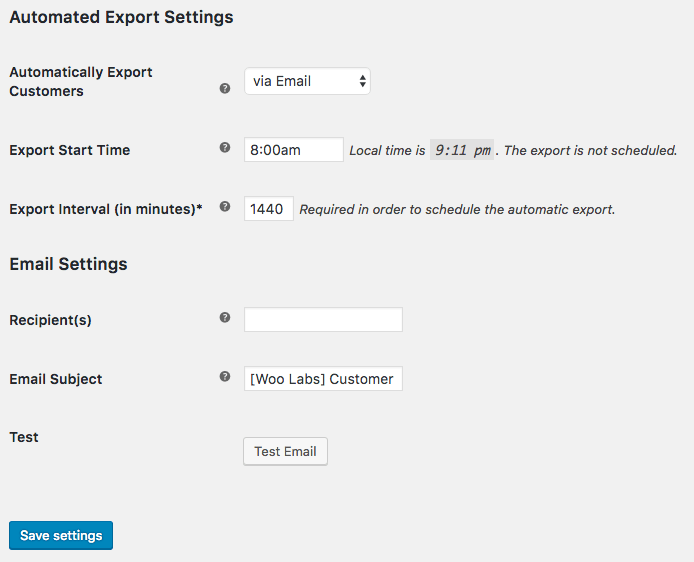
Automatically Export Customers – Select an auto-export method to automatically export un-exported customers on the recurring interval set. Auto exports only include “new” (non-exported) customers with each run.
Export Start Time – (If exports are scheduled) Choose the start time for automatic customer exports. The next export will run at the chosen time and continue on the recurring interval set.
Export Interval – (If exports are scheduled) Choose the interval for automatic customer exports. The default is 30 minutes.
Email Settings (Customers)
Recipient(s) – Enter recipient email address(es) to receive the XML export. Separate multiple addresses with commas. Defaults to site admin email.
Email Subject – Enter the subject of the Export email. Defaults to [Store Name] Order XML Export.
Local Exports (Customers)
Local auto-exports have no specific settings; these files are generated and simply saved for 14 days in your “Export List” without being transferred.
FTP Settings (Customers)
Server Address – Enter either an IP address or hostname for the FTP server
Username – Enter the username for the FTP server
Password – Enter the password for the FTP server
Port – Enter the port to connect to for FTP. This should be port 21 for regular FTP, 22 for SFTP, and 990 for FTP with Implicit SSL
Initial Path – Enter the initial path to change to before uploading the export file. The initial path already includes a leading slash so do not include one. It does require trailing slash. For example, to upload to a “test” folder, you would enter test/. If you are connecting via SFTP, the initial path needs to be a full path to the folder if the username you are connecting with does not default to the HOME directory
Security – Choose the type of security for the FTP server. Ask your FTP provider if you’re unsure what to select.
Passive Mode – Enable this to turn on passive mode for FTP connections. This should be unchecked unless you are having issues connecting, especially if you are seeing the “PORT command successful” message followed by a timeout in the error log
HTTP POST Settings (Customers)
HTTP POST URL – Enter the URL to which you want to POST the exported CSV.
↑ Back to top
Both orders and customers can be exported manually at any time. Any manually-triggered export will still be processed asynchronously unless you’ve enabled Batch Processing in the settings. Manual exports will be available in the export list when the export has been processed. If the export happens asynchronously, you can wait for the file to download, or continue working until you get a “job completed” notice.
The bulk export tool lets you export several orders or customers at once. You can access the bulk export tool via WooCommerce > XML Export > Export and selecting “Orders” or “Customers” for your export type.
When exporting customers, you can export all customers, or select a start and end date range to get customers whose registration / first purchase was in the given date range.
Export Tool: Customers
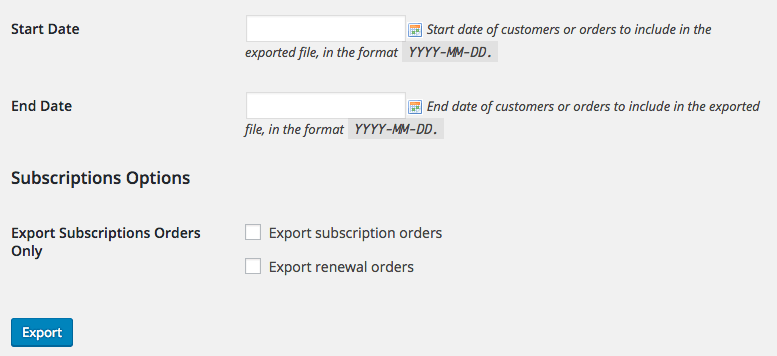
When exporting orders, you have more options to configure to get the order list you need.
Export Tool: Orders
Order Statuses – Select the order statuses that should be exported. For example, if you only want processing and completed orders to be exported, use the multi-select box and click on “Processing” and “Completed”. Leave this blank to export orders with any status.
Product Categories – Select product categories for the export. This will only include orders that contain products from the selected categories. Leave this blank to export orders with any product category.
Products – Select products for the export. This will only include orders that contain the selected product(s). Leave this blank to export orders with any product.
Start Date – Enter a start date for the export. This will only include orders placed after the start date. Leave blank to include all orders.
End Date – Enter an end date for the export. This will only include orders placed before the ned date. Leave blank to include all orders.
Finally, if WooCommerce Subscriptions is enabled, you’ll see a Subscriptions Options section added. This will allow you to export subscription orders, renewal orders, or both without any “regular” orders included. This does not export subscription records from the “Subscriptions” list; this is more like an “order filter” for subscription purchases instead.
↑ Back to top
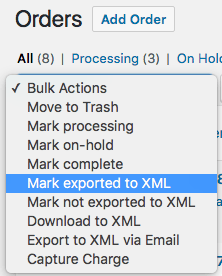
You can also trigger order exports from your Orders list. The “export” action will let you quickly export an un-exported order, while the “bulk export” action for orders will export all selected orders.
Single Order Export Action
Order Bulk Actions
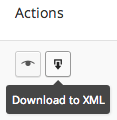
While viewing a single order, you’ll also have a “download to XML” action for the order.
↑ Back to top
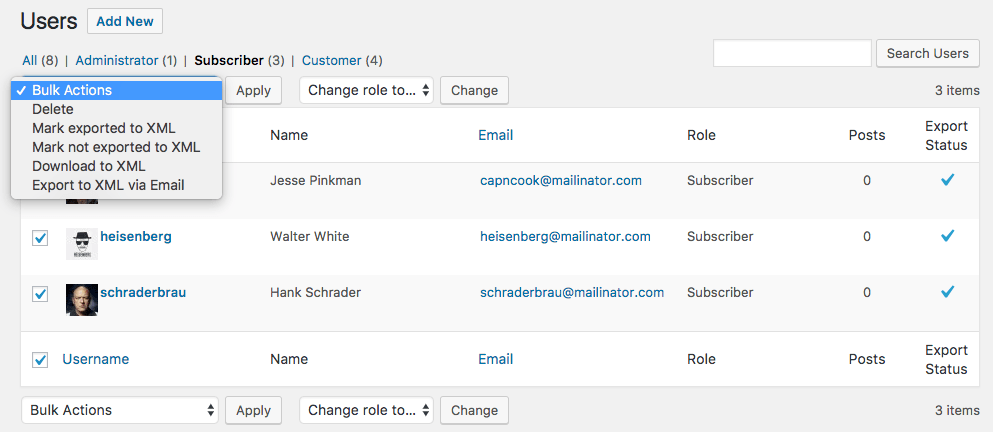
Customer exports can be triggered from the WordPress “Users” list, letting you export a list of customers via bulk action (helpful if you want to export for a certain user role).
↑ Back to top
Order and customer bulk actions, along with order single actions, will allow you to select an “Export to XML via {method}” action if you have auto-exports configured. This can let you manually trigger an FTP, Email, or HTTP POST transfer for the selected order(s).
Transfers can also be initiated from the “Export List” for a previous export.
Both orders and customers can be exported via Email, FTP, or HTTP POST on a schedule, or saved locally to your export list on a schedule. To configure your automatic export settings, please see our notes on order auto-export settings or customer auto-export settings.
Here are some important notes about automated exports, which address common questions:
Orders that were placed before the plugin was installed & activated will not be automatically exported. They can be marked as “exported” using the bulk action.
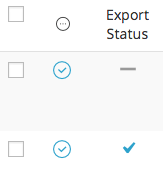
For automated exports, only “new” records will be exported. For orders, this means any order that does not have the “Export Status” as “exported”.
Export Status
For customers, this means only new purchasers or newly registered users are included in automated exports (customer export status is hidden).
Timezones: Please note that the exports happen in the same timezone as you’ve set for the WordPress site. If the site timezone is set to New York (EST) and the export time is set to 9:30am, the exports happen in the same timezone as the site.
Auto-exports should always be tested once configured to confirm dummy files reach their destination successfully using the “Test” actions.
↑ Back to top
The plugin relies on WP-Cron to help it schedule the automated export jobs. This is the established way of performing recurring tasks with WordPress. Unfortunately, the WP-Cron system is not always 100% accurate – it requires constant traffic to your site in order to trigger events at the proper times.
There are two suitable workarounds for the accuracy issue:
Use a service like Pingdom, UptimeRobot, etc to ping your site every few minutes – this FAQ section details how to do this.
Your hosting provider should be able to help you with workaround #1, which would be the ideal if your hosting allows it. This is guaranteed to solve the issue with random times.
↑ Back to top
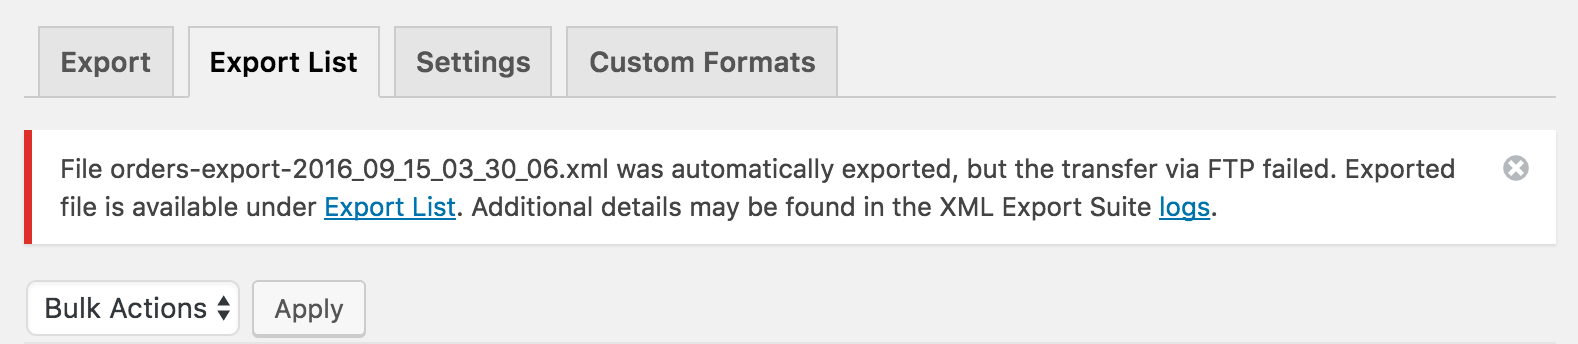
When automated exports are configured, the plugin will track the transfer status of each automated export under the Export List. If transfers fail, any site user who can manage WooCommerce (typically admins and shop managers) will be notified of transfer failures so they can be retried from this list.
If several failures occurs consecutively, you’ll be notified so that logs and settings can be checked to ensure the automated export set up is correct.
↑ Back to top
If you’re looking to test automatic exports or debug them, we recommend using a service like Beeceptor or Webhook tester, which will allow you to test the HTTP POST option. You can create a new bin or test URL and use the plugin’s “Test” option to send data for debugging.
You can also test the export scheduling using the WP Crontrol plugin. This lets you view all cron events along with their arguments, recurrence, and when they are next due.
↑ Back to top
This list is not exhaustive, but here are some of the plugins that are known to be compatible with the WooCommerce Customer / Order XML Exporter. Just because a plugin may be missing from this list does not mean that it won’t be incompatible with the XML Exporter. You can also read up on customizing your XML output for compatibility with other extensions.
Fields / tags are automatically added for plugins in this list; they are compatible out-of-the-box.
This plugin is also compatible with refunds while using the default export format (or if manually included in a custom format). Each order will display a RefundedTotal field, which will display the total amount refunded in the order, as well as an Refunds tag, which shows detailed refund data.
Each line item will also have Refunded and RefundedQuantity tags, which will display the total amount and quantity refunded for a particular item in the order.
** Subscriptions
Note that this plugin is compatible with Subscriptions, but is not a subscriptions exporter. When Subscriptions is active, you can choose to export subscription or renewal orders only as a sort of filter on which orders to export. This does not export subscription data for you to then import your subscriptions into a new site.
↑ Back to top
There are very few plugins that are fully incompatible with the order exporter, but here are some known issues with other plugins.
Product Add-ons is not fully compatible with this export plugin. While add-on data will be displayed in line item meta when exported, dedicated compatibility to show add-ons separately for each line item will not be included. You can see more in this FAQ.
↑ Back to top
Exports are done as a background, asynchronous process, that requires your site to make requests to itself for information. As such, your site cannot block HTTP requests or exports will not begin to process. If your exports freeze without completing, your site may be blocking HTTP requests in some way.
Please check the following common causes of blocked requests:
Are you using a maintenance mode or blocking plugin? For example, the “Airplane Mode” plugin for developers will block HTTP requests. Please disable the maintenance mode plugin to process exports.
Likewise, as HTTP requests are being made, your site domain must match your server IP address. This one really only relates to the developers: if you’re using a hosts file for a domain, make sure it’s on your server as well so the plugin can use it.
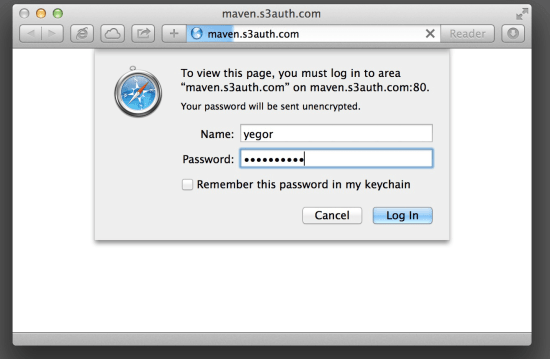
Similarly, if your site is behind BasicAuth, background requests will fail to complete. For example, WP Engine staging sites often use basic authentication to block site access (you see a popup for credentials when you try to access the site):
Please see the notes here to correct this issue, or disable basic authentication while testing exports.
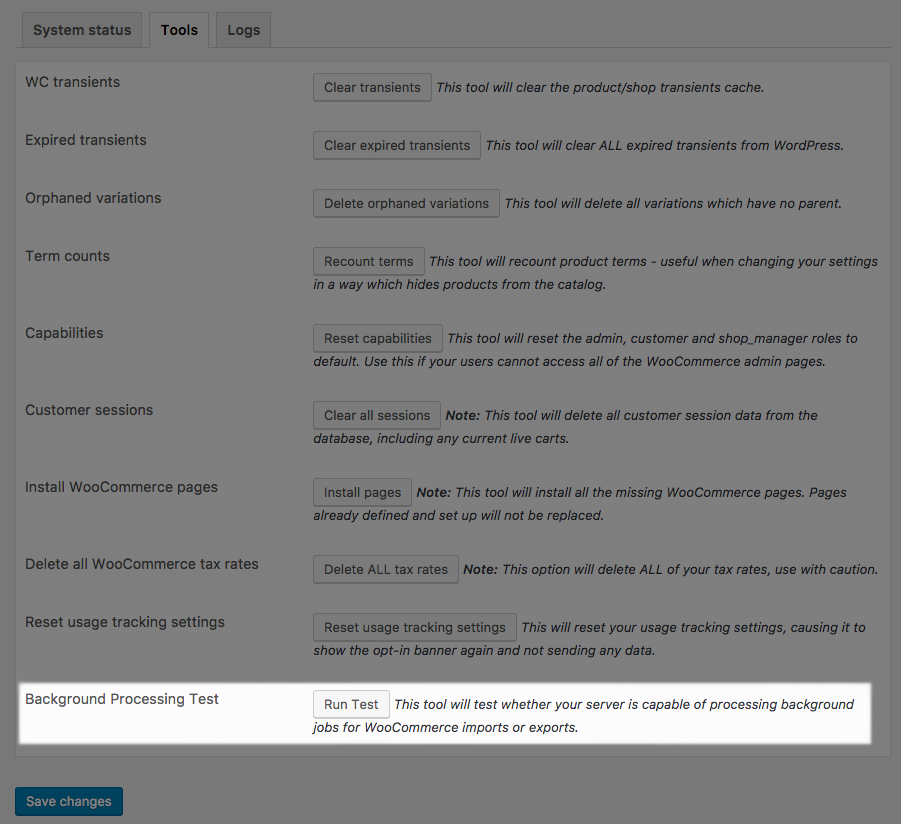
Finally, some hosts will block the requests from servers to themselves. You can test this by going to WooCommerce > Status > Tools. The plugin will add a tool called “Background processing test”, which will simulate the export process:
If this tool returns an error, this means that your host won’t allow requests from your site’s server (the plugin) to itself to start processing a file (sometimes called a “loopback connection”). Your host must enable this for exports to work.
While some hosts may note that this is a security issue, there is no security threat to using a loopback connection; if done incorrectly, it could increase server usage, but quality hosts will combat this for you with intelligent rate limiting.
More importantly, many features in WooCommerce or upcoming features need loopback connections to function: for example, the database updater (already in use) and future plans for backgrounded email sending; both of which uses the same type of background processing (and requires loopback connections). It’s essential that a host for an eCommerce site support this.
↑ Back to top
If you’re running into slow exports or out-of-memory errors, please contact your hosting provider to double-check that the the MySQLi extension is installed on your server and that WordPress is using it. In rare cases, the extension is already installed but is not being used by WordPress, but this can be easily remedied by adding define( 'WP_USE_EXT_MYSQL', false ); to your wp-config.php file.
With the introduction of the database data store in v2.4.0, the plugin now defaults to streaming exports to their destination whenever possible, rather than sending an entire file at once. This increases server efficiency and reduces the likelihood of out-of-memory errors, especially when downloading very large exports. This new feature requires the MySQLi extension to be enabled and be used by WordPress.
Turn on the error log and review it under WooCommerce > System Status > Logs. If this doesn’t help you resolve the issue, submit a support ticket, with the log as an attachment.
↑ Back to topQ: Why aren’t all of my customers exported?A: Customers must have at least one order before they will be considered an export-able “customer.”
Q: Will exported orders also show refunded totals?A: They can, but only if you’re using one of the default format (or a custom format that includes refunds). See our info on refunds for more information.
Q: Can I export the custom fields I have created with the Checkout Field Editor extension?A: Yes, you can! As of Checkout Field Editor version 1.4.6, native support for the Customer / Order XML Exporter is included in Checkout Field Editor.
If you use a default or custom order export format as of XML Export v2.0+, only the Checkout Field Editor custom fields are added to the export in a “prettified” way.
Q: How do I remove the Export Status column on the orders page?A: You can easily hide this column (and any columns on your Orders / Products pages!) by going to “Screen Options” at the top right of your page. While viewing the Orders page, you’ll see that the “Export Status” is enabled. If you disable it, this will remove the corresponding column from your Orders screen. This is a neat trick to customize your Order and Product administration no matter what plugins are installed.
Q: Can I separate Product Add-ons in the XML so they’re easier to find?A: The way Product Add-ons are stored on orders makes it almost impossible to accurately get all add-ons for an order, so we don’t plan to add compatibility for this to the XML Exporter.
However, we do have a custom code snippet available that should work for most stores, depending on whether your add-ons use special characters or not. To use this, please be sure you know how to properly add custom code to your site and that you test the export format with the snippet added.
Q: Is it possible to change the character encoding or XML version? My site uses special characters.A: Yep! Most every site should be okay with the defaults, but if you need to filter the character encoding, standalone definition, xml version, or other format definitions, you can use the wc_customer_order_xml_export_suite_format_definition filter — here’s an example snippet to get you started.
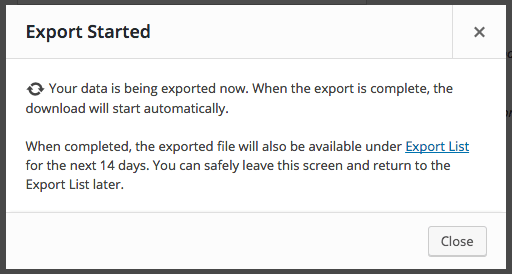 If you wait for the export process to complete, your file download will begin automatically, and you’ll see a notification that the process has completed.
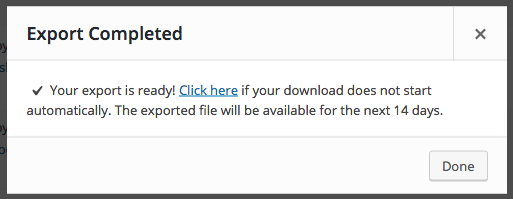 If you don’t want to wait for the export, that’s okay too! You can leave the page to continue working, or leave the site completely. As soon as the export has completed, you’ll receive a notification that your file is ready, and can be downloaded from the “Exports List”. If you’ve left the site, this will be shown to you upon your return.


 You will not be able to process automated exports if your host does not support background processing. In the meantime, you can enable the “Batch Processing” setting. This will require you to stay on the page for manual exports, but will provide an alternate way of exporting orders and customers until your host resolves background processing on the site.
 You can view your custom formats settings from WooCommerce > XML Export > Custom Format, and switch between the “Orders” and “Customers” section to customize your format for each.


 If several failures occurs consecutively, you’ll be notified so that logs and settings can be checked to ensure the automated export set up is correct.

 Please see the notes here to correct this issue, or disable basic authentication while testing exports.