- Checkout Add-Ons are not dependent on the products in an order, but are added to the entire order. If you’re looking for add-ons that only apply to certain products, please check out the Product Add-ons extension.
- This plugin cannot manage inventory or SKUs for add-on “products” or services, as they essentially act like fees.
Translation ready! Text Domain: woocommerce-checkout-add-ons
As of WooCommerce 8.3, Cart and Checkout blocks are available as the default experience. WooCommerce Checkout Add-ons has not yet been updated to be compatible with those blocks, so we recommend following this guide to revert to Cart/Checkout shortcodes. Additional plugin updates will soon be released to ensure compatibility with the new block checkout. Please check out this page for the latest updates or reach out to our support team with any questions!
Installation
↑ Back to top- Download the extension from your WooCommerce dashboard.
- Go to Plugins > Add New > Upload and select the ZIP file you just downloaded.
- Click Install Now and then Activate.
- Go to WooCommerce > Checkout Add-ons and read the next section to learn how to use the plugin.
Setup and Configuration
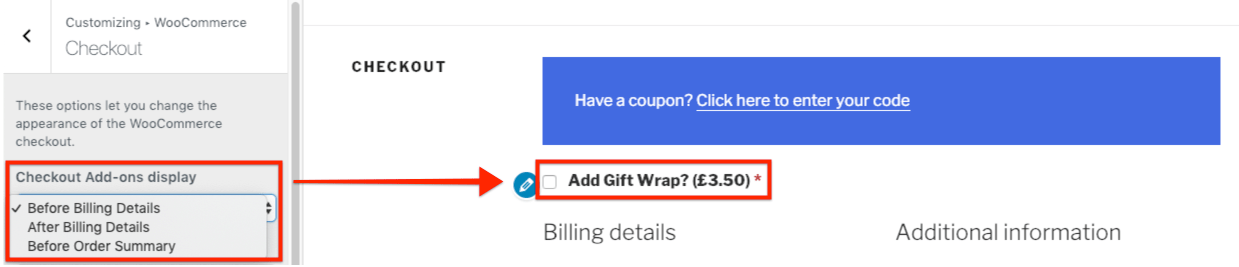
↑ Back to top- Go to Appearance > Customize.
- Select WooCommerce > Checkout.
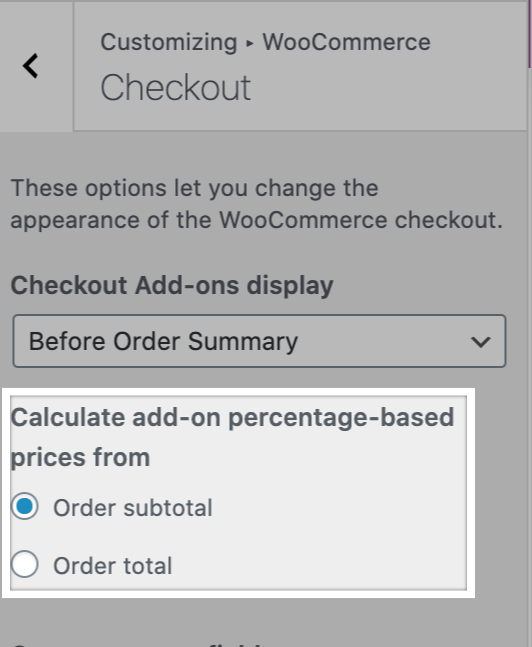
- Select the desired display setting from the Checkout Add-Ons display menu.
- Click Publish.
Creating Checkout Add-ons
↑ Back to top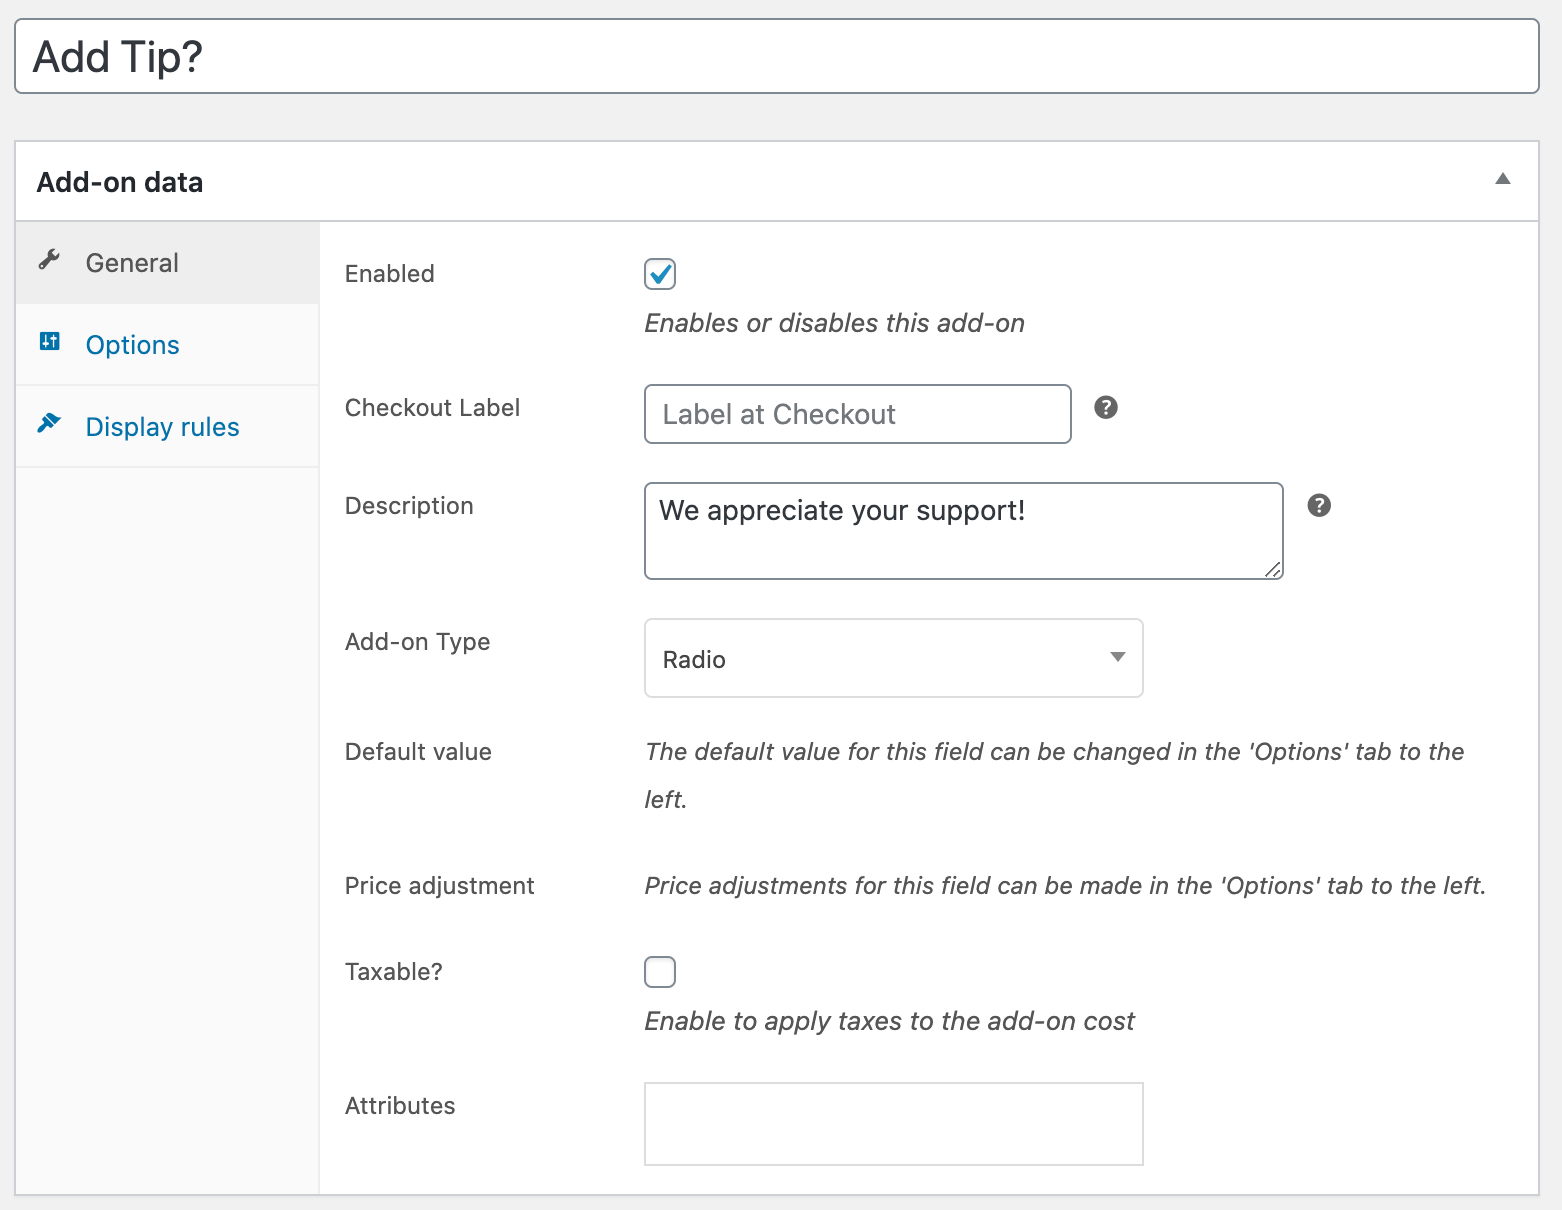 You can now begin creating your checkout field! On the General tab, you can modify the following fields:
- Enabled: Add-ons are enabled by default, but can be disabled if you want to temporarily remove them without completely deleting them from your site.
- Checkout Label: Optional. Customer-facing label for this add-on. If left blank, the add-on Title will be used.
- Description: Optional. Customer-facing field where you can provide additional context about the add-on. Supports limited HTML.
- Add-on Type: Choose the add-on field type.
- Default value: Optional. The value that should be prepopulated for the field on the checkout page.
- Price adjustment: Optional. Determine the fee or discount associated with this add-on, as either a fixed amount or a percentage.
- Taxable?: Determines if tax rates should apply to the add-on. This setting will only appear if taxes are enabled for your store.
- Tax Rate: If taxable, determines which tax rate will apply to the add-on.
- Attributes: Optional. These settings impact whether the add-on field is required and if/how it should be displayed on the Orders page.
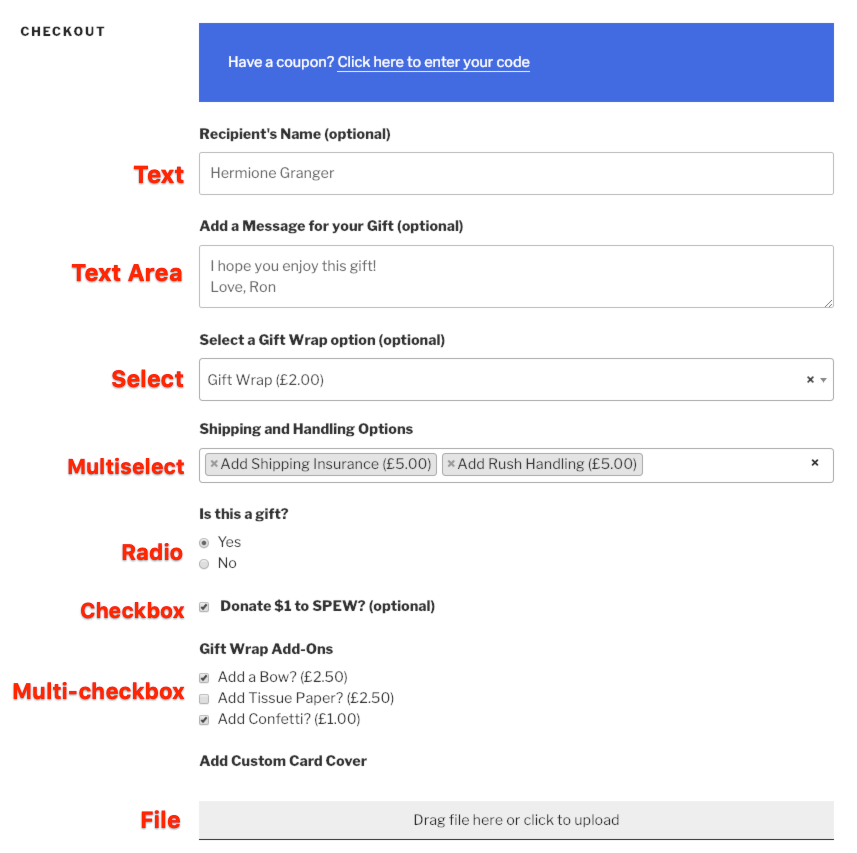
Add-on Types
↑ Back to top| Type | Description | Example Use Case |
|---|---|---|
| Text | Customer can enter a short string of text. | Gift recipient’s name |
| Text Area | Customer can enter a long string of text. | Gift messages |
| Select | Customer can select one option from a drop-down menu. | Gift wrapping options |
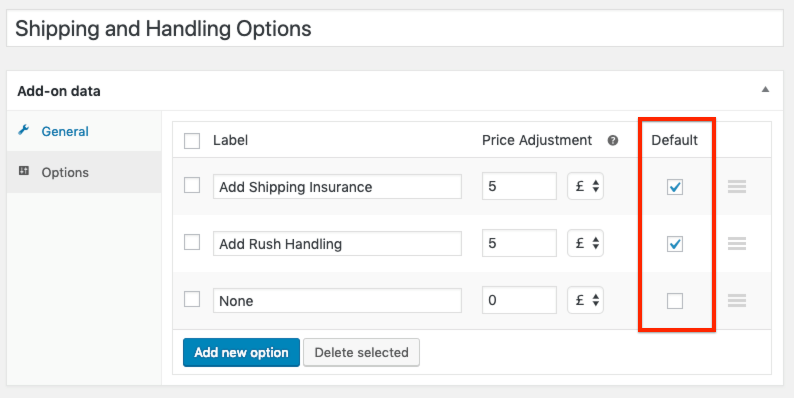
| Multiselect | Customer can select one, several, or all options from a drop-down menu. | Shipping and handling add-ons (e.g. Add Insurance, Add Rush Handling, etc.) |
| Radio | Customer can select one option from a list of radio buttons. | Choosing whether or not the order contains a gift. |
| Checkbox | Customers can select a single checkbox. | Adding a fixed-amount donation |
| Multi-checkbox | Customer can select one, several, or all options from a list of checkboxes. | Gift wrapping add-ons (e.g. Add a bow, Add tissue paper, etc.) |
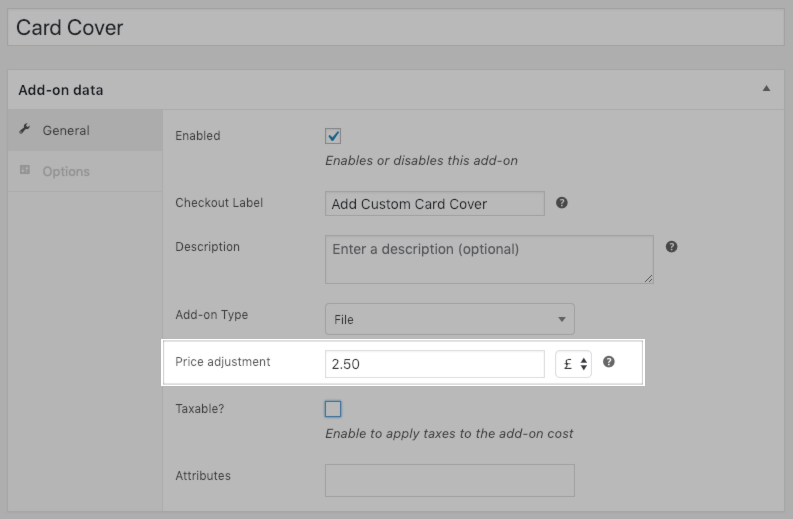
| File | Customer can upload a file to include in their order, which you can access from your Media Library or when viewing the order. | Custom card cover |
Options
↑ Back to top
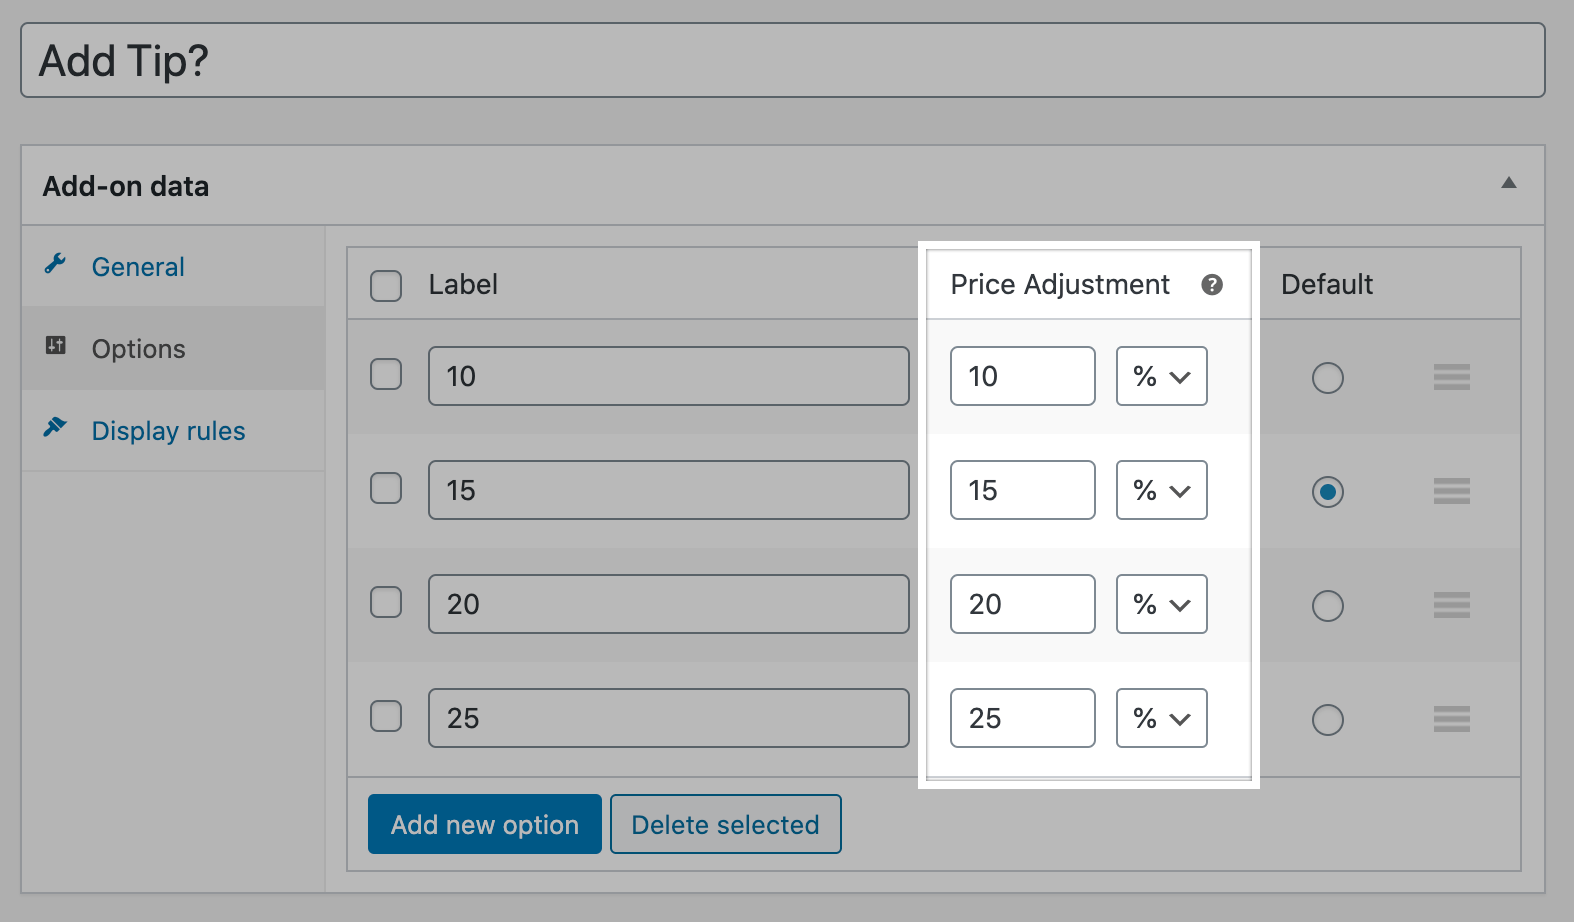
Price Adjustments
↑ Back to top2.50. To add a discount, enter the price adjustment as a negative value, such as -2.50.
When setting the price adjustment as a percentage, the adjustment will be calculated based on the order’s subtotal.
For the “Text”, “Text Area”, and “File” add-on types, you can set the price adjustment on the General tab:
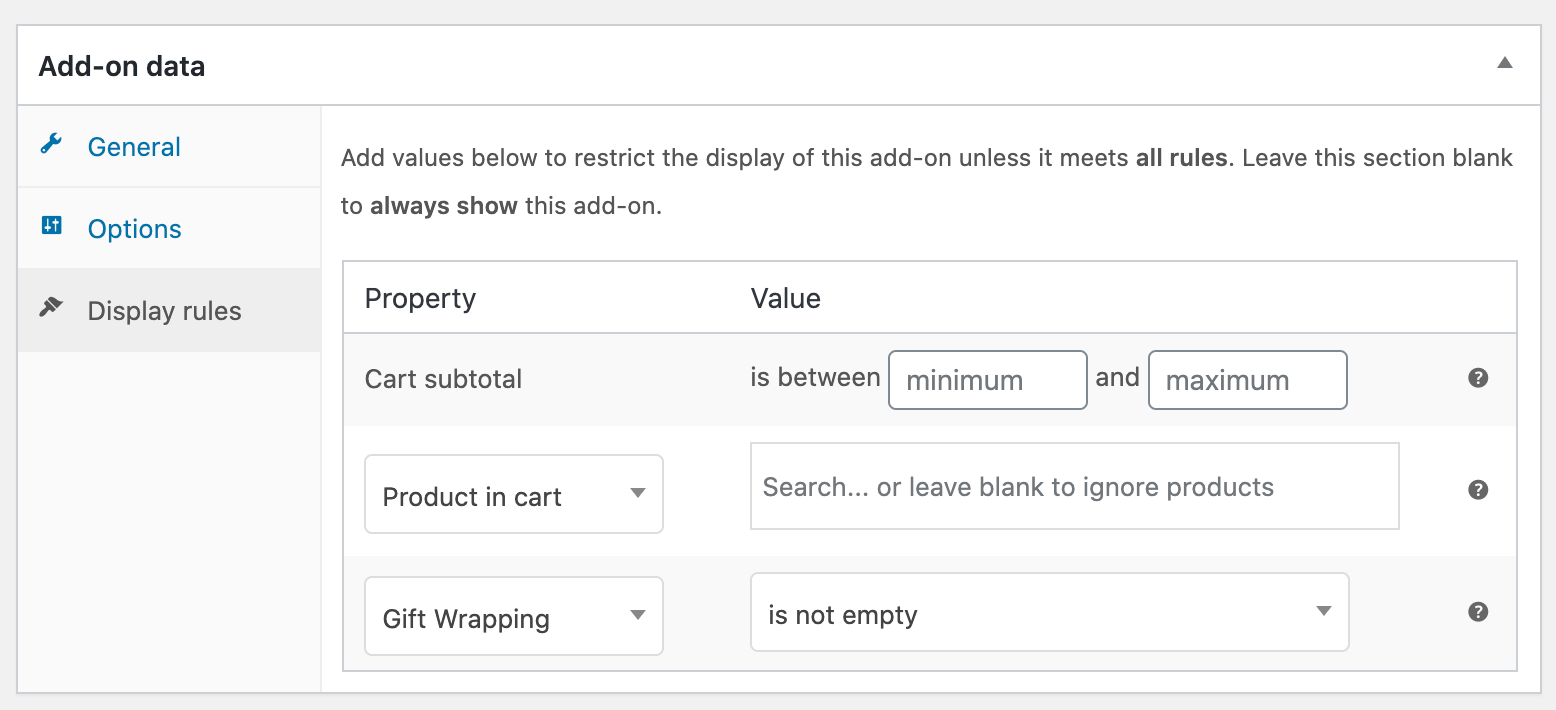
Display rules
↑ Back to top- Cart subtotal: add-on will only appear when the cart subtotal is within the indicated range
- Product or category in cart: add-on will only appear when any of the listed products or product categories are in the cart.
- Add-on value: this add-on will appear based on the value of another add-on. This is great for gift options – if someone has indicated that the purchase is a gift, you can then offer options like gift wrapping or a custom card.
Attributes
↑ Back to top- Required: If selected, the customer cannot place the order until the field is populated or selected. Adds a red asterisk to the field to denote its requirement.
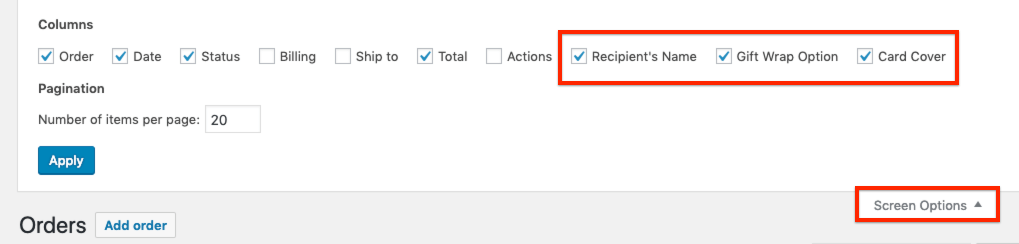
- Display in View Orders screen: Adds the add-on field to the Orders list so you can view its values across orders in one screen.
- Allow Sorting on View Orders screen: Lets you sort the Orders list alphabetically/numerically by the add-on field’s value. Cannot be set for “Multiselect”, “Multi-checkbox”, or “File” add-on types.
- Allow Filtering on View Orders screen: Lets you filter the Orders list to display only the orders with a particular value in the add-on field. Cannot be set for the “Text Area” add-on type.
- Renew with Subscriptions: If using WooCommerce Subscriptions, lets you include the add-on in renewal orders. Learn more about compatibility with Subscriptions.
Administrator View
↑ Back to top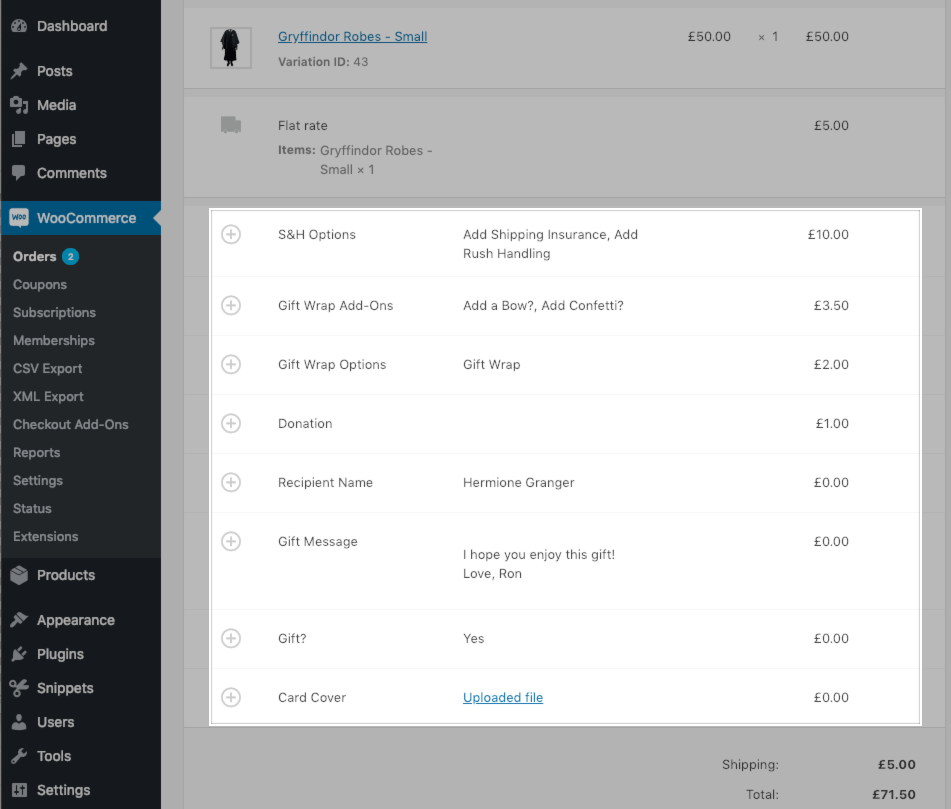

Viewing File Uploads
↑ Back to top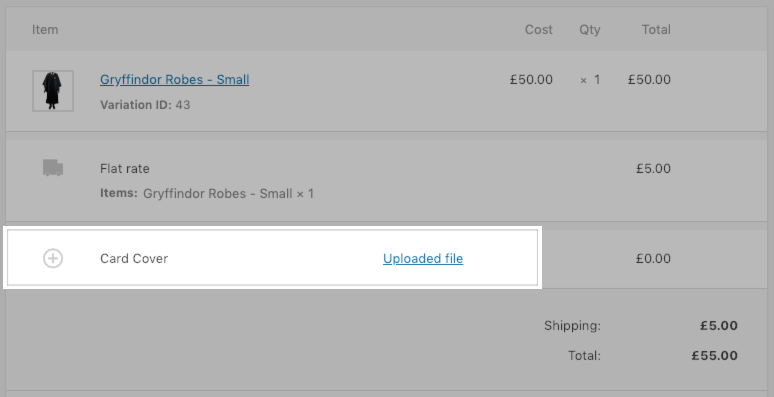

Customer View
↑ Back to top

Compatible Plugins
↑ Back to topCustomer/Order/Coupon Export – CSV
↑ Back to topCheckout Add-Ons in Default or Built-in Exports
When using a default or built-in format, add-ons and any price adjustments are automatically added as columns in the export. To ensure each column name is unique, the add-on’s ID number will be added to the column names for checkout_add_on and checkout_add_on_total.Checkout Add-Ons in Custom Exports
When using a custom format, you can add your fields as new columns. You’ll need to know the field’s ID, which you can find at the end of the URL when viewing the add-on editor:
checkout_add_on_{addonID}: List the add-oncheckout_add_on_total_{addonID}: List the associated discount or fee

Customer/Order/Coupon Export – XML
↑ Back to top<CheckoutAddOns> wrapper used for built-in formats.
 The add-on name, value, and cost associated with the add-on will be output for each add-on in the element.
An example of the expected XML output:
The add-on name, value, and cost associated with the add-on will be output for each add-on in the element.
An example of the expected XML output:
<CheckoutAddOns>
  <CheckoutAddOn>
    <ID>field ID</ID>
    <Name>field admin name</Name>
    <Value>field's customer input for this order</Value>
    <Cost>field's total cost added to this order</Cost>
  </CheckoutAddOn>
</CheckoutAddOns>
Subscriptions
↑ Back to top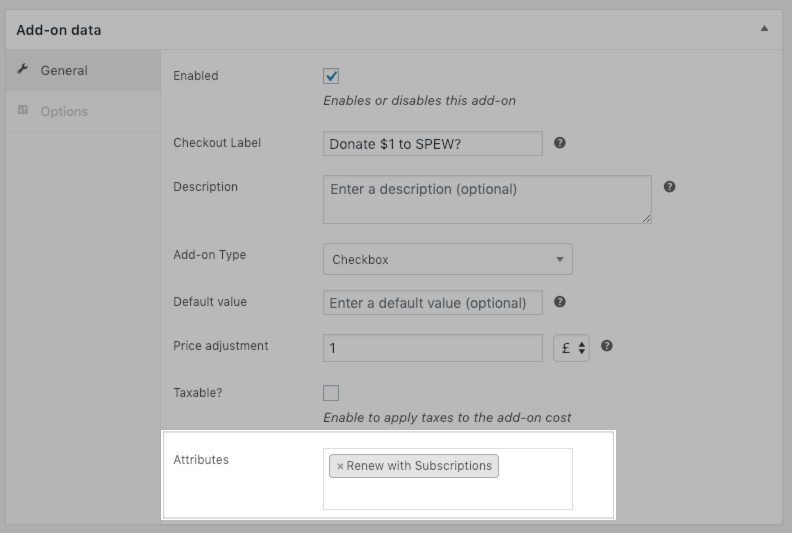
Frequently Asked Questions
↑ Back to topQ: Can customers upload multiple files in a “File” add-on? A: Each “File” add-on permits only one upload. However, you can include multiple fields of this type if necessary. You can also instruct customers to upload ZIP files to include multiple files in one field.
Q: Can I only show add-ons when certain products are purchased? A: You can use display rules to only show add-ons when a certain product or product category are in the cart, but the add-on will still apply to the entire cart – not to that specific product. If you need add-ons that only apply to certain products, please consider the Product Add-ons extension.
Q: Can I use Checkout Add-Ons with One Page Checkout? A: Yes! One Page Checkout is supported in Checkout Add-ons from version 1.3.0+.
Q: Can I hide an add-on from the Orders list or do I have to edit its attribute? A: You can temporarily hide any checkout field shown on the Orders list using the Screen Options tool. Please note that the “Display in View Orders screen” attribute must be enabled for the add-on before it will appear here.
Q: Can I change the way add-ons are displayed on the checkout page? A: Sure. These fields will inherit the styling set by your theme, so they should match the rest of your inputs already. If you want to using different styling, you can target
#wc_checkout_add_ons with some CSS. For example, let’s say you want to make them only take up 75% of the page in the center, and have some space between them and the customer info. You could add something like this to your child theme or custom CSS stylesheet:
#wc_checkout_add_ons {
	width:75%;
	margin:30px auto 0px auto;
}
Here’s a tiny bit of CSS we typically use with the Storefront theme to patch radio and checkbox fields:
#wc_checkout_add_ons label.checkbox {
	display: inline-block;
	margin-left: 5px;
}
Q: Can I use HTML in the add-on field options? A: You can use HTML in the options for the “Radio” and “Multi-checkbox” add-on types. The HTML should be wrapped in double braces, like so:
{{<a href="link">}}Link Text{{</a>}}
Q: Can I add placeholders or descriptions? A: Yes, these can be added easily via a code snippet! If you’d like an example, check out our developer docs.
Translating Add-ons
↑ Back to topwoocommerce-checkout-add-ons
However, any configurable options (settings for which you enter text, such as the Checkout Label or Description values) are not typically translatable since they’re not strings that the plugin has available in its .pot file. However, some plugins have a way for you to register these options for translation.
WPML Compatibility
↑ Back to topTranslating Labels
You can translate your labels in Checkout Add-ons via WPML so they can be displayed in different languages on your site. First, add this snippet to your site where you keep custom code:
This file contains bidirectional Unicode text that may be interpreted or compiled differently than what appears below. To review, open the file in an editor that reveals hidden Unicode characters.
Learn more about bidirectional Unicode characters
| <?php | |
| function sv_wc_checkout_add_ons_wpml_translate( $label ) { | |
| return apply_filters( 'translate_string', $label, 'woocommerce-checkout-add-ons', $label ); | |
| } | |
| add_filter( 'woocommerce_checkout_add_on_get_name', 'sv_wc_checkout_add_ons_wpml_translate' ); | |
| add_filter( 'woocommerce_checkout_add_on_get_label', 'sv_wc_checkout_add_ons_wpml_translate' ); | |
| function sv_wc_checkout_add_ons_options_wpml_translate( $options ) { | |
| $translated_options = array(); | |
| foreach ( $options as $option ) { | |
| $option['label'] = apply_filters( 'translate_string', $option['label'], 'woocommerce-checkout-add-ons', $option['label'] ); | |
| $translated_options[] = $option; | |
| } | |
| return $translated_options; | |
| } | |
| add_filter( 'woocommerce_checkout_add_on_get_options', 'sv_wc_checkout_add_ons_options_wpml_translate' ); |
- Select one of the “Auto-register” options in WPML > String Translation > Auto register strings for translation.
- The checkout page should have a translation (even just a dummy one) and you should visit one of the non-default language translations for the strings to be picked up.
- No matter where the snippet is placed (theme or plugin), the context in WPML > String Translations will be
woocommerce-checkout-add-ons.
Multi-currency Support
This gist can add WPML multi-currency support to Checkout Add-ons:
This file contains bidirectional Unicode text that may be interpreted or compiled differently than what appears below. To review, open the file in an editor that reveals hidden Unicode characters.
Learn more about bidirectional Unicode characters
| function wc_checkout_add_ons_wpml_multi_currency_support( $adjustment ) { | |
| return apply_filters( 'wcml_raw_price_amount', $adjustment ); | |
| } | |
| add_filter( 'woocommerce_checkout_add_on_get_adjustment', 'wc_checkout_add_ons_wpml_multi_currency_support', 100 ); | |
| add_filter( 'wc_checkout_add_ons_add_on_option_cost', 'wc_checkout_add_ons_wpml_multi_currency_support', 100 ); |
Polylang Compatibility
↑ Back to top<?php tag.)
This will let you translate add-on strings under Languages > String Translation.
Troubleshooting
↑ Back to topwp-includes/js/plupload/plupload.full.min.js to the Never minify the following JS files list:
 You can read more about this here.
For other issues, please submit a support ticket.
You can read more about this here.
For other issues, please submit a support ticket.