Overview
↑ Back to topSupports split-shipments of Shipwire-managed and non-managed products as well!
As of WooCommerce 8.3, Cart and Checkout blocks are available as the default experience. WooCommerce Shipwire has not yet been updated to be compatible with those blocks, so we recommend following this guide to revert to Cart/Checkout shortcodes. Additional plugin updates will soon be released to ensure compatibility with the new block checkout. Please check out this page for the latest updates or reach out to our support team with any questions!
How it Works
↑ Back to top- You determine which items are fulfilled via Shipwire by using a matching SKU, and whether orders for these should be exported automatically or manually by a store admin to Shipwire. (Please note that SKUs should be unique between products.) You can set automatic exports based on the shipping country.
- You configure Shipwire shipping options from the WooCommerce settings.
- Customer selects an item that’s fulfilled via Shipwire, and places an order purchasing this item and selecting an available Shipwire shipping method.
- Once the order is paid for, it can be exported to Shipwire for fulfillment (order is “processing”).
- Based on your settings, the relevant order is either exported automatically, or will be exported manually via the “Orders” page or “Edit Order” screen.
- Shipwire receives the information sent from your WooCommerce store, and fulfills the order with appropriate shipping.
- You can opt to have stock reduced and shipment tracking information updated automatically – WooCommerce and Shipwire will automatically remain synced if you enable this under “settings”. Any shipping information is stored within the order.
- You can opt to automatically complete orders once they’re marked as “shipped” in Shipwire. If so, the order will automatically be completed without lifting a finger!
- Your customer receives their order on-time, and you feel great because of the easy shipping and order management and synchronization 🙂
Installation
↑ Back to top- Download the extension from your WooCommerce dashboard
- Go to Plugins > Add New > Upload and select the ZIP file you just downloaded
- Click Install Now, and then Activate
- Click the Configure link and read the next section to learn how to setup and configure the plugin.
Connect to Shipwire
↑ Back to topGet API Credentials
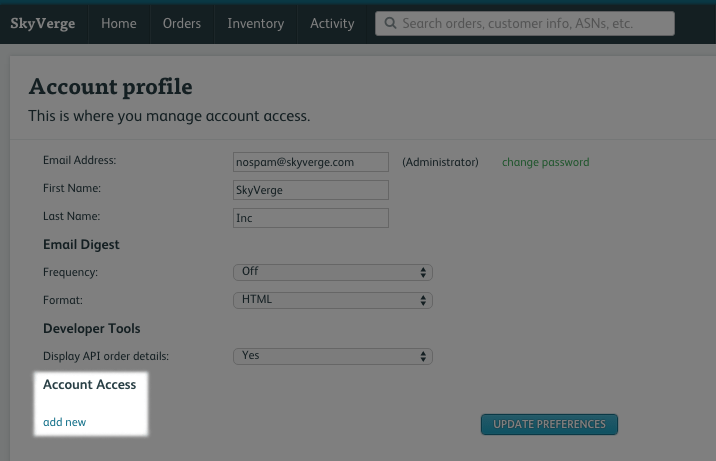
↑ Back to topIn the top right, click on your login name, then click “Account Profile”:
 Click “Add New” under the Account Access section :
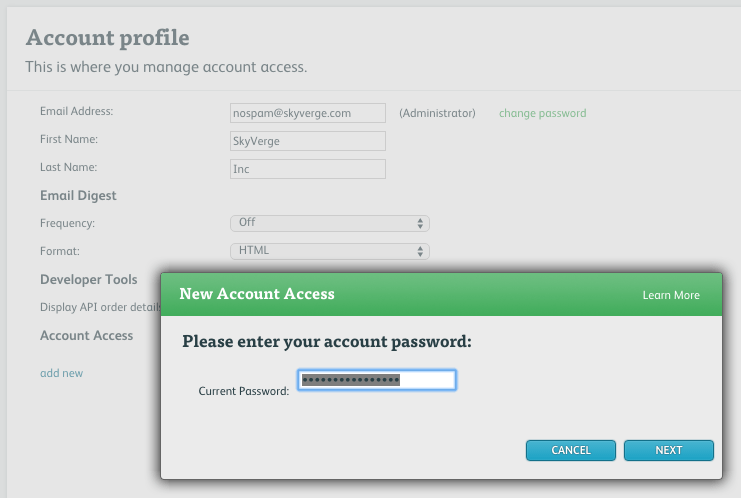
 Enter your master account password (the same password you login with) :
 Select “API” as the account type :
 For email address we recommend that you enter
 shipwireapi@yourdomain.com, making sure to replace yourdomain.com with your store’s domain name. Enter “Shipwire API” for the name and uncheck the “Email user with account access instructions” checkbox:
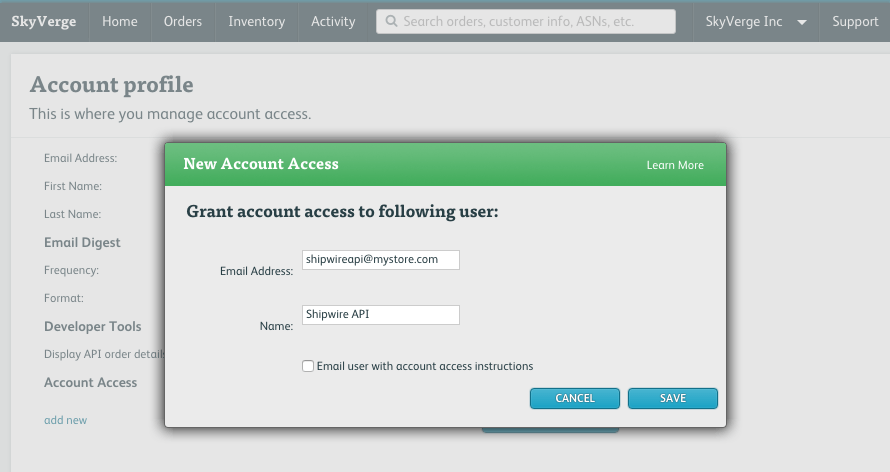 Click save and you’ll get a success message telling you the password has been emailed.
Now, check your email for the password for the API user you just created. It should look like this:
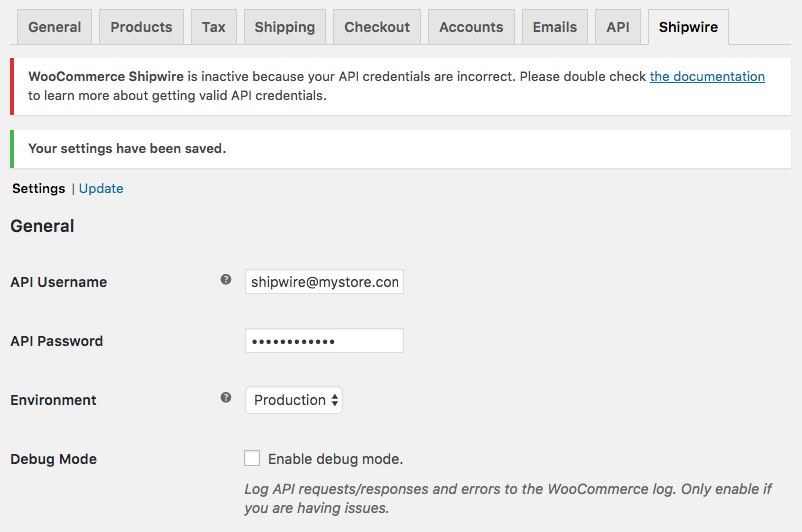
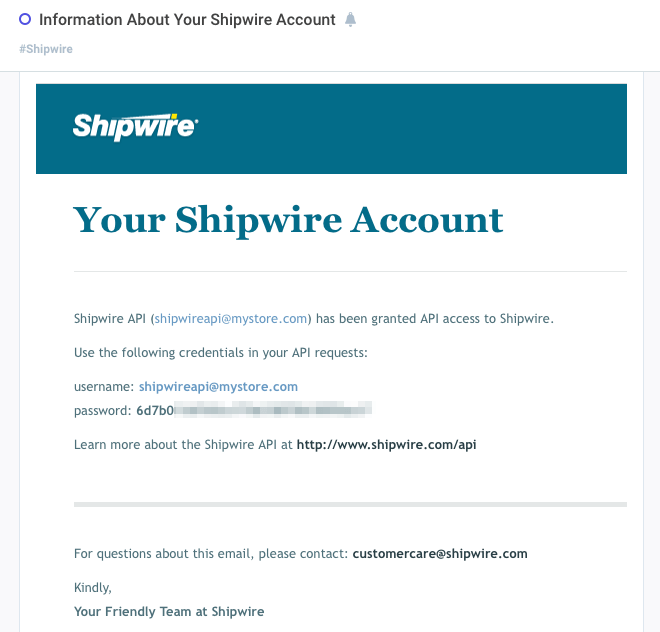 Copy the username and password in this email to the text boxes under WooCommerce > Settings > Shipwire and click “Save Settings”:

 This is because customers who calculate shipping on the cart page may receive invalid rates, as Shipwire recalculates rates at checkout once a full address is available. For example, if the customer enters a commercial address on the checkout page, methods like “FedEx Home Delivery” will no longer be available. Shipwire cannot access all necessary information on the cart page, so there’s no way to display the most accurate rates here.
That’s it! You’ve connected your WooCommerce store to Shipwire! Read on to learn how to setup your products.
Product Setup
↑ Back to top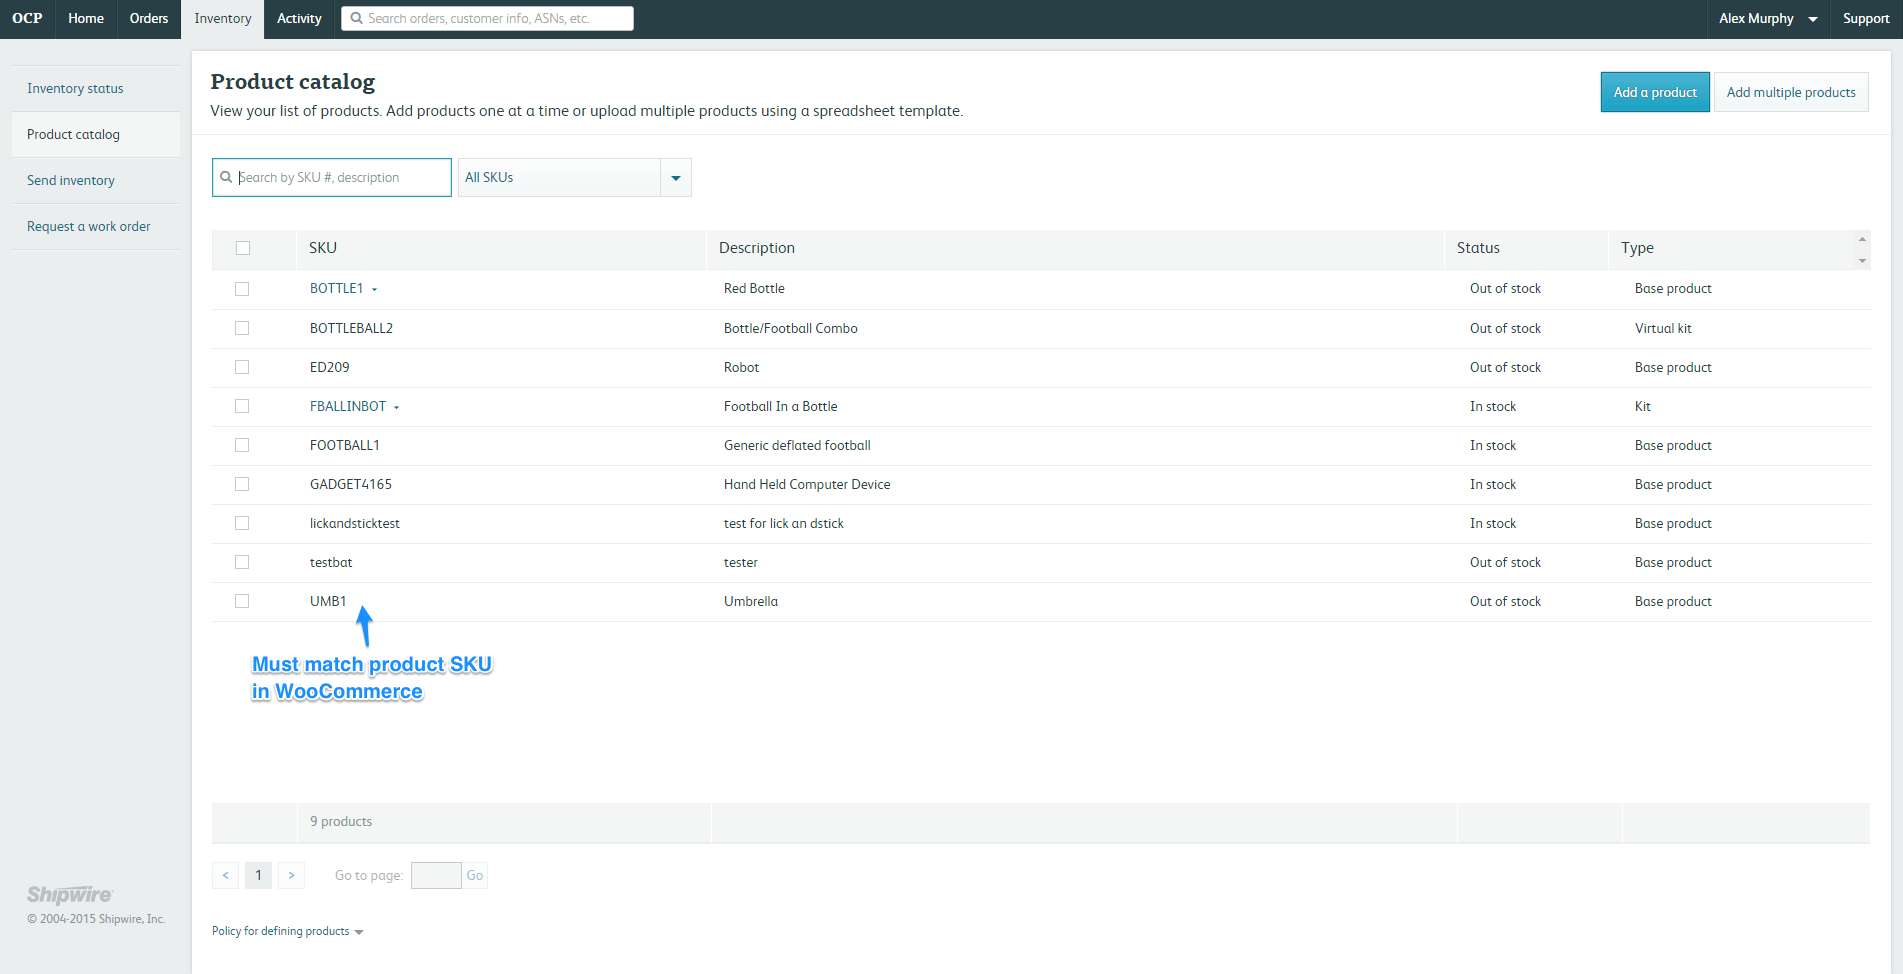 Important: When setting up products, the SKU must match exactly to the SKU listed for the product in WooCommerce and products should have a unique SKU. If you already have your products setup within WooCommerce, you can use the Product CSV Import/Export extension to export a CSV of your products that can be adjusted and imported into Shipwire. Ask your Shipwire rep about this process.
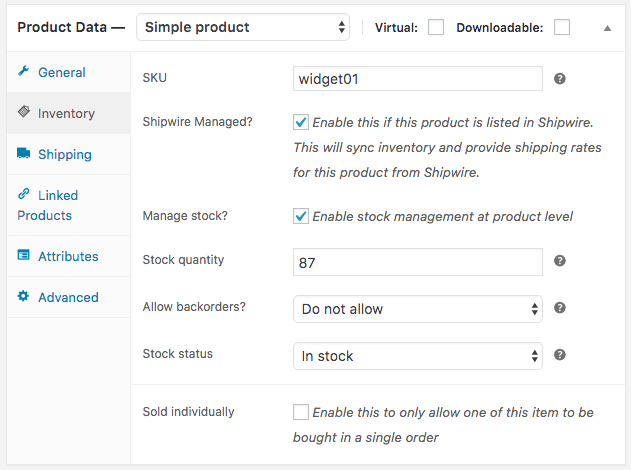
Now, log into your WooCommerce store and go to the Edit Product page for the product that was setup in Shipwire. Go to the Product Data tab and you’ll now see an extra option for Shipwire under “Inventory” (below the SKU). Check the “Shipwire Managed?” checkbox and save the product.

Extension Settings
↑ Back to topGeneral Settings
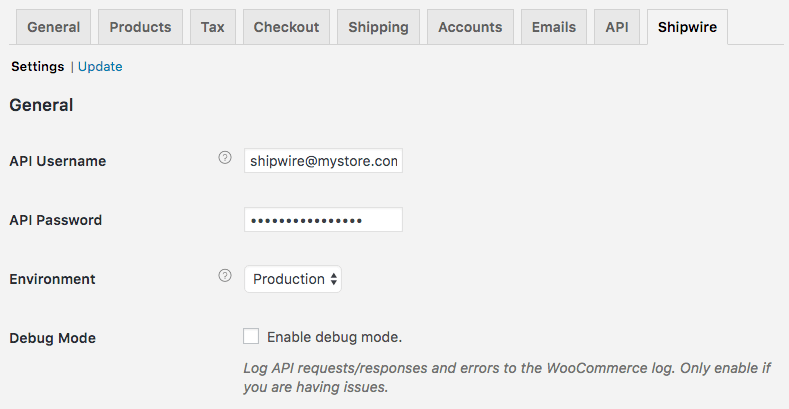
↑ Back to top- API Username – The username for the API user setup via the process above. Please do not use your own Shipwire account username.
- API Password – The password for the API user setup via the process above. Please do not use your own Shipwire account password.
- Environment – The environment to send API requests to — this should be set to “Production” unless you are using a Shipwire test account.
- Debug Mode – Enable this to save API requests/responses to the WooCommerce error log (/wp-content/plugins/woocommerce/logs/shipwire.txt) — please only enable this if you are having issues with the extension.
Fulfillment Settings
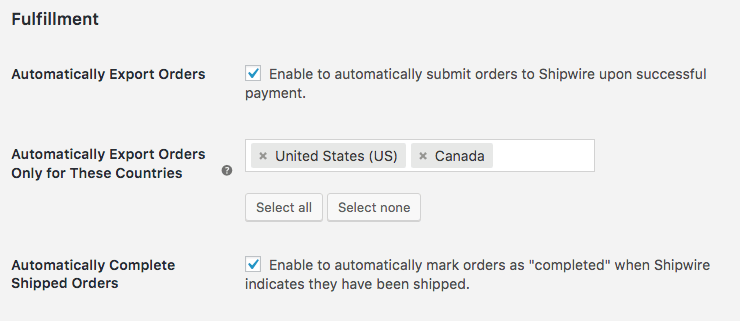
↑ Back to top- Automatically Export Orders – Enable this to automatically submit orders to Shipwire upon successful payment. By default, this will only submit orders that have received payment, or the order status changes from on-hold / failed to processing / completed. Orders can be manually submitted to Shipwire if this is disabled.
- Automatically Export Orders Only for These Countries – (Shown if automatic exports are enabled) Enable this to limit automatic order exports to the specified countries. If the ‘ship to’ country of the order is not selected, it will not be exported and will need to be manually exported using the order actions or bulk order actions.
- Automatically Completed Shipped Orders – Enable this to automatically change the order status of orders marked as “Shipped” by Shipwire to “completed”. We recommend leaving this enabled.
Inventory
↑ Back to top- Automatically Update Inventory – Enable this to automatically update inventory for all Shipwire-managed products on a recurring basis. The order stock will be updated to reflect what Shipwire reports as the inventory count for each product.
- Update Interval – (shown if automatic updates are enabled) Inventory updates are pushed from Shipwire to your site automatically. However, this update interval serves as a backup in case an update is missed (ie your site server is temporarily unavailable). Enter how often inventory should be checked for updates to re-sync (in minutes). As a best practice, we recommend setting this to 60 minutes or more.
- Include Pending Inventory in Stock – (shown if automatic updates are enabled) Enable this to include inventory listed as “Pending” within Shipwire (this is inventory that may be arriving soon, or is otherwise in transit to Shipwire) as valid stock within WooCommerce. This will combine “Good” and “Pending” inventory and set the total as the available stock.
Include Inventory from Warehouse Locations – (shown if automatic updates are enabled) Select the warehouse continents that inventory will be included from. Defaults to “Worldwide” to use all inventory. This will not depend on customer location. Rather, total inventory for your store will only include inventory housed in warehouses within the selected continents.
Use this setting if you use Shipwire to sell in multiple countries, but only sell to certain countries on your site and thus want only specific inventory counts displayed.

Tracking
↑ Back to top- Automatically Update Tracking – Enable this to automatically update tracking information for all orders on a recurring basis.
- Update Interval – (shown if automatic updates are enabled) Order tracking updates are pushed from Shipwire to your site automatically. However, this update interval serves as a backup in case an update is missed (ie your site server is temporarily unavailable). Enter how often tracking data should be checked for updates to re-sync (in minutes). As a best practice, we recommend setting this to 60 minutes or more.
Update Shipwire Data
↑ Back to top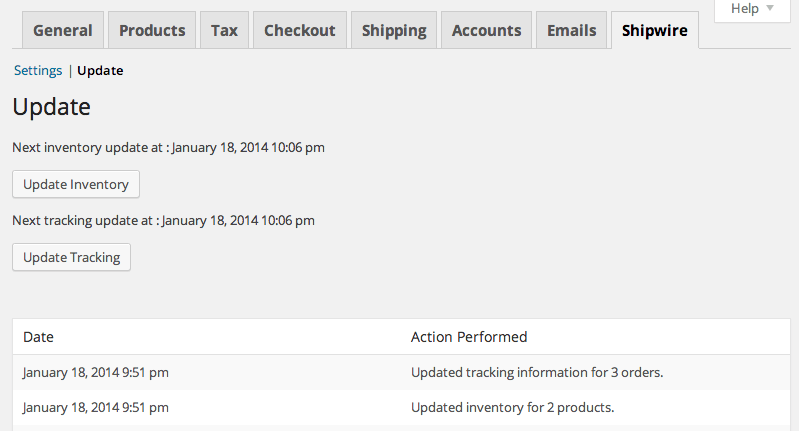
Shipwire Shipping Method
↑ Back to top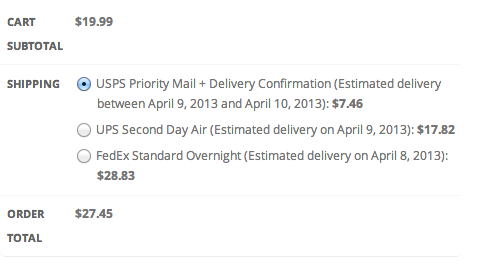 As of version 2.0, the cart can contain both managed and non-managed products. Item that will be fulfilled by Shipwire will be sorted into one shipment, and the rate shown will be the one supplied by Shipwire. Items that are not managed and are fulfilled by other means will be sorted into another shipment and will use your WooCommerce shipping settings and rates.
Enable real-time shipping rates by browsing to WooCommerce > Settings > Shipping > Shipwire and checking the “Enabled” checkbox. Once a customer completes checkout, their selected shipping rate will be passed to Shipwire for correct order fulfillment.

To use a different shipping method (e.g. Table Rate Shipping or Free Shipping), simply disable this and enable your desired shipping method. Orders will be exported using the ‘GD’ shipping code, which is the standard code for ground shipping.
- Enable/Disable – Check this box to enable or disable this shipping method.
- Method Availability – Choose which countries this method should be available for — Shipwire supports many international countries, so it’s recommended to leave this as “All allowed countries”.
- Specific Countries – (shown if “Method Availability” is “Specific Countries”) If you want to limit the countries for which Shipwire rates are available, select the countries that have Shipwire rates enabled.
- Tax Status – Choose whether the shipping cost is considered taxable or not.
- Handling Fee – Add an optional handling fee that will be added to the shipping rates provided by Shipwire.
- Additional Handling Fee – Add an additional handling fee that will be applied to each item in the order past the first item. This is useful when you want to pass along the cost imposed by Shipwire to pick orders to your customers as part of the overall shipping cost. This only displays if a handling fee is set.
- Show Delivery Estimates – Enable this to display estimated delivery dates next to the shipping rate.
- Require Delivery Confirmation – Enable this to only display rates for services that have delivery confirmation.
- Require Tracking – Enable this to only display rates for services that include tracking information.
- Show Carrier Name / Service Level – Show the actual carrier name and service level (e.g. FedEx Ground) instead of generic names (e.g. Ground Shipping). If you disable this, you may change the names of the rates displayed.
Managing Orders
↑ Back to top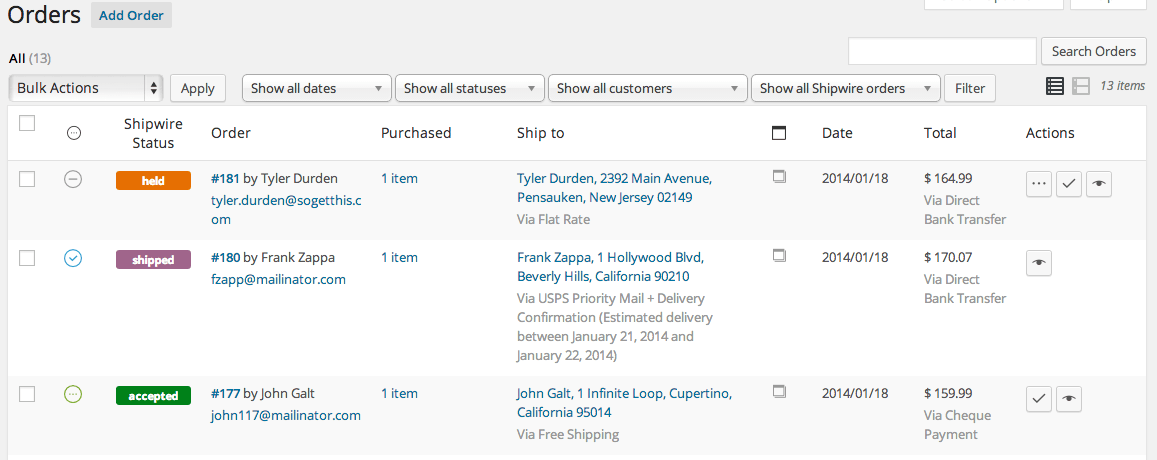
- New – An order with this status has not been exported to Shipwire. The “Export to Shipwire” order action buttons are available.
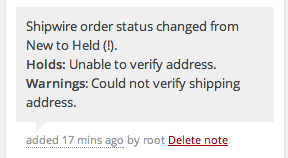
- Held – An order with this status has been exported to Shipwire successfully, but requires manual release within the Shipwire website before it will be shipped. This is often due to an invalid address or an item that is out of stock. You may also see this listed with an exclamation point next to it ( e.g. “Held (!)”, which means there were warnings associated with the order as well. See the Accepted status description to learn more about warnings.
- Failed – An order with this status has failed export to Shipwire, usually because of API errors (incorrect username/password) or HTTP errors with your server. View the order notes for more information about why the order export failed.
- Accepted – An order with this status has successfully exported to Shipwire. You can view additional details on the Edit Order page. Occasionally you may see this listed as “Accepted (!)” which means there were warnings associated with the order. Warnings are non-serious issues with an order that do not prevent it from being fulfilled and shipped. This is typically due to an address that changes classification (e.g. Residential to Commercial). You can see the specific warning message by viewing the order notes for the order.
- Shipped – An order with this status has been successfully fulfilled and shipped by Shipwire. You can view additional tracking information on the Edit Order page.
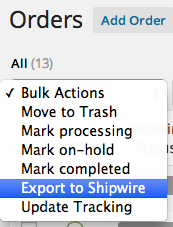
Export orders to Shipwire
↑ Back to top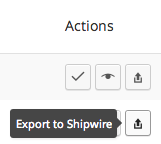
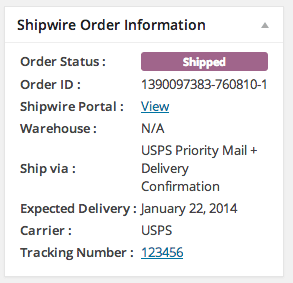
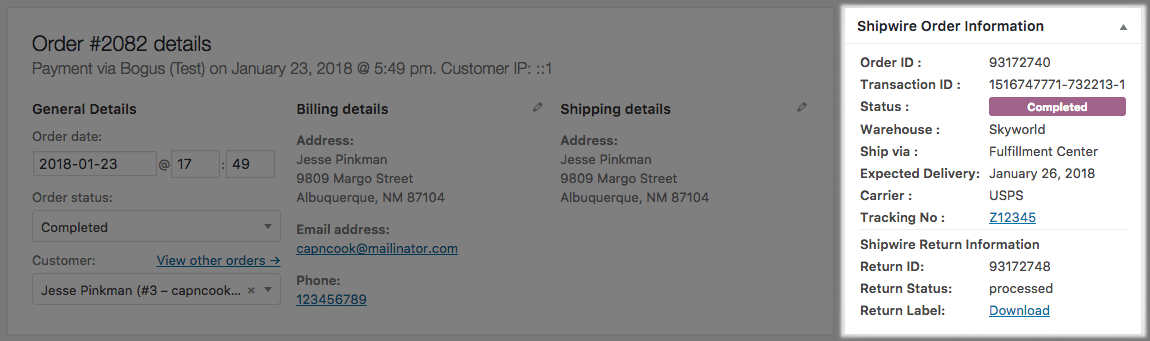
View Shipwire info
↑ Back to top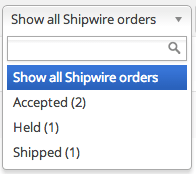
Returns and cancellations
↑ Back to topRefunds from WooCommerce, however, are not automatically synced, given it’s unclear if a refund also means that items will be returned (in the case of broken items). If you’d like to process a return to Shipwire, then you must start a return for the order. You can do so using the “Start a return” order button:
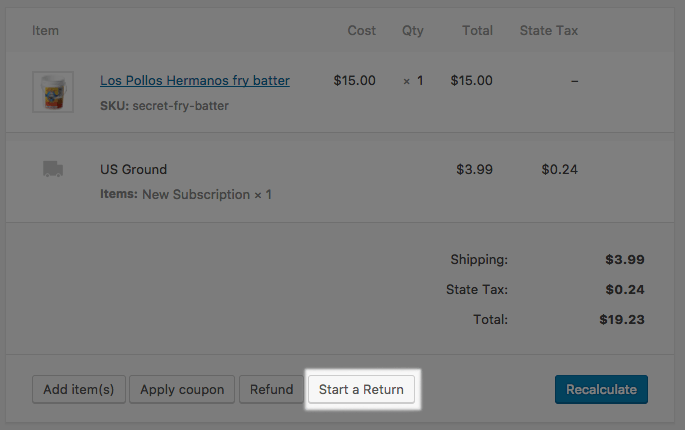
Heads up! Shipwire only supports one return per order, so you can only start a return once for any WooCommerce order. This action is disabled after a return has been processed.
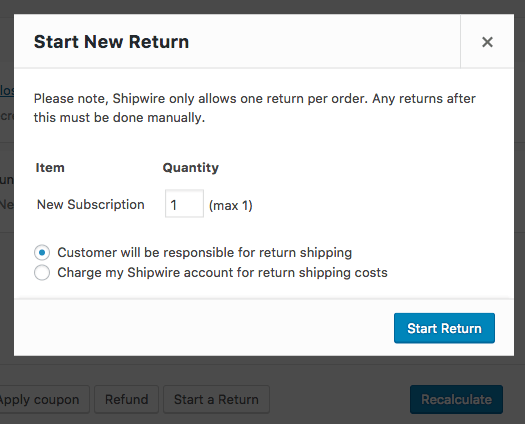
This will open a modal to select the quantity of each line item being returned. You can also determine if return shipping should be charged to the customer, or if you’d like to deduct return shipping from your Shipwire account (providing a pre-paid return label to the customer instead).
 When a return is processed, this information will be added to the Shipwire information box for your order, and allow you to download a return label for the order.
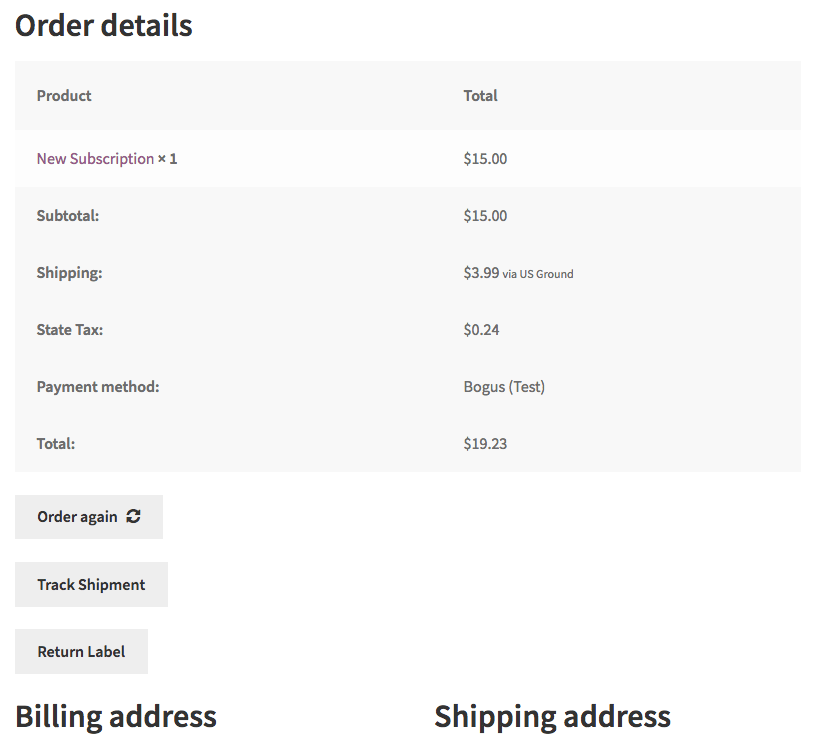
 Customers will also see the ability to download a return label from their account under My Account > Orders, or by viewing a particular order in the account.

Serial Number Scanning
↑ Back to top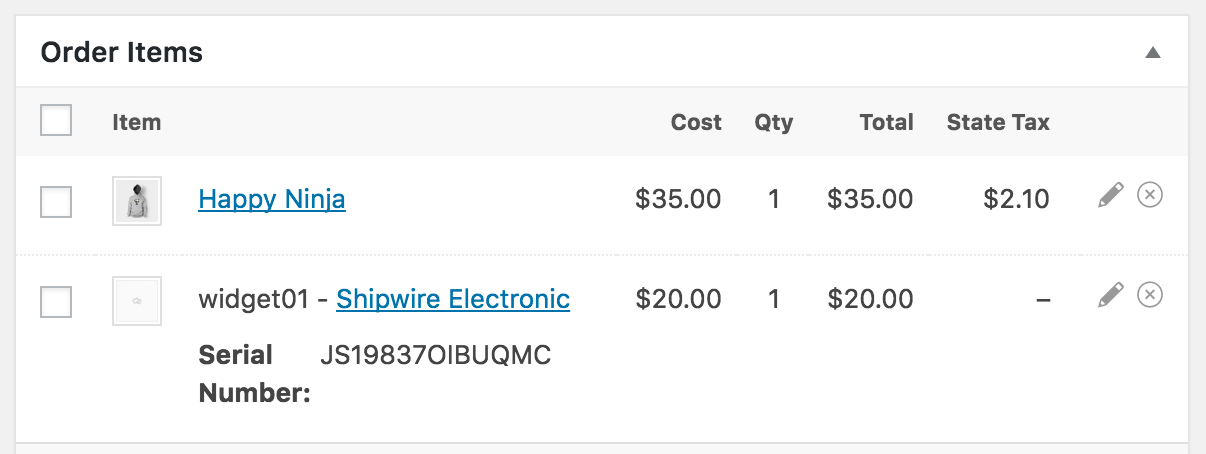
Customer Views
↑ Back to top- If you have both managed and non-managed items, customers may see multiple shipments when checking out as Shipwire items are included in a separate shipment from non-managed items. (requires version 2.0+)

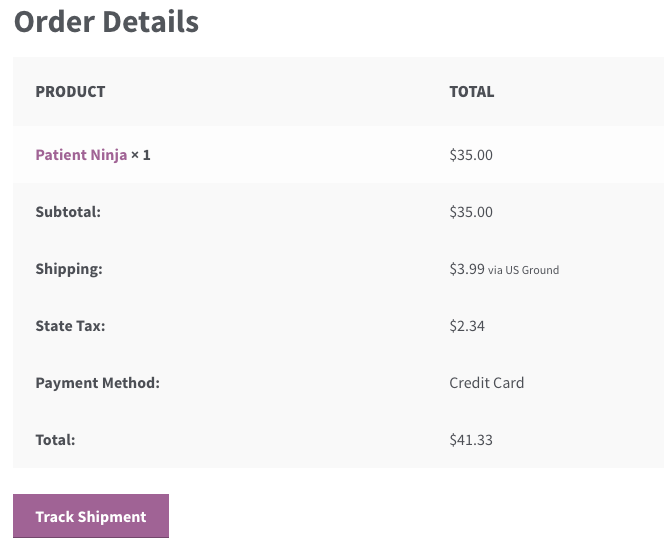
- A Shipwire tracking link is added to the “order completed” emails when available.
- Shipwire tracking links are added to the “View Order” page in the account when available.
- If serial numbers are available for a product, they’re shown on the customer order details in the account and emails as well.
Plugin Compatibility
↑ Back to topProduct Bundles
↑ Back to topFor example, a store may sell Products A, B, and C. However, if these are bundled, this doesn’t necessarily mean that exporting to Shipwire should include SKUs for Product A, Product B, and Product C; it depends on how A, B, and C are packaged.
Products A and B may be sold separately, but included in the same container or packaging as part of the bundle, which means this should be treated differently in Shipwire than the items sold individually. Or, the bundle could represent one package that contains A, B, and C, which is also different than the individual items.
As the way the bundle as “assembled” and shipped can change, this will affect how bundles are sent to Shipwire, and the bundle’s configuration in WooCommerce must therefore also represent its physical shipping configuration.
If you’d like the bundle to represent individual items, and export those SKUs in the bundle individually to Shipwire, then you must tell Product Bundles that items are shipping separately:
 Otherwise, if the bundle represents different packaging, you should ensure that the bundle has a different SKU that is also tracked in Shipwire.
You can learn more about this in the Product Bundles Shipstation guide, as this represents a similar set up to Shipwire.
Frequently Asked Questions
↑ Back to topA: Yes! Simply go to WooCommerce > Settings > Shipping > Shipwire and disable the Shipwire shipping method.
Remember that Shipwire will automatically choose the actual shipping carrier used and the customer will not be able to change this (there’s no way to force Shipwire to select an expedited shipping carrier when using another shipping method like Table Rate Shipping). Order exports are not affected by the shipping method available or used.
Q: Why are rates incorrect on the cart page sometimes?
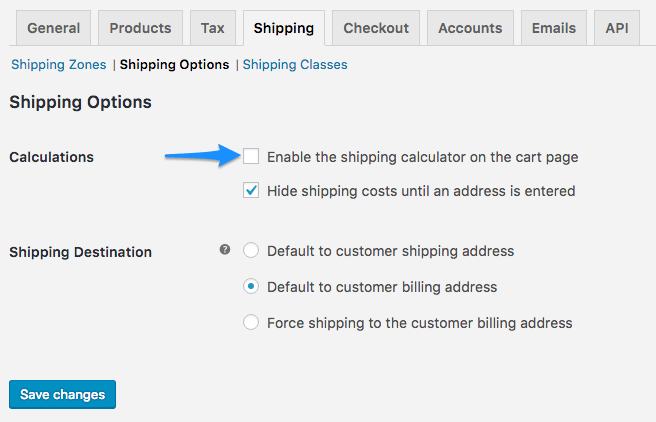
A: When customers estimate shipping on the cart page, only the postal code is required. This can, on rare occasions, lead to inaccurate rates, as the actual rates are re-calculated at checkout once a full address is provided.
For example, if the customer enters a commercial address on the checkout page, methods like “FedEx Home Delivery” will no longer be available. We recommend that you disable the shipping calculator under WooCommerce > Settings > Shipping > Shipping Options to avoid this issue.
Q: How do I map or select which Shipwire shipping methods I’d like to use?
A: Unfortunately this isn’t something we have control over when you configure Shipwire Shipping, as Shipwire determines the best rates to offer automatically based on the inventory location and shipping location. “Ground (GD)” shipping could display UPS ground, FedEx Home Delivery, or other rates based on what is the best available rate at the time.
Q: Why aren’t ‘completed’ orders exported to Shipwire?
A: By default, the extension only exports orders which are set to ‘On-hold’ or ‘Processing’, since we assume completed orders don’t require any further action. You can temporarily switch an order to ‘Processing’ to export to Shipwire or use the
wc_shipwire_valid_order_statuses_for_export filter explained below. Place the following snippet in functions.php in your theme folder:
https://github.com/godaddy-wordpress/wc-plugins-snippets/blob/master/woocommerce-shipwire/add-valid-export-statuses.php
Troubleshooting
↑ Back to top- Check that you have entered your API key correctly.
- Double-check that you have entered your API key correctly 😉 You will likely get a warning if you haven’t, but this doesn’t always guarantee you haven’t made a typo:
- Is your site publicly available? Shipwire can’t send your site inventory or order updates if it’s not publicly accessible.
- Are shipping rates showing as not available? Make sure at least some items in the cart are Shipwire-managed and you’ve entered a postcode for US addresses, or country/city for international shipments.
- Are orders not exporting to Shipwire? Please (1) ensure the WooCommerce order status is processing or on-hold, as completed orders are not exported, (2) ensure your products have SKUs that match and are unique from other products, a Shipwire SKU, and (3) ensure these products are marked as Shipwire managed under the product details.
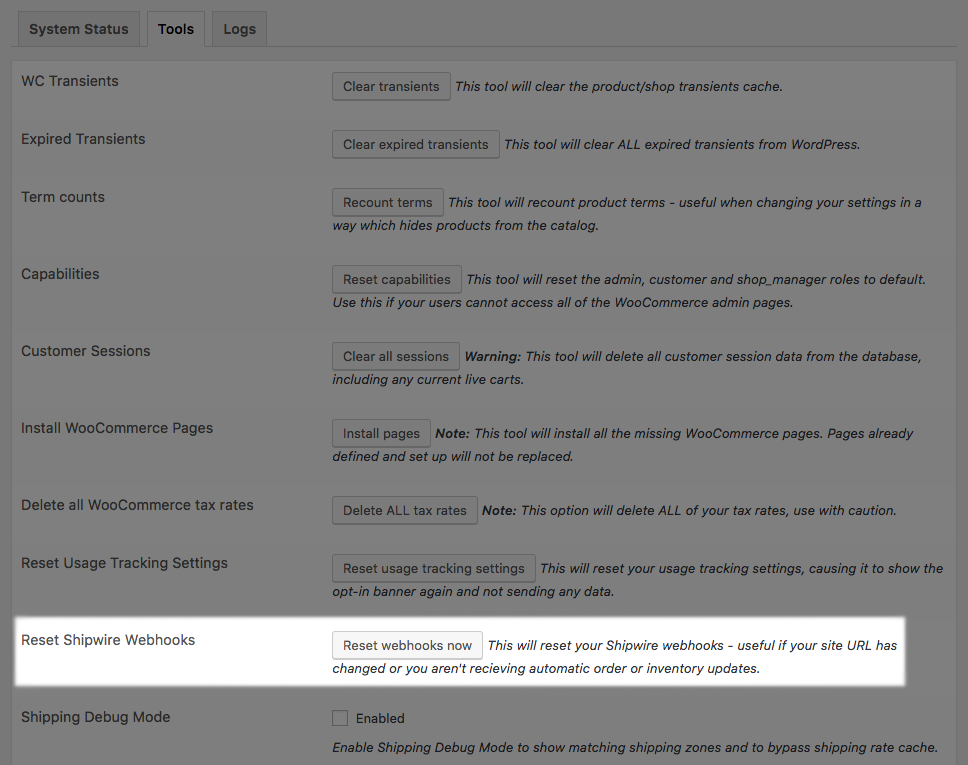
- Are inventory or tracking updates not occurring as expected? Please try resetting webhooks under WooCommerce > System Status > Tools and waiting a few hours to see if updates re-sync:
- Still having issues? Enable debug mode on WooCommerce > Shipwire > General Settings, try to reproduce the issue, and submit the information found under WooCommerce > System Status > Logs within the shipwire.log along with your support ticket.
For Developers
↑ Back to topActions
do_action( 'wc_shipwire_product_options_start' );anddo_action( 'wc_shipwire_product_options_end' );— Use this to add options to the Shipwire product tabdo_action( 'wc_shipwire_order_exported', $this, $response );— Passes in the Shipwire order object (which extends theWC_Orderobject), and the API response. Fired immediately after an order is exported to Shipwire.do_action( 'wc_shipwire_tracking_updated', $this, $tracking_info );— Passes in the Shipwire order object (which extends theWC_Orderobject), and an array of tracking information. Fired immediately after tracking is updated for an order.do_action( 'wc_shipwire_inventory_updated', $product, $item_inventory );— Passes in theWC_Productobject that inventory has just been updated for, and an array of inventory counts for the product.do_action( 'wc_shipwire_all_inventory_updated', $product_ids );— Passes in an array of product IDs that inventory was just updated for.
Filters
apply_filters( 'wc_shipwire_settings', $settings[ $tab_id ], $settings, $tab_id );— Passes in the settings array and the current tab ID — use this to add additional settings to the Shipwire settings pages.apply_filters( 'wc_shipwire_auto_export_order', true, $order_id );— Passes in(bool) trueand the order ID for the order being automatically exported. Use this prevent a specific order from being automatically exported.apply_filters( 'wc_shipwire_valid_order_statuses_for_export', array( 'on-hold', 'processing' ) )— Passes in array of valid order statuses for export. Use this to prevent/accept particular order statuses for Shipwire export.