Role-based pricing for B2B/B2C and wholesalers. Manage roles, bulk set prices, dynamic pricing, category pricing, coupons, VAT, TAX exempts, registration, private store and much more.
Installation
↑ Back to top- Download the .zip file from your WooCommerce account.
- Go to: WordPress Admin > Plugins > Add New
- Upload the ZIP file using the, “choose file” button.
- Activate the extension.
More information at: Installing and Managing Plugins.
External documentation for Roles & Rules B2B (found here – Consortia)Setup and Configuration
↑ Back to topTo set up your store with Roles & Rules B2B:
Go too: WooCommerce > Settings > Roles & Rules B2B.

General tab, the options are:
- Private store: This option hides prices and cart functionally for users who are not logged in. This option also changes the “add to cart” button to “view product.” Your shop is now like a product catalog with no prices. If you do not use this option, your store shows your normal prices for B2C customers. Remember to disable the Guest role so it is not active (green icon).
- Private store: Not Logged in price text: If you would like, you can write text here instead of just having a hidden price. For example: Login to view prices.
- Hide retail price: Use this option if you do not want to show the retail price (current price before i.e rule reduction). After clicking this option your store only shows the B2B price for your customers.
- Hide variable retail price (from – to): If you have variable prices with no price range the price will be like this:
$20 – $0To avoid this you can hide the prices or set a price range. - Text before variable price: You can add i.e a label like From to get i.e From $10, then when you select a variant you get the specific price on that variation.
- Text after retail price: Write i.e RRP here to show customers what this price is. Format will be: $10.00 RRP. Setting a text in this field will add a new line after retail price and text.
- Text after B2B price: Use this for roles that includes VAT. I.e: $14 inc.VAT. NOTE: if you use this you also need to set the Text after net prices (ex.VAT).
- Show reduction in %: With this option you can show your customers the reduction in percent. The reduction shows below/after the price.
- Text before reduction: If you like to set a text before reduction like; You save 30%, just enter “You save” in this text box.
- Set reduction text after %: If you like to set a text after reduction like; 30% reduction, enter “reduction” in this text box.
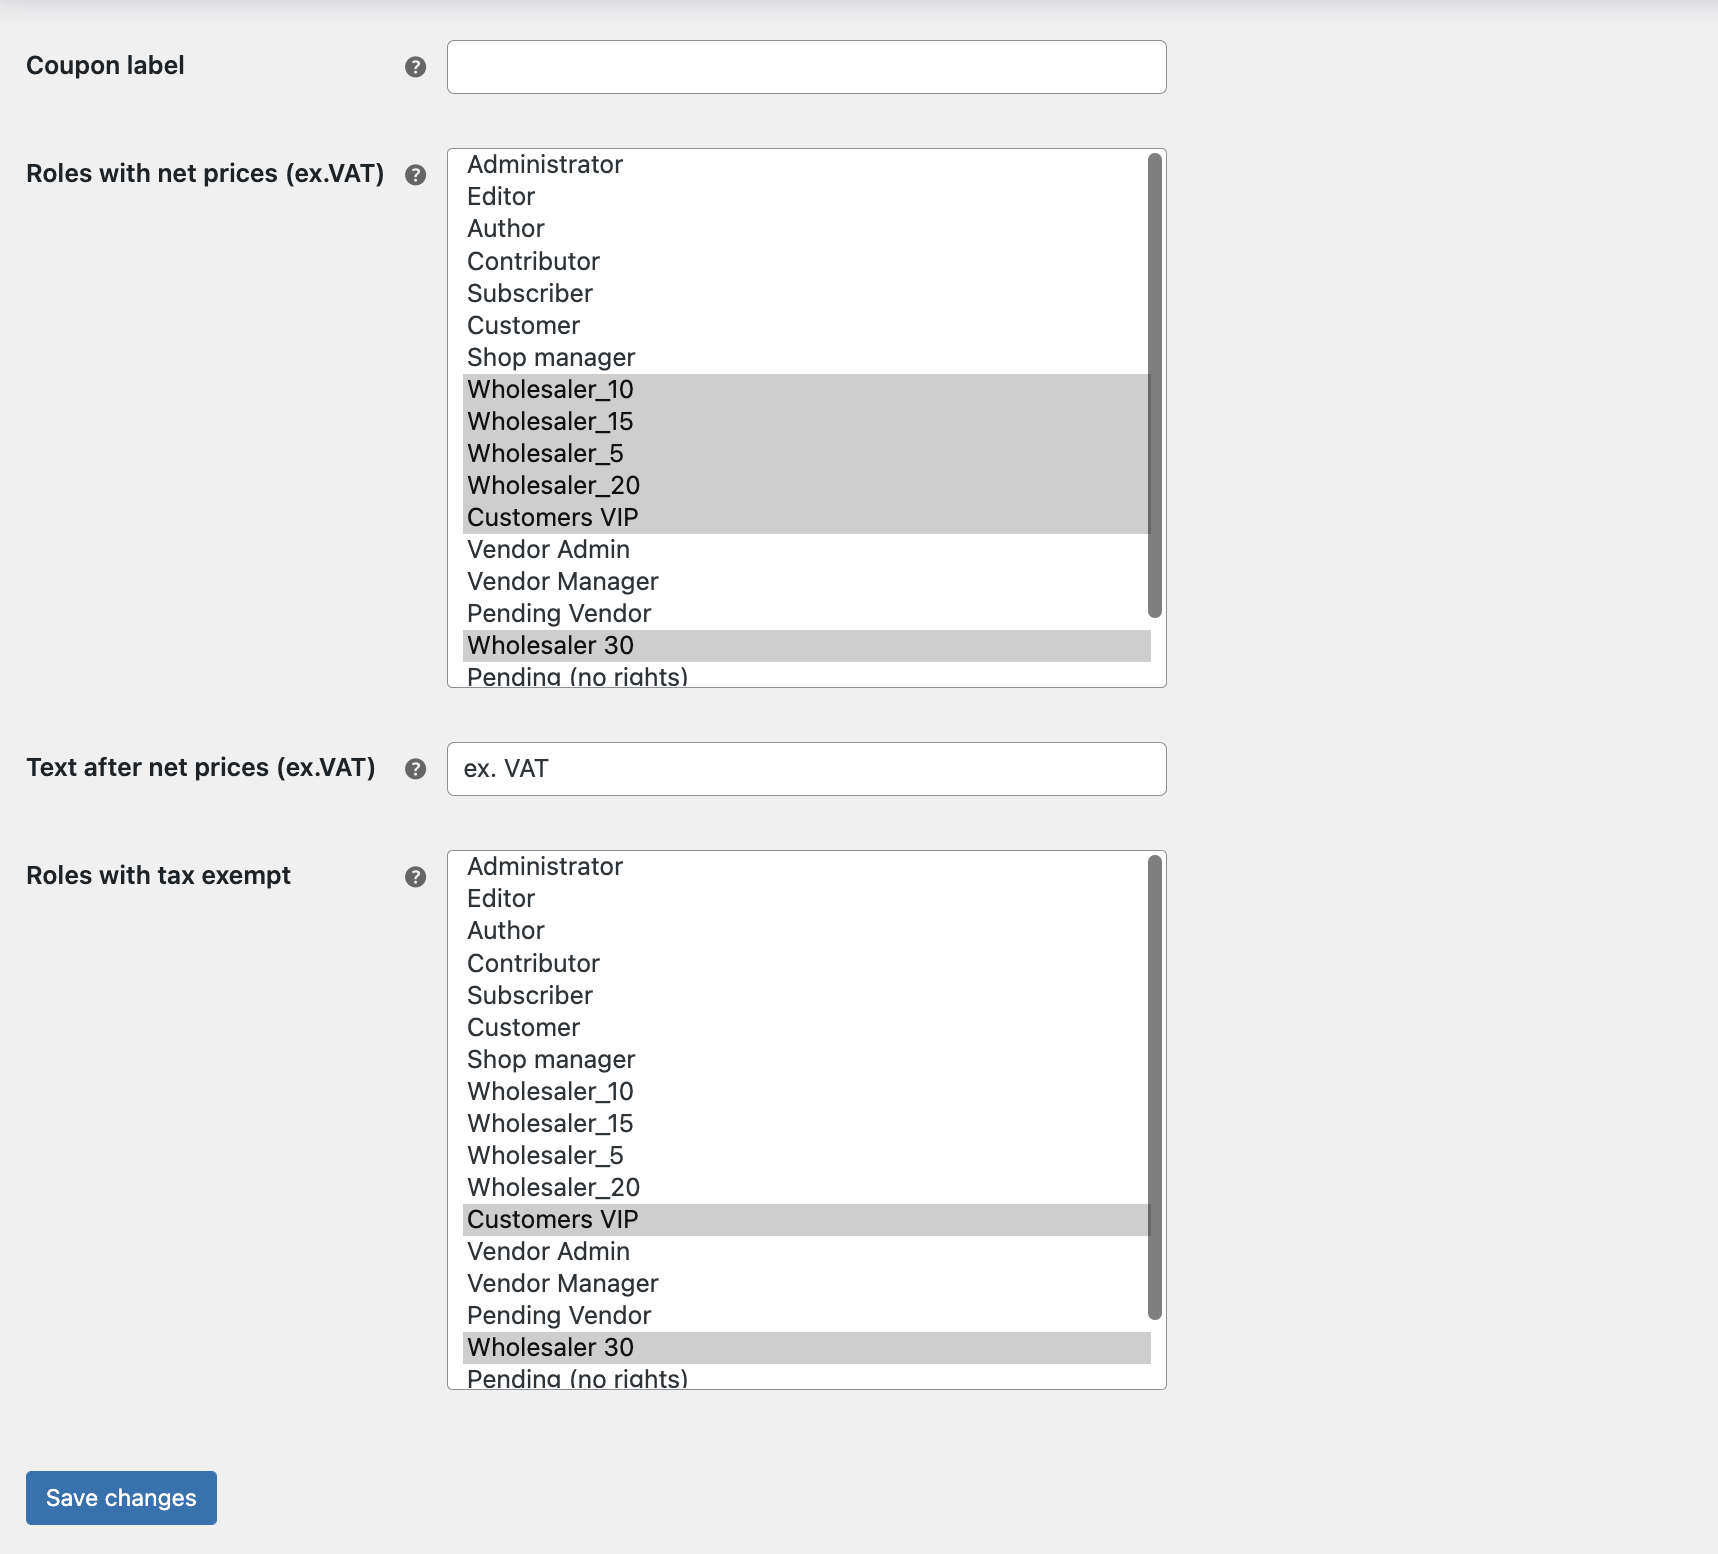
- Coupon label: If you enable and use coupons, you can set the text that will explain the extra discount you give your
- Roles with Net prices: Select role(s) to override WooCommerce tax settings for B2B/wholesaler customers to show net prices: ex. VAT. In Roles & Rules B2B you find an info label on every role with net prices too.
- Text after net prices (ex.VAT): Add i.e ex.VAT here to use after prices(and roles) with net prices.
- Net prices on orders: REMOVED and replaced with:
- Roles with tax exempt: Select roles to be executed taxes (used in combination with ex.VAT roles). This means that in cart/checkout, prices for shipping, coupons and totals will be shown ex. taxes (VAT) and the order will be pushed the same way (no VAT / Taxes). For roles not selected, orders will have taxes added to total and executed ink. taxes (VAT).
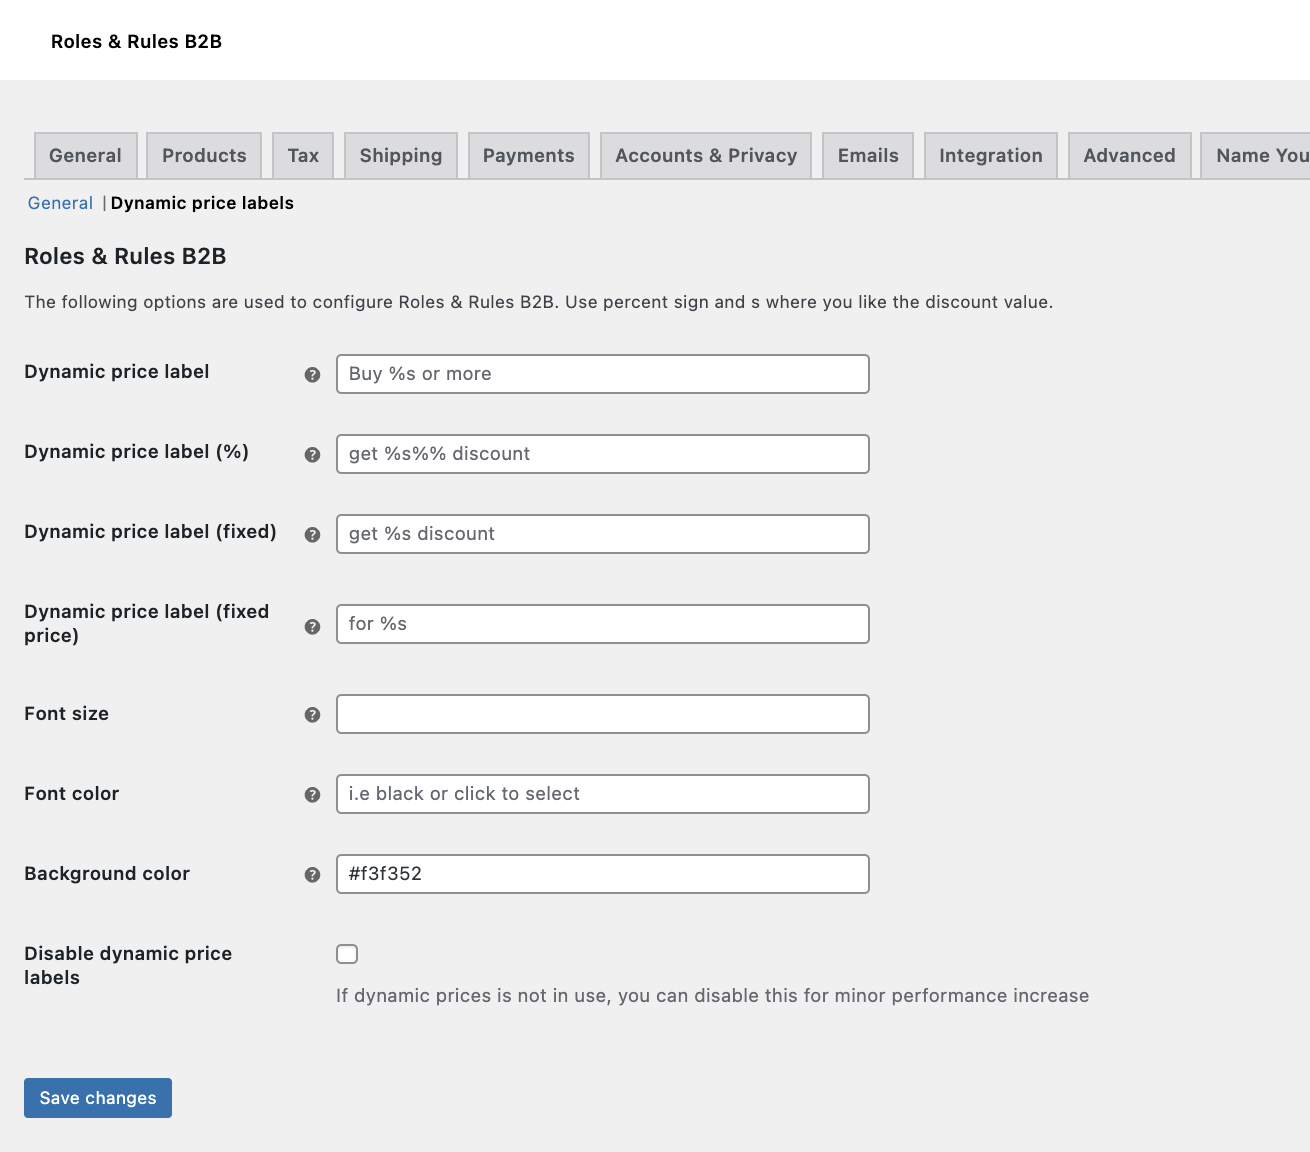 Dynamic labels tab, (used for categories and products – quantity give X % discount) the options are:
- Dynamic price label: Write i.e: Buy %s to get (%s will set the variable quantity on your rule for category or product), if no text is written the default text will be used.
- Dynamic price label (%): Write i.e: , get %s%% discount (%s will set the variable discount on your rule for category or product – note %% will give the percent sign), if no text is written the default text will be used.
- Dynamic price label (fixed): Write i.e: get %s discount (%s will set the variable discount on your rule for category or product), if no text is written the default text will be used.
- Dynamic price label (fixed price): Write i.e: for %s (%s will set the price on your rule for category or product), if no text is written the default text will be used.
- Font size: Set the font size on price label (default uses H5 – HTML tag, and has the CSS class: rrb2b_qty_discount that can be used for further styling of fonts, color, margins, padding, background color and more)
- Font color: Set the font color (default the theme color i.e black) – click the input and select your color.
- Background color: Set the background color (default none) – click the input and select your color.
- Disable dynamic price labels: If you do not use dynamic prices you can check this for a minor performance increase.
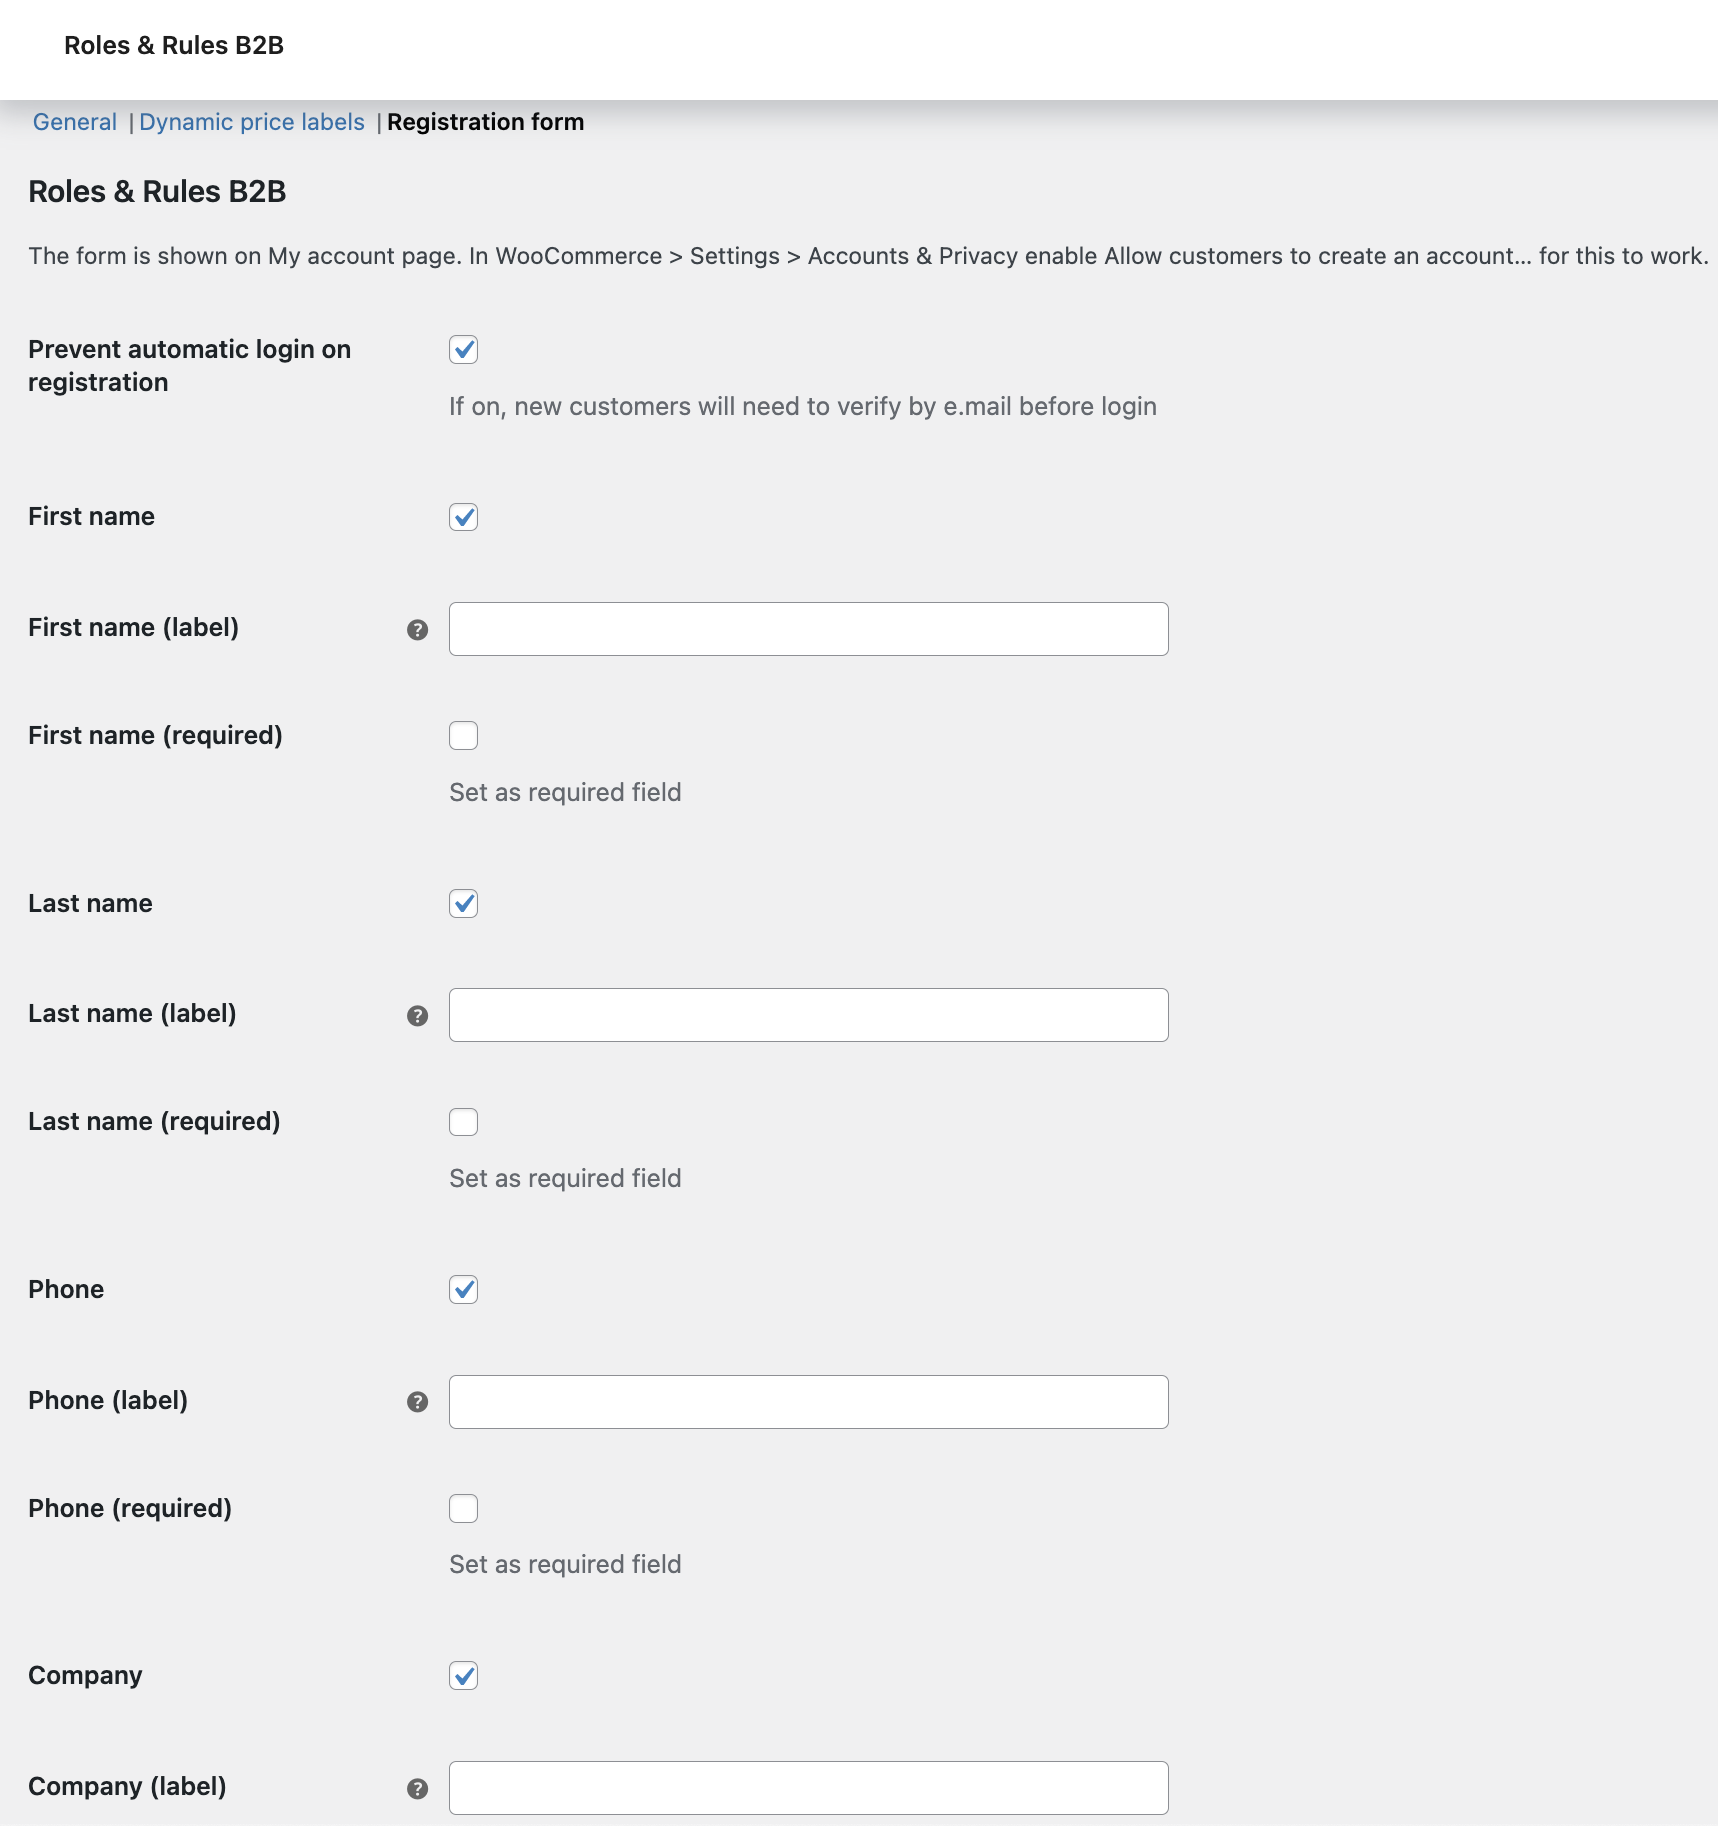
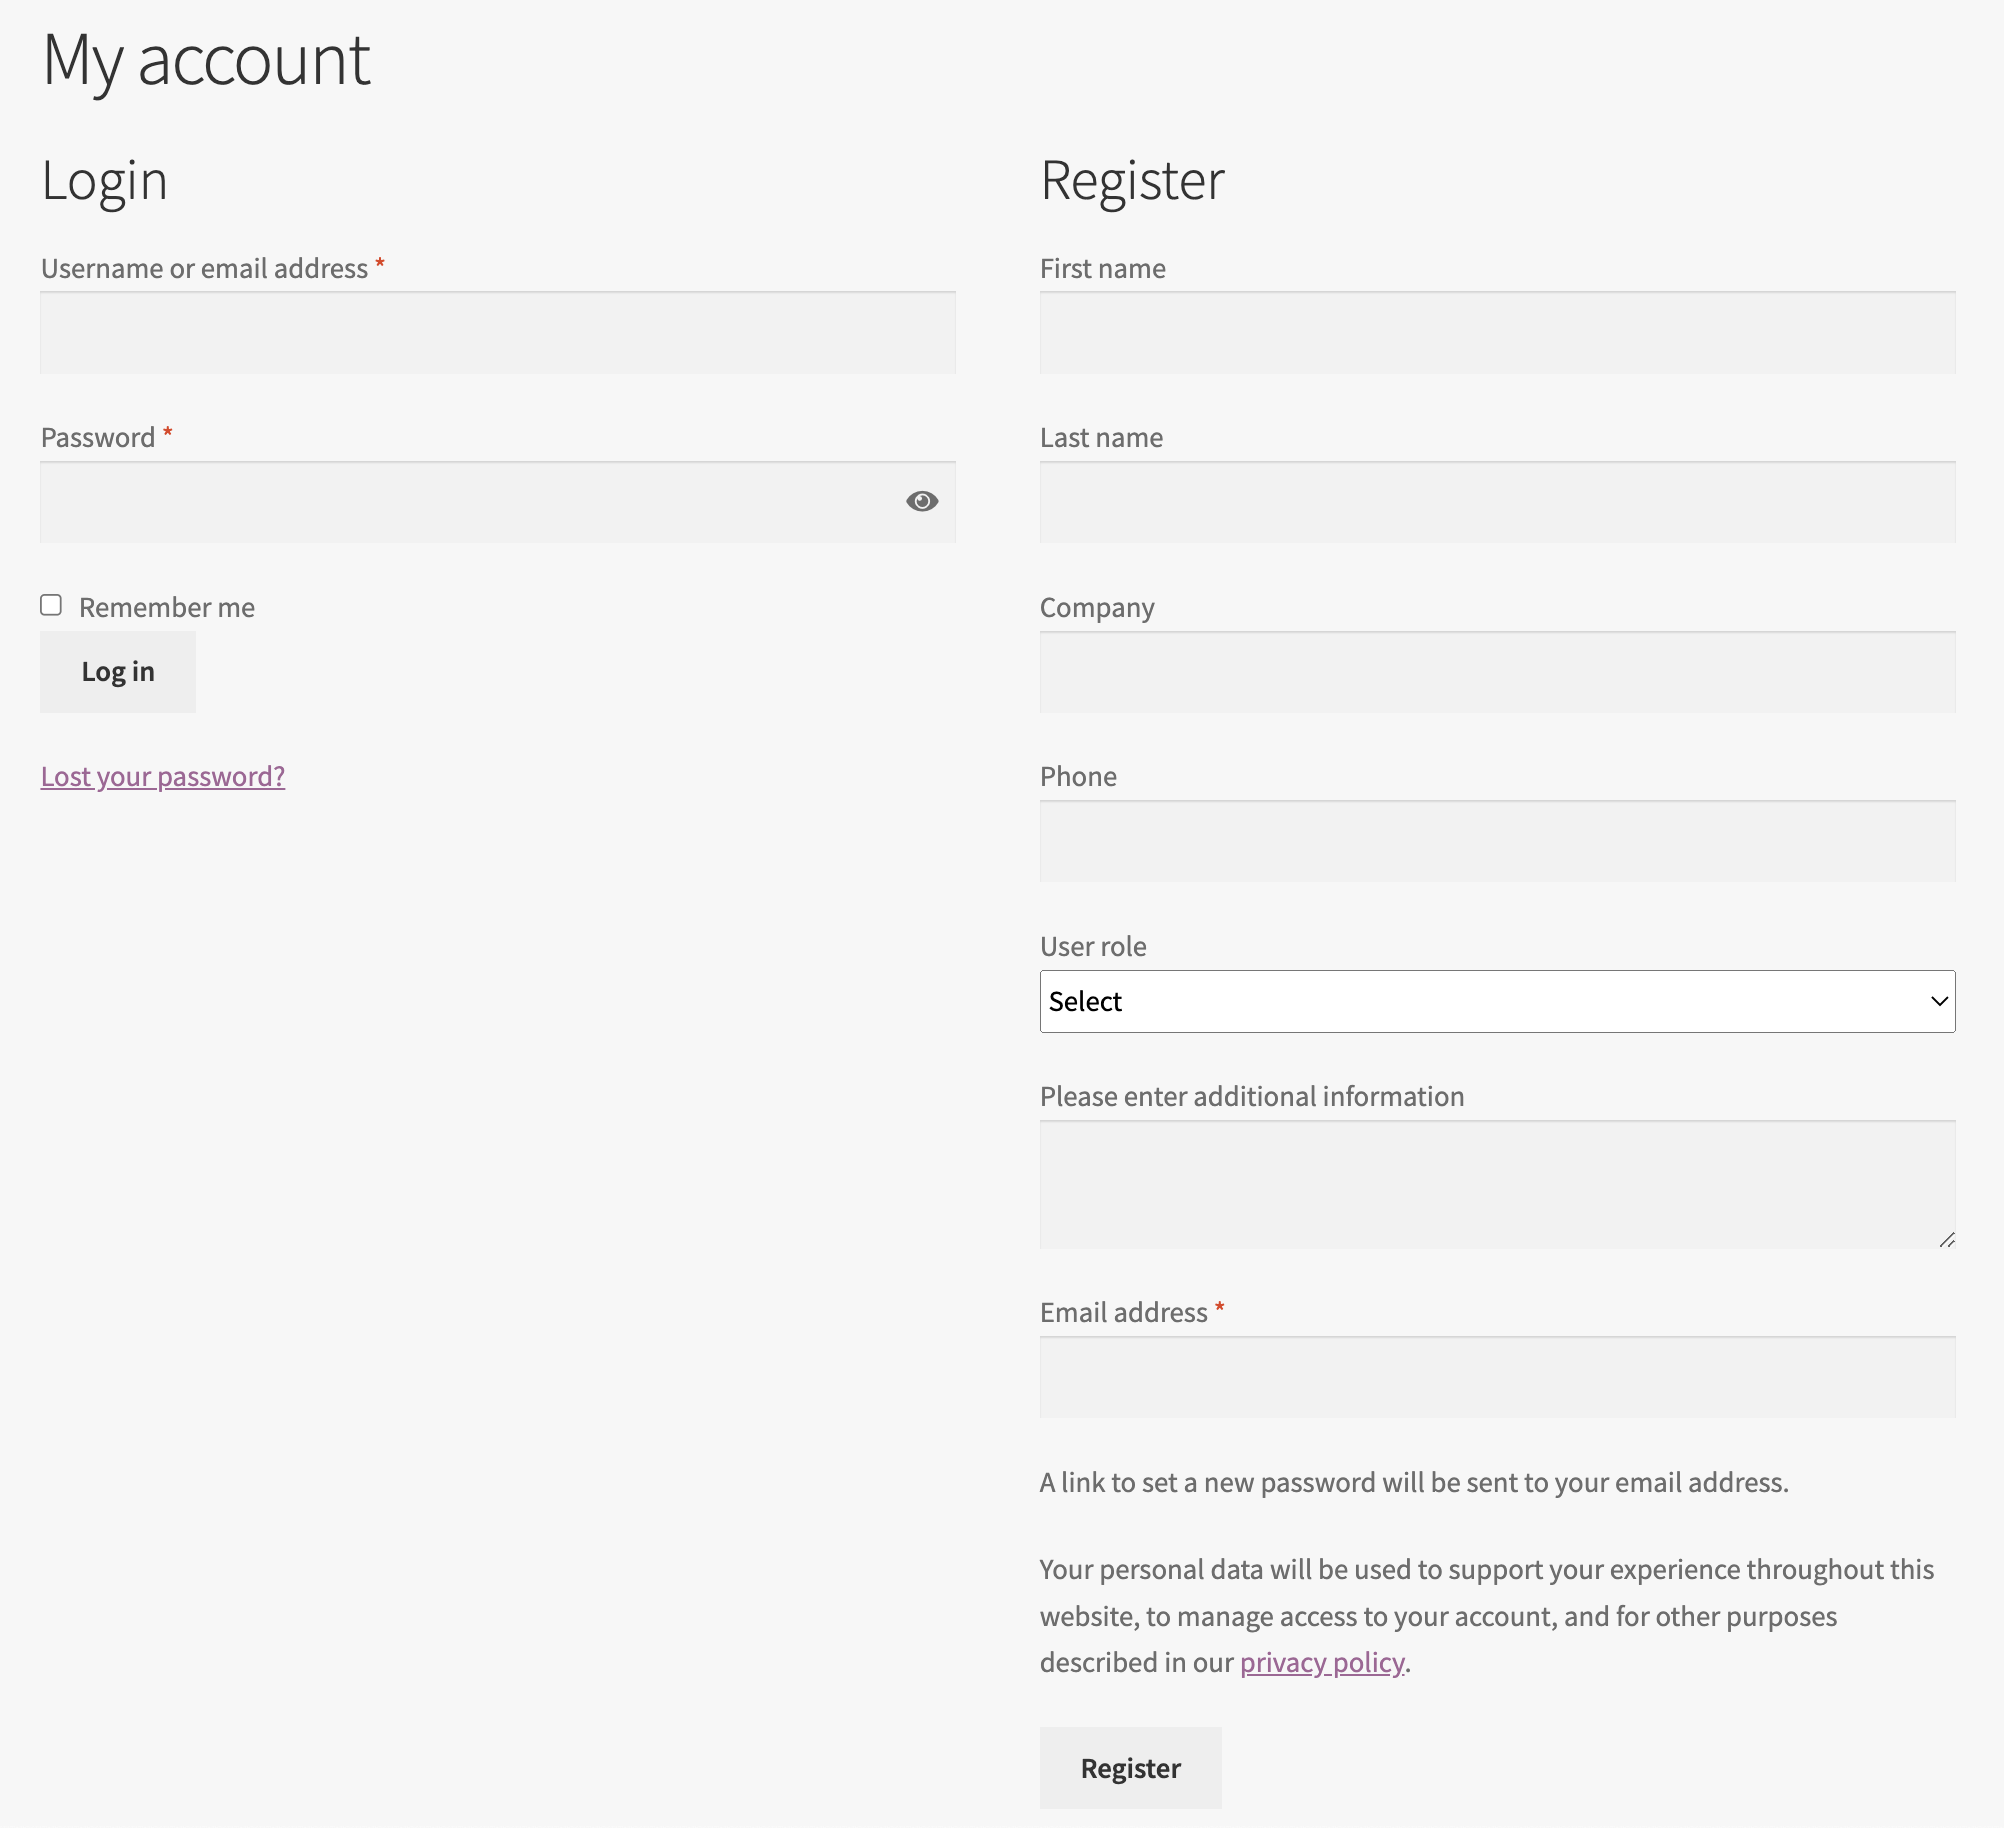
 The registration form has several options:
- Prevent automatic login on registration: If checked the new user is not allowed to login before he / she have confirmed his e.mail address
- First name: Check this if you want it in the registration form
- First name (label): Set the label for this field if i.e you want a custom label or translation missing.
- First name (required): Check if you want it to be a required field
- Last name: Check this if you want it in the registration form
- Last name (label): Set the label for this field if i.e you want a custom label or translation missing.
- Last name (required): Check if you want it to be a required field
- Phone: Check this if you want it in the registration form
- Phone (label): Set the label for this field if i.e you want a custom label or translation missing.
- Phone (required): Check if you want it to be a required field
- Company: Check this if you want it in the registration form
- Company (label): Set the label for this field if i.e you want a custom label or translation missing.
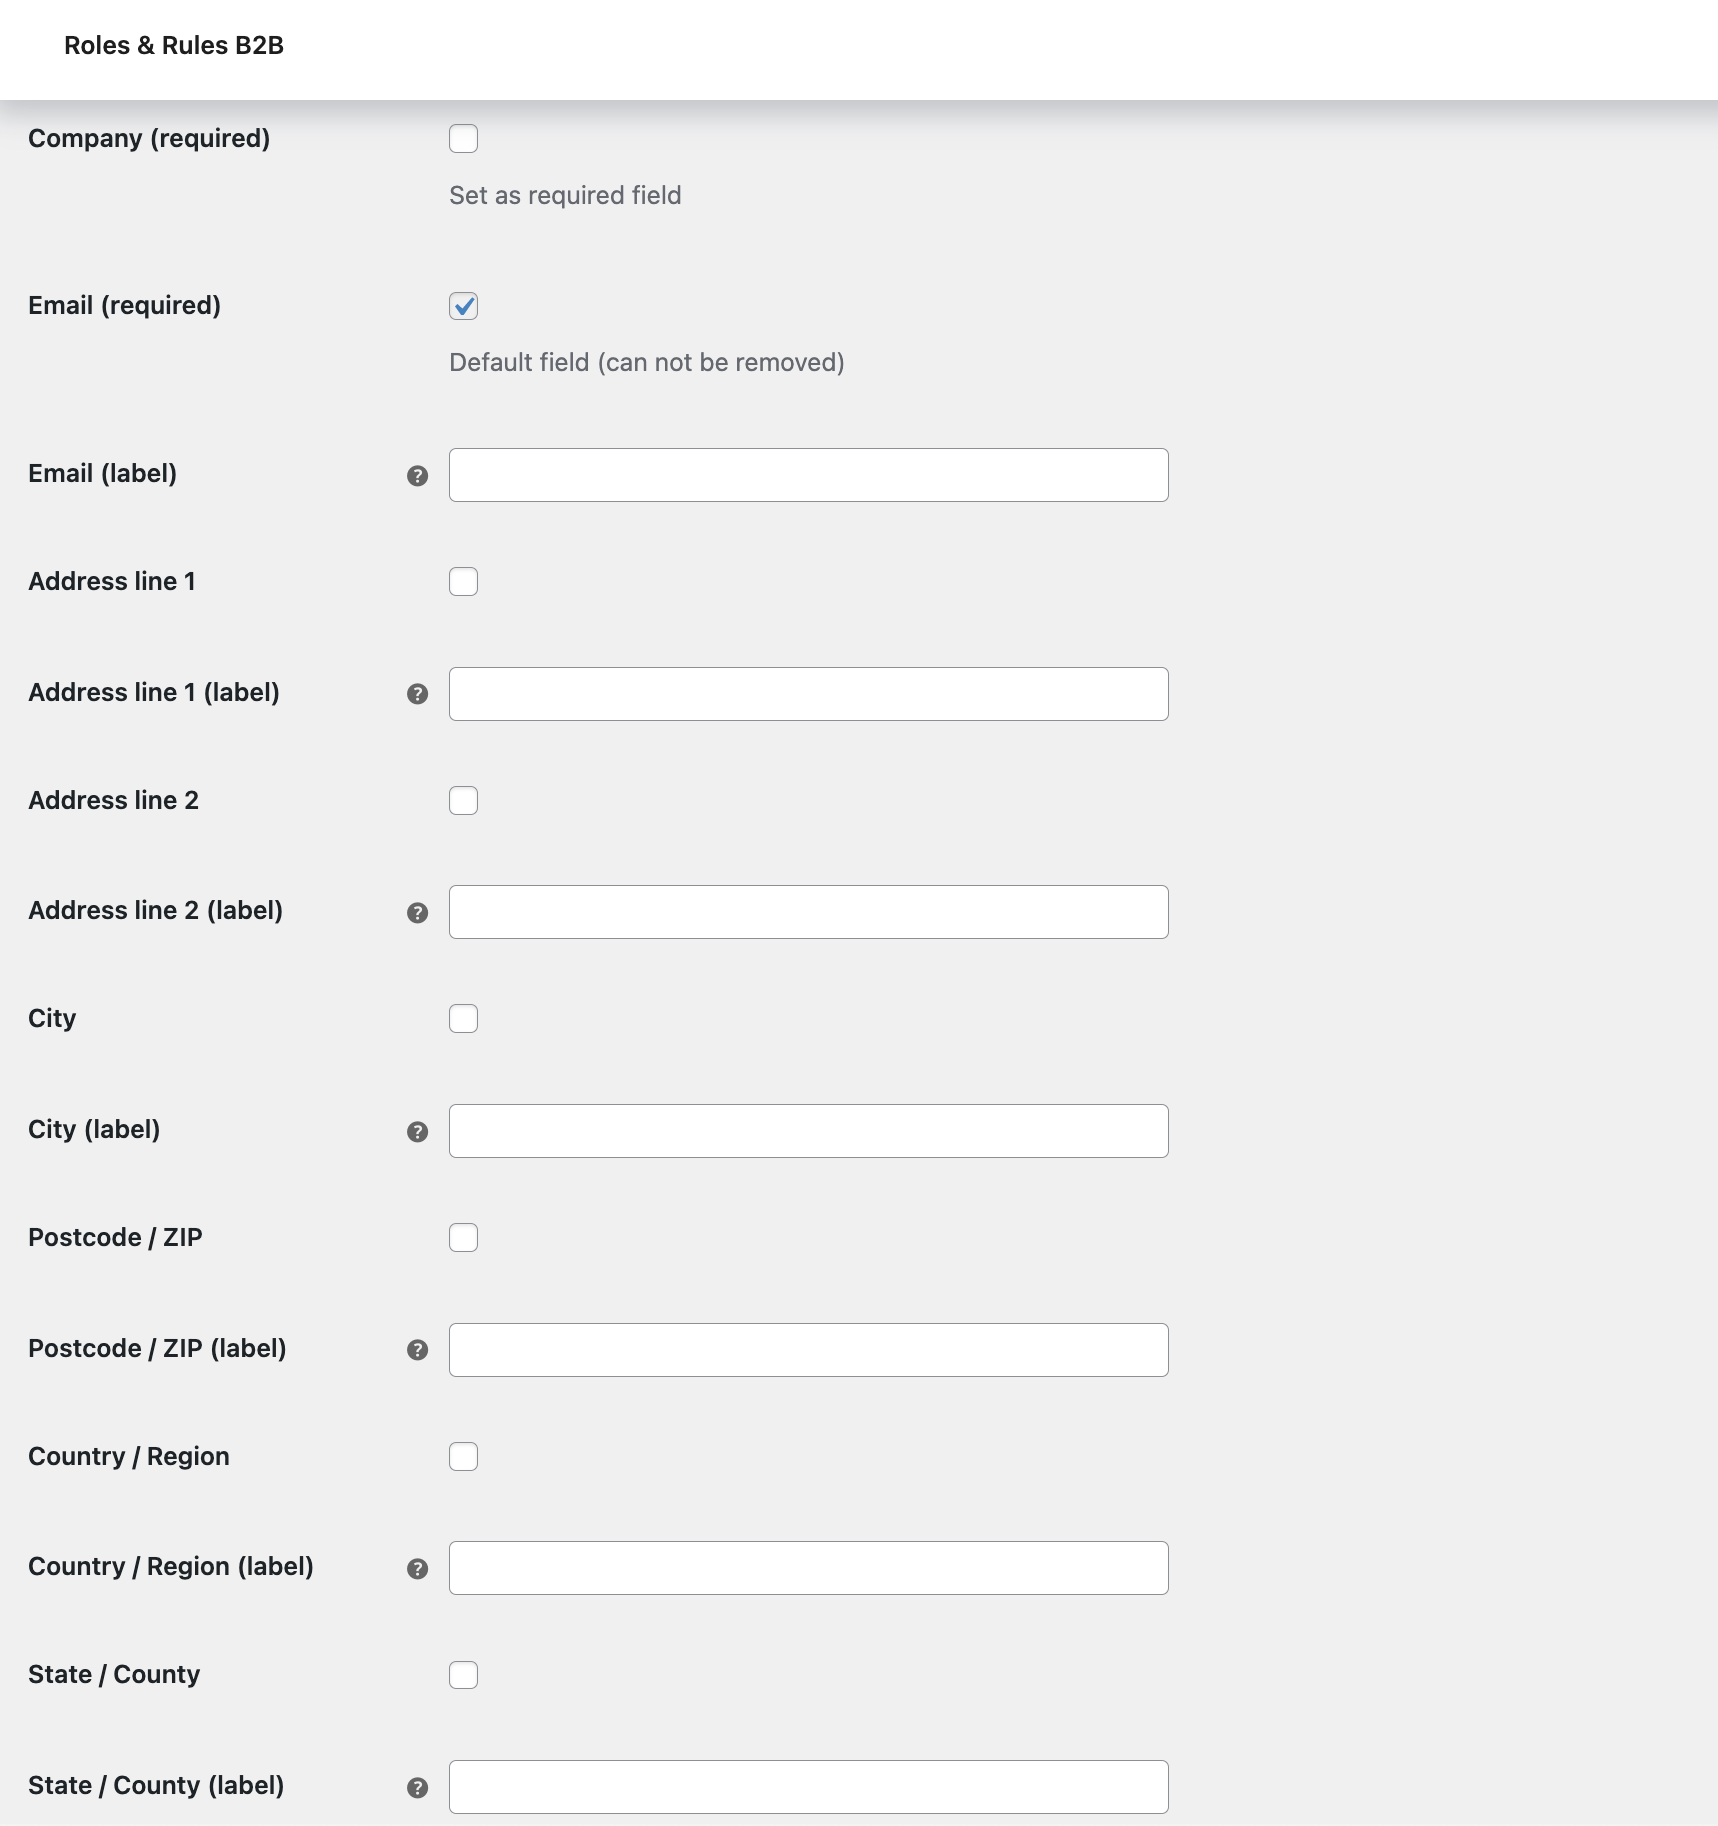
- Company (required): Check if you want it to be a required field
- Email (required): This is a default field that needs to be in the form – or a user will not be added
- Email (label): Set the label for this field if i.e you want a custom label or translation missing.
- Address line 1: Check this if you want it in the registration form
- Address line 1 (label): Set the label for this field if i.e you want a custom label or translation missing.
- Address line 2: Check this if you want it in the registration form
- Address line 2 (label): Set the label for this field if i.e you want a custom label or translation missing.
- City: Check this if you want it in the registration form
- City (label): Set the label for this field if i.e you want a custom label or translation missing.
- Postcode / ZIP: Check this if you want it in the registration form
- Postcode / ZIP (label): Set the label for this field if i.e you want a custom label or translation missing.
- Country / Region: Check this if you want select country / region in the registration form
- Country / Region (label): Set the label for this field if i.e you want a custom label or translation missing.
- State / County: Check this if you want it in the registration form
- State / County (label): Set the label for this field if i.e you want a custom label or translation missing.
- User roles (label): Set the label for this field if i.e you want a custom label or translation missing.
- User roles: Select (multiple if you like) roles a user can request. The selection will be a select dropdown box in the form. We recommend to set up roles with the Pending (no rights). If no roles is selected the select dropdown will not be shown in the form.
- Customer message: Check this if you want an extra text (text area) input field on the registration form. Here you can get additional information from the new customer. The information entered here will be found on the customer / user (with the date submitted).
- Customer message (label): Set the label for this field if i.e you want a custom label or translation missing.

Using the registration form
↑ Back to top- Go to WooCommerce > Settings > Accounts & Privacy
- In Account creation check: Allow customers to create an account on the “My account” page
- Check any other here if you like (we recommend automatically generate password to)
- Save changes
- Go to WooCommerce > Roles & Rules B2B > Roles (tab)
- Add roles you want to use in the form:
- Request B2B role (example) with capabilities Pending (no rights)
- This gives you a role the user can use on registration, but you need to change to i.e B2B if you approve the user
- Add roles you want to use in the form:
- Go to WooCommerce > Settings > Roles & Rules B2B
- Check the fields you want in the form
- Check the roles you want a user to have – we recommend pending roles like in 2.1 (above). If you add roles with read or more (capabilities) then the user can login right after he has done the registration. So for security of your site we recommend this (pending roles).
- Save changes
- Go to yourdomain.com/my-account/ (or the like where you have the “My account” page)
- Now your registration form should be visible (if not already logged inn)
Next: Start setting up Roles and Rules
Go to: WooCommerce > Roles & Rules B2B
Manage Roles
↑ Back to top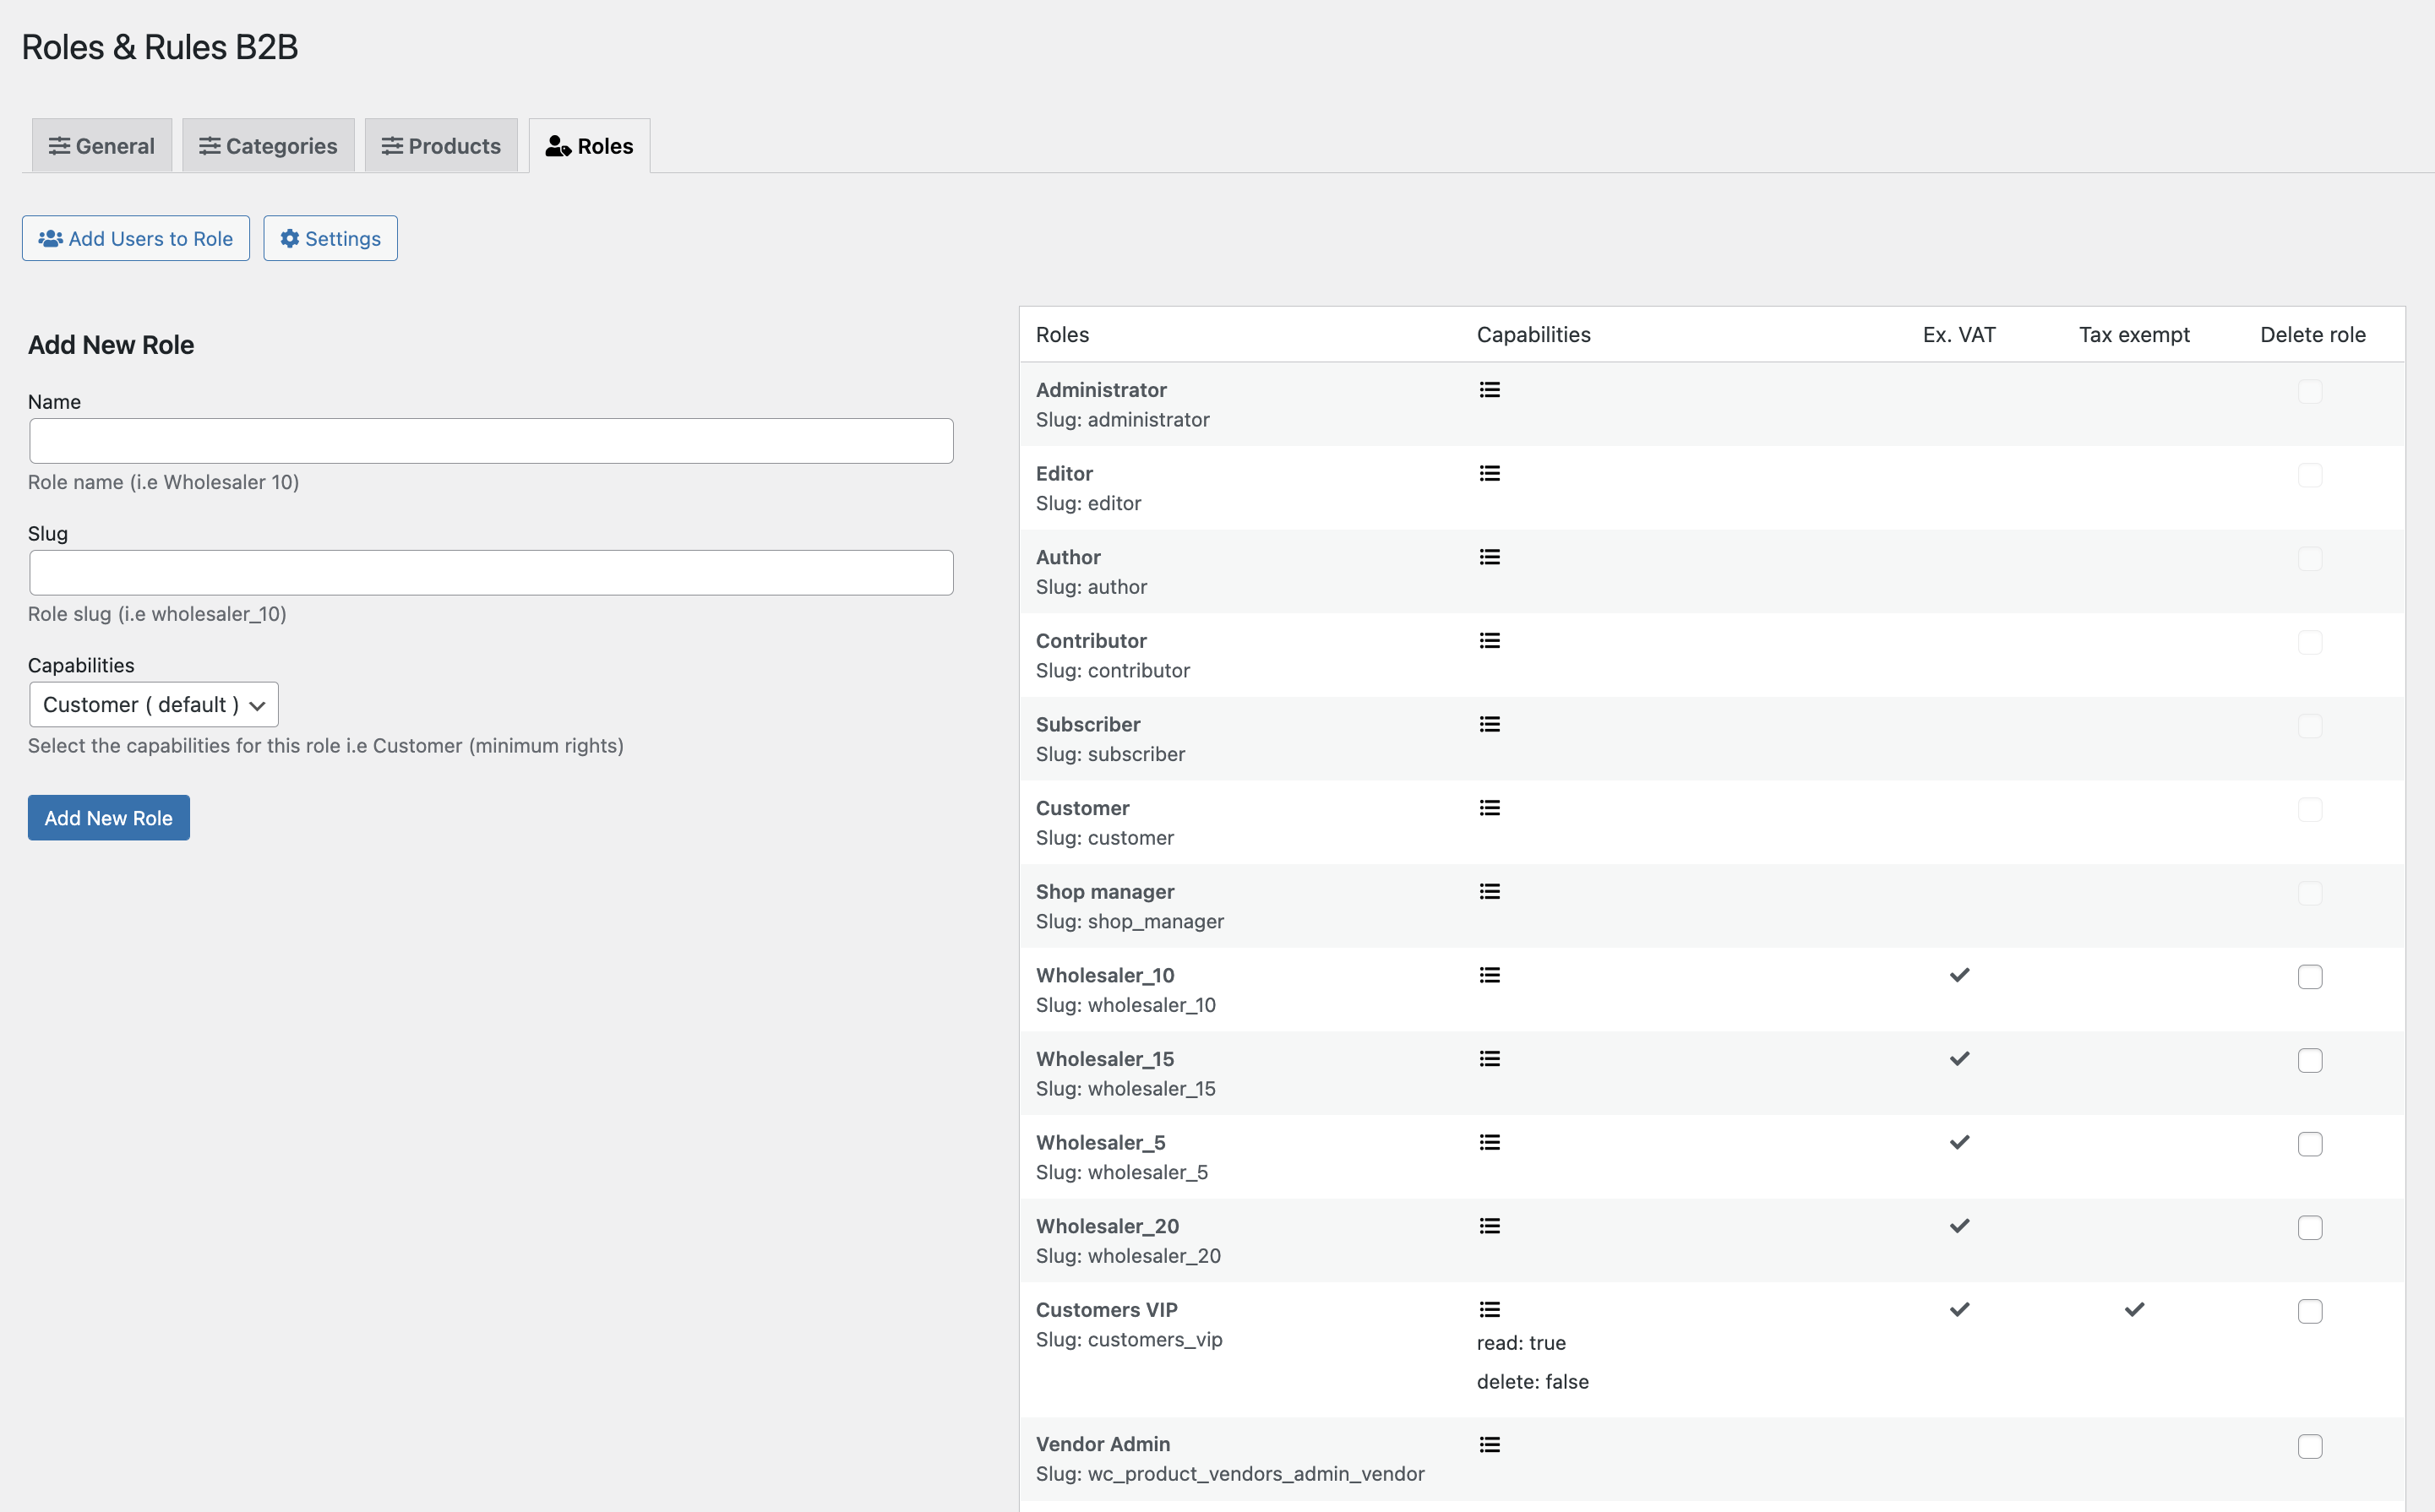 To use Roles & Rules you need to have Roles for your B2B or B2C users. Role names can be anything i.e: Wholesaler (something) or VIP Customers, these roles will then be used for your customers. In WP Admin > Users you can easily bulk update users with a Role.
If you need a role for a customer group (users), add a role name and a slug for that role. Slugs must be a whole word I.e wholesaler_vip (lowercase letters and no space). Then set the capabilities for your role, default Customer (minimal rights), other capabilities is possible but require that you know what you let your users access your WP admin. After this just click the “save” button.
Now you can add users (customers) to this role. Above the “add role” section you will find a button which says, “add users to role.” This button sends you to the users list. Here you can bulk add users to any role. Add your users (customers) to the created role and use the button, “Roles & Rules B2B” to get back to Roles & Rules to continue adding roles or set up rules for the new roles.
To use Roles & Rules you need to have Roles for your B2B or B2C users. Role names can be anything i.e: Wholesaler (something) or VIP Customers, these roles will then be used for your customers. In WP Admin > Users you can easily bulk update users with a Role.
If you need a role for a customer group (users), add a role name and a slug for that role. Slugs must be a whole word I.e wholesaler_vip (lowercase letters and no space). Then set the capabilities for your role, default Customer (minimal rights), other capabilities is possible but require that you know what you let your users access your WP admin. After this just click the “save” button.
Now you can add users (customers) to this role. Above the “add role” section you will find a button which says, “add users to role.” This button sends you to the users list. Here you can bulk add users to any role. Add your users (customers) to the created role and use the button, “Roles & Rules B2B” to get back to Roles & Rules to continue adding roles or set up rules for the new roles.
Table – list of roles
↑ Back to topSet up General Rules
↑ Back to top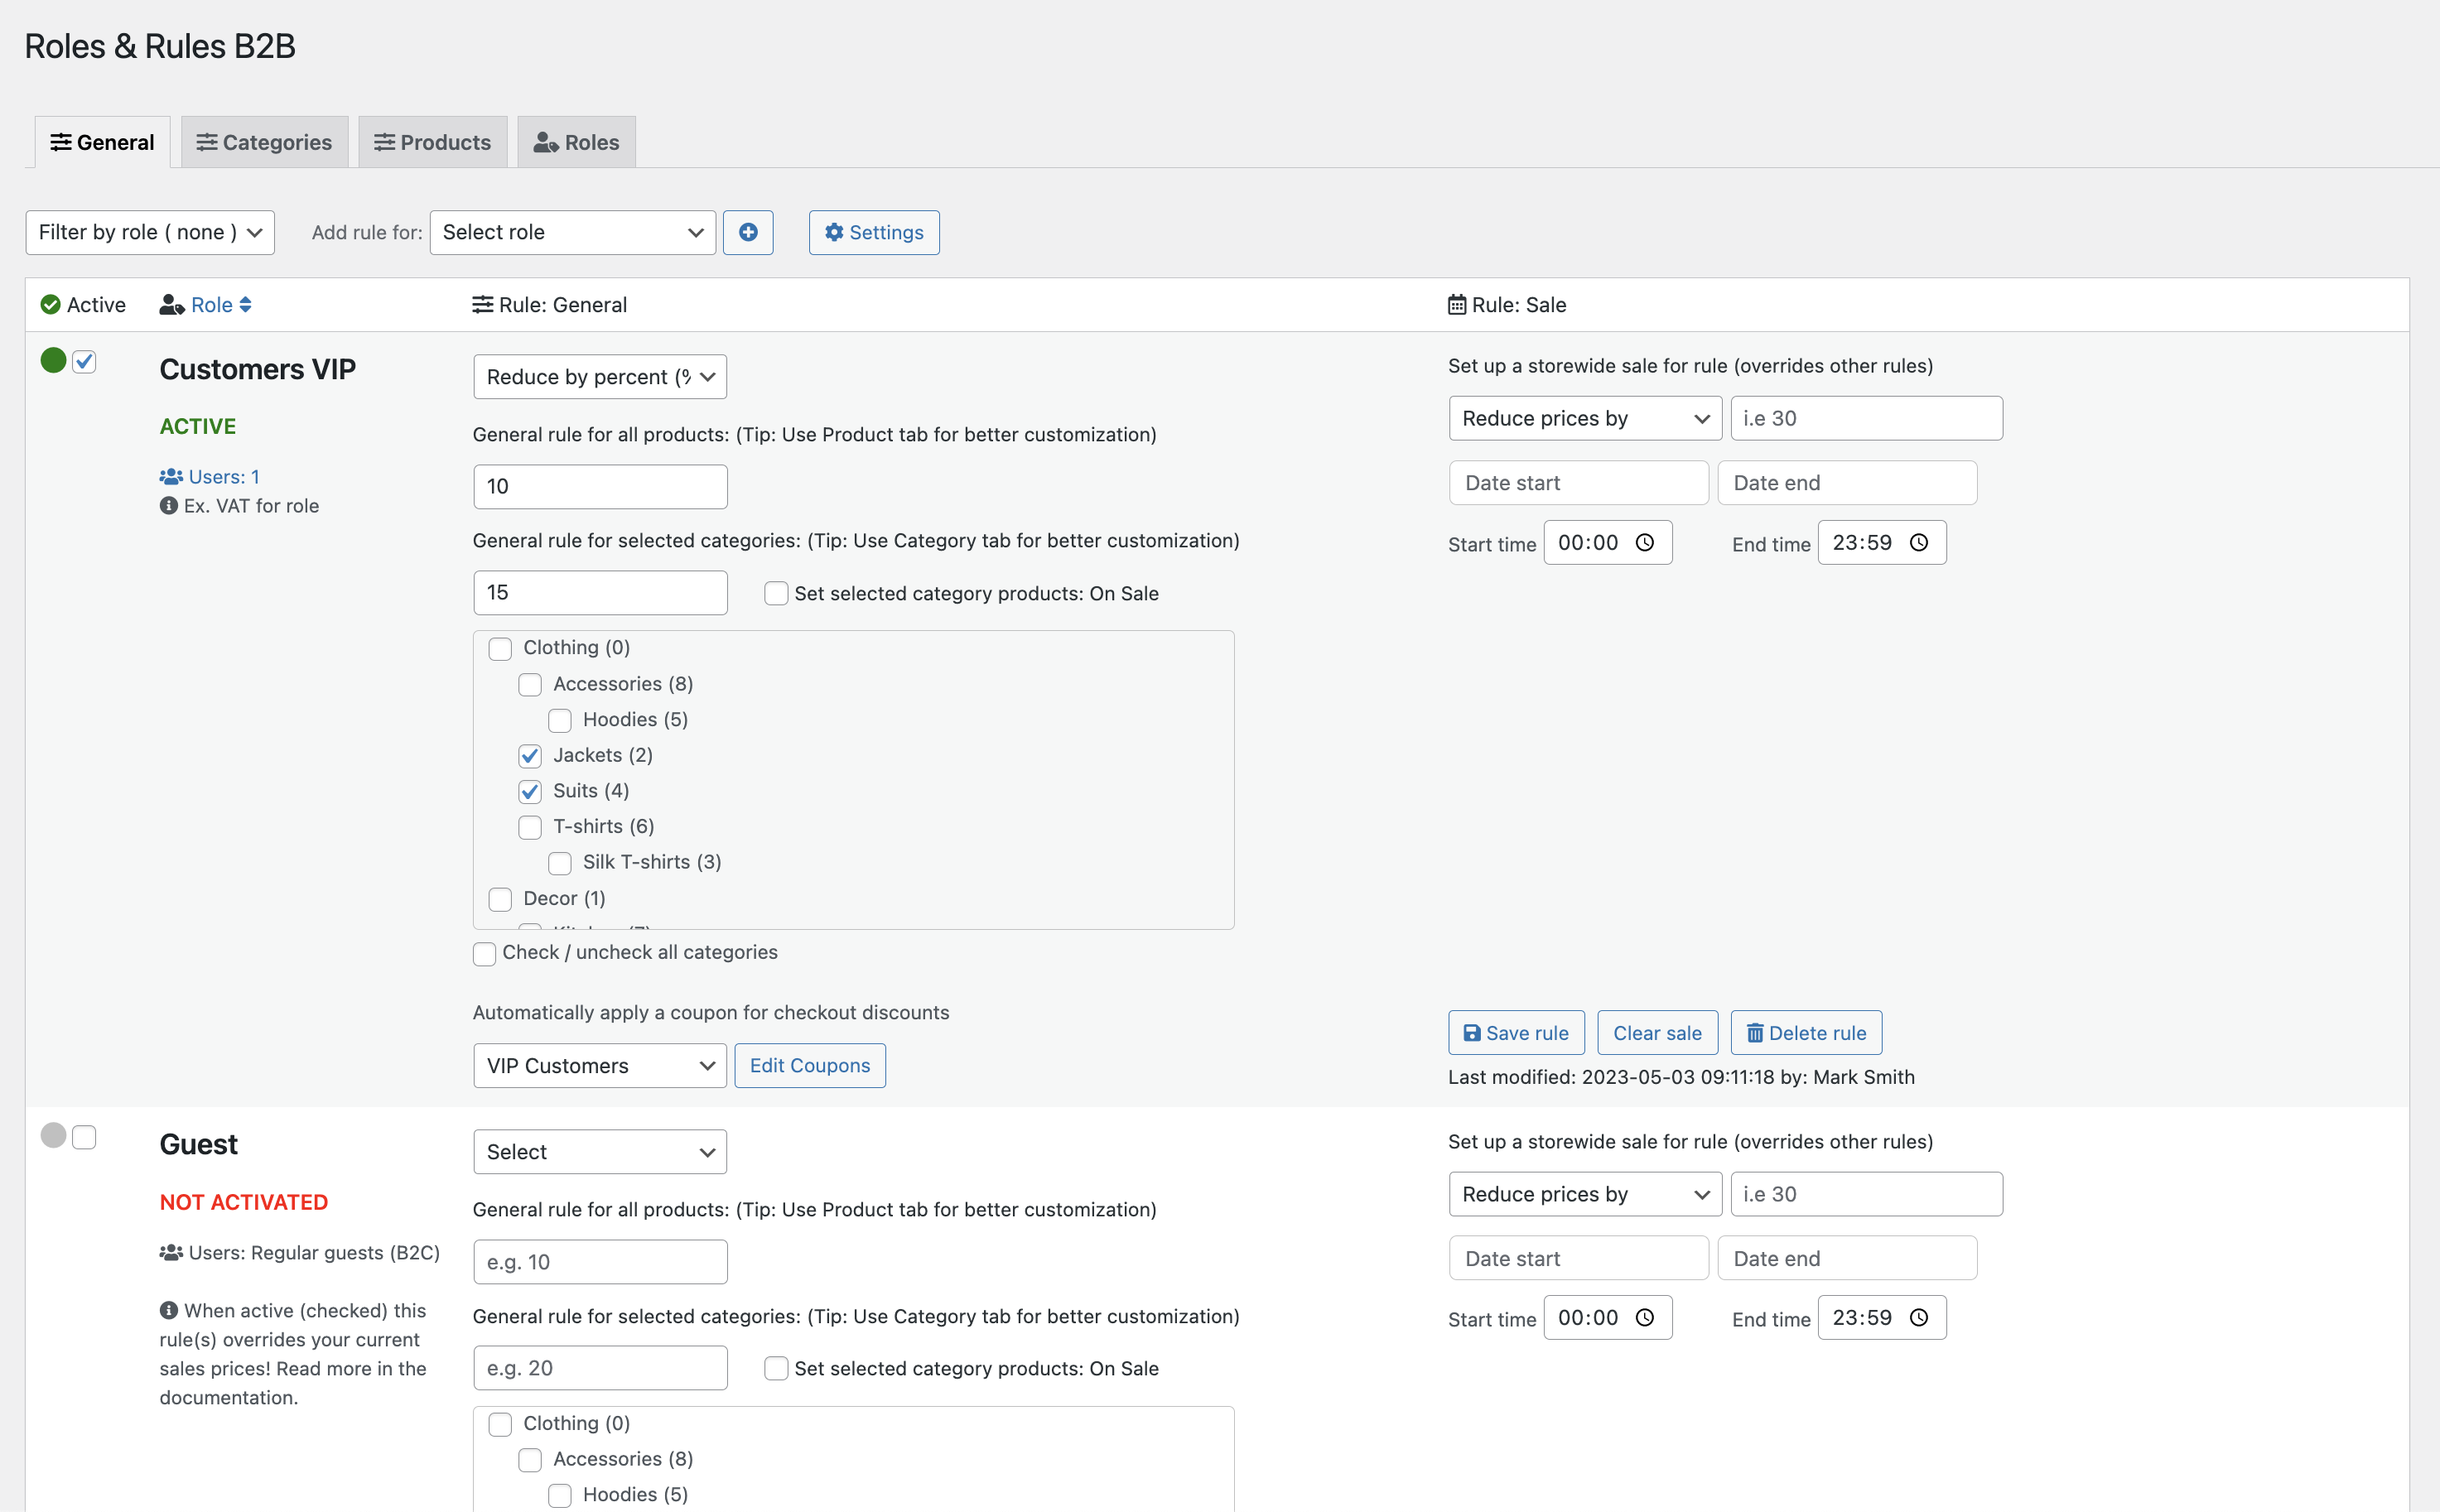
Click the “General” tab (default view). Here you can set up every rule for your roles. Find: Add rule for > Select role > select your role and click the + button. Now you can start setting up rules for this Role. Note that you can also filter on any role you have rule for, this makes it easy to edit category and product rules when a role is selected.
The columns:
- Active: make sure to check this to make the rule active for the role you are currently editing. (green marking when active)
- Role: this column shows the role name (slug) and below a count of users assigned to this role. The column can be sorted by ASC (default) and DESC.
- Rule: General: this is the main column for setting up rules for a user role. First we decide if we want to adjust prices in percent or by fixed price. Let’s say we want to reduce in percent (select box: Adjust price by), then we enter a value like 5. Then the general rule is a 5% reduction on every product/variation in the store for this role. It is possible to increase prices or give reductions on your current prices using the adjust price via, “select dropdown options”.
- Default rule for categories: Here you can add extra rules for this role. If you have categories you want to give extra reductions to, just check those categories. Below that, you will find an input field. Add your desired discount, 15 here (in this case will be 15% a reduction in percent set, as the general rule). Now this role has a 5% reduction on every product/variation and 15% reduction on your products in the selected categories.
- The tab Categories has options to set rules for any selected category. More information on this page.
- Checkbox: Set category products: On Sale. When this is checked the products in the categories selected will appear in the store as, “On Sale” with sales badges (by your design in the store). If however, you have chosen to increase your prices, the sale is not valid and sales text (+badges) will not show.
- Coupon dropdown box: Here you can select one of your coupons to add to your rule. This is handy if you like to set an extra discount on checkout if i.e the customer purchase for i.e $300 or more. If you like to give your customers free shipping and more. The Edit Coupons button sends you direct to edit coupons.
- Default rule for categories: Here you can add extra rules for this role. If you have categories you want to give extra reductions to, just check those categories. Below that, you will find an input field. Add your desired discount, 15 here (in this case will be 15% a reduction in percent set, as the general rule). Now this role has a 5% reduction on every product/variation and 15% reduction on your products in the selected categories.
- Rule: Sale: This column is for storewide sales for the current role; this sale will override the general rule(s). First set reduction in percent or set fixed value + the sale value, then set sale start and sale end date using the date selectors. If you want to set the start and end time, use the time selectors below the sale dates. When finished save changes for rule. Once saved, your sale starts and ends on the set dates and time. The sale will show as on sale in the store with sales badges displayed. Sales are only valid if they have start and end dates.
- A green label stating: Active Sale! will be shown when the sale is ongoing.
Set up Category rules
↑ Back to top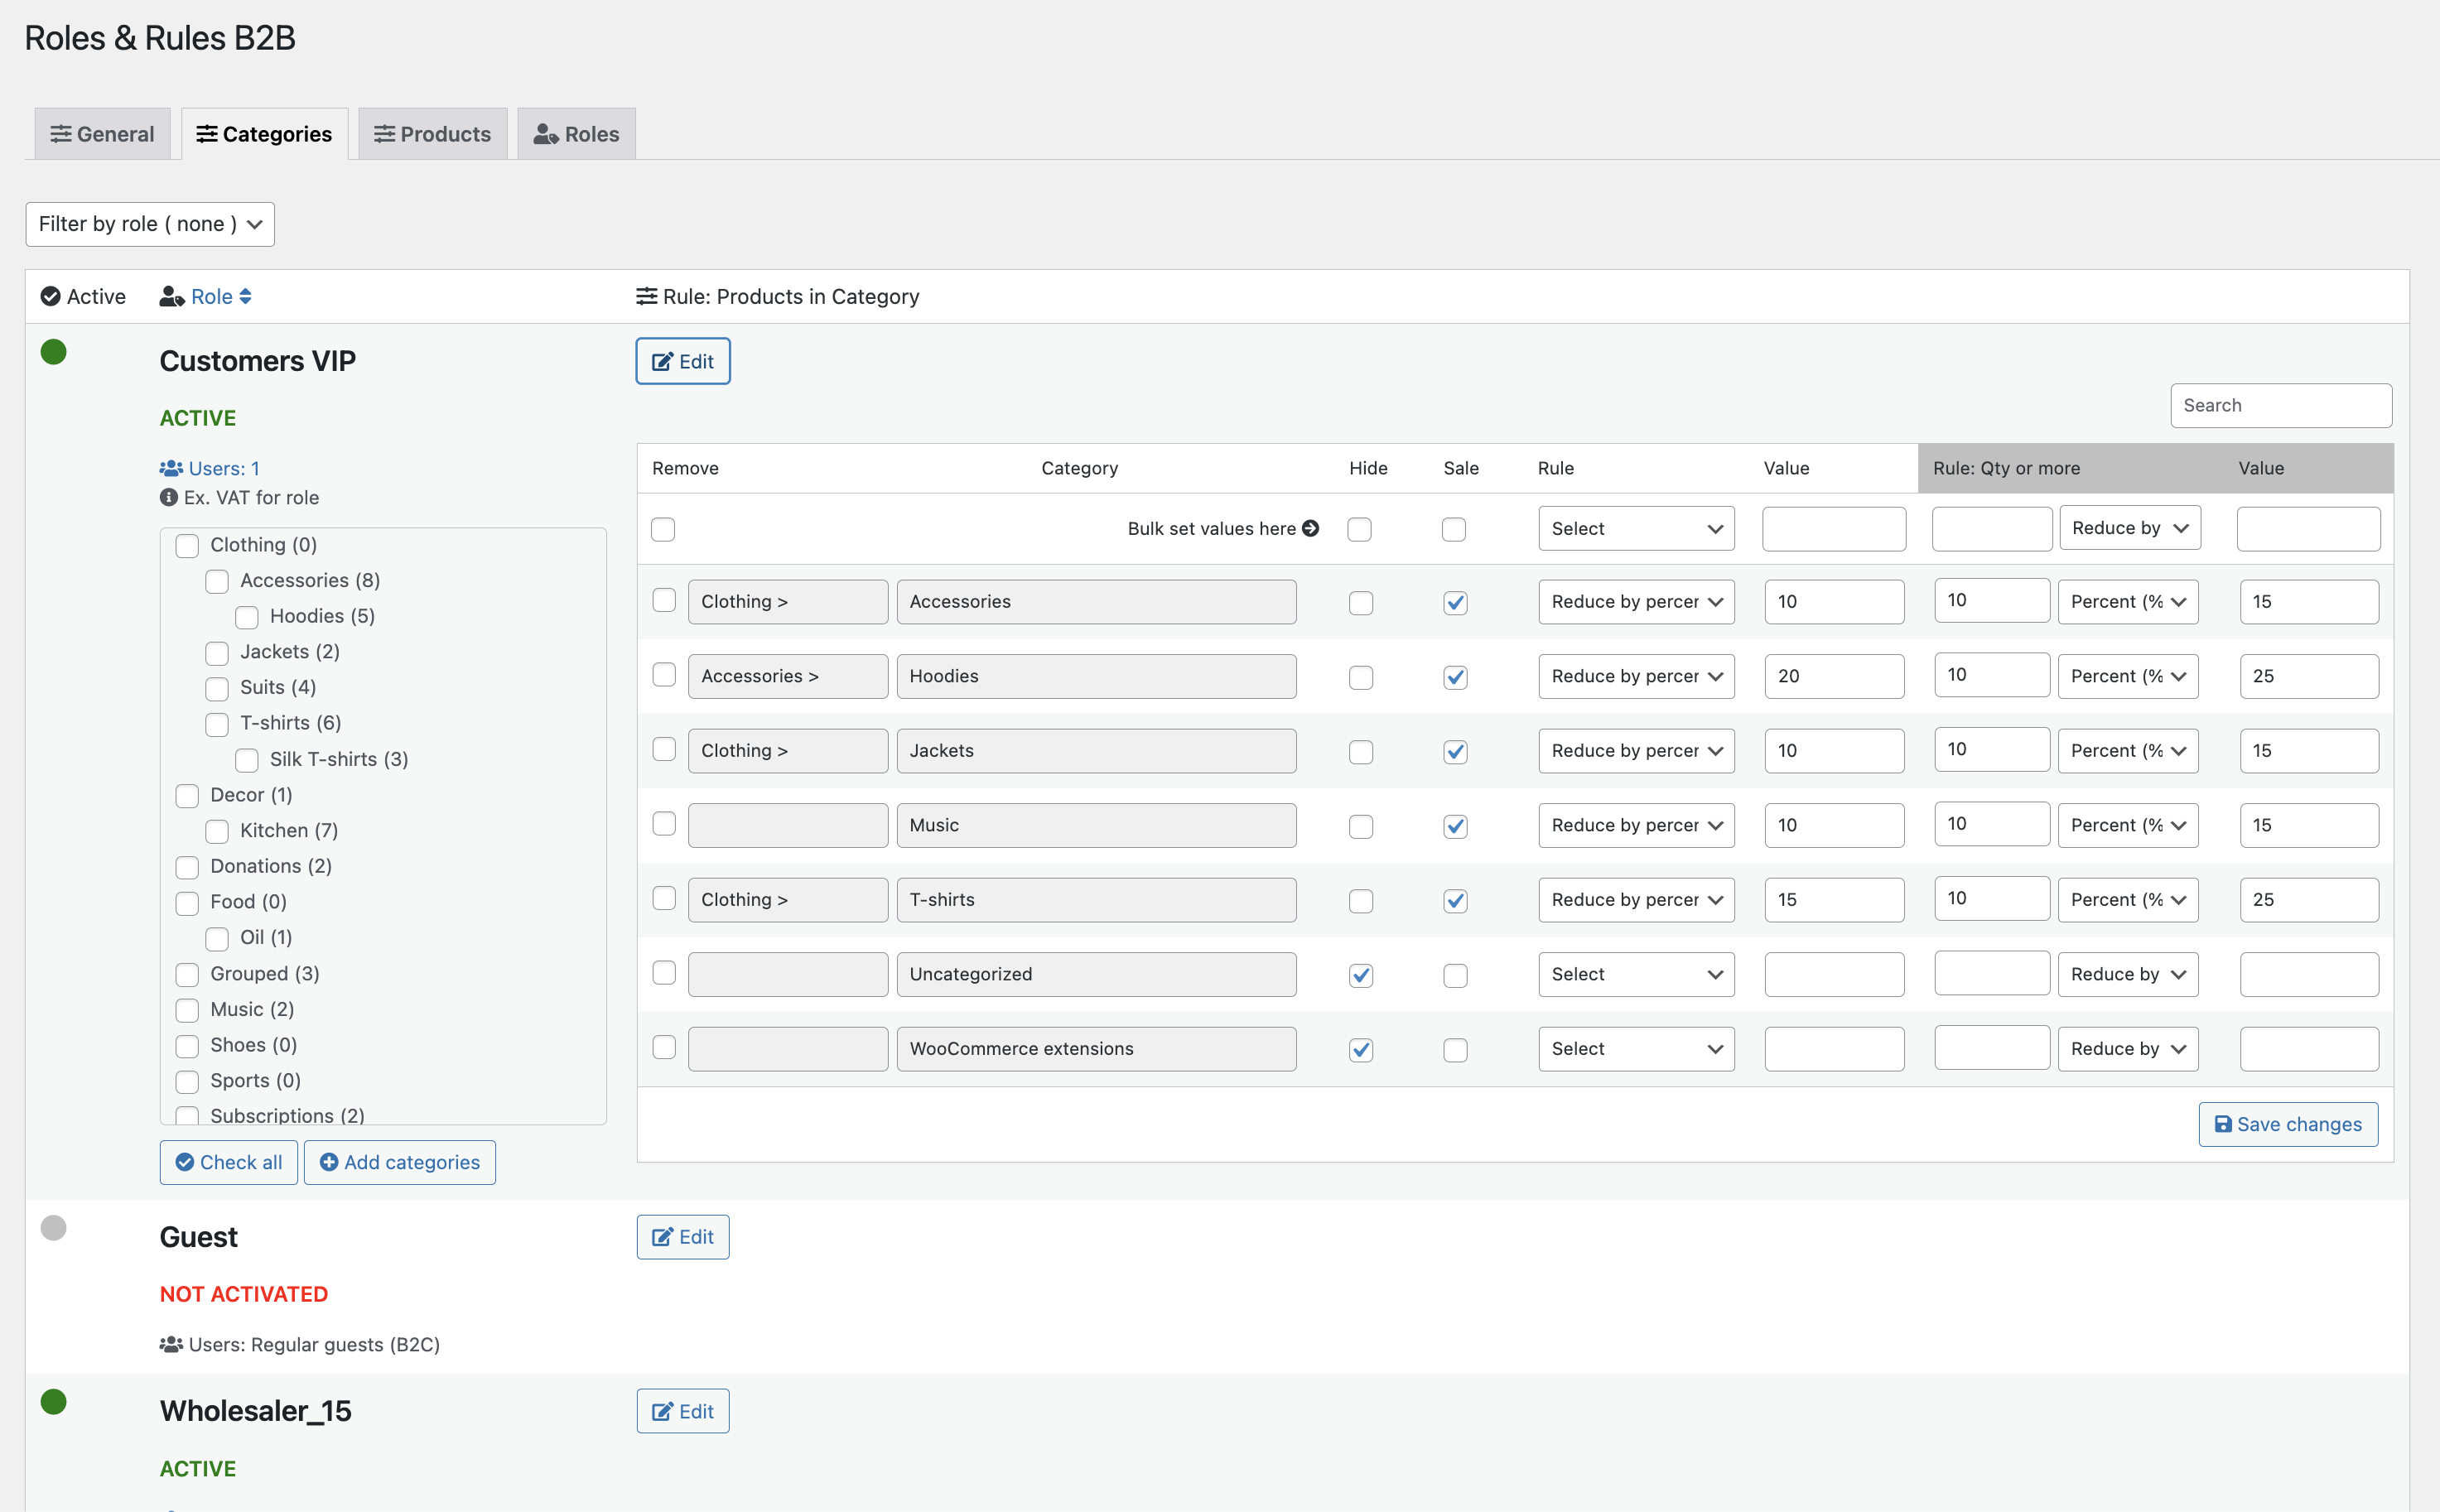
- Remove (column): If you check this + Save changes (button) you remove this category rule.
- Category: The name of the category
- Hide: By checking this the category will be hidden and its products for the role you edit.
- Sale: If you check this for a category the category and its products will be on sale (including badges as in a normal B2C Woo store). However this only works if you have added values in Adjust and Value.
- Adjust: Use the select dropdown to select the type of adjustment you want on this category i.e Reduce by percent. Important to set or no adjustments will be made.
- Value: Set a numeric value her i.e 20 ( 20% when Adjust is in Reduce by percent).
- Rule: Qty or more: Set a quantity that indicate a minimum or more, then set a reduction type (percent or fixed value). This is dynamic pricing and let you give customers option to buy more products for a better discount.
- Rule value: Set the discount value that you want to give customers (based on percent or fixed value). The dynamic pricing have labels you can change to your own likings in settings (see the section for Dynamic labels above).
- Save changes button: Use this after you have made changes in the categories table.
Set up product rules
↑ Back to top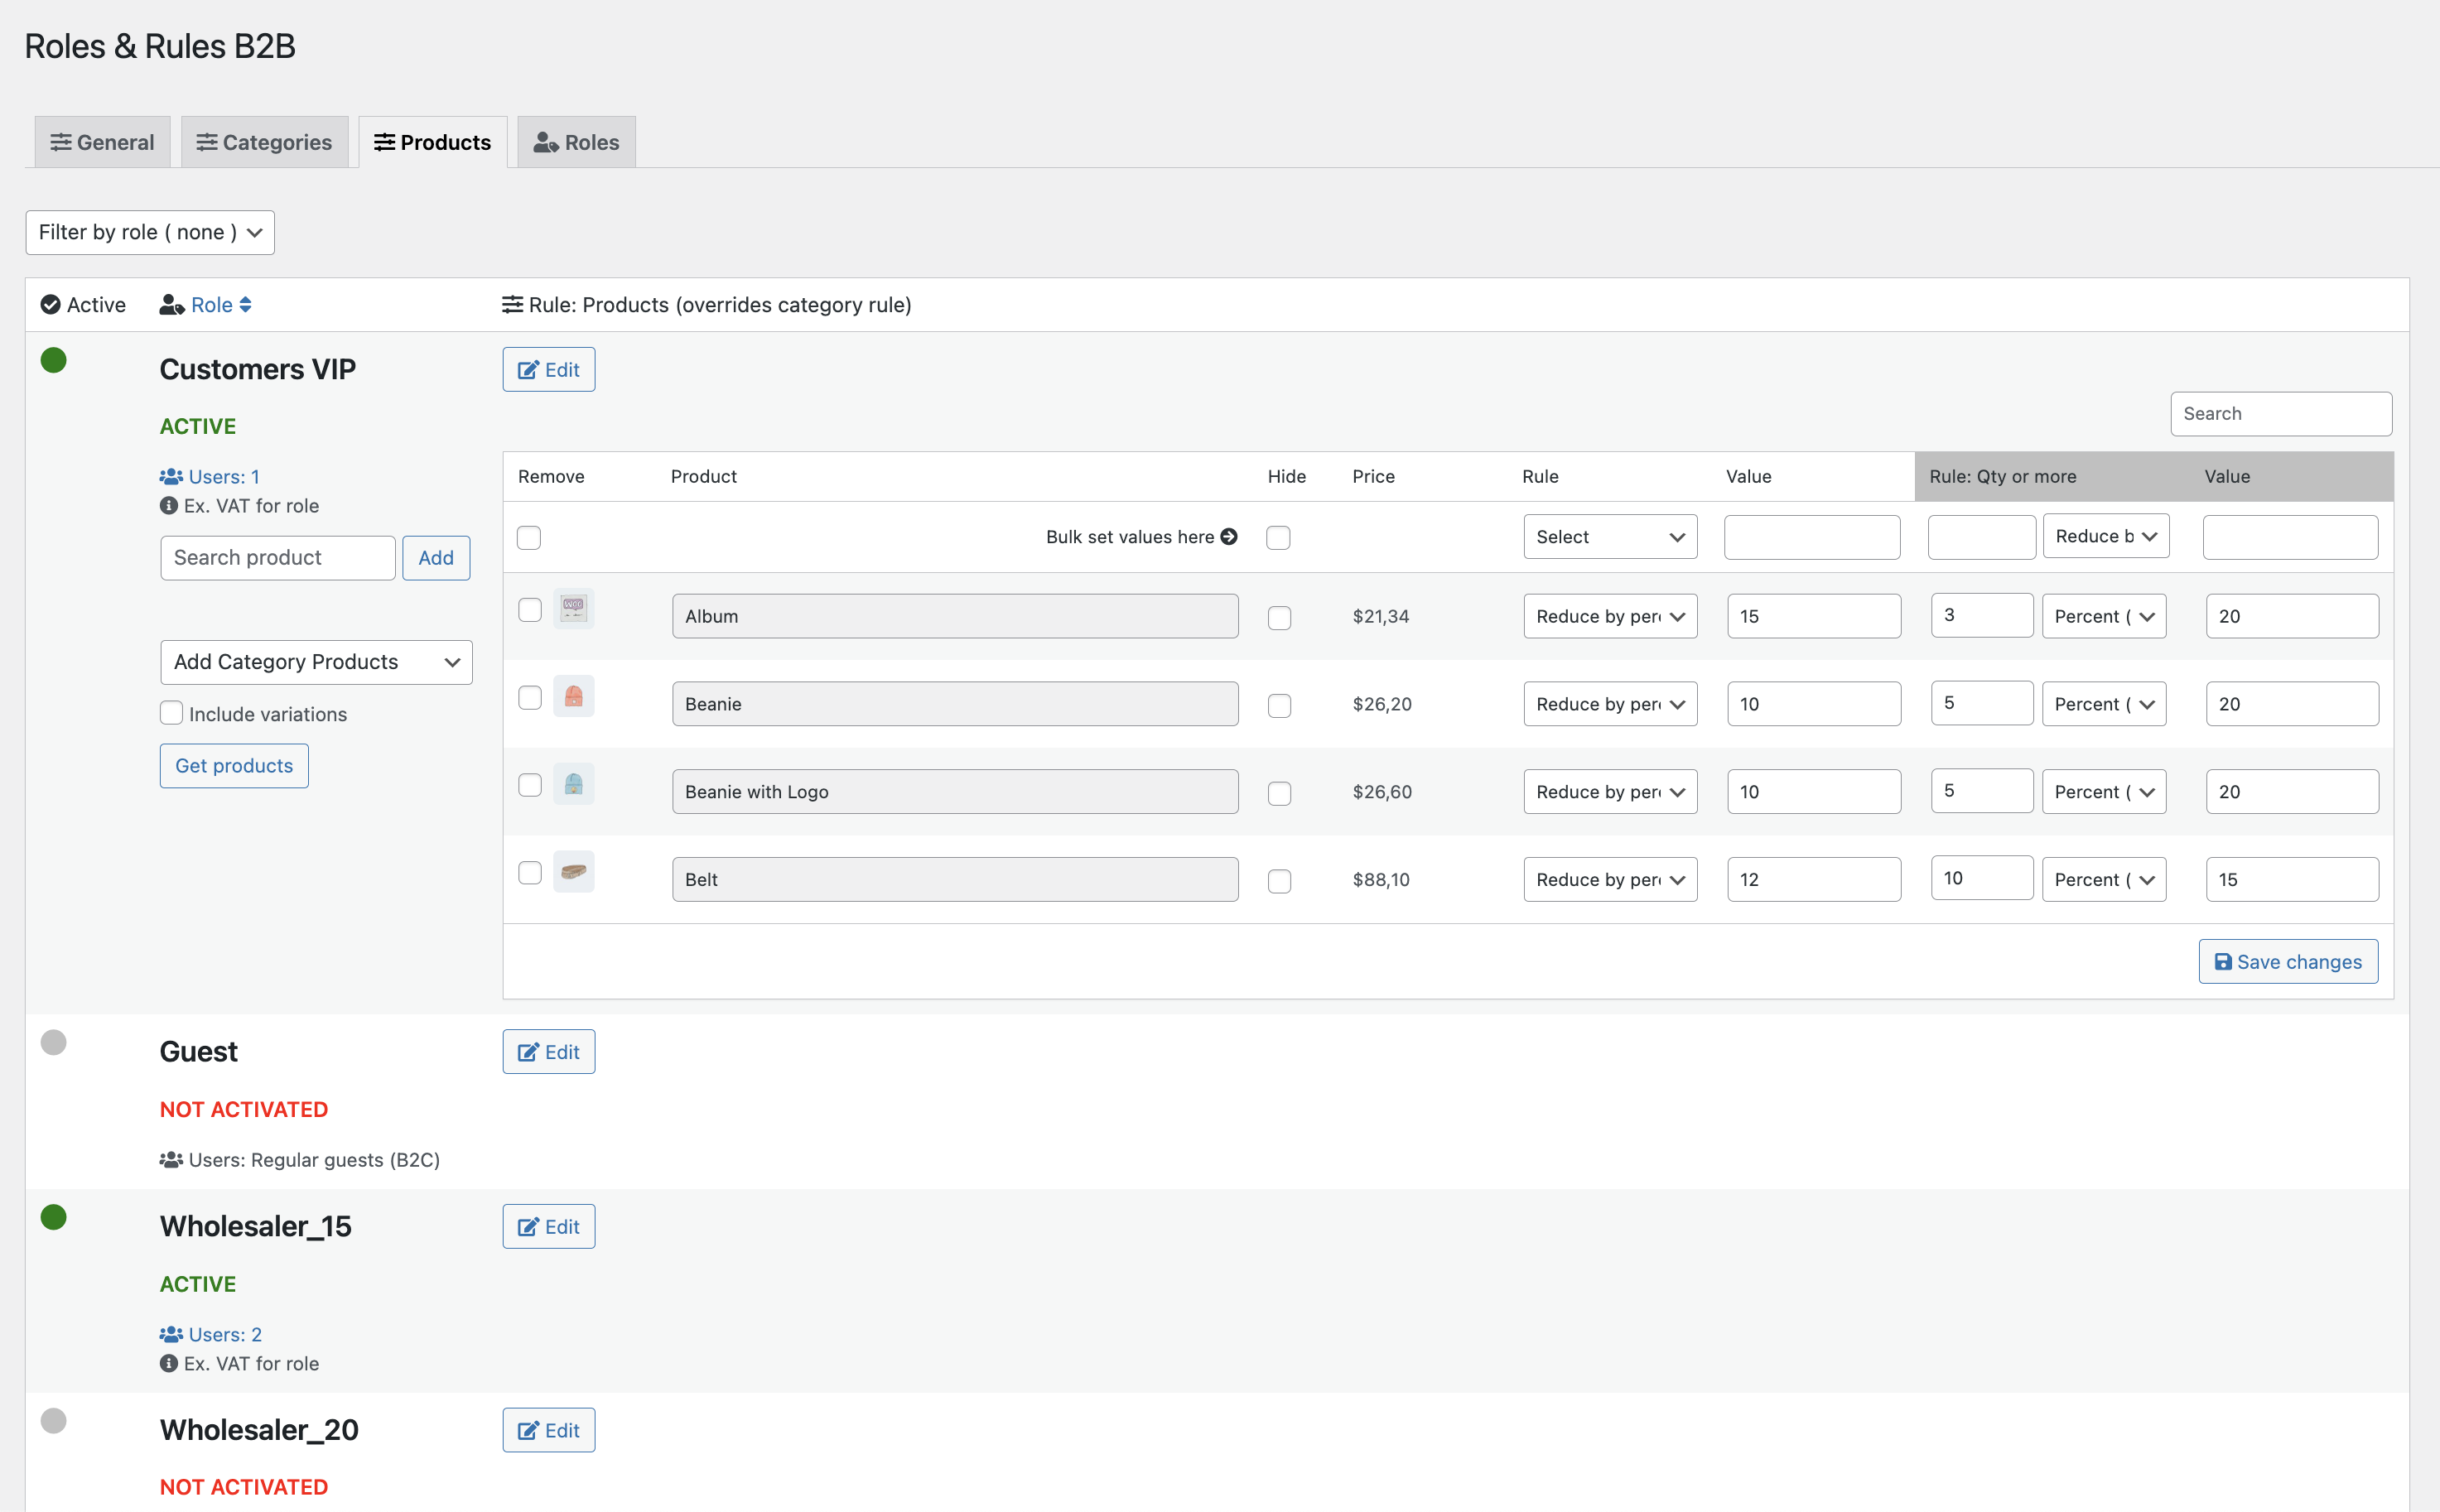
- Active: If a green icon is shown, this rule is active
- Role: Shows the role and the amount of users attached to this role
- Search product: start typing a product and suggestions will appear, select the product/variation you want and click the Add (button). This adds the product to the product table.
- Add category products: Select a category and the products in this category is added to the product table for the rule.
- Rule Products: Shows all the rules you have created and enables you to add products with specific rules.
- Remove: Check this if you want to remove product rule (and Save changes)
- Product thumbnail: Move mouse over and magnify the image
- Product: Shows the name of the product / variation
- Hide: Check if you want to hide a product for the role. (read in FAQ for more info)
- Price: Shows the current price of your product (not adjusted by any rule).
- Adjust: Select dropdown box with these options:
- Reduce by percent (%)
- Reduce by fixed amount
- Increase by percent (%)
- Increase by fixed amount
- Fixed price
- Value: Set the value that will use the adjust rule (i.e reduce by percent)
- Rule: Qty or more: Set a quantity that indicate a minimum or more, then set a reduction type (percent, fixed value or fixed price). This is dynamic pricing and let you give customers option to buy more products for a better discount.
- Rule value: Set the discount value that you want to give customers (based on percent, fixed value or fixed price). The dynamic pricing have labels you can change to your own likings in settings (see the section for Dynamic labels above).
- Save changes button – saves the values in the product table.
- Remove: Check this if you want to remove product rule (and Save changes)
Testing of rules
↑ Back to topUsage
↑ Back to topRoles & Rules B2B was originally created as a B2B extension, but this extension can easily be used for B2C shops or as a hybrid of both. The shop will work as normal for users who are not logged in, but if users are logged in with an and active rule the extension will provide this users special prices based on your rules. New from vs 1.2.1 is that we added guest users (regular B2C customers), this means you can now set rules for every visitor/customer of your store – even not logged inn.
Prices
↑ Back to top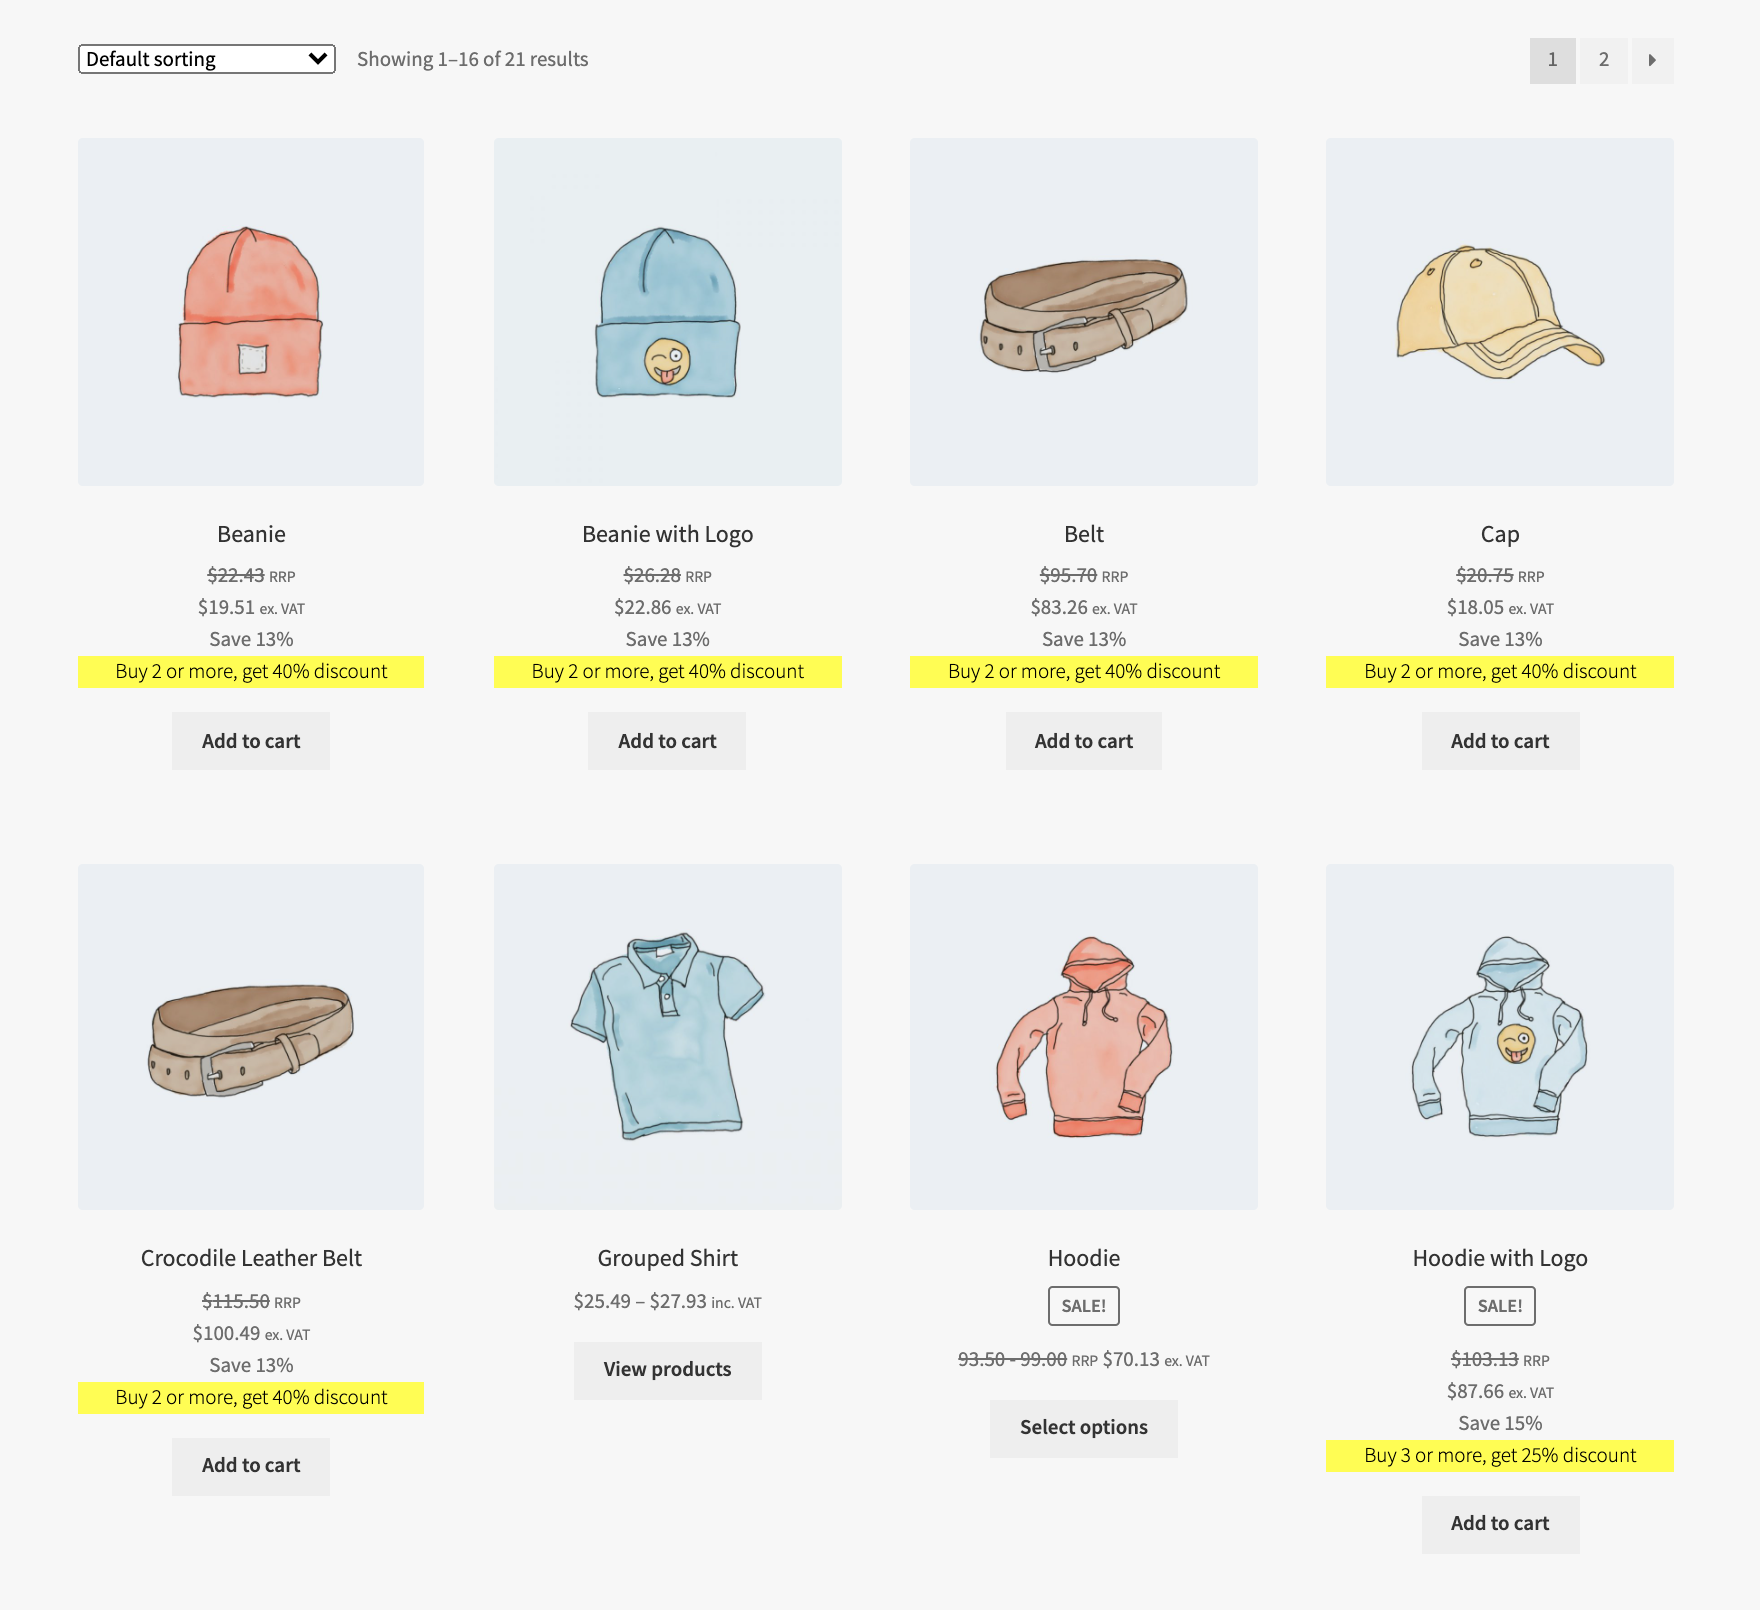
Roles & Rules B2B does not create any extra price fields on your products, the plugin uses your current product prices for the calculations. This means that when you show your prices in your B2B store the customer will see your regular price and your B2B price; like this: $40.00 – $30.00 (default setting). However, if you increase prices, the price will be shown like this: $40.00. There are several options for setting prices and labels for prices. In Roles & Rules settings you find several options for showing percentage reductions and labels for this.
Private store/ Catalog mode
↑ Back to top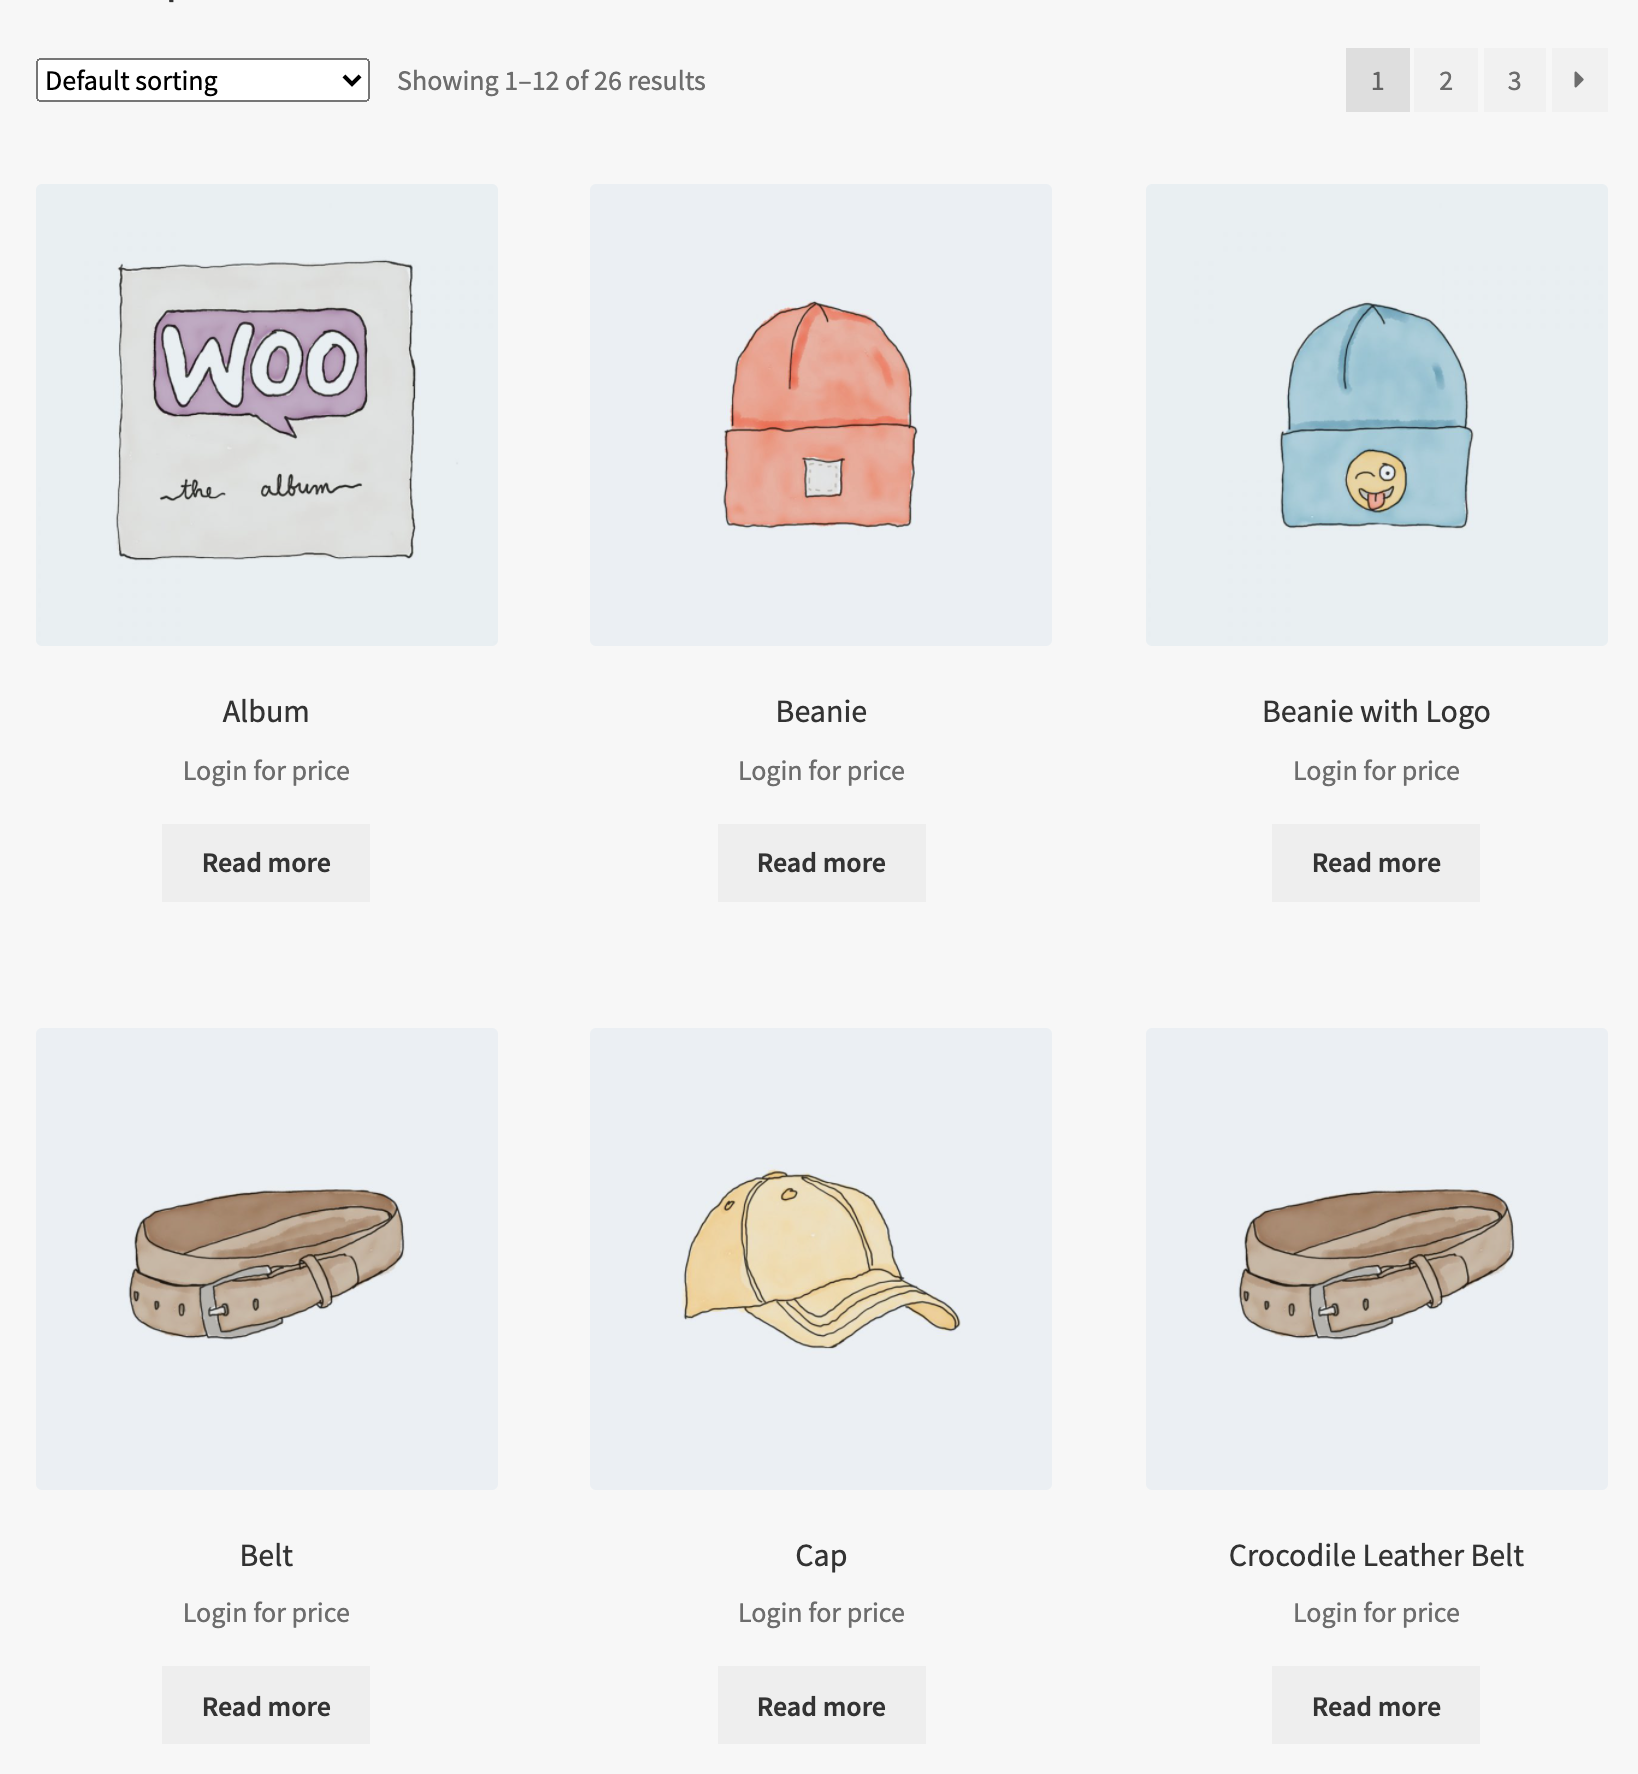
You can easily hide prices and shop functionality using the hide prices checkbox in the Roles & Rules B2B settings. You also have the option to write text instead of empty prices; like: Login to view price. If the “hide prices” option is active your shop acts as a product catalog for both non logged in users and users with no active rule.
Using Coupons
↑ Back to top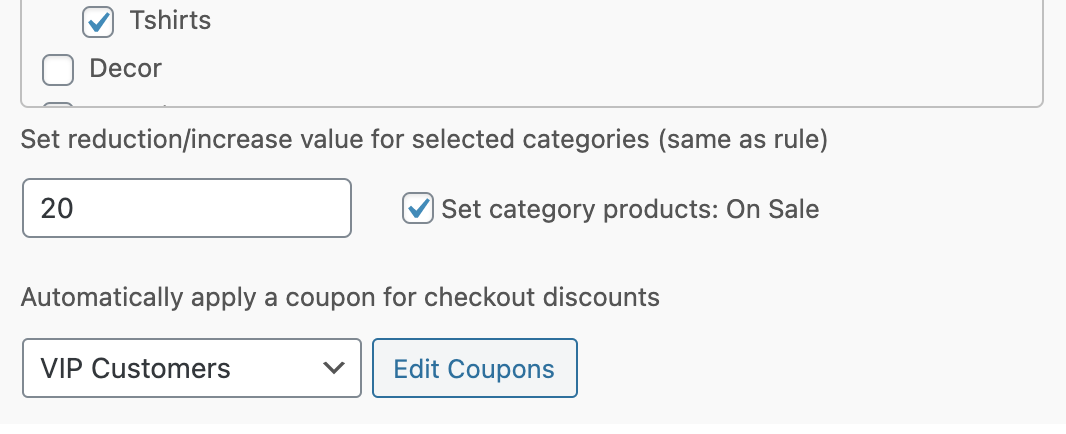 You can apply a coupon to a rule easy by selecting the coupon that fit your customers. This can be i.e if customer purchase for more than $300 – customer gets a $20 discount and i.e free shipping. Use the button Edit Coupons to set up and edit your coupons. If Coupons is not present go to WooCommerce > Settings > General, find enable coupons and check this. Read more about coupons here:
Coupon Management
Sales
↑ Back to top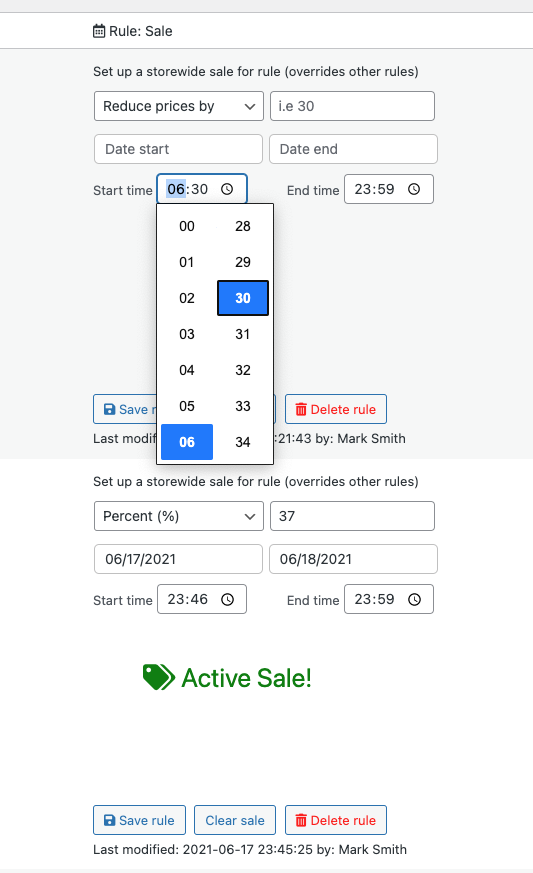 There are many reasons for setting up sales for your store – even for a B2B store. In Roles & Rules B2B you can easily set up sales on selected categories or set up a storewide sale using start and end dates. When setting up a sale, your B2B store behaves just like the B2C store with sales badges on your products. This means you can have many different sales based on the roles and rules you set up – running whenever you want.
To set it up a sale, use the “reduce price by” section, select the dropdown box, and select your desired method, like percent. Then set the percentage value to something like 30. This will calculate 30% off your current regular prices and add the “On Sale” badges in the store. After setting the percentage value, you just need to set the start and end date for the sale. If you want to control when your sale starts exactly use the start/end time to. Use the “clear sale” button if you want to just remove the current sale. Once finished – just click the “save rule” button and make sure the rule is active (first column) – shows with a green dot if active.
There are many reasons for setting up sales for your store – even for a B2B store. In Roles & Rules B2B you can easily set up sales on selected categories or set up a storewide sale using start and end dates. When setting up a sale, your B2B store behaves just like the B2C store with sales badges on your products. This means you can have many different sales based on the roles and rules you set up – running whenever you want.
To set it up a sale, use the “reduce price by” section, select the dropdown box, and select your desired method, like percent. Then set the percentage value to something like 30. This will calculate 30% off your current regular prices and add the “On Sale” badges in the store. After setting the percentage value, you just need to set the start and end date for the sale. If you want to control when your sale starts exactly use the start/end time to. Use the “clear sale” button if you want to just remove the current sale. Once finished – just click the “save rule” button and make sure the rule is active (first column) – shows with a green dot if active.
Delete rule
↑ Back to topTo delete a rule, just click the “delete rule” button (red text). When you click this a message box is shown (ok or cancel). So make sure that no users have this role and that the role is not active before you delete it. The user role remains available and you can create a new rule again on this role as desired.
Last modified label
↑ Back to topBelow the save rule and delete rule you will find the date and time for when the table was last modified and by whom.
Logged in
↑ Back to topLogged in users that have an active rule for their role will see their discounts and sales. If the rule for this role is not active, the user will instead see the default prices in the shop with no discounts.
Not logged in
↑ Back to topIf nothing is set in Roles & Rules settings then the typical customer will see your normal prices, general sales, and your normal shop. If you have selected the option to hide prices in the Roles & Rules settings, the typical customer will see no prices on products and only a “view product” button instead of “add to cart.” In addition, shop functionality like cart and checkout will be hidden. If you set up an active rule for guest users this will be shown for all not logged in users.
FAQs
↑ Back to topCan I use Roles & Rules B2B for a hybrid store (B2B and B2C)?
↑ Back to topYes you can, if you have customers you would like to give special prices to you can set up roles and rules for them. When they log in they will get the prices for that role. One example will be that you have B2C customers and they have prices inc. VAT. The prices for B2C customers will be what you have on your products. When it comes to B2B/wholesaler customers you perhaps want to have the prices ex. VAT and rules like 20% discount on all products – this you can easy set up in Roles & Rules B2B.
Can I use Roles & Rules for guest users (B2C store)?
↑ Back to topHow does hidden products work?
↑ Back to topIs the prices updated at once in the store?
↑ Back to topAlmost true, when you save a new rule for one of your roles it can take a maximum of 60 seconds before it is updated in the store. This is done for better performance in the store.
How is the order of rules applied?
↑ Back to top- The general rule applies for every product i.e 10% reduction for every product
- If categories rules this applies for every product in the categories i.e 20% reduction. For products not in the categories the general rule (1) applies (in this example 10%)
- Sales rules applies for every product and rule 1, 2 and 4 is not considered when calculating the prices. Example 30% reduction storewide applies to all products/variations.
- Product rules goes before rule 1, this means that special rules set for any product will always be first applied. One thing to note is that if a product is in a category and this category has Sale, the product will be on sale (including sales badges).
- Category rules will be set after any single product rules. If there is a storewide sale this will come before any category rule