Orders are the center of activity in your WooCommerce store.
This document is a guide to managing orders in WooCommerce. It is designed to assist administrators and shop managers in navigating through the various aspects of order management.
Orders are visible to users with the Admin or Shop Manager roles. Orders are usually created when a customer on your site completes the checkout process, though you can manually add orders from the admin area as well. Orders can also be created via external systems that integrate with your site via the WooCommerce REST API.
This document covers:
- Details of the available order statuses in the Core WooCommerce plugin
- Viewing and Managing multiple orders at once via the table on the Orders page
- Viewing and editing a single order from the Edit Order page
- Manually Adding an order as an admin
- Collecting payment for an order
- Removing personal data from orders
- The Multi-Site orders widget
- Handling Test Orders
- Troubleshooting Orders
Creating and managing orders via the REST API is beyond the scope of this document. Technical documentation for the REST API can be found here.
Order Statuses
↑ Back to topEvery order has its current state marked by a status. Order statuses can provide valuable information about the state of an order at a glance. The video and table below provide an overview and more details about order statuses in WooCommerce
Every order also has a Status. Order statuses let you know how far along the order is, starting with “Pending payment” and ending with “Completed.” The following order statuses are used in the Core WooCommerce plugin:
| Status | Description | Notes |
|---|---|---|
| Pending payment | The order has been received, but no payment has been made. Pending payment orders are generally awaiting customer action. | If your customer needs a payment link to make payment, check the Paying for an Order section below. |
| On hold | The order is awaiting payment confirmation. Stock is reduced, but you need to confirm payment. | The On hold status is generally assigned to an order when a customer pays via an “offline” payment method that doesn’t have immediate payment confirmation, like the BACS gateway. Offline payment methods require you to manually verify the payment was processed; once you confirm payment has been received, you can change the status of the order. The On hold status may be temporarily assigned to orders if the customer paid using a delayed notification payment method, like SEPA Direct Debit. Depending on the payment gateway in use on your site, the order may be moved automatically from On hold to a different status once the payment clears. Check the order notes on the order and the documentation of your payment gateway for details. You may also see the On hold status if you use a payment gateway that has an option to separate the authorization and capture of funds. Check the order’s notes and your payment gateway’s documentation for details. |
| Processing | Payment has been received (paid), and the stock has been reduced. The order is awaiting fulfillment. | All orders require processing except those in which all products are both Virtual and Downloadable. This is the shop owner or warehouse’s cue to ship the order and manually change the status to Completed. |
| Completed | Order fulfilled and complete. | Requires no further action. |
| Failed | The customer’s payment failed or was declined, and no payment has been successfully made | Depending on the payment gateway and the payment confirmation method it uses, this status may not show immediately. Orders will be marked Failed if the order was abandoned before payment was complete and the hold stock window expires without a response. Here is a helpful article for a better understanding and how to fix Failed orders in WooCommerce. |
| Draft | Draft orders are created when customers start the checkout process while the block version of the checkout is in place. | Orders in the Draft status are only visible on the “Draft” sub-tab of the Orders overview page. See the WooCommerce Blocks Documentation for more details on the Draft status. |
| Canceled | The order was canceled by an admin or the customer. | When an order has the Canceled status, stock for line items on the order is returned to the store’s inventory if inventory management is enabled. An order with the Canceled status may need to be refunded. Check the order’s notes and your payment gateway’s documentation for details. |
| Refunded | Orders are automatically put in the Refunded status when an admin or shop manager has fully refunded the order’s value after payment. | If you opt to use the Manual Refund option, it is possible for an order to reach this status without the customer’s funds having been returned.Check our documentation on Refunding orders in WooCommerce for more details. |
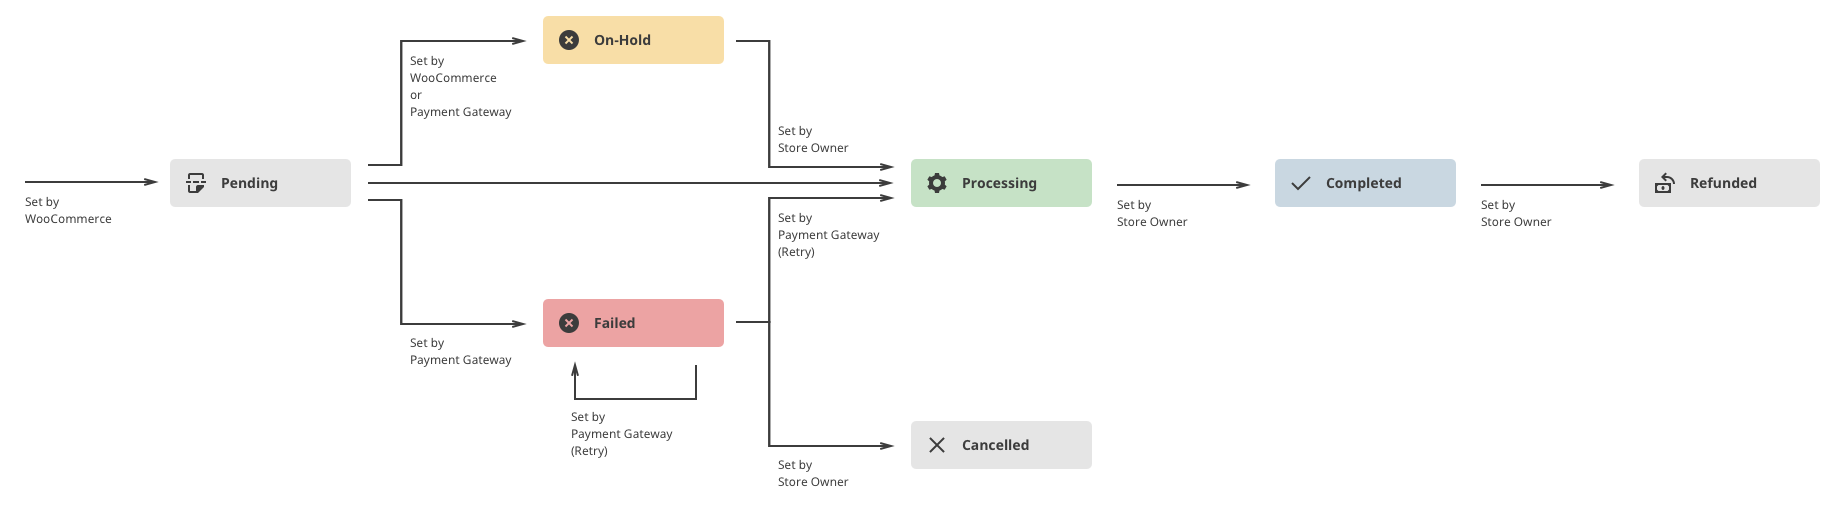
Visual Diagram to Illustrate Order Statuses
↑ Back to topThis flow chart illustrates how an order moves through statuses from Pending payment to Failed or Processing then Completed, Canceled, or Refunded.
Order Statuses and Emails
↑ Back to topLearn more about the different order emails that are sent in the Email Settings documentation.
Viewing and Managing Multiple Orders
↑ Back to topOrders Overview
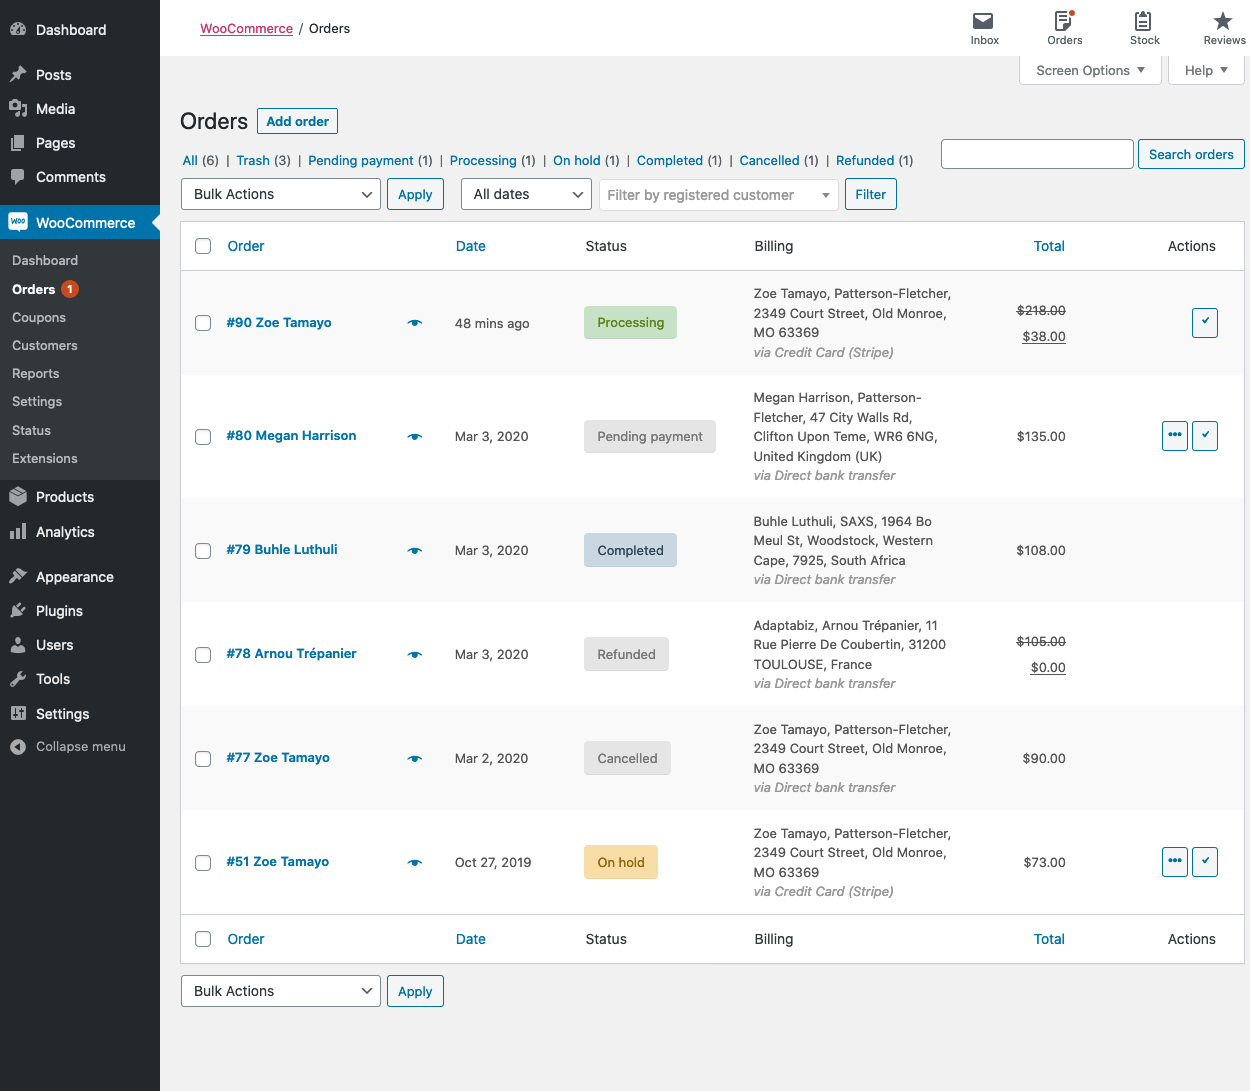
↑ Back to topWhen a shop starts taking orders, the Orders admin page fills up. Navigate to WooCommerce > Orders to view your orders.
Each row displays several details. Some information is visible by default, and others can be added. Extensions can add additional options as well. These are the default options available in WooCommerce:
- Order number and customer name
- Date of purchase
- Order status
- Billing address
- Purchase total
- Quick Actions
Some other options that can be enabled but are not pictured above are:
- Shipping address
- Origin (if Order Attribution is enabled)
Note: WooCommerce is highly extensible, open source software. Extensions commonly add additional data to WooCommerce orders. If you see additional information to what’s pictured here, it may be added by an extension, your theme, or custom code.
Screen Options
↑ Back to topThe information visible in the Orders table can be altered via the “Screen Options” settings.
To change the columns of data that are visible on the Orders table:
- Go to WooCommerce > Orders.
- Select Screen Options in the top right corner.
- Select which Columns to show.
- Check the boxes of items you want to be displayed.
- Select Apply.
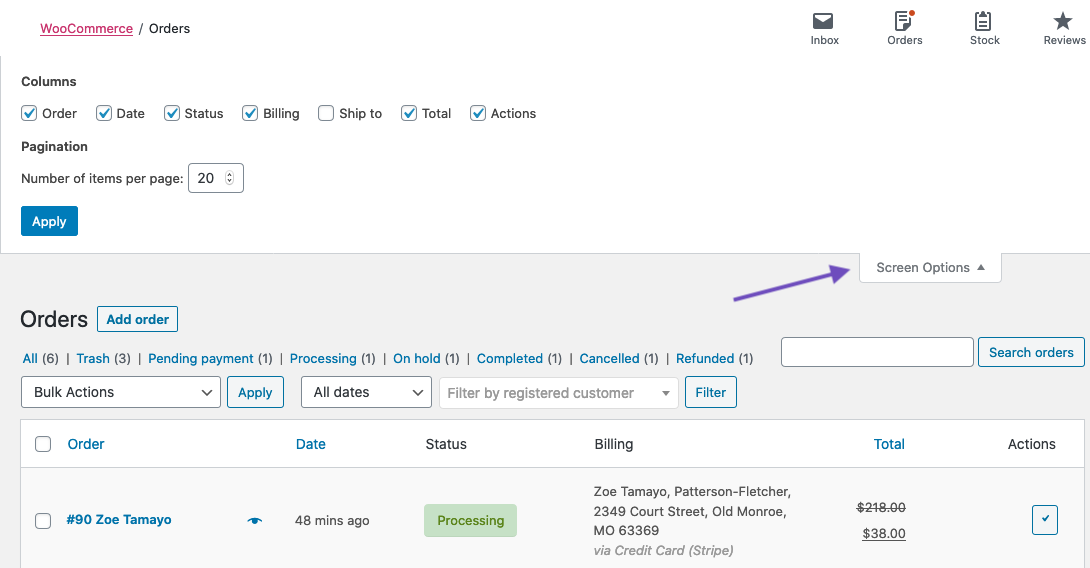
In the Screen Options settings, there’s also a setting to increase the number of Orders visible per page. Increasing this can be an effective way to edit many orders at a time. However, setting the number of orders visible on a single page too high can significantly increase load times for the page.
Filter and Arrange Orders
↑ Back to topOrders can be filtered by Date (month/year) or by registered customer.
- Select the month or search for a customer.
- Select the Filter button.

Select the heading to sort orders in ascending or descending order by Order number, Date, or Total.
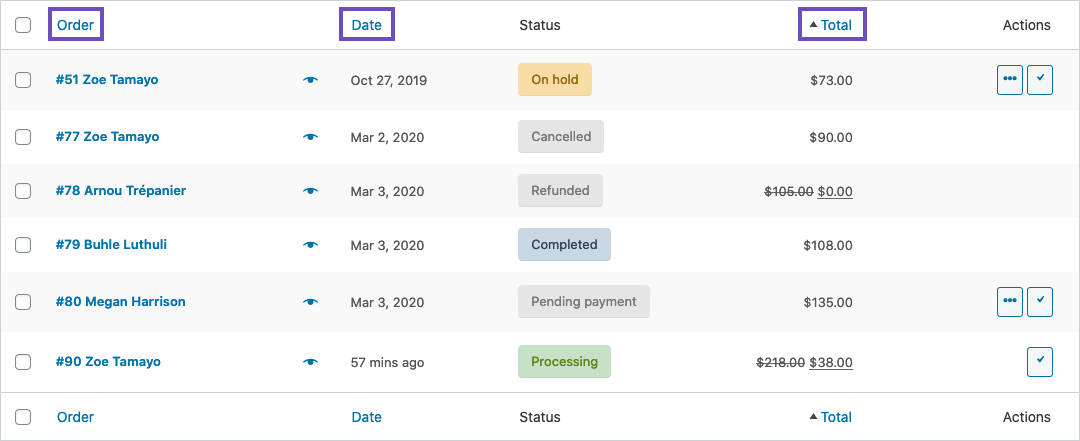
Note: The Total column does not take the refunded amount into consideration when sorting.
Searching and Finding Orders
↑ Back to topOrders can be found using the search box at the top right of the order list. Enter an order number, customer name, or other information shown in the order list such as address. Click Search orders or tap return on your keyboard and search results will show a list of matching orders.
Previewing Orders
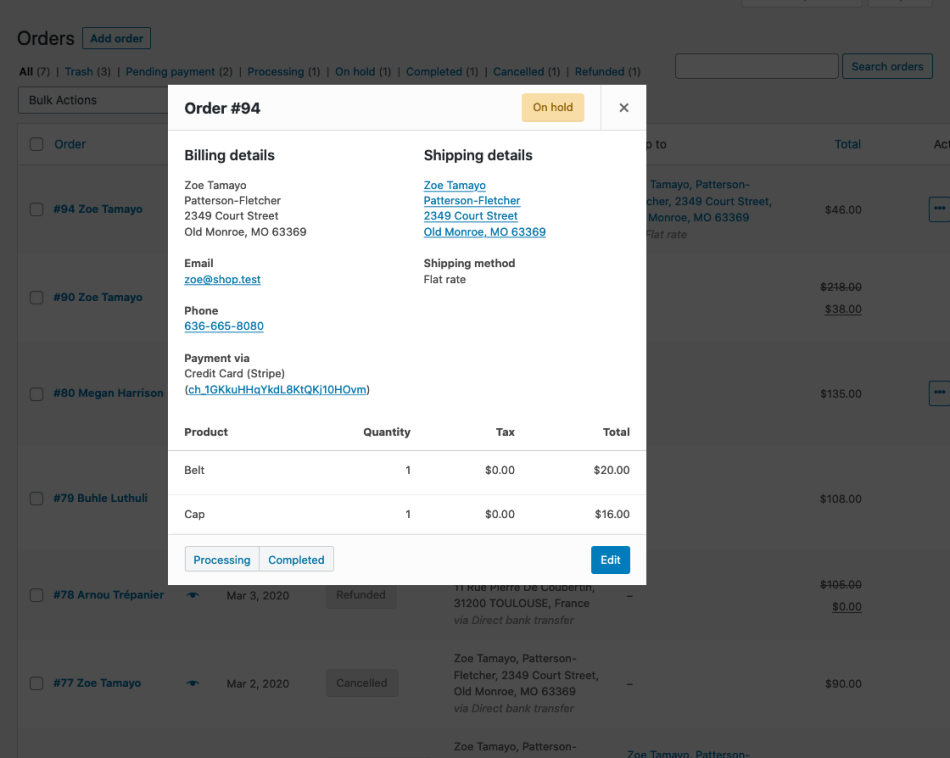
↑ Back to topYou can preview an order by selecting the eye icon next to that order.

Clicking the eye icon opens a preview modal containing that allows you to change the order status. Additionally, the preview modal contains information about the order, such as:
- Order number
- Status
- Billing details
- Payment method
- Shipping details
- Items ordered
Order Statuses in the Overview
↑ Back to topOrder Statuses are color-coded and descriptive.
- Canceled: Grey
- Completed: Blue
- Failed: Red
- On Hold: Orange
- Pending payment: Grey
- Processing: Green
- Refunded: Grey
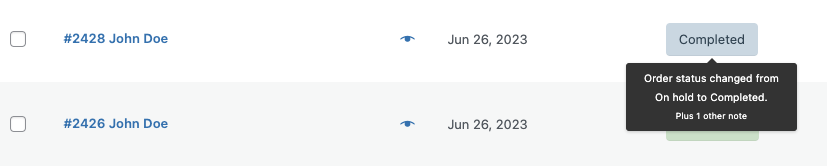
Hovering over an order status displays the most recent Note added to the order.
Order Actions
↑ Back to topIf enabled in the screen options, the orders table will include shortcut buttons to quickly mark orders as Processing or Completed.

Managing Multiple Orders at once with Bulk Actions
↑ Back to topMuch like WordPress’ other post types that let you alter post statuses en masse, WooCommerce Orders also have a bulk editing feature.
Bulk Actions can be used to move orders to the trash, or update their status en masse.
To update multiple orders at once:
- Check the boxes on the left-hand side of the rows you wish to edit.
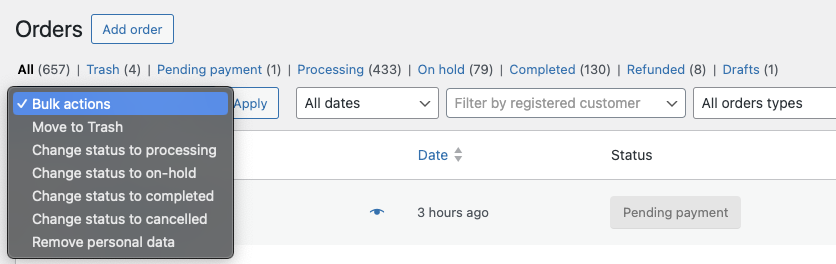
- Click the Bulk Actions dropdown to display available options.
- Choose the action you’d like to take on the selected orders.
- Select the Apply button.
Your orders will be updated per your selection. Available options include:
- Move to Trash
- Change status to processing
- Change status to on-hold
- Change status completed
- Change status to cancelled
- Remove personal data (if Removing Personal Data settings are enabled)
Viewing and Editing a Single Order
↑ Back to topFrom the Single Order page, you can view edit, and update order data. Some options are:
- Change the order status.
- Edit order items, like adjusting the products, prices, and taxes.
- Reduce and restore stock for an order
- Perform order actions, like email order details to the customer or regenerate download permissions
- Modify product Meta to edit product variations by removing and adding meta
- Apply coupons.
- You will need to know the coupon code to apply to the order.
- Coupon usage counts are tracked, and coupons can also be removed from orders.
- The order must be unpaid for coupons to have an affect
- Add a fee. You can enter an amount or percentage to add a fee to an order.
- Negative fees will apportion taxes between all other items, and will not make the cart total go below zero
Order Details
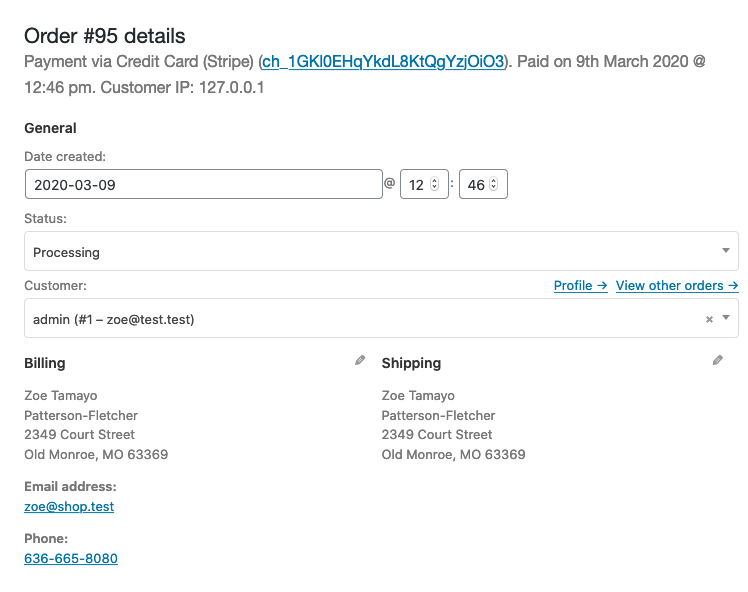
↑ Back to topViewing Order Details
The Order Details panel you can view:
- Order number
- Payment details
- Order date and time
- Order status
- Customer details:
- Username and email, together with a link to view their profile and other purchases the customer may have had in the past
- Billing details
- Shipping details
Editing Order Details
Most of the details in this section can be updated and/or changes.
- To change the date and time, use the dropdown date selector and the quantity selectors for the time.
- To change the status, choose the right status in the dropdown.
- To change the customer, select the current customer and search for the new customer.
Under “Billing” and “Shipping,” several other details can be changed. In order to do so, select the pencil icon next to each of them.
- Under “Billing,” the following things can be changed:
- Billing address
- Thiscan also be loaded from the customer’s profile by selecting “Load billing address”
- Phone number
- Payment method and details
- Billing address
- Under “Shipping,” the following things can be changed:
- Shipping address
- This can also be loaded from the customer’s profile or copied from the billing address
- Customer provided note
- Shipping address
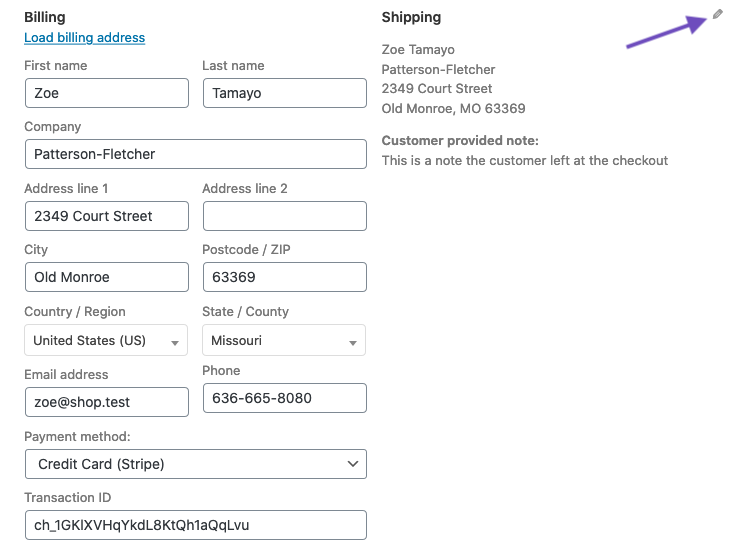
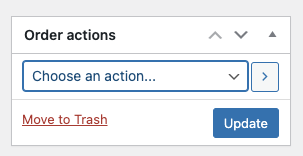
Once you’ve made any necessary changes, press the Update button in the Order actions metabox to update the order.
Order Items and Totals
↑ Back to topViewing Order Items
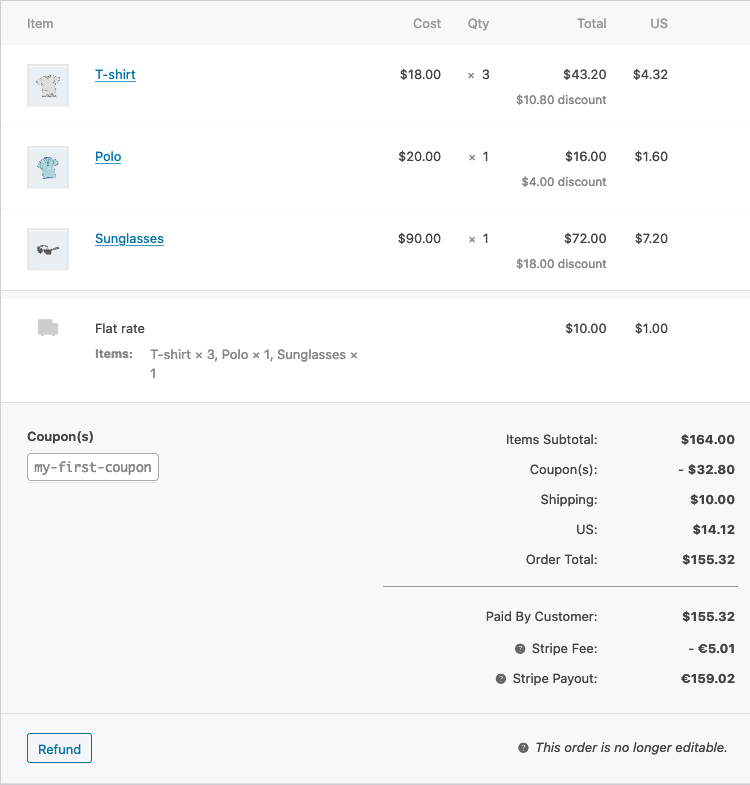
The next panel on the order page is the Order Items panel. This contains the product items, the shipping details, and the order summary.
- Each product item row lists:
- Product image
- Product name
- Single product Cost
- Quantity
- Total (Cost x Quantity, with discounts taken into consideration)
- Taxes
- Below that, the shipping details are displayed. This will include:
- Shipping method
- Boxed items
- Total cost
- Taxes
- The last section contains an overview of the order costs. This section will change if an order is refunded. By default, it will include:
- Items subtotal: the cost excluding tax
- Coupon(s): the amount deducted based on the use of coupons; the coupons used are displayed left in this section
- Shipping: the shipping cost for the order
- Taxes: the amount of taxes for the whole order, which will be replaced by the tax code applied to the order
- Order total: the total of the above costs
- An overview of what is paid and the fees taken by the payment gateway
Editing or Adding Order Items
Apart from refunding, order items can not be edited unless the order status is Pending payment or On hold.
Product items. Select the pencil icon next to a product line to edit.

The following product items can be edited:
- Add Meta: Add and remove meta to change product variable options.
- Quantity: Number of items the customer is purchasing.
- Total: Line price and line tax before pre-tax discounts.
- Tax: Tax cost. For example, if a customer is tax-exempt you may want to remove the taxes.
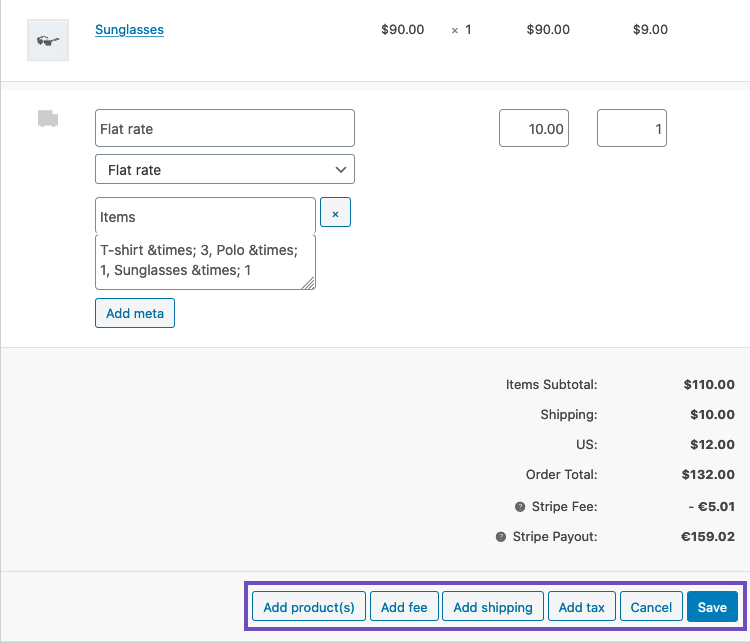
Other actions. Next, you can perform four actions at the bottom of this window:

- Add item(s) will show you six new options:
- Add product(s): Add additional products to the order.
- Add fee: Add an additional fee, such as gift wrapping.
- Add shipping: Add a shipping cost. When you’ve done this, select the pencil icon to update the name, the method, the cost, and the tax.
- Add tax: Add an additional tax code to every section in the order.
- Cancel: Cancel if you do not want to make any changes.
- Save: Save once the changes are made.
- Once you’ve done this, you can select Recalculate if you want to automatically perform new calculations based on store settings. This can be handy if you are adding or removing products, coupons, shipping methods, etc. Note that any tax changes that you’ve manually included will be removed as the tax settings in your store will apply based on the customer address.
- Apply coupon: If your customer forgot to add the coupon could or you want to reward the customer before they pay, selecting this option will show a modal that allows you to apply a coupon code.
- Refund: Refunds the customer. For more information about Manual and Automatic Refunds, see WooCommerce Refunds.
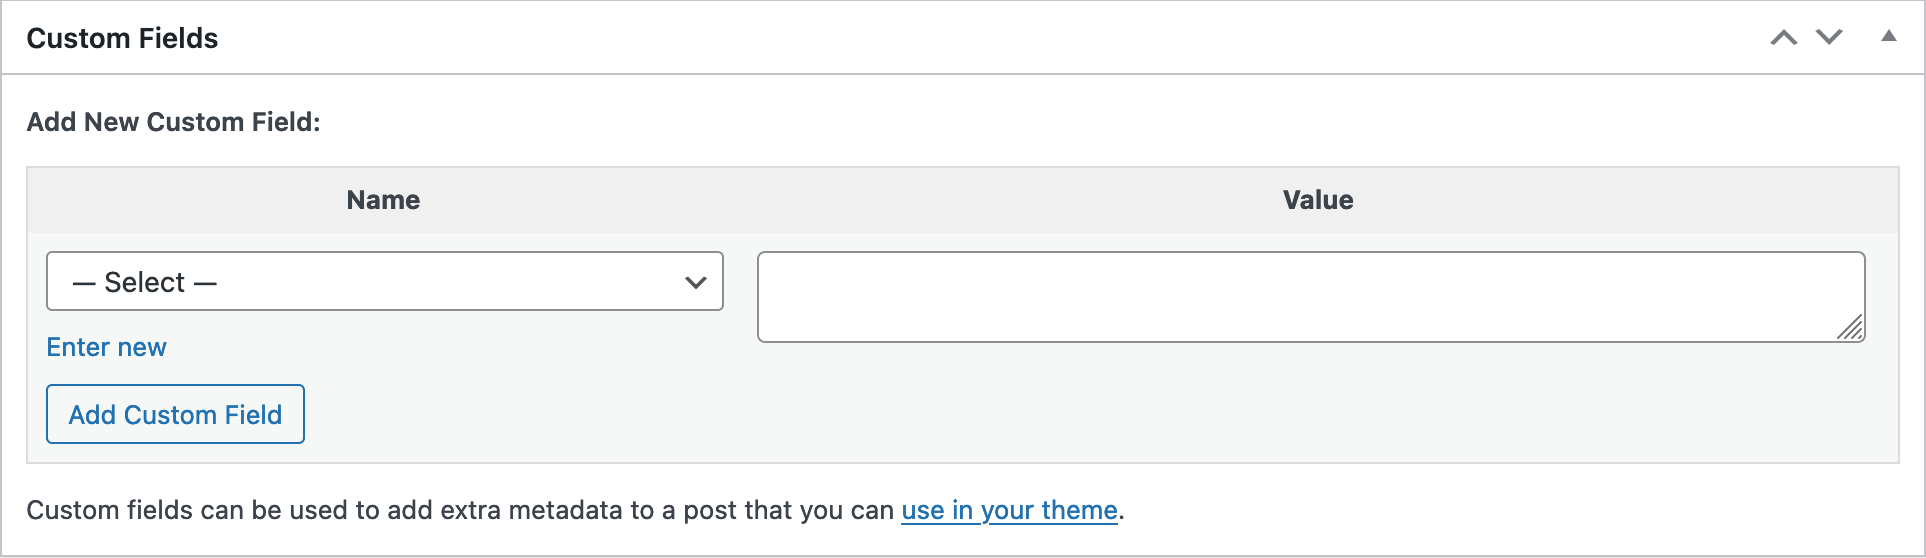
Custom Fields
↑ Back to topTo add custom meta fields, use the Custom Fields metabox. This is a core WordPress functionality that can be very useful in the context of WooCommerce if you need to include additional data with your orders.
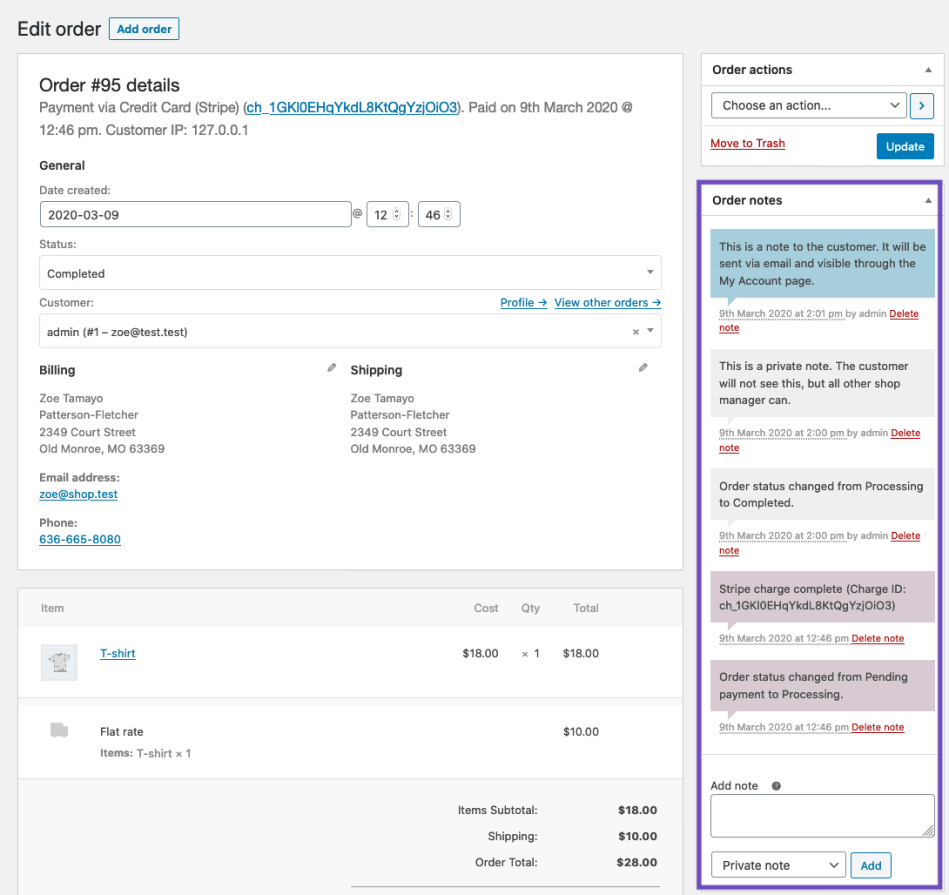
Order Notes
↑ Back to topThe Order Notes panel displays notes attached to the order and can be used for storing event details, such as payment results or reducing stock levels, or adding notes to the order for customers to view. Some payment gateways also add notes for debugging.
The following note types are possible:
- Purple: System status notices, such as payment gateway details.
- Grey: General status updates, such as status changes or private notes. Customers do not see these notes but may receive notification of them, e.g., when the status changes from processing to completed, an email may be sent (depending on your settings).
- Blue: Notes to the customer. Customers receive notes via email and can also view them by viewing an order in their My account section.
Notes can be a powerful tool for communicating with customers or other store managers. Need to add a tracking number for shipping? Is stock delayed? Add a customer note, and they are automatically notified.
To add a note:
- Add the content of the note to the text area.
- Select Private note or Note to customer in the dropdown.
- Select Add.
Manually Adding an Order
↑ Back to topTo add an order:
- Go to WooCommerce > Orders.
- Select Add order at the top of the page. The Single Order page appears.
- Input customer details, add line items, apply coupons, apply fees and calculate totals. These are the same as the Editing or Adding Order Items.
- Set a status for the new order, e.g., If it needs to be paid, use “Pending payment.”
- Save.
Paying for an Order
↑ Back to topTaking payment for an order is an important step where many pieces come together to offer your shoppers a smooth, easy experience that is also secure and promotes customer privacy. In WooCommerce, orders can be paid in a several different ways:
- Payment can be made upon order creation in the cart and checkout process.
- This is the standard flow, and will likely cover most orders.
- With some payment gateways, payment can be made in person via a supported card reader or using the Tap to Pay functionality and the Woo Mobile app
- Orders in the Draft or Pending payment status can be paid via another order payment flow which can be entered via the:
- Pay for this order link included in the Order Invoice email.
- Pay action button In the Customer’s Account area in the Orders tab.
- Customer payment page → link found in the order’s detail page in the admin area. (You can manually share this link with the customer)
Below we’ll explore the details of the different ways Pending payment and Draft status orders can be paid. As well as customer verification methods that exist to protect customer privacy.
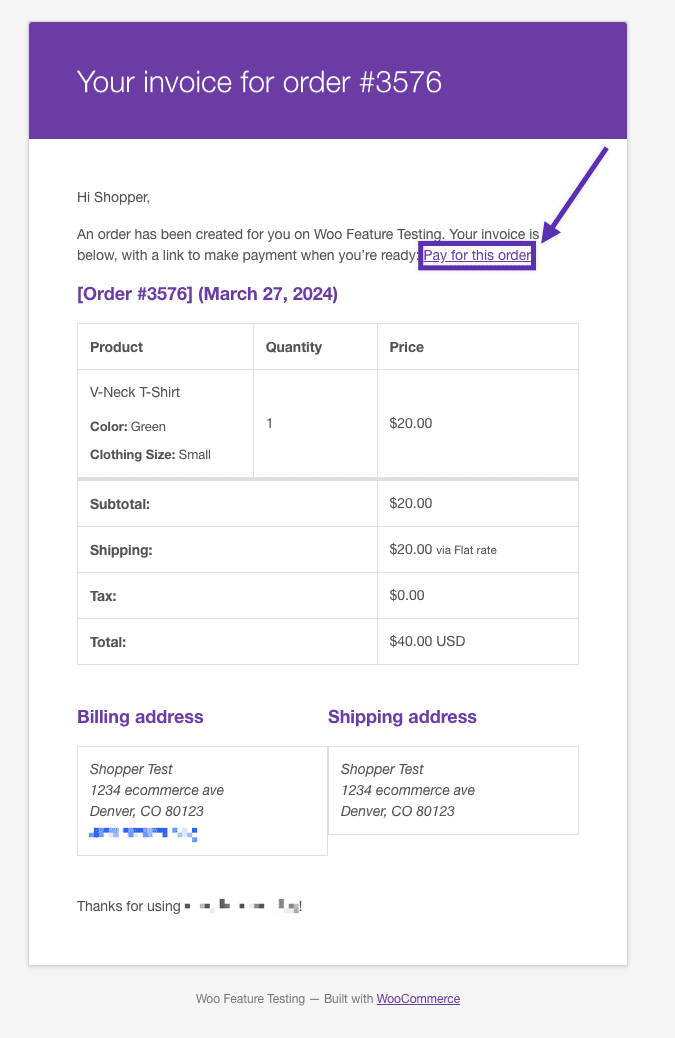
Pay for this order link included in the Order Invoice email
↑ Back to topUse the Order Actions dropdown to email order details to the customer with payment instructions.

In the email your customer receives, there will be a link accompanying their invoice. They can follow the link to enter the order payment flow.
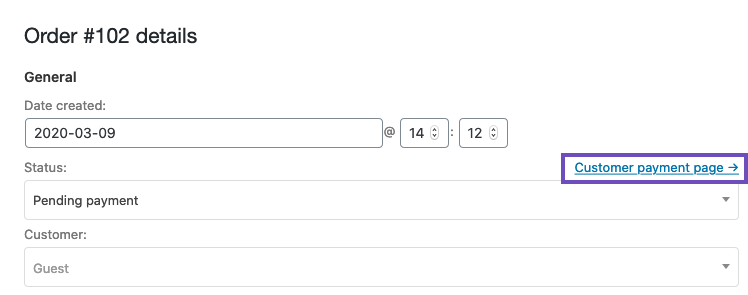
Customer payment page link from the admin area
↑ Back to topIn the admin area, on the individual order page, you’ll see a link titled Customer payment page →. You can share this link with the customer for them to follow and complete payment.
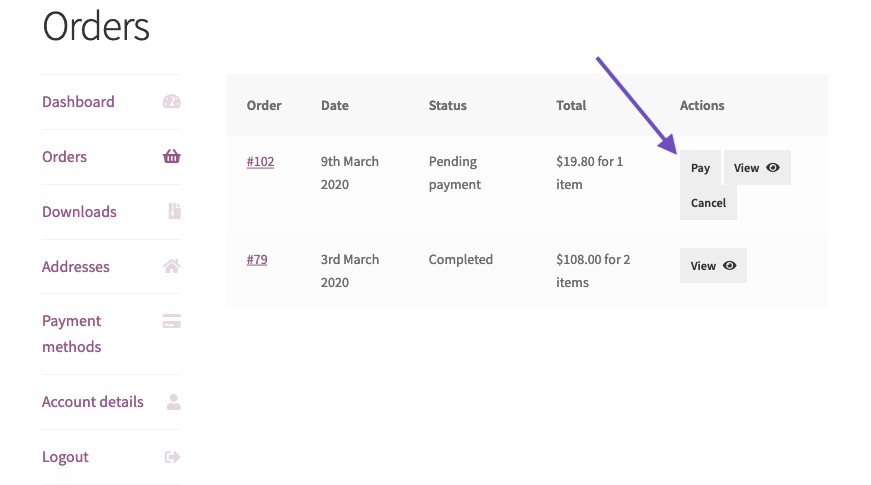
The Pay action button in the Orders tab of the account area
↑ Back to topIf the customer is a registered user of your site, any unpaid orders assigned to will show a Pay option in the Orders tab of their My Account area.
If you are testing customer payment flows and wish to pay as the customer, you may consider using the User Switching plugin (not made or endorsed by WooCommerce) to log in to the customer’s account and complete the payment as them.
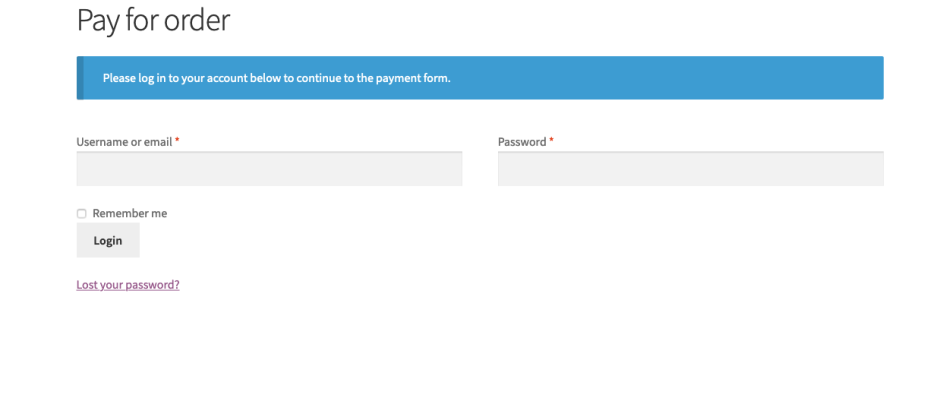
Customer Verification
WooCommerce has measures in place to ensure your shoppers’ orders are private.
- If the order is assigned to a registered customer and they follow a payment link while logged out, the customer will be prompted to log in to their account to continue to the payment form.
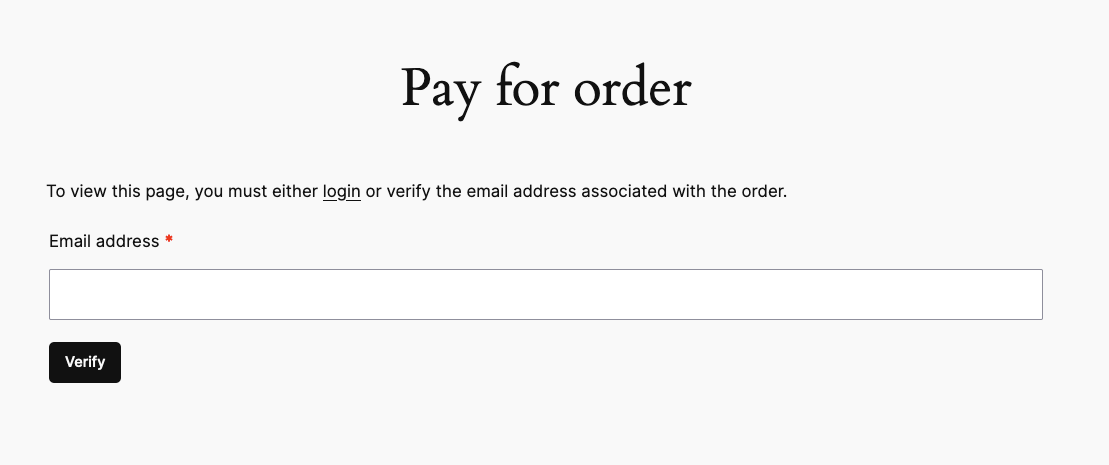
- If the order is assigned to the “Guest” customer, anyone who follows a payment link more than 10 minutes after the order was created will be prompted to verify the email address on the order to continue to the payment form.
- If no email address is associated with a guest order, anyone with the payment link will be able to pay for the order.
Developers: The length of this “Grace Period” where orders can be accessed without verification is 10 minutes by default. This time period can be altered via thewoocommerce_order_email_verification_grace_period filter in WooCommerce’s codebase.
Disabling order email verification – Developer Level
This order email verification is in place as a privacy feature to prevent malicious actors from viewing order details of guest orders. However, we acknowledge that custom use cases exist which may work best without this feature enabled. If you’d like to disable guest order email verification, you can do so using the woocommerce_order_email_verification_required filter as demonstrated in the following code snippet.
add_filter( 'woocommerce_order_email_verification_required', '__return_false' );Note: If you’re not comfortable modifying your site using code snippets we recommend working with a qualified developer. We highly recommend Codeable, or a Certified WooExpert.
Removing Personal Data
↑ Back to topStarting with WooCommerce 3.4+, it is possible to remove customer data from orders.
To enable this option:
- Go to: WooCommerce > Settings > Accounts & Privacy.
- Enable Allow personal data to be removed in bulk from orders.
- Save changes.

The option to remove personal data will then be available for orders:
- Go to: WooCommerce > Orders.
- Select the orders that need personal data removed.
- Select Bulk Actions > Remove personal data.
- Select Apply.
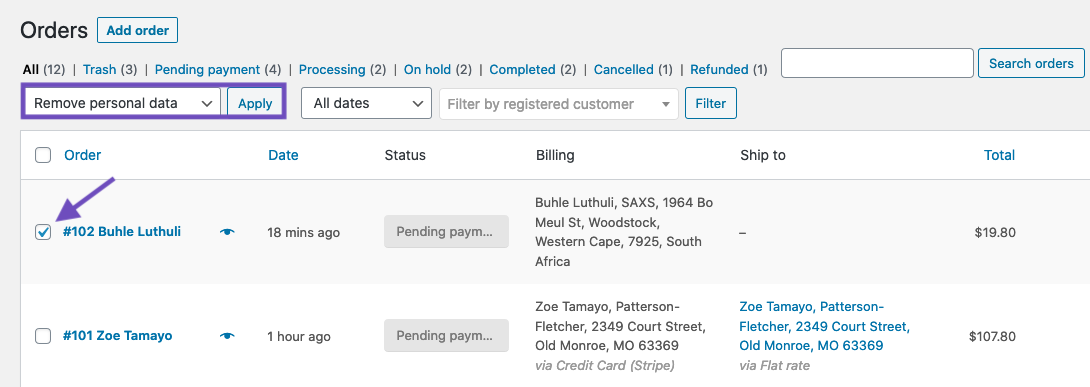
After personal data has been removed, orders will appear on the Orders screen like this:

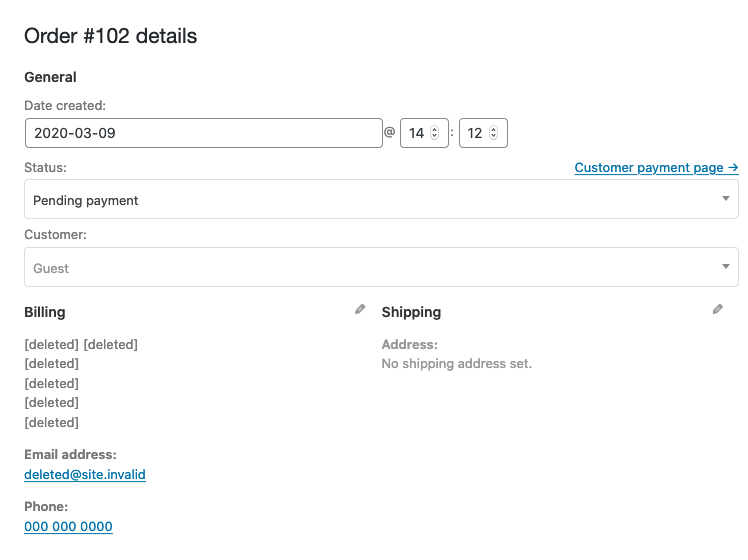
On an individual order, personal data is removed like in this screenshot:
Orders will be anonymized so sales stats are unaffected.
Personal data removal can also be automatically associated with account erasure requests. WordPress allows deleting user details upon request via Tools > Erase Personal Data. This removal can now also be associated with the orders of this user.
For details on these settings and how to use them refer to the Personal Data Retention section of Configuring WooCommerce Settings
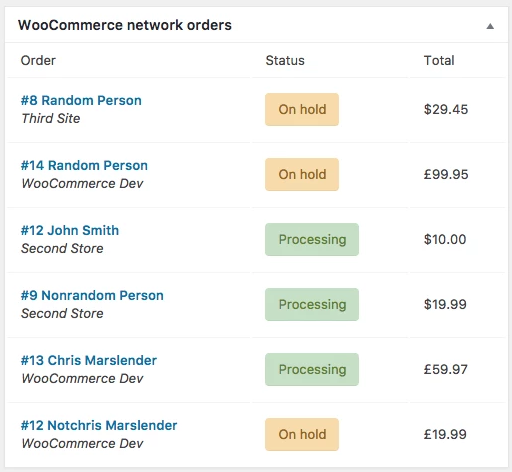
Multi-site orders
↑ Back to topStarting with WooCommerce 3.4, there is a widget that appears under the Dashboard menu that shows order information from across all sites. You can click on an order to be taken to the details of the order on that site.
Handling test orders
↑ Back to topIn some scenarios, you may want to create test orders in your store. For example, you may be testing or troubleshooting a new payment method or other integration related to orders. These will function like normal orders, meaning they will trigger emails, appear in Analytics, etc.
There’s currently no visual difference or special status for test orders. As a result, other plugins or services that integrate with WooCommerce may be unable to differentiate between these test orders and your real orders. Please check the documentation for each integration to see how you should handle testing. Depending on your needs, you may wish to disable certain extensions or integrations before making test orders.
When your testing is done, these orders can then be trashed and removed from your site if preferred. That way these orders aren’t handled, or shipped inadvertently, nor will they appear in your store Analytics, etc.
Note: To avoid unintended complications with test payments on your live site, you can perform testing exclusively on a staging site.
Troubleshooting
↑ Back to topUnderstanding Order Statuses in Relation to Payment Gateways
↑ Back to top| Status | Description | Payment gateway comments |
|---|---|---|
| On hold | The order is awaiting payment confirmation. Stock is reduced, but you need to confirm payment. | Usually seen with payment methods when you need to manually confirm, such as BACS (bank transfer) or cheque. |
| Pending payment | The order has been received, but no payment has been made. | Most gateways will report back and set the order status to Processing (payment successful) or Failed (payment unsuccessful). If the shop never receives either signal, it keeps the status on Pending payment. A paid order with the Pending payment status tends to be due to a lack of communication between your payment provider and your site. This could be due to a misconfiguration (e.g. webhooks, payment notification URLs) or a plugin conflict. |
| Processing | Payment has been received (paid), and the stock has been reduced. The order is awaiting fulfillment. | If the payment has been successful the order will be set to Processing. |
| Completed | Order fulfilled and complete. | These generally aren’t interesting because everything has gone correctly. WooCommerce will automatically set the status for orders to Completed if all products in the order are both Virtual and Downloadable. |
| Failed | The customer’s payment failed or was declined, and no payment has been successfully made. | An order can have the Failed status if the hold stock window expired without a response or there is a lack of communication between your payment provider and your site. |
Note: If you are still using the now deprecated and hidden-by-default PayPal Standard functionality and orders are staying in the Pending Payment status after successful payment, you may have an IPN issue. See the troubleshooting section at Debugging IPN Issues.
Why aren’t my shop’s orders sequential?
↑ Back to topWhile every order uses a unique order ID, they won’t necessarily be sequential. Order numbers are non-sequential because they share the wp_post database table. This database table is shared with other post types in WordPress — like pages, comments, and coupons. Each time a new post of any kind is created, it increments the ID number used in the database table by one. So if items of other post types are created between orders, the order IDs will “skip” those IDs which have been used by other posts.
To assign your orders sequential order numbers, you can use an extension like Sequential Order Numbers Pro.
Questions and Support
↑ Back to topDo you still have questions and need assistance?
This documentation is about the free, core WooCommerce plugin for which support is provided in our community forums on WordPress.org. Searching there you’ll often find that your question has been asked and answered before.
If you haven’t created a WordPress.org account to use the forums, here’s how.
- If you’re looking to extend the core functionality shown here, we recommend reviewing available extensions in the Woo Marketplace.
- Need ongoing advanced support, or a customization built for WooCommerce? Hire a WooExpert agency.
- Are you a developer building your own WooCommerce integration or extension? Check our Developer Resources.
If you weren’t able to find the information you need, please use the feedback thumbs below to let us know! 🙏