Overview
↑ Back to topNote: This product has been retired and is not for sale. Documentation is no longer being updated.
Installation
↑ Back to top- Download the extension from your WooCommerce dashboard
- Goto Plugins > Add New > Upload and select the ZIP file you just downloaded
- Click Install Now, and then Activate
- Click the Configure link for the plugin, and read the next section to learn how to setup and configure the plugin.
Setup and Configuration
↑ Back to top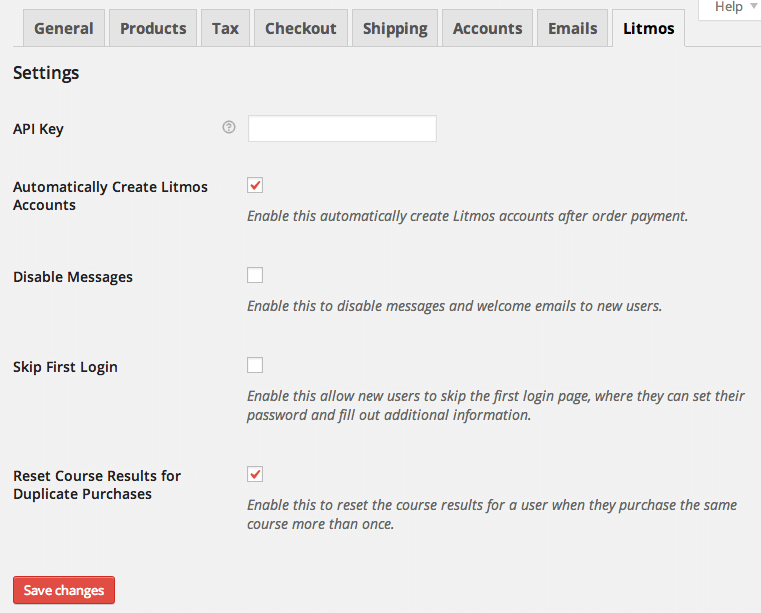
Extension Settings
↑ Back to top- API Key – Enter your API Key, found on your Profile page when you log into your Litmos account.
- Automatically create Litmos accounts – Check this to automatically create a Litmos account for the customer and assign the purchased course to them. If left unchecked, you’ll still be able to manually create the customer and assign the purchased course by clicking the “Export to Litmos” button when viewing the order.
- Disable Messages – Check this to disable messages when customer’s log in to their Litmos course. Note: This will disable course invitation emails; please see further details below.
- Skip First Login – Check this to take the user to the course page when first logging in, instead of showing them a registration screen which asks for additional information.
- Reset course results for duplicate purchases – Check this to automatically reset the course results for an existing customer when they purchase the same course again. This is helpful when selling a low-cost practice exam that a customer might want to take multiple times.
Other Information
↑ Back to topDisabling Messages
You can enable the “Disable messages” option to stop the display messages and emails for customers when they log into their Litmos course. Enabling this option will disable the initial “course invitation” email for all users, even those that don’t already have an account under this Litmos account. This means that new users may not know where to log in or what their user name is, so we recommend that store owners add some information to the WooCommerce emails and / or Thank You page showing customers their Litmos username (most likely the billing email) and sending them tohttps://{account}.litmos.com/account/forgot to reset their password.
Frequently Asked Questions
↑ Back to topQ: What happens when a customer purchases more than 1 quantity of a single course? A: Currently the extension will only create 1 user account per course purchased, regardless of the quantity. This is because Litmos has poor support for multi-user API calls, which may be improved in the future. That said, there are workarounds — if you have a use case, please submit a feature request via support ticket.
Troubleshooting
↑ Back to top- Check that your API Key is correct
- Double-check that your API Key is correct 😉
- Submit a support ticket so we can troubleshoot further.