If you are using one of our previous PayPal extensions, you will find details on upgrading to PayPal Payments here.
WooCommerce PayPal Payments is a full-stack solution that offers powerful and flexible payment processing capabilities. Set up quickly. Enable payment acceptance easily. Offer your customers a seamless checkout experience and get paid quickly.
WooCommerce PayPal Payments is the only payments extension that includes PayPal, Pay Later, Vaulting, advanced credit and debit card processing, and local payment methods.
By integrating with WooCommerce PayPal Payments, you can:
- Offer full-stack payment processing – the choice of payment methods for your customers.
- Smart payment buttons – present relevant payment methods to your customers in specific markets. With one integration, sellers can automatically offer more payment method options as they become available.
- Fully customizable card fields for Advanced Card Payments.
- Use the latest PayPal features in a single integration, including PayPal Pay Later.
Requirements
↑ Back to topTo install WooCommerce PayPal Payments, you need:
- WordPress Version 5.3 or newer (installed)
- WooCommerce Version 3.9 or newer (installed and activated)
- PHP Version 7.2 or newer
- PayPal business or personal account
Installation
↑ Back to top- Log in to WordPress Admin.
- Go to Plugins > Add New.
- Search for the WooCommerce PayPal Payments plugin.
- Click on Install Now and wait until the plugin is installed successfully.
- You can activate the plugin immediately by clicking on Activate now on the success page. If you want to activate it later, you can do so via Plugins >Installed Plugins.
Account Setup and Onboarding
↑ Back to topTesting in Sandbox
↑ Back to topPayPal transactions can be tested in the PayPal Sandbox before accepting live payments on your site. See the PayPal sandbox testing guide for more details.
Note: All transactions conducted in the Sandbox are for testing purposes and will not result in the receipt of any actual funds.
- Visit https://developer.paypal.com
- Log in using your PayPal account credentials
- Navigate to Testing Tools -> Sandbox Accounts -> Create account
- Either use the existing pre-generated business account or create a new business or personal account
- For the Sandbox account you would like to use, click the email address or … and select View/Edit Account
- Note down the email address and password for the account to use with the onboarding process
- While here, create a second business or personal account and note down these login details as well to use as the buyer when testing the PayPal payment process
Connect a PayPal account
↑ Back to topOnce the WooCommerce PayPal Payments plugin has been installed and activated, it needs to be connected to your PayPal account.
The integrated onboarding connects a PayPal account via login credentials (email and password) without the need for API credentials. The onboarding automatically creates a new REST application in the PayPal developer site, registers the webhooks, and enables relevant features such as Vaulting. The account can also be connected manually, but the onboarding process is the preferred option as it automatically configures the REST App and credentials.
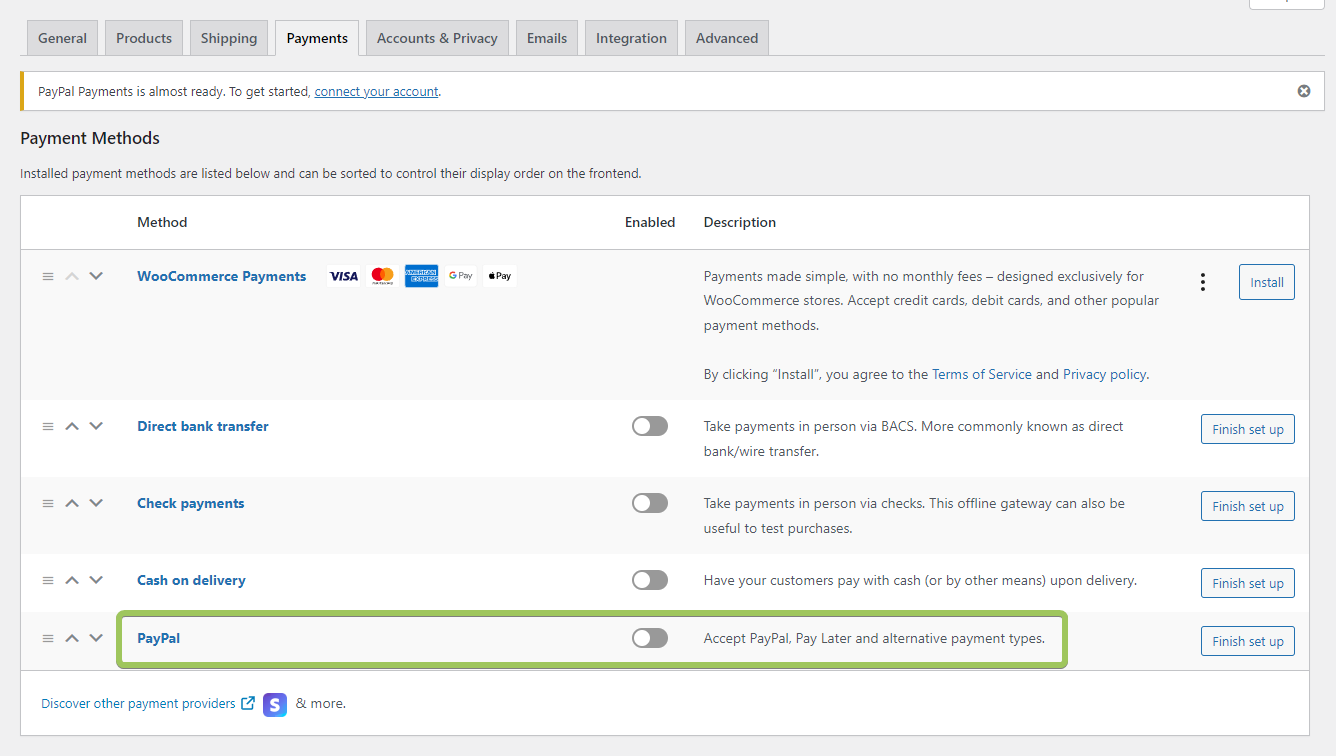
- After installing and activating the WooCommerce PayPal Payments plugin, go to WooCommerce > Settings
- Click the Payments tab
- The Payment methods list may include two PayPal options
- Click Set Up (or Manage if the extension is already active) next to PayPal. (not PayPal Standard)
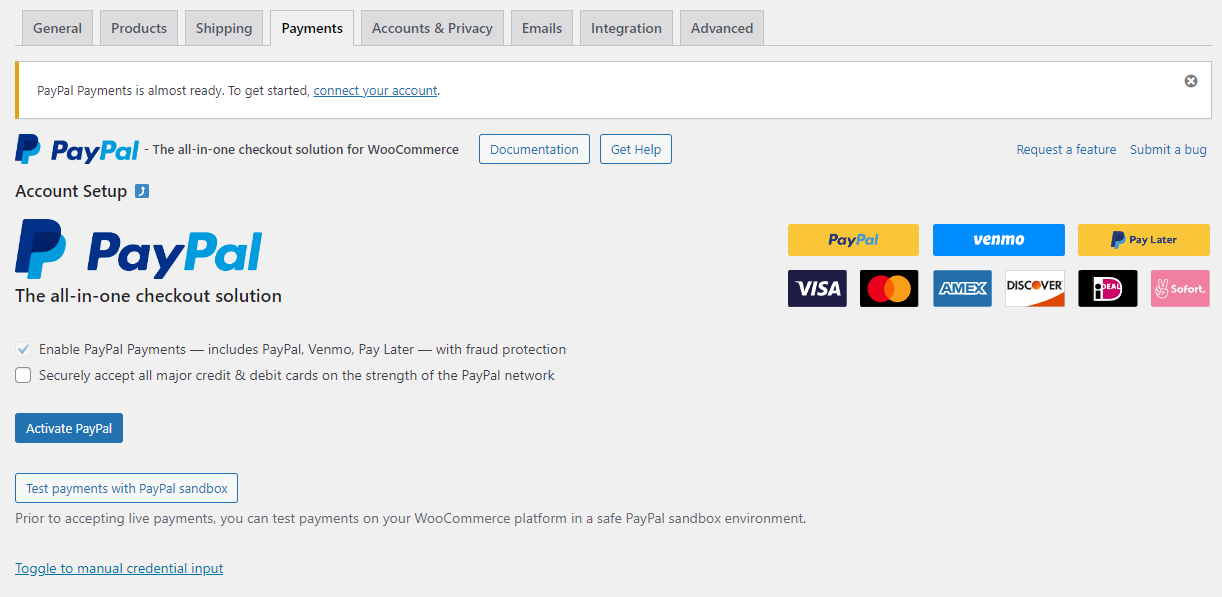
- The Account Setup section presents different options for the onboarding process:
Reveal more onboarding details
Reveal more onboarding details
- Enable PayPal Payments — includes PayPal, Venmo, Pay Later — with fraud protection
- This setting is required as PayPal Payments automatically offers eligible payment methods. You can hide specific payment methods once the onboarding process is completed.
- Securely accept all major credit & debit cards on the strength of the PayPal network
- Enables or disables credit card functionality, which can be changed after onboarding. If enabled, PayPal Payments offers two different credit card processing options:
- Standard Card Processing:
- PayPal manages card transactions with a user-friendly, pre-built experience, streamlining compliance requirements for all business and casual seller accounts.
- Advanced Card Processing:
- Only available in selected regions. PayPal acts as the payment processor for card transactions. Card fields are fully customizable and provide optional features like Vaulting or Chargeback Protection for more security. Additional vetting by PayPal is required and prompted automatically during the onboarding.
- Only available in selected regions. PayPal acts as the payment processor for card transactions. Card fields are fully customizable and provide optional features like Vaulting or Chargeback Protection for more security. Additional vetting by PayPal is required and prompted automatically during the onboarding.
- Check
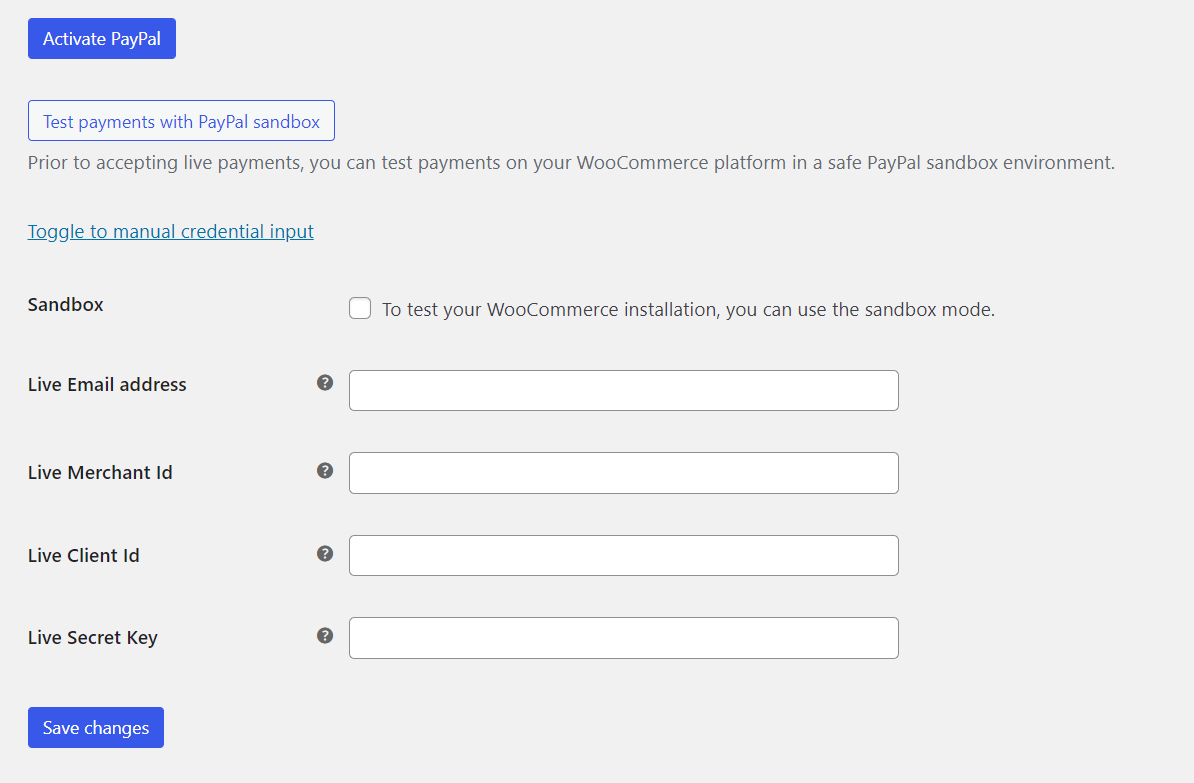
Securely accept all major credit & debit cards on the strength of the PayPal networkto enable credit & debit card functionality (this can be changed after connecting) - Activate PayPal by clicking the button and following the prompts to connect your live PayPal account. Click Test payments with PayPal Sandbox to test the integration using the PayPal Sandbox. If you don’t have a PayPal account yet, you can create one from the activation window.
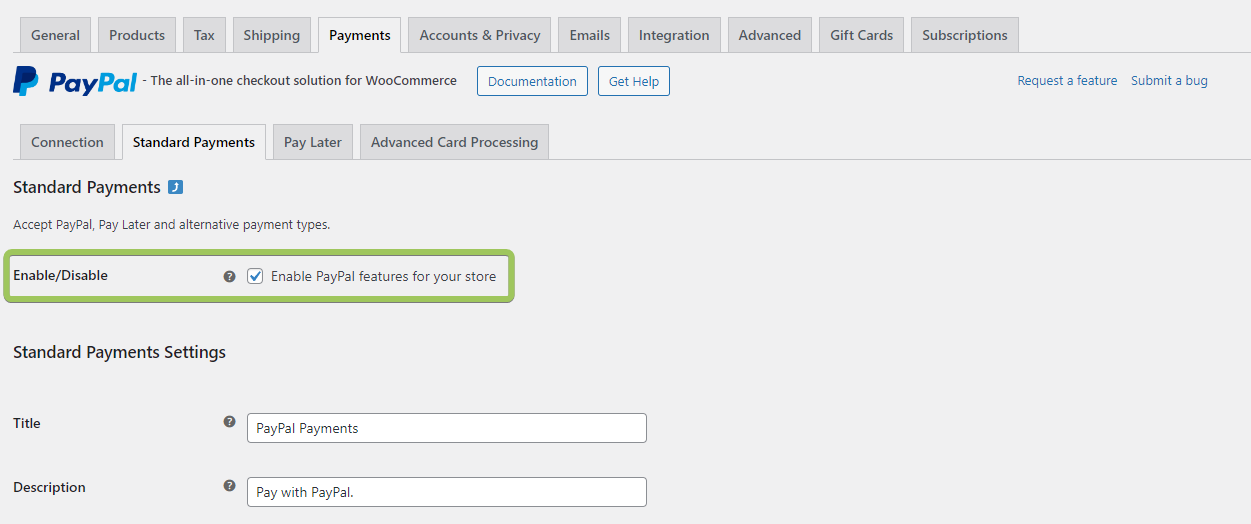
- After completing the connection steps, navigate to the Standard Payments tab and ensure the checkbox next to Enable/Disable is checked.
Configure your desired PayPal button appearance and click Save changes to enable PayPal. By default, the PayPal gateway and smart buttons are enabled on the Checkout, single product, and Cart pages.
Complete setup guide for PayPal Payments
The setup process is thoroughly explained in our integration video guide below. The settings pages in the latest versions of PayPal Payments have been updated for improved user experience, so they may differ from what is shown in the video.
Manual credential input
↑ Back to topIf connecting with the onboarding process is not possible (e.g. due to lack of login credentials), the PayPal account can also be connected with manually created API credentials.
Note: PayPal Payments can only determine the available advanced features (Advanced Card Processing, Apple Pay, Google Pay, Pay upon Invoice) for the connected PayPal account when the (manually) connected API credentials were created by the onboarding process.
Clicking Toggle to manual credential input reveals the input fields. A REST application must be created on the PayPal developer site to retrieve the API credentials needed to connect the account. The steps below describe how to find the required PayPal Merchant ID, Client ID, and Secret Key.
Obtaining the Merchant ID
PayPal Payments requires the Merchant ID, a unique ID for every PayPal account. The Merchant ID helps to protect your identity.
When using PayPal Payments your Merchant ID will be used instead of your primary email address to create the payment buttons. This way your email address won’t be visible to spammers.
Here’s how to locate the Merchant ID for your PayPal business account:
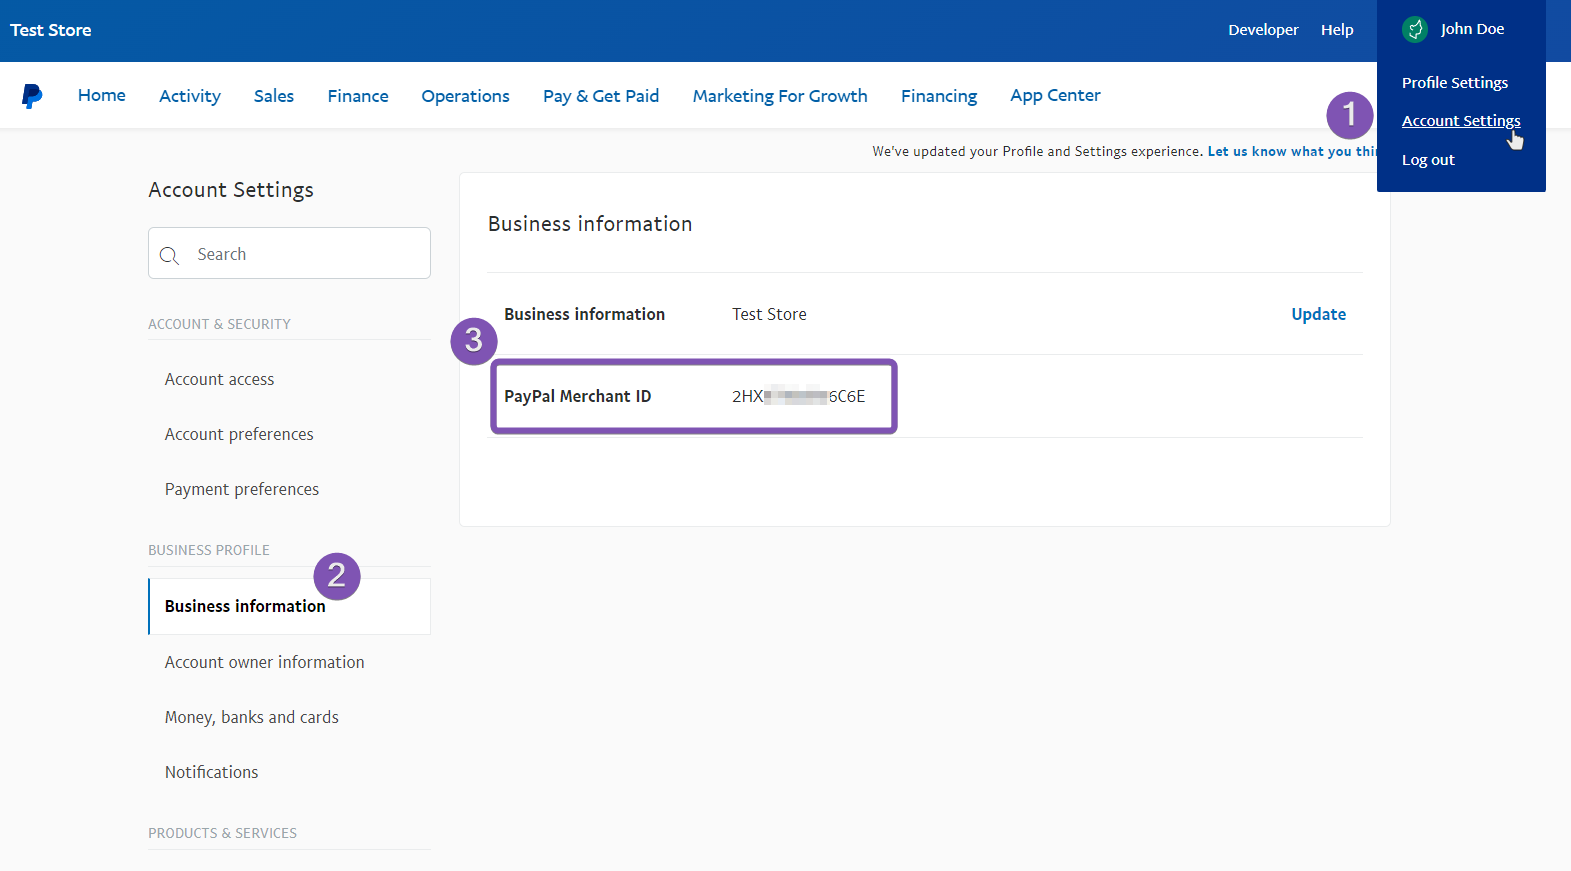
- Go to your Account Settings.
- Click Business information under “Business profile.”
- You’ll find your ID next to “PayPal Merchant ID.”
More information and instructions for personal PayPal accounts are available here: How do I find my Secure Merchant ID on my PayPal account?
Sandbox accounts can also view the Merchant ID from the same page on the corresponding sandbox.paypal.com website, or from the PayPal developer site (the Merchant ID may be listed as Account ID for sandbox accounts on the PayPal developer site).
Obtaining the Client ID & Secret Key
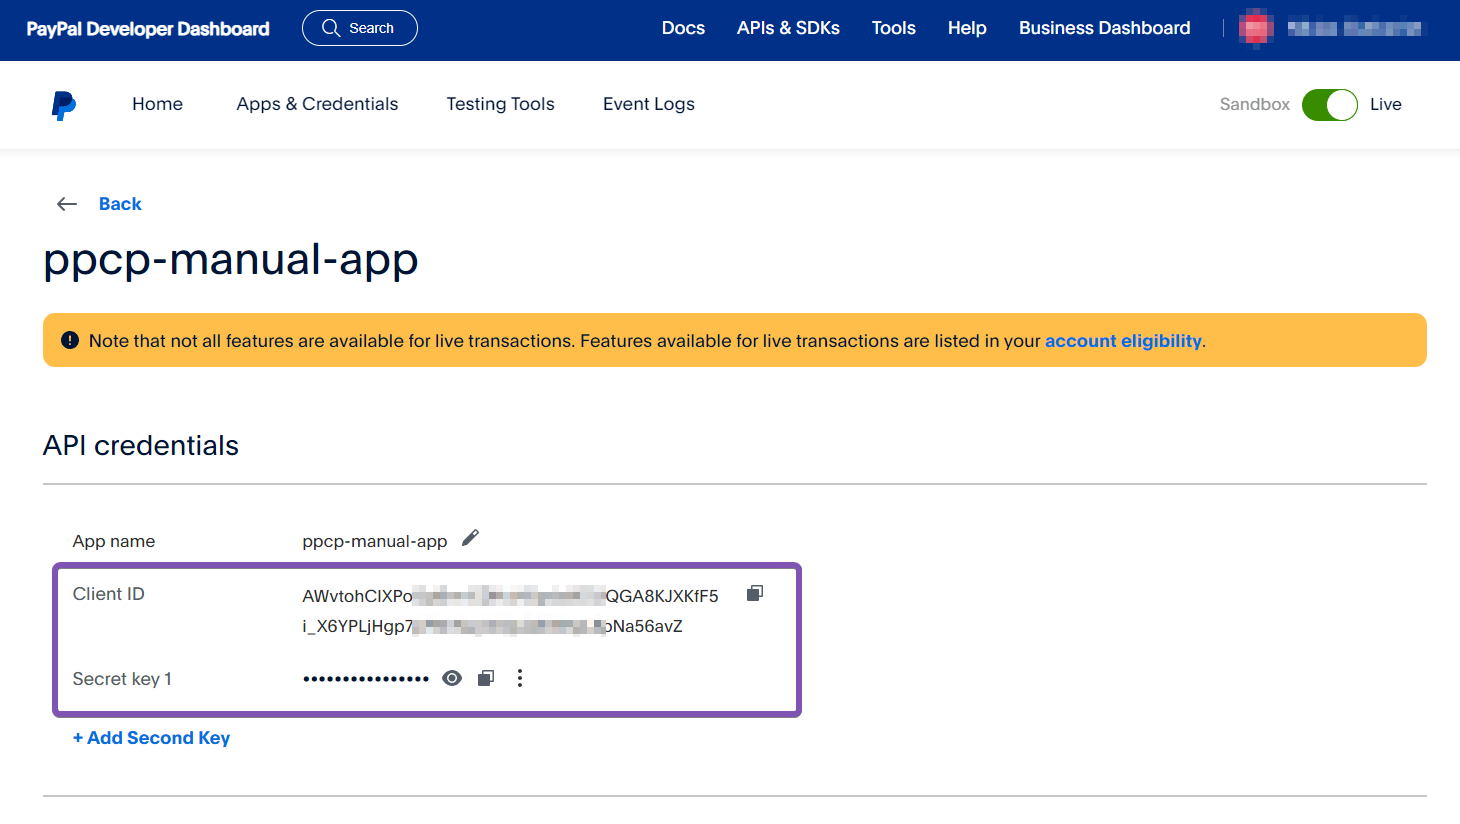
The Client ID & Secret Key can only be obtained from the PayPal Developer Website.
- Visit the PayPal developer dashboard: https://developer.paypal.com/
- Log in with your PayPal account. Every PayPal account is automatically a PayPal developer account with access to this site.
- In the top left corner, click Apps & Credentials. Choose between creating a Sandbox or a Live app from this page before clicking Create App.
- Fill in your desired name for the new app (e.g. ppcp-manual-app) and click Create App. Sandbox apps may need to be assigned to a specific Sandbox account on this page.
- On the next page, PayPal displays the account email address, the Client ID, and Secret Key.
This video explains how to create a REST App on the PayPal developer website. Please note PayPal is continuously improving the developer website and experience.
Plugin Configuration
↑ Back to topThe plugin configuration is explained in the sections below.
Connection
↑ Back to topThe Connection tab displays all the necessary information for the plugin to connect with your PayPal account. This includes your API credentials, activation status for advanced features, webhook status, and more.
Account Setup
↑ Back to topAfter following the steps outlined in Connect a PayPal account, the REST API credentials for the connected PayPal account are displayed in this section.
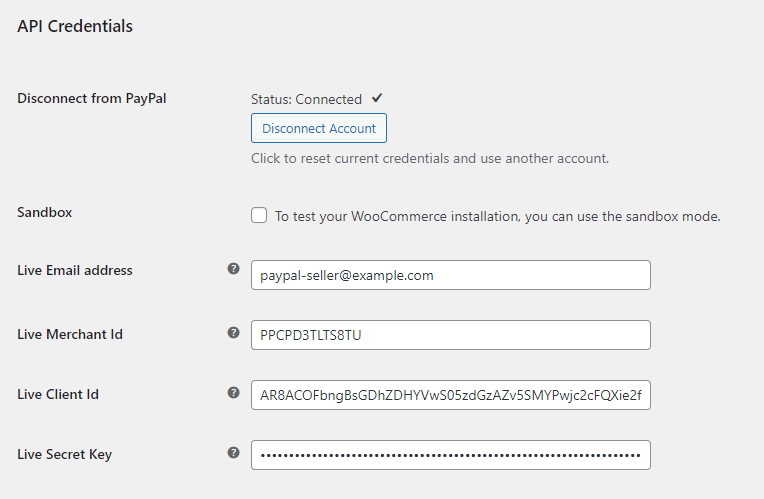
Toggle the Sandbox checkbox to switch from live to sandbox accounts for testing purposes.
To connect a different PayPal account, click Disconnect Account and connect your account via the onboarding wizard.
Feature Onboarding
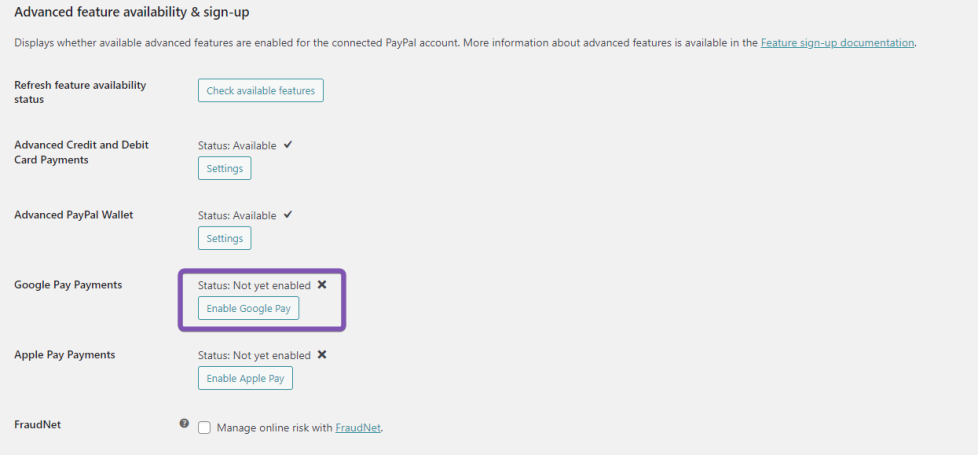
↑ Back to topThe Advanced feature availability & sign-up section displays the activation status for advanced features for the connected PayPal account.
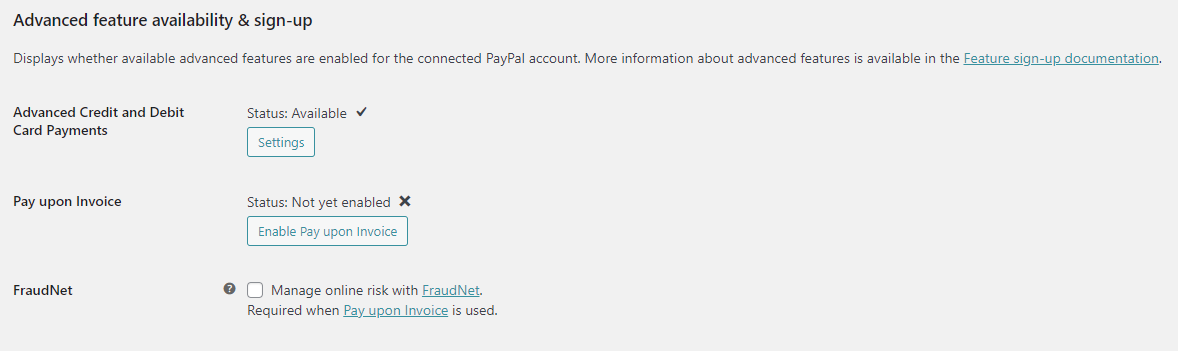
Advanced features could be signed up for from this page if the account was not already enabled.
- Advanced Credit and Debit Card Payments
- Apple Pay
- Google Pay
- Pay upon Invoice
- FraudNet (required when Pay upon Invoice is enabled)
General integration configuration
↑ Back to top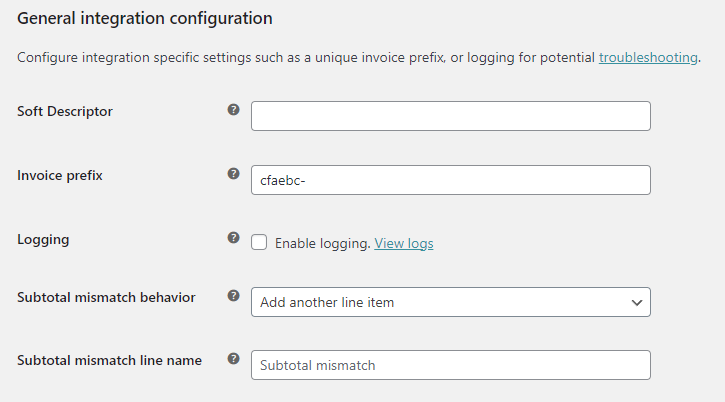
The integration configuration includes the configuration for various plugin behaviors such as the invoice prefix and logging.
Soft Descriptor
This is a customizable text field where you input a concise description of your business or transaction. This description will appear on the customer’s card statement to help them identify the transaction. It is limited to 22 characters. Please ensure it accurately represents your business or the transaction to avoid customer confusion.
Invoice prefix
Use a unique prefix to distinguish invoices, especially if using one PayPal account for multiple installations. The PayPal invoice number will always correspond to the WooCommerce order number, even if customized. Please use only English letters, “-” or “_” characters for the prefix.
Logging
Turn on Logging to trace and resolve any transaction issues or for general troubleshooting. It’s especially useful to enable it when encountering unexpected issues, and sharing these logs can aid the support team in addressing your queries more effectively. If everything operates smoothly, you may disable logging. Please note, logs are automatically deleted after 30 days.
Subtotal Mismatch Behavior
This setting deals with the discrepancies between WooCommerce and PayPal in subtotal calculations due to rounding differences. Selecting “Do not send line items to PayPal” eliminates any discrepancies by not sending individual line items, but results in an empty order details list on PayPal. To preserve order details on PayPal and correct any mismatch, choose “Add another line item.”
Subtotal Mismatch Line Name
This setting is available when “Add another line item” is selected above. It allows you to designate the name of the additional line sent to PayPal to rectify the subtotal mismatch, ensuring that PayPal accurately receives all order details.
Webhook Status
↑ Back to topPayPal Payments uses webhooks to communicate events with and from PayPal, replacing the previous reliance on IPN. The onboarding wizard automatically configures necessary webhooks. The Webhooks Status section provides two buttons for webhook simulation and resubscription without visiting the PayPal developer site.
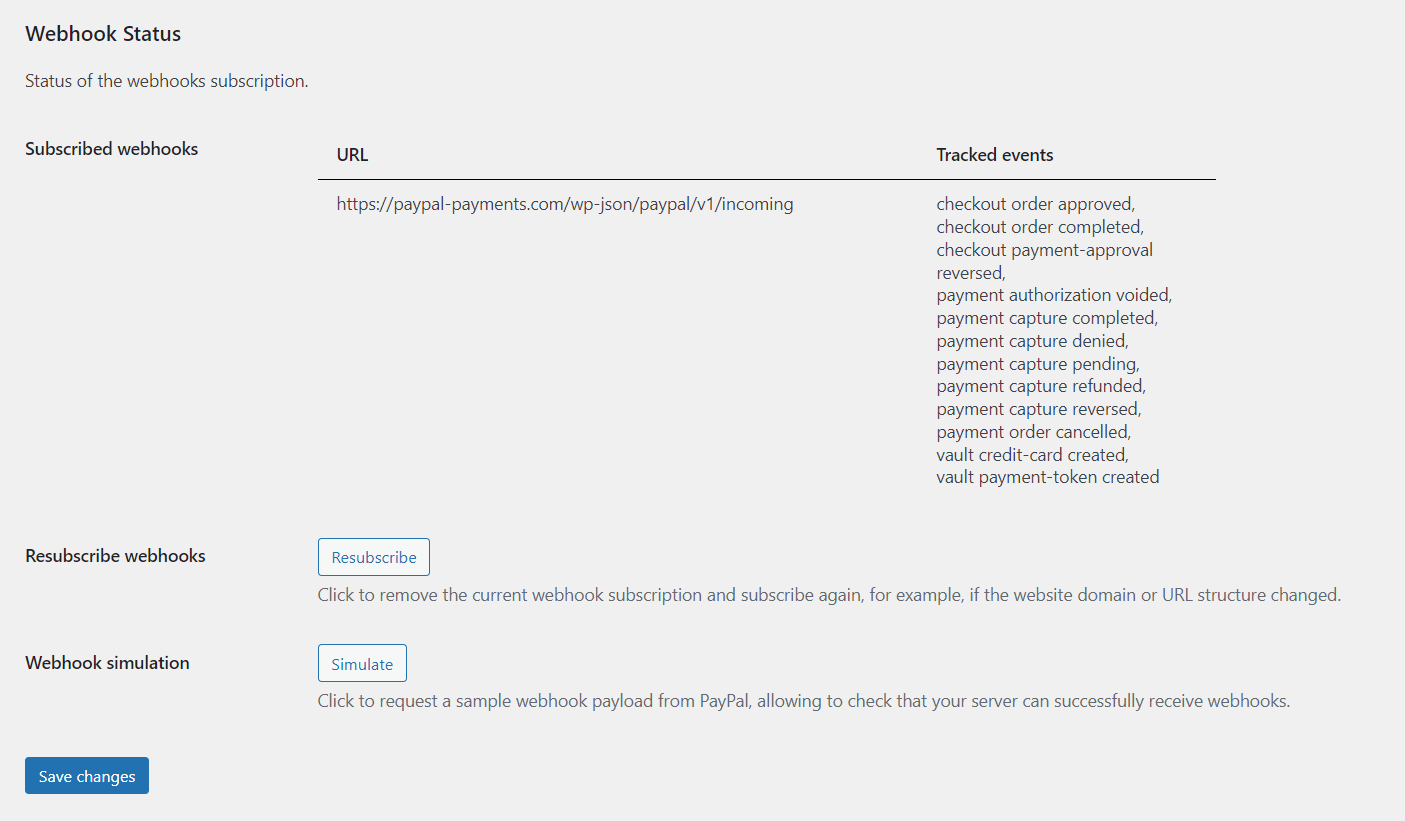
To resolve potential communication issues between WooCommerce and PayPal refunds, it is recommended to click the Resubscribe button in the Webhooks Status section. This will ensure that the plugin is using the latest webhooks. After resubscribing, run a Simulate test to verify the successful receipt of the webhooks. If the simulation results in an error, follow the troubleshooting steps outlined.
Webhooks are an essential component in the functioning of the plugin. Especially for Alternative Payment Methods, as the buyer’s payment is only captured after receiving a webhook confirmation.
Plugin Uninstallation and Data Removal
↑ Back to topPayPal Payments stores settings and other related data in your database. However, there may be times when you wish to uninstall the plugin and remove all related data. By default, uninstalling the plugin will not delete these settings. Your configurations will be saved in case you decide to reinstall the plugin in the future.
PayPal Payments provides an option for removing all plugin-related data upon uninstallation by checking the Remove PayPal Payments data from Database on uninstall setting.
Additionally, it is possible to reset the plugin to its initial state without uninstalling the plugin:
The Clear now button from the Remove PayPal Payments data from Database setting will delete all current data related to the plugin and return it to the state it was in immediately after the initial installation.
Be aware that this action is irreversible; once clicked, all your saved settings will be lost, and the plugin will revert to its default configuration.

Standard Payments
↑ Back to topGeneral Settings for PayPal Payments
↑ Back to top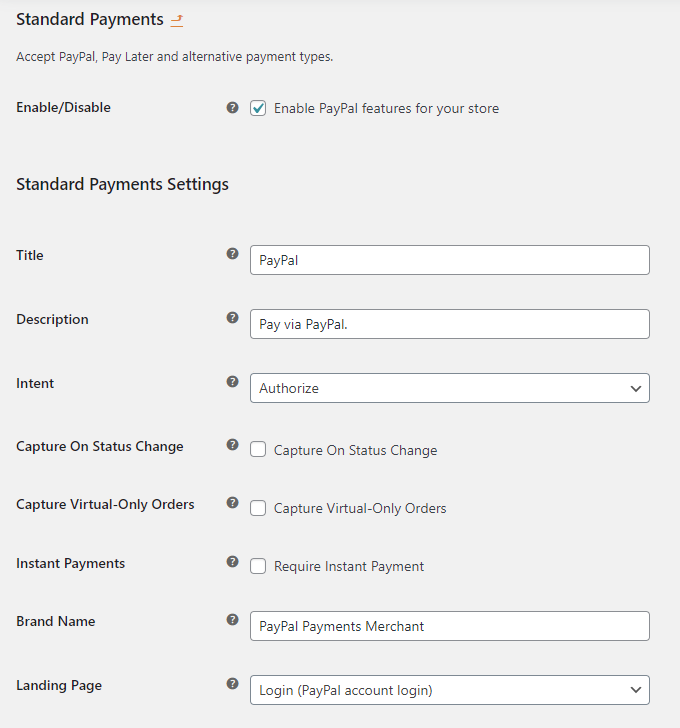
- Enable/Disable – Enable the PayPal Gateway checkbox to display PayPal smart buttons in your shop.
- Title – The title for the PayPal gateway the user sees during the checkout process.
- Description – The description the user sees during the checkout process.
- Intent – The intent is to either capture a payment immediately after an order is created or authorize a payment for later capture. When configuring Authorize intent, automatic payment captures can be configured for virtual products or when changing the order status.
- Instant Payments – If you enable this setting, PayPal will be instructed not to allow the buyer to use funding sources that take additional time to complete (e.g., eChecks). Instead, the buyer will be required to use an instant funding source, such as instant transfer, credit/debit card, or Pay Later.
- Brand Name – Control the name of your shop that customers will see during the payment process.
- Landing Page – Type of PayPal page to display in the popup after clicking the button.
Alternative Payment Methods
↑ Back to top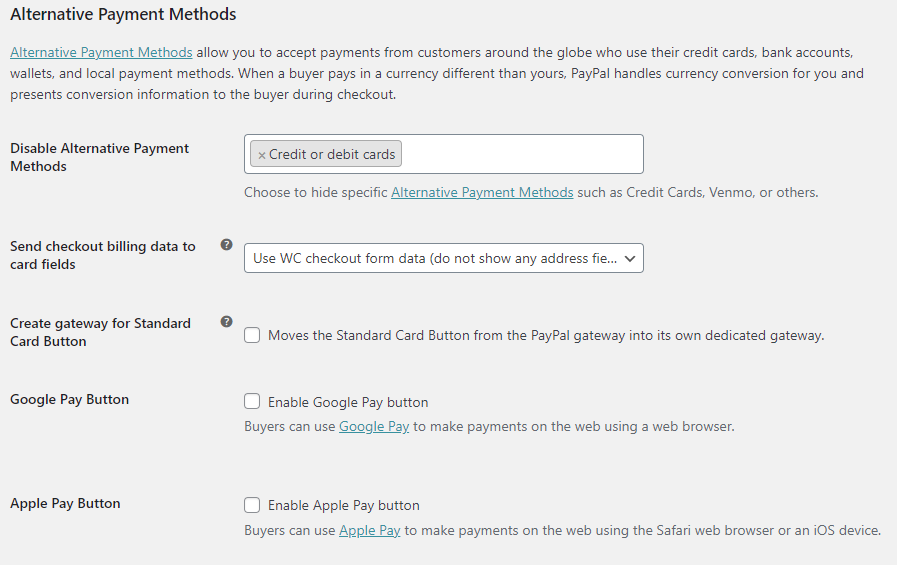
- Disable Alternative Payment Methods – All possible funding sources such as Credit Cards, Venmo, or other Alternative Payment Methods will be shown by default for eligible buyers. Disable funding sources with this setting.
- Send checkout billing data to card fields – Using the WooCommerce form data increases convenience for the customers as they don’t have to enter their details twice, but it can cause issues if card details do not match the billing data in the checkout form.
- Create gateway for Standard Card Button – By default, the Debit or Credit Card button is displayed in the PayPal Checkout payment gateway. This setting creates a separate gateway only for the Card button.
- Google Pay Button – Enable this to provide the Google Pay button below your configured PayPal buttons. This feature is limited to certain regions and requires a dedicated signup. More details can be found in the Google Pay section.
- Apple Pay Button – Enable this to provide the Apple Pay button below your configured PayPal buttons. This feature is limited to certain regions and requires a dedicated signup. More details can be found in the Apple Pay section.
Saved payments
↑ Back to top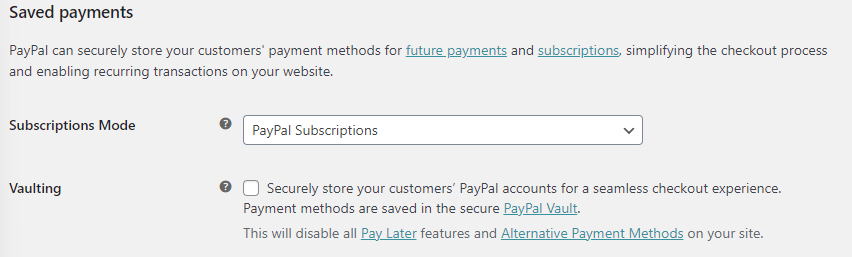
- Subscriptions Mode – When using the Woo Subscriptions plugin, you can configure PayPal Subscriptions, PayPal Vaulting, or disable PayPal for subscriptions. More details are listed in the Subscriptions FAQ.
- Vaulting – Enable Vaulting to save PayPal accounts for future payments. This feature can be used independently of subscriptions to save payment methods but requires approval for Vaulting.
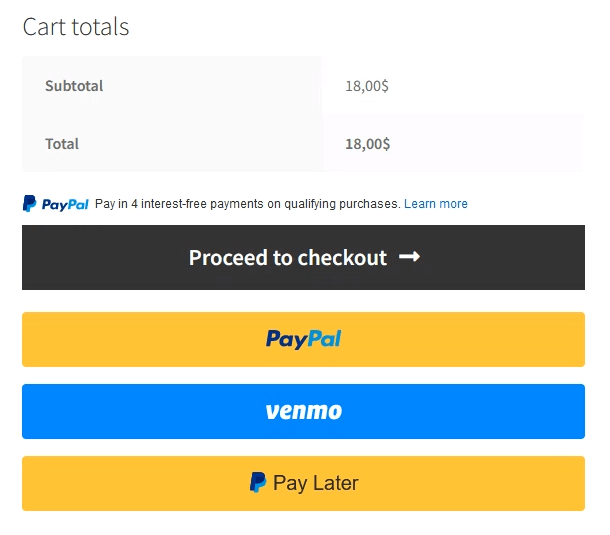
PayPal Buttons
↑ Back to topPayPal Payments implements the PayPal smart buttons on various pages of your site. The button styling can be configured individually for the Single Product Page, Classic Cart, Classic Checkout, Mini Cart, Express Checkout and Cart.
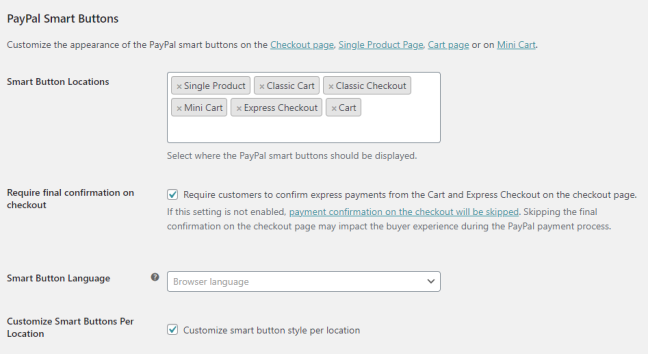
- Smart Button Locations – Select the pages where you want the PayPal buttons to be shown. If no button location is selected, the PayPal gateway will not be available.
- Require final confirmation on checkout – Disabling this setting lets your buyers to skip the payment confirmation on the checkout page when using the PayPal button on the Block Cart or Block Express Checkout.
- Smart Button Language – The language and region used for the displayed PayPal Smart Buttons. The default value is the current language and region setting in the visitors browser.
- Customize Smart Buttons Per Location – Enabling this option allows for customization of the PayPal buttons for each enabled location. If not selected, all enabled buttons will have a uniform appearance based on a shared styling configuration.
Classic Checkout Buttons
↑ Back to topEnabling the Classic Checkout Buttons is necessary for the display of the PayPal gateway on the Classic Checkout page using the [woocommerce_cart] Shortcode block or the Classic Checkout block. This gateway offers buyers a choice between PayPal smart buttons and Alternative Payment Methods, such as Venmo or Pay Later.
The button preview serves as a tool to help you style the buttons for your shop, however, the payment buttons displayed to customers may differ based on factors such as their location, eligibility, or the button configuration.
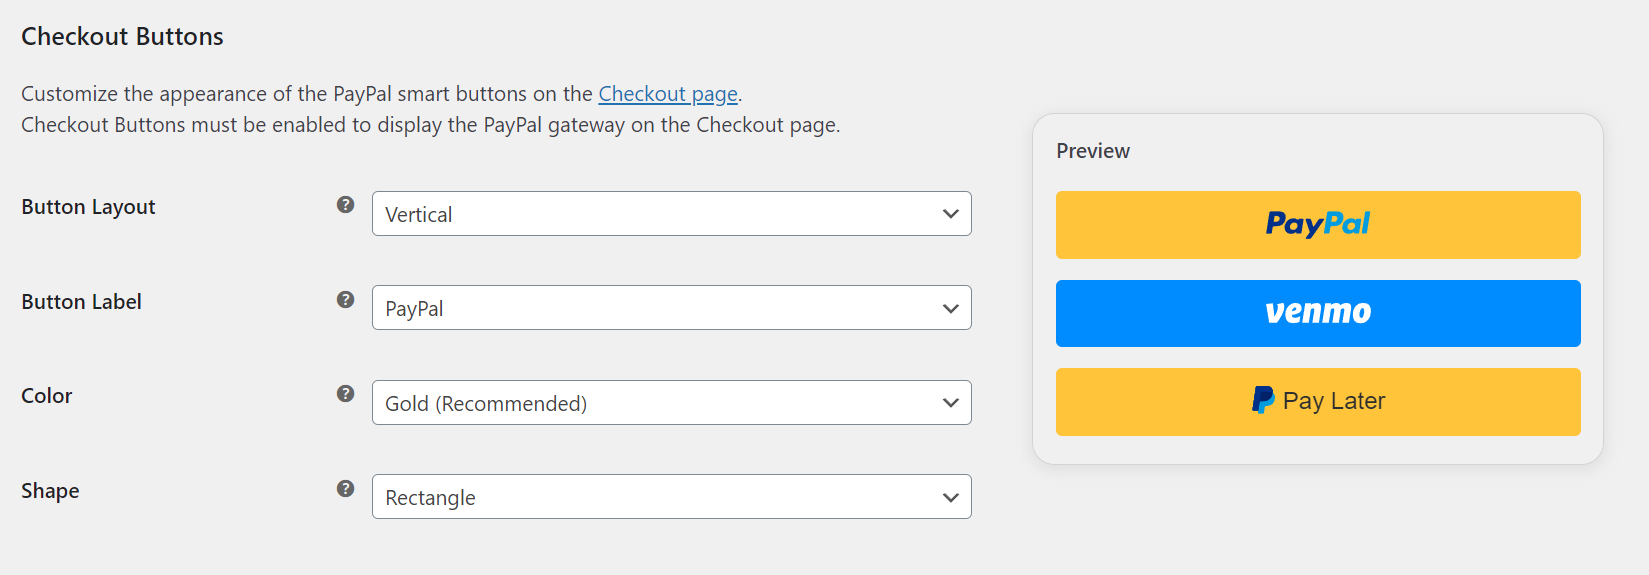
- Button Layout – If additional funding sources are available to the buyer through PayPal, multiple buttons are displayed in the space provided. Choose “vertical” for a dynamic list of alternative and local payment options or “horizontal” when space is limited.
- Tagline – Add a tagline. This will only appear if you select a horizontal layout.
- Button Label – This controls the label on the primary PayPal button.
- Color – Controls the background color of the primary PayPal button. Use “Gold” to leverage PayPal’s recognition and preference, or change it to match your site design or aesthetic.
- Shape – The pill-shaped button’s unique and powerful shape signifies PayPal in people’s minds. Use the rectangular button as an alternative when pill-shaped buttons might pose design challenges.
PayPal Payments implements most of the PayPal Smart Button styling options as demonstrated in this video:
Single Product Page Buttons
↑ Back to topThis section controls the smart buttons on the Single Product Page and has the same styling options as the Buttons on Checkout settings above.
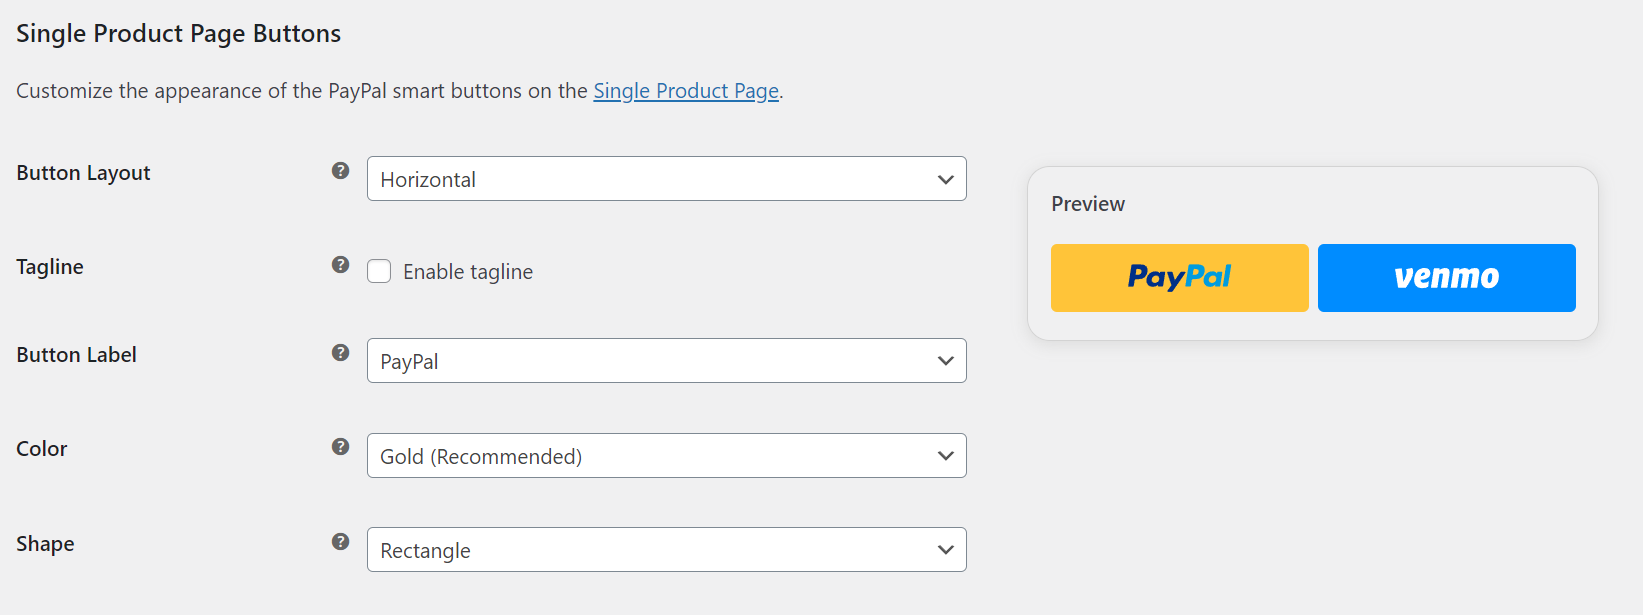
- Button Layout – If additional funding sources are available to the buyer through PayPal, multiple buttons are displayed in the space provided. Choose “vertical” for a dynamic list of alternative and local payment options or “horizontal” when space is limited.
- Tagline – Add the tagline. This line will only show up if you select a horizontal layout.
- Button Label – This controls the label on the primary button.
- Color – Controls the background color of the primary button. Use “Gold” to leverage PayPal’s recognition and preference, or change it to match your site design or aesthetic.
- Shape – The pill-shaped button’s unique and powerful shape signifies PayPal in people’s minds. Use the rectangular button as an alternative when pill-shaped buttons might pose design challenges.
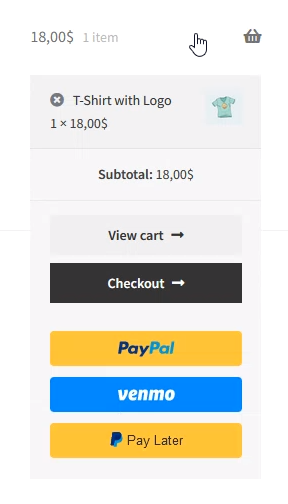
Classic Cart Buttons
↑ Back to topThis section controls the smart buttons on the legacy Cart & Block Cart pages and has the same styling options as the Buttons on Checkout settings above.
- Buttons on Cart – Enable/Disable PayPal buttons on a Cart.
- Button Layout – If additional funding sources are available to the buyer through PayPal, multiple buttons are displayed in the space provided. Choose “vertical” for a dynamic list of alternative and local payment options or “horizontal” when space is limited.
- Tagline – Add the tagline. This line will only show up if you select a horizontal layout.
- Button Label – This controls the label on the primary button.
- Color – Controls the background color of the primary button. Use “Gold” to leverage PayPal’s recognition and preference, or change it to match your site design or aesthetic.
- Shape – The pill-shaped button’s unique and powerful shape signifies PayPal in people’s minds. Use the rectangular button as an alternative when pill-shaped buttons might pose design challenges.
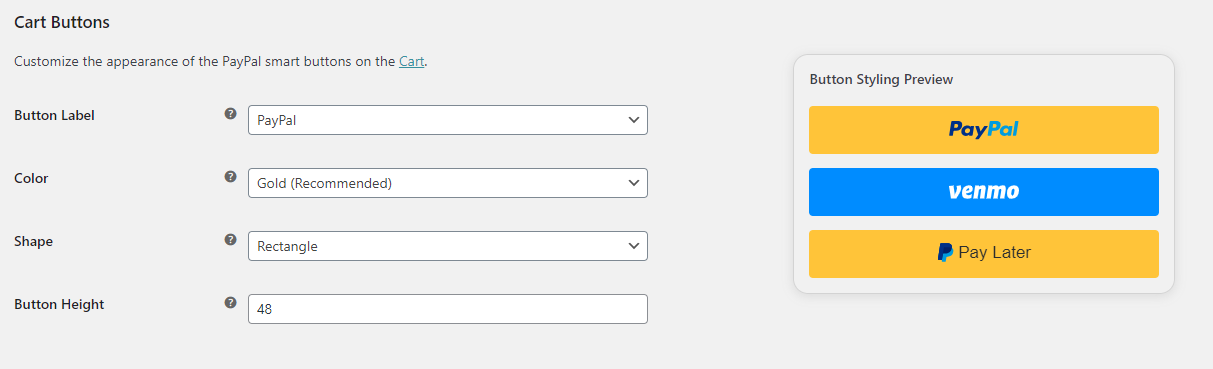
Mini Cart Buttons
↑ Back to topThis section controls the smart buttons on the Mini Cart and has the same styling options as the Buttons on Checkout settings above with an additional Button Height setting.
The Mini Cart Buttons are disabled by default. Enabling this section results in the PayPal scripts loading on (almost) every page on the website.

- Button Layout – If additional funding sources are available to the buyer through PayPal, multiple buttons are displayed in the space provided. Choose “vertical” for a dynamic list of alternative and local payment options or “horizontal” when space is limited.
- Tagline – Add the tagline. This line will only show up if you select a horizontal layout.
- Button Label – This controls the label on the primary button.
- Color – Controls the background color of the primary button. Use “Gold” to leverage PayPal’s recognition and preference, or change it to match your site design or aesthetic.
- Shape – The pill-shaped button’s unique and powerful shape signifies PayPal in people’s minds. Use the rectangular button as an alternative when pill-shaped buttons might pose design challenges.
- Button Height – Set a dedicated button height with a value ranging from 25 to 55.
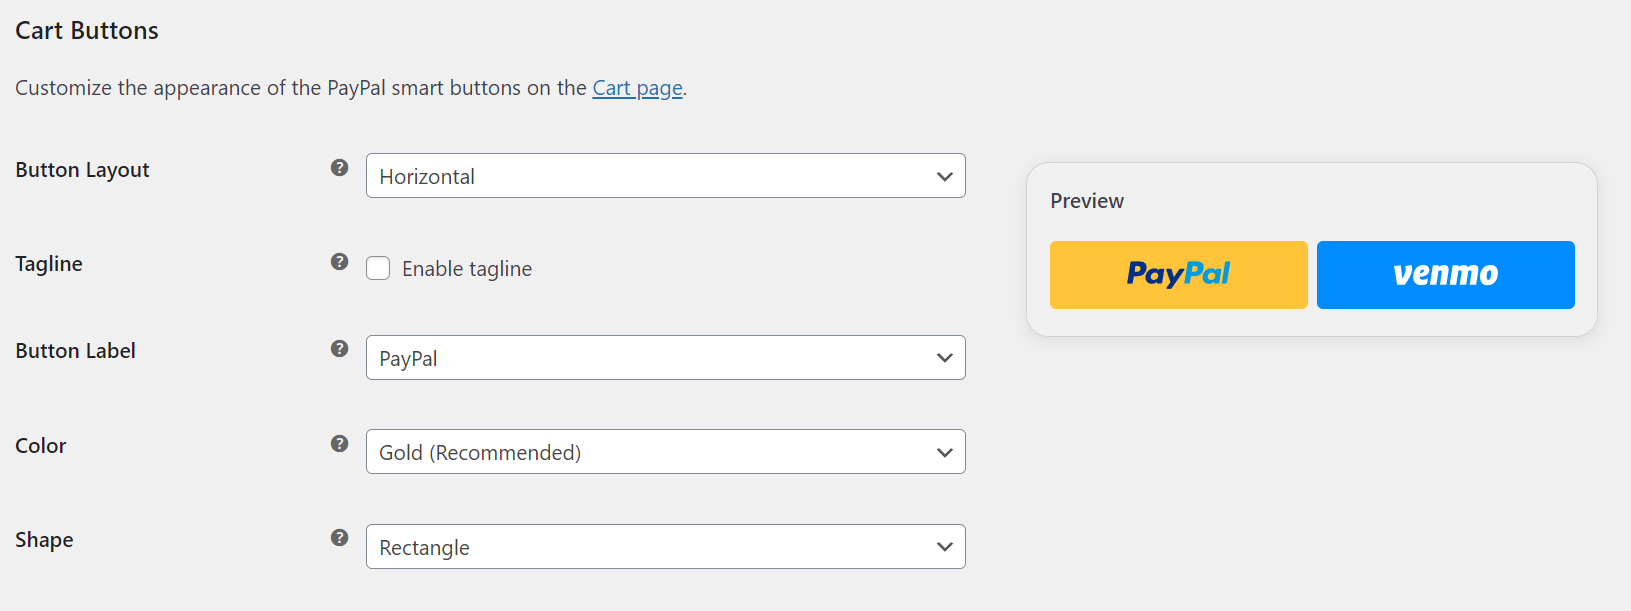
Cart Buttons
↑ Back to topThis section controls the smart buttons on the Cart block.
- Button Label – This controls the label on the primary button.
- Color – Controls the background color of the primary button. Use “Gold” to leverage PayPal’s recognition and preference, or change it to match your site design or aesthetic.
- Shape – The pill-shaped button’s unique and powerful shape signifies PayPal in people’s minds. Use the rectangular button as an alternative when pill-shaped buttons might pose design challenges.
- Button Height – Set a dedicated button height with a value ranging from 25 to 55.

Express Checkout Buttons
↑ Back to topThis section controls the express smart buttons and the availability of the PayPal gateway on the Checkout block.

- Button Label – This controls the label on the primary button.
- Color – Controls the background color of the primary button. Use “Gold” to leverage PayPal’s recognition and preference, or change it to match your site design or aesthetic.
- Shape – The pill-shaped button’s unique and powerful shape signifies PayPal in people’s minds. Use the rectangular button as an alternative when pill-shaped buttons might pose design challenges.
- Button Height – Set a dedicated button height with a value ranging from 25 to 55.

Pay Later
↑ Back to topPay Later is a feature that enables customers to pay over time while you receive payment upfront, without any additional cost. This feature is available in select locations and consists of the Pay Later button and the Pay Later messaging to promote the Pay Later option to eligible buyers.
The Pay Later tab provides a configuration interface for the Pay Later option, which is only available to customers in eligible countries. In this section, you can enable or disable the Pay Later button and Pay Later messaging and customize their appearance for individual locations.
Pay Later Messaging
↑ Back to topPay Later messaging lets your buyers know they can buy now and pay later, if they check out with PayPal. Adding messaging to your website can help improve conversion, attract new customers, and increase order values. Pay Later messages are dynamic, enabling you to show your customers their specific Pay Later offer, based on the contents of their shopping cart.
By default, the following Pay Later Messaging Locations are available:
- Single Product page
- Cart
- Checkout
- Home
- Shop (includes Search & Product Categories pages)
The messaging can be configured to match your website style with the settings available in the new Pay Later messaging configurator:
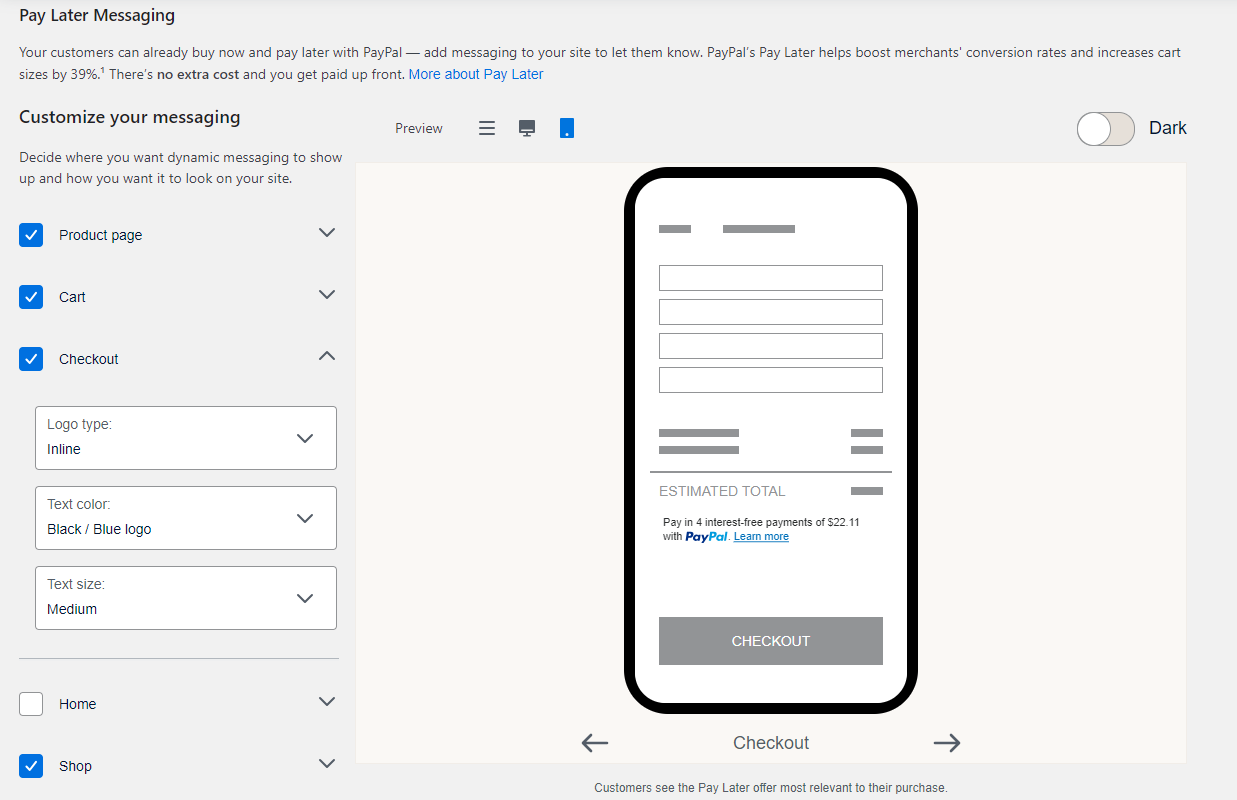
The Pay Later messaging & configurator languages depend on the primary country of the PayPal merchant account.
More details about the requirements & benefits of adding Pay Later messaging to your site can be found in the Pay Later section.
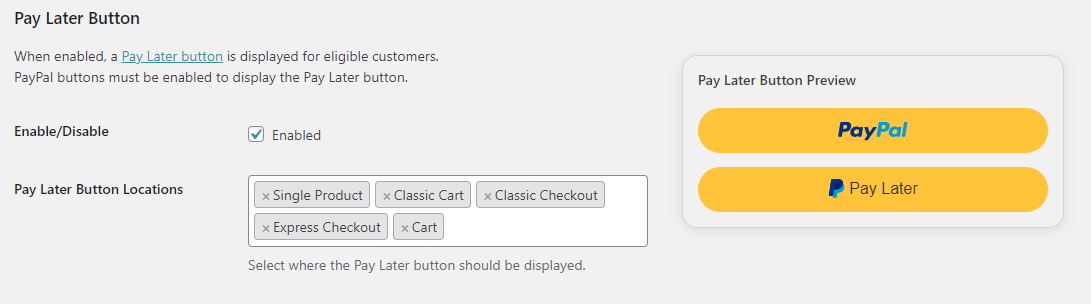
Pay Later Button
↑ Back to topTo enable the Pay Later button, the PayPal smart buttons must be enabled. The Pay Later button can only be displayed together with the PayPal button, and cannot be shown on its own. But individual Pay Later button locations can be configured, depending on where the PayPal button is enabled.
Advanced Card Processing
↑ Back to topPermission required
Get PayPal account permission to use Advanced Card Processing payment functionality by following the guide here.
After completing the onboarding process for Advanced Card Payments, follow these steps to navigate to the Advanced Card Processing settings:
- Go to WooCommerce > Settings > Payments > PayPal.
- Click the Advanced Card Processing tab.
- Check Enable/Disable to activate advanced card features and a separate checkout gateway exclusively for card payments.

The following settings can be configured for Advanced Card Processing:
- Enable/Disable – Once enabled, the Credit Card option will show up in Checkout.
- Title – This controls the title that the user sees during Checkout.
- Vaulting – Enable Vaulting to save credit and debit cards for future payments and subscription functionality.
- Disable specific credit cards – All possible credit cards will be accepted by default. You have the option to disable certain credit cards.
- Show logo of the following credit cards – Define which credit card logos you want to display for the gateway.
- Contingency for 3D Secure – Select a preferred 3D Secure behavior:
- No 3D Secure – causes transactions to be denied if 3D Secure is required by the bank of the cardholder.
- 3D Secure when required – returns a 3D Secure contingency when it is a mandate in the region where you operate.
- Always trigger 3D Secure – triggers 3D Secure for every transaction, regardless of SCA requirements. Learn more about 3D Secure.
Read Advanced Card Processing – Advanced Credit and Debit Card payments for more information about advanced card payments.
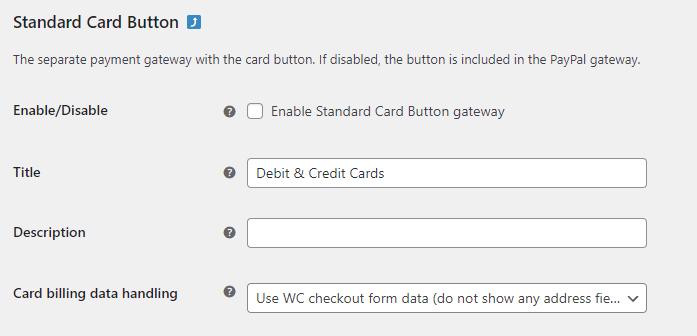
Standard Card Button
↑ Back to topWhen enabling the Separate Card Button from PayPal gateway setting, the Standard Card Payments button is extracted from the PayPal gateway into a separate gateway called Standard Card Button.
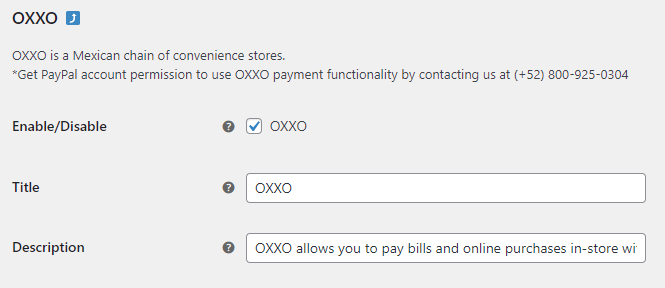
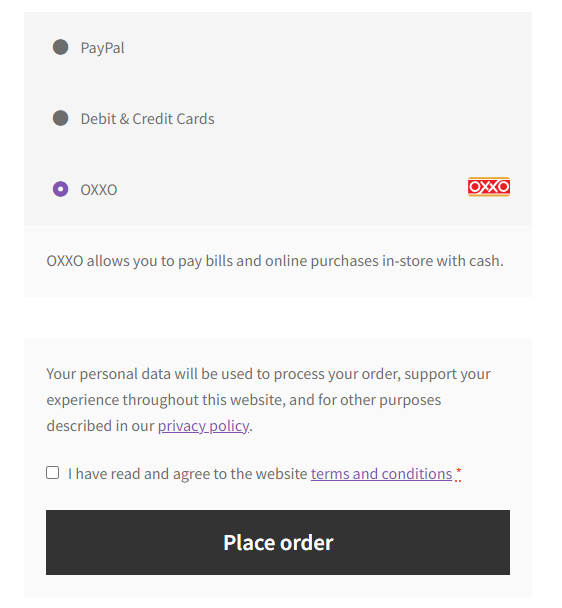
OXXO
↑ Back to topPermission required
Get PayPal account permission to use OXXO payment functionality by contacting PayPal at: (+52) 800-925-0304
OXXO is a Mexican chain of convenience stores with +19,800 stores in Latin America. It represents nearly 20% of online transactions in Mexico and allows customers to pay bills and online purchases in-store with cash. OXXO payments have a low risk of fraud or unrecognized payments because the customer must provide the payment in person.
This gateway only appears for merchants with their store location in Mexico.
Pay upon Invoice
↑ Back to topPermission required
Get PayPal account permission to use Pay upon Invoice payment functionality by following the guide here.
Pay upon Invoice (or Rechnungskauf mit Ratepay in German) is an invoice payment method only available for merchants in Germany.
Read Pay upon Invoice – Rechnungskauf for more information about the Pay upon Invoice requirements and configuration. After completing the onboarding process for Pay upon Invoice, follow these steps to navigate to the Pay upon Invoice settings:
- Go to WooCommerce > Settings > Payments > PayPal.
- Click the Pay upon Invoice tab.
- All visible fields including Brand name and Customer service instructions must be filled with your information.
- Check Enable/Disable to activate the Pay upon Invoice gateway.
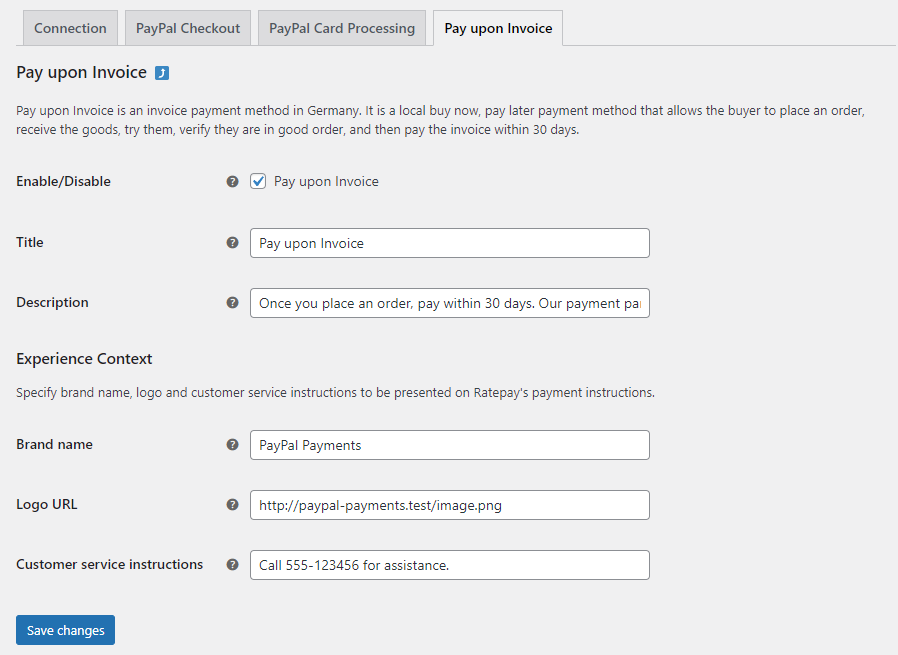
- Enable/Disable – Once enabled, the Pay upon Invoice option will show up in Checkout.
- Title – This controls the title that the user sees during Checkout.
- Description – This controls the description which the user sees during checkout.
- Brand name – Merchant name displayed in Ratepay’s payment instructions.
- Logo URL – Logo to be presented on Ratepay’s payment instructions.
- Customer service instructions – Customer service instructions to be presented on Ratepay’s payment instructions.
Customer Experience
↑ Back to topSmart buttons, Vaulting, and Advanced Card Processing
↑ Back to top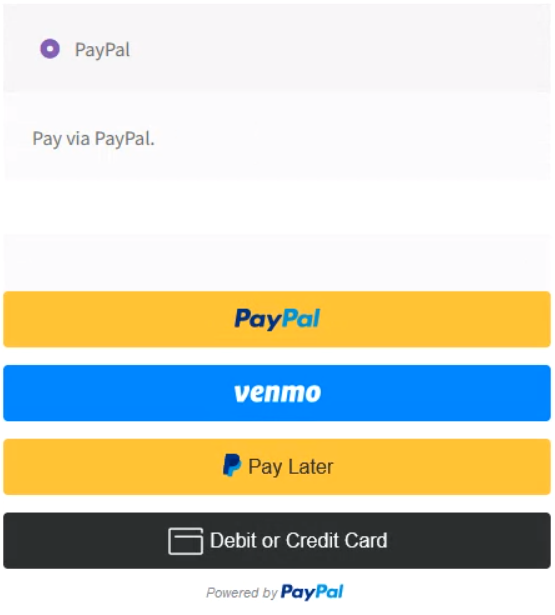
Smart buttons on single product, Cart, Mini Cart, Checkout
↑ Back to top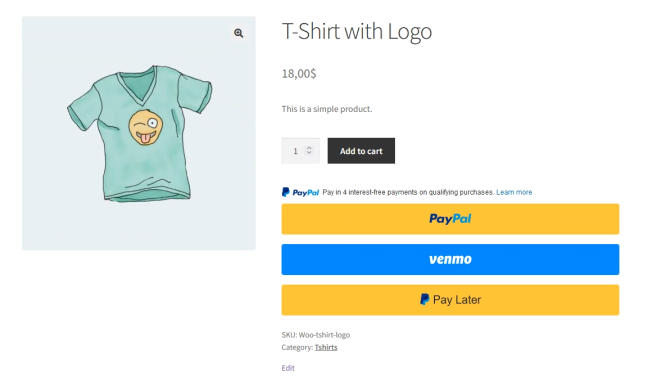
PayPal on non-Checkout pages
↑ Back to topThe smart buttons on product and cart pages simplify the checkout process by auto-populating the customer’s address details from their PayPal account to the WooCommerce checkout form. This feature was previously called PayPal Express.
The customer experience:
- Customer adds items to the cart
- Customer clicks the PayPal button on the cart page
- Customer logs in to PayPal and authorizes the transaction*
- PayPal sends the customer’s billing/shipping information to the WooCommerce Checkout page
- Customer confirms shipping preferences and taxes on the Checkout page
- Customer clicks “Place order” to complete the transaction with PayPal.
This process reduces the amount of data entry required by the customer, streamlining the checkout experience.
*PayPal obtains order authorization for an amount up to 150% of the subtotal to account for taxes and shipping costs, capped at $75. The original subtotal is used if no taxes or shipping costs apply, otherwise the updated total is used.
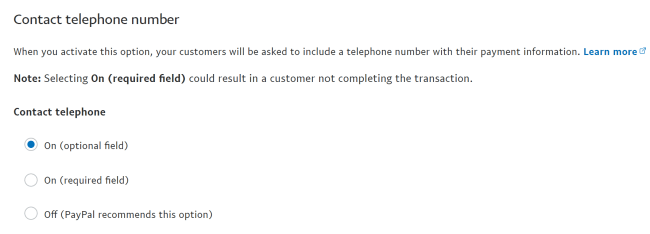
Retrieve the buyer’s phone number
By default, PayPal does not transmit the buyer’s phone number from their PayPal account to the Checkout page.
To enable this functionality, log into your PayPal account and navigate here for Live accounts and here for Sandbox accounts: Account Settings > Website payments > Website preferences
Scroll down to the section Contact telephone number and set it either to On (optional field) or On (required field) depending on your Checkout page configuration.
Retrieve the buyer’s billing and shipping details
By default, WooCommerce is configured to handle separate billing and shipping details for your orders.
When utilizing the Express Checkout buttons, PayPal, by default, only transmits the buyer’s shipping details to WooCommerce. Depending on the WooCommerce Checkout configuration, the shipping details will be inserted into the billing details on the WooCommerce Checkout page.
To enable the retrieval of separate shipping and billing information from PayPal to WooCommerce, contact the PayPal Merchant Support via the Call us or Message us option. Request PayPal to enable the billing address feature for your account so your Checkout page can be automatically populated with the complete buyer shipping and billing details.
PayPal on the Checkout page
↑ Back to topThe PayPal buttons on the WooCommerce Checkout page take the place of the “Place order” button. Customers must complete all required form fields before making a payment. When a smart button is clicked, the form fields are checked on the server before creating the PayPal order. If necessary, this form field validation can be turned off with a filter to avoid compatibility issues with third-party code. The WooCommerce form field validation occurs after the PayPal order has been created. If the WooCommerce validation fails, the customer will not be charged and no WooCommerce order will be created.
Depending on customer eligibility and plugin configuration, Alternative Payment Methods are automatically presented in the PayPal Payments Checkout gateway.
Plugin features explained
↑ Back to topAdvanced Card Processing
↑ Back to topPayPal Payments offers two ways to accept credit card payments:
- Standard Card Payments – These payments display a branded Debit or Credit Card button and have a pre-built user experience.
- Advanced Credit and Debit Card Payments (Advanced Card Processing) – This method provides a fully customizable user experience.
Advanced Card Processing
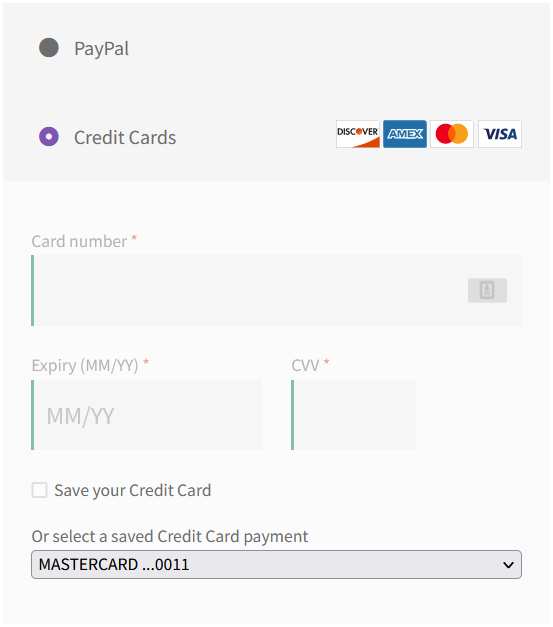
Advanced Card Processing offers fully customizable “hosted fields” on your website, allowing you to accept credit card payments while keeping your site’s branding consistent. The hosted fields can be styled with your website’s theme or custom CSS.
Available for business accounts in select countries, this solution enables your customers to make debit and credit card payments without requiring a PayPal account. With Vaulting, customers can store their card details for future purchases or subscription renewals.

Note
If you don’t have a PayPal business account yet or have not been evaluated, you can sign up for the Advanced Credit and Debit Card features by visiting PayPal’s website. For a list of countries where this feature is available, see the PayPal documentation on Advanced credit and debit country and currency availability.
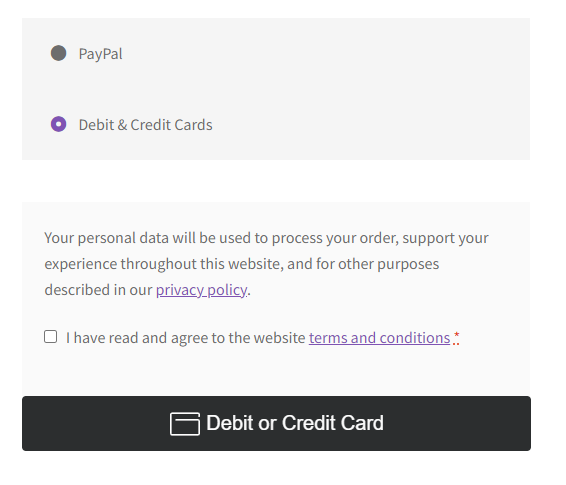
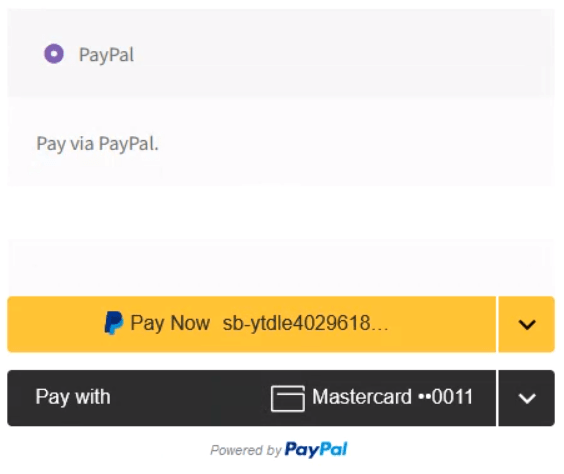
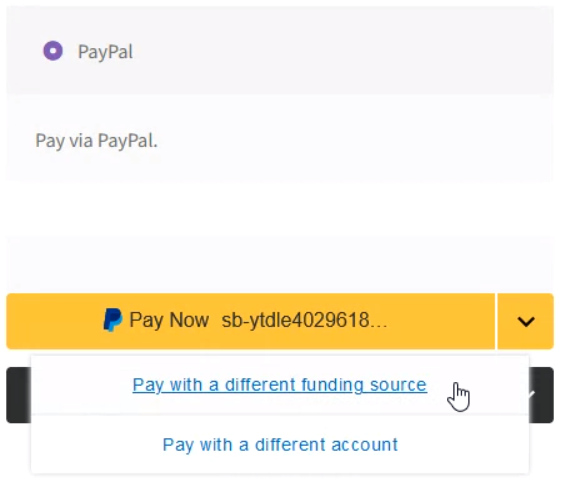
Standard Card Payments with branded Debit or Credit Card smart button
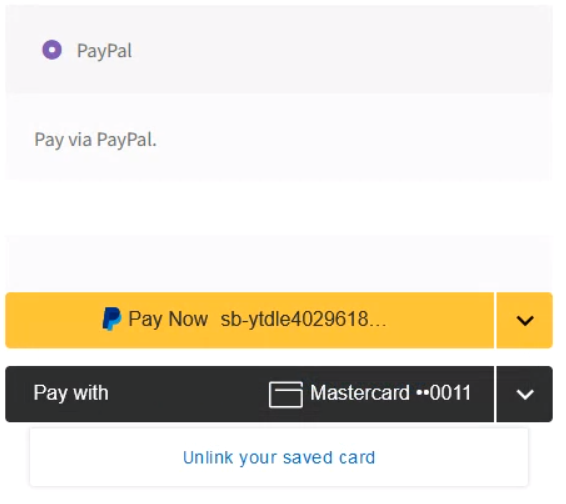
The Standard Card Processing option provides a simple solution for accepting credit card payments. When enabled during onboarding, this option displays a PayPal-branded debit or credit card smart button on the checkout page, allowing buyers to pay without a PayPal account. However, in certain circumstances, such as when the Vaulting feature is enabled, buyers may need to log in to an existing PayPal account or create a new one in order to complete the payment with a card.
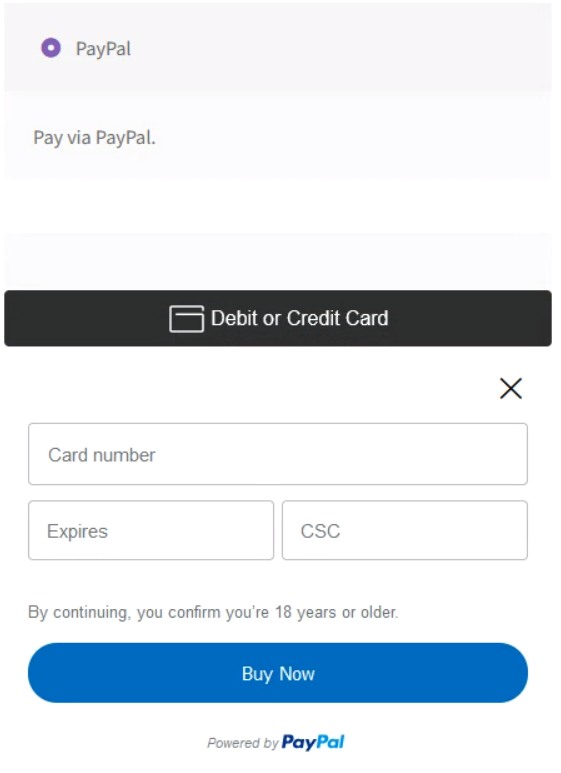
The pre-built experience provided by the branded smart button makes it clear that PayPal is the payment processor for the transaction. You can hide the branded credit/debit card smart button with the Disable Alternative Payment Methods setting or switch to the Advanced Card Processing gateway for a fully customizable payment experience.
These settings in the Standard Payments tab determine various features and functionality of the card button.
- Card billing data handling – Using the WC form data increases convenience for the customers but can cause issues if card details do not match the billing data in the checkout form.
- Separate Card Button from PayPal gateway – By default, the Debit or Credit Card button is displayed in the PayPal Checkout payment gateway. This setting creates a separate gateway only for the card button.
Advanced Card Payments vs. Standard Card Payments
The Advanced Card Processing offers enhanced functionality compared to the standard credit card smart button. Here are some examples:
- Users can pay with credit cards without requiring a PayPal account for every application.
- More streamlined checkout experience through native-looking “hosted fields” integration with no PayPal branding.
- Fully customizable card fields.
- Fraud Protection gives you the insight and control you need to balance chargebacks and declines better. Included with Advanced Checkout at no extra cost.
- Advanced Card Processing supports Vaulting, letting your customers save their credit cards for faster, easier subsequent checkouts or automatic subscription renewals without requiring Reference Transactions.
- Supports Strong Customer Authentication (SCA) as required in the European Economic Area (EEA) and other 3D Secure contingencies.
- In some markets, lower transaction fees compared to regular PayPal-branded credit card payments.
Signing up for Advanced Credit and Debit Card features
Advanced credit and debit card functionality requires that your business account be evaluated and approved by PayPal. You automatically initiate the signup when connecting with the onboarding wizard via Activate PayPal button when selecting the Advanced Card Processing option.
PayPal may request more information about your business when you sign up for advanced card payments from here:
Sandbox accounts must follow the same sign-up process to activate advanced card functionality: PayPal documentation: Enable your account for advanced debit and credit card processing
Activate Advanced Card Processing for Advanced Credit and Debit Card features
Unlock advanced credit card features by visiting the Advanced Card Processing tab in the plugin settings and enabling the gateway. The standard credit/debit card button on the Checkout page will be replaced by a dedicated and customizable payment gateway for card payments.
With the Vaulting feature enabled, customers can save their credit cards for easier and quicker future transactions.
This new unbranded gateway can be fully customized with CSS to integrate seamlessly into your native Checkout page while keeping your site’s branding consistent.
Customizing the hosted fields
Customize the appearance of the hosted fields from the Advanced Card Processing with CSS. The default style of the fields is based on the active theme, but you have the option to modify them to match your website’s design.
Note
Customizing the hosted fields with custom CSS in the WordPress customizer may not display the changes instantly. For the updated styling to be reflected, ensure to save your modifications and reload the page or add an !important attribute.
CSS Selectors
| FIELD | SELECTOR |
| Button wrapper #id | #ppcp-hosted-fields |
| Button class | #ppcp-dcc-order-button |
| Card number id# | #ppcp-credit-card-gateway-card-number |
| Expiry id# | #ppcp-credit-card-gateway-card-expiry |
| CVV id# | #ppcp-credit-card-gateway-card-cvc |
| Save Credit Card box id# | #saved-credit-card |
Supported CSS properties
For more information on supported CSS properties, please refer to the PayPal documentation. This resource provides a comprehensive list that you can use to further customize your hosted fields.
Example CSS
While the default style of the fields is controlled by the theme, you have the option to customize the appearance to better fit your needs. Here’s an example CSS that can be added to the WordPress customizer to see the possible adjustments:
#ppcp-credit-card-gateway-card-number, #ppcp-credit-card-gateway-card-expiry, #ppcp-credit-card-gateway-card-cvc {
  background-color: #ffffff !important;
  border: 1px solid #bbbbbb !important;
  border-radius: 5px !important;
  box-shadow: 0 2px 4px 0 rgba(0, 0, 0, 0.1) !important;
  height: 40px !important;
  padding: 0 10px !important;
}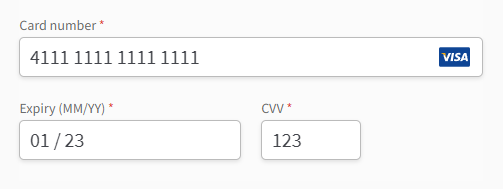
Testing Advanced Credit and Debit Card features with PayPal Sandbox
The Advanced Card Processing implements on-site hosted fields to deliver SCA & PCI compliant payment experiences and supports advanced features like 3D Secure 2 or Vaulting. The Vaulting feature requires special cards for testing: PayPal documentation: Vault-ready test cards
Note: Credit cards can only be saved in the Vault with the Advanced Card Processing and not the standard credit card smart button.
3D Secure 2 requires dedicated test cards which can be found in the official PayPal documentation. Regular, non-3D Secure & non-Vaulting payments can be tested with cards from the Card Generator in the PayPal developer dashboard.
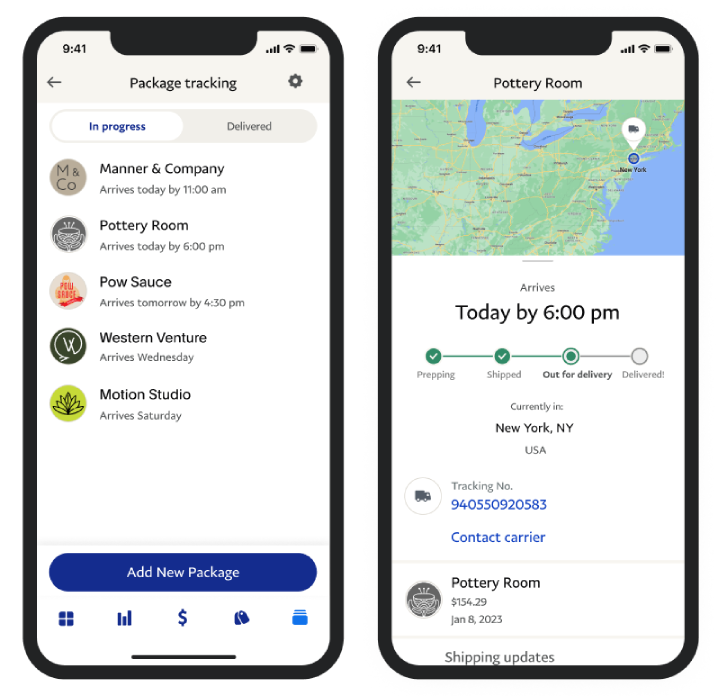
Package Tracking
↑ Back to topElevate Your Post-Purchase Experience
The latest WooCommerce PayPal Payments version offers an improved post-purchase experience for merchants and buyers. Benefit from shorter hold times, Seller Protection eligibility, and other improvements to the existing package tracking system to facilitate smoother transactions and better buyer-seller relations.
The latest Package Tracking functionality is available out of the box for merchants operating in the following regions:
- Australia
- Canada
- France
- Germany
- Italy
- Spain
- United States
Automated Order and Shipment Synchronization
Streamline the process of sharing product details and shipping information between WooCommerce and PayPal for a smoother post-purchase experience. PayPal automates the synchronization of package tracking data, reducing manual work associated with payment holds, disputes, chargebacks, and customer support.
Expedited Funds Release
Funds held in your PayPal account will be available within 8 days instead of 21 upon providing tracking details, improving cash flow for merchants.
PayPal Seller Protection
Adding tracking information to PayPal orders makes them eligible for PayPal Seller Protection, which reduces or even eliminates losses associated with disputes and chargebacks. Check out these additional tips on how to reduce chargebacks here.
Reduced Account Reserves
Demonstrating consistent shipping performance helps build trust with PayPal, eventually lowering the amount of reserves held in your account.
Automated Dispute Resolution
An automated “Item not received” dispute resolution process is included, providing an easy-to-navigate resolution workflow for merchants and customers.
No Additional Fees or Setup
Merchants from supported regions can use this PayPal service without additional fees or setup. Customers from the United States who use the PayPal app will be able to track packages in the app and receive push notifications with live shipping updates. This functionality will be available in other supported regions at a later date.
Package tracking is provided automatically for all customers who pay with PayPal in your store, with no need for you to push notifications manually. Customers will receive notifications in real time, keeping them informed at every step along the way.

No Setup Required
The enhanced post-purchase experience is available to merchants operating from a supported region out of the box without any complex setup procedures. Benefiting from this is as easy as providing your package tracking data from the PayPal Package Tracking metabox from the edit order page in WooCommerce. Customers using the PayPal app can track packages and receive live updates, facilitating a transparent transaction process.
Conclusion
The latest WooCommerce PayPal Payments version provides merchants and buyers an enhanced post-purchase experience. It simplifies the sales process by automatically sharing all relevant product details and shipment information between your WooCommerce store and PayPal. This means fewer headaches due to disputes and quicker access to your funds, enhancing the buyer-seller relationship. For more details on how to take advantage of the new functionality, check out How to use Package Tracking features.
Package Tracking for other countries
If you operate outside the supported regions, rest assured you will not be left behind. You can use the existing tracking integration to update PayPal with your shipment details and enjoy benefits such as PayPal Seller Protection. The updated PayPal Package Tracking metabox allows for the same customization of carrier options and statuses as in previous iterations while providing a better overview of existing shipments. Note that providing a tracking number is mandatory when submitting details to PayPal in the latest package tracking iteration.
How to use Package Tracking Features
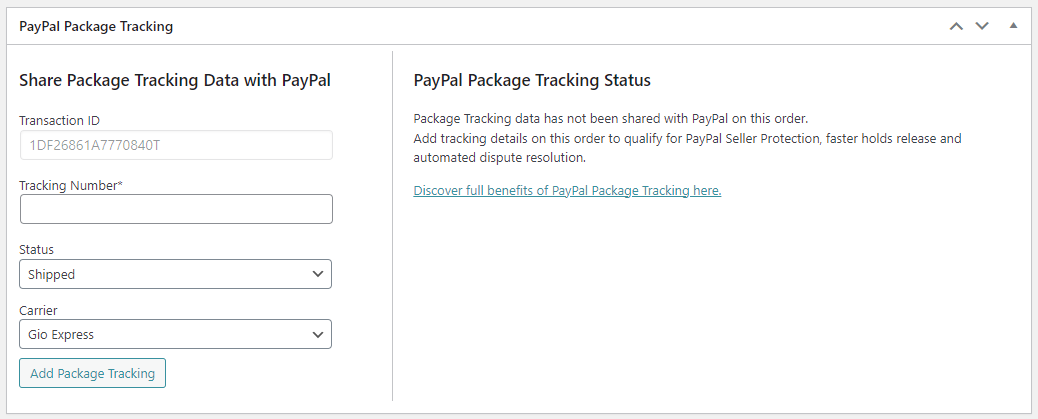
The PayPal Package Tracking metabox is displayed below your WooCommerce order details by default. Depending on your preferences, the metabox can be freely moved to different positions on the edit order page. The metabox can also be hidden from the Screen Options at the top of the page without impacting the package tracking plugin compatibility.
Once the tracking number for your shipment is available, create the tracking data by following these steps:
- Edit the WooCommerce order
- Navigate to the PayPal Package Tracking metabox
- Fill out the Tracking Number field
- Select the Status of the shipment
- Select the Carrier
- Click “Add Package Tracking” to transmit the tracking data to PayPal
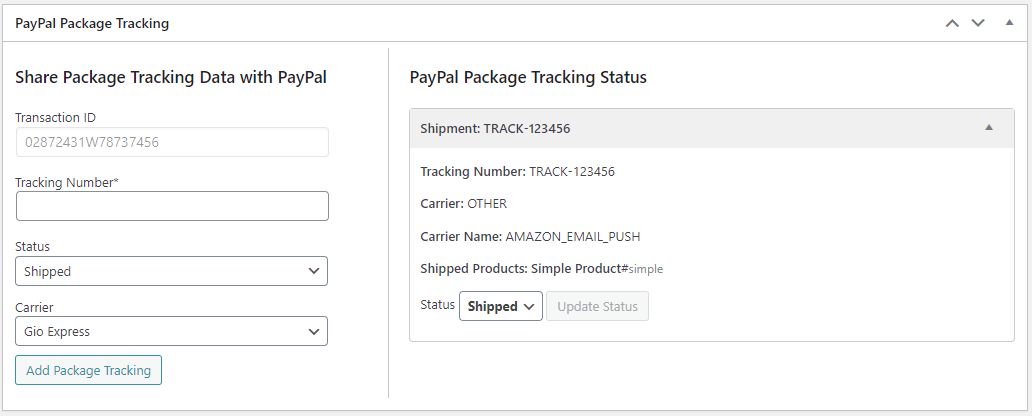
That’s it! Once the tracking data is submitted, PayPal automatically provides additional benefits such as seller protection or customer shipping notifications.The shipment status can be updated after the submission, but if you need to change the tracking number, create a new shipment with the new number and set the existing shipment to the Canceled status. Shipment statuses:
| Status | Description |
| Shipped | The item was shipped and is on the way. |
| On hold | The item is on hold. Its shipment was temporarily stopped due to bad weather, a strike, customs, or another reason. |
| Delivered | The item was already delivered when the tracking number was uploaded. |
| Canceled | The shipment was canceled, and the tracking number no longer applies. |
The recommended way to submit your tracking data to PayPal from outside of WooCommerce, e.g., with an external ERP system, is to utilize the REST API integration from the official WooCommerce Shipment Tracking plugin.PayPal Payments automatically picks up the tracking data and submits it to PayPal.
Please note that tracking data at PayPal can be created via REST API but not modified or deleted.
Customization and Compatibility
If you already provide package tracking functionality in your WooCommerce store with another popular or widely used plugin, they may integrate with the PayPal Package Tracking feature. When creating a shipment with any of the following plugins, PayPal Payments automatically transmits the package tracking data to PayPal without you having to enter the same data twice:
- WooCommerce Shipping
- WooCommerce Shipment Tracking (incl. REST API)
- ShipStation for WooCommerce
- Germanized
- YITH WooCommerce Order & Shipment Tracking
Example of the integration with the WooCommerce Shipment Tracking plugin:
Beyond this, customizations such as custom shipping providers or support for additional package tracking plugins can be added by taking advantage of the filters provided by the PayPal Payments plugin. More details can be found in the developer-oriented GitHub documentation.
How to enable tracking for your account
If you are not operating from a supported region, the tracking feature must be enabled for your PayPal account before you can add tracking information to orders.
The easiest way to enable tracking is to disconnect your PayPal account from the integration and reconnect it using the onboarding wizard.
Alternatively, get in touch with the PayPal Merchant Support and request Tracking to be enabled for your account.
Package Tracking FAQ
Q: What can I do with PayPal Package Tracking?
A: The PayPal app provides live shipping updates for your purchases so you know where your packages are and when they’ll arrive. Read more
Q: Which Package Tracking-related information is sent to PayPal?
A: The Tracking data is shared with PayPal when creating it from the WooCommerce order. The following details (among others) are shared with PayPal during the order/tracking data creation process:
- Product Name
- Product SKU
- Product URL
- Product Image URL
- A UPC value can be sent with a code snippet (contact support for guidance)
When the tracking data is submitted, PayPal will automatically match the line items provided with the tracking based on their SKU and utilize the data for customer presentation.
Q: Can you integrate package tracking support for plugin XYZ?
A: Please open a feature request, and the team will look into possible options. You can also ask the development community for help with customizations, as any developer can programmatically extend the tracking integration thanks to the provided filters.
Q: Want more information about PayPal Package tracking?
A: Here are some more articles that may be helpful:
Does PayPal provide package tracking?
What can I do with PayPal Package tracking?
What if there’s an issue with one of my packages?
Apple Pay
↑ Back to topApple Pay is a digital payment system developed by Apple. It allows users to make payments using their iOS and Mac devices using the Safari browser. With Apple Pay, users can link their credit cards, debit cards, and bank accounts for seamless transactions.
Add Apple Pay, all major credit and debit cards, customizable features, and risk management tools for transparent, secure transactions at competitive rates. Making it easy for you to do business, even if customers don’t have PayPal.
Apple Pay eligibility & signup
Apple Pay via PayPal Payments is available for merchants operating from the regions listed in the PayPal documentation here. PayPal business accounts operating in these countries can sign up for Apple Pay from this link.
The same signup link is available on the Connection tab in the PayPal Payments settings when clicking Enable Apple Pay:
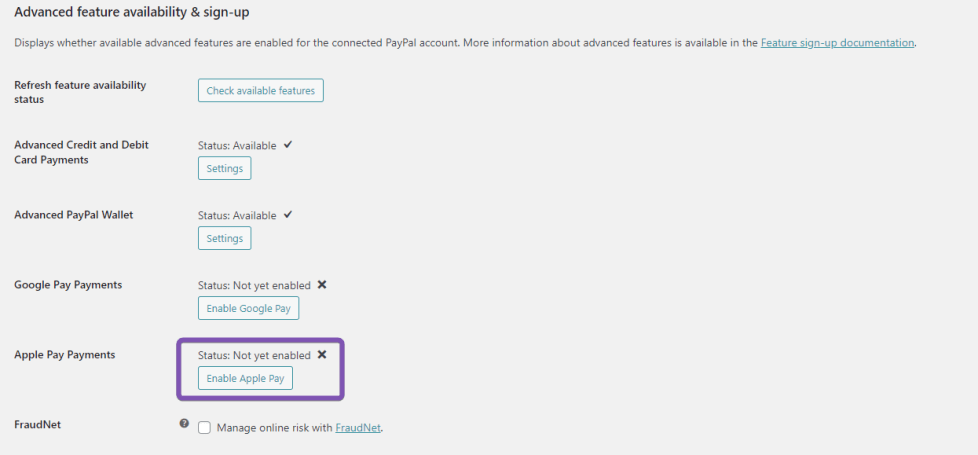
When signing up for Apple Pay after the PayPal account has been connected to PayPal Payments, you may need to click the Check available features button for Apple Pay to become available.
Important
Any (sub)domain names that will show an Apple Pay button need to be registered (Live Domain Registration / Sandbox Domain Registration) in your sandbox and production PayPal account. The Apple Pay payment method won’t work if the domain isn’t registered.
To enable the Apple Pay button on your site, check Enable Apple Pay button and save the settings with “Save changes”. The Apple Pay button will automatically appear in all enabled Smart Button Locations below the PayPal button. The Apple Pay button will only be visible in the shop on supported devices with the Safari browser.
Note
While PayPal Payments cannot automatically register the domain for you, it automatically presents your domain association file (https://example.com/.well-known/apple-developer-merchantid-domain-association) for Apple to validate the manually registered domain.
Setup instructions
Follow these steps to sign up for Apple Pay and enable it in the PayPal Payments extension:
- Sign up for Apple Pay
- Navigate to the Connection tab and click
Check available featuresto refresh your feature eligibility - In the Standard Payments tab, check
Enable Apple Pay buttonand clickSave changes - Click the
Manage Domain Registrationbutton - Register the shop domain on the PayPal website
- The Apple Pay button should now be functional and appear wherever the PayPal smart buttons are enabled
- To update the validation status notice in the plugin, click the Apple Pay button in the shop from a supported device
More details about the setup
Your domain must be registered on the PayPal website by clicking the “Manage Domain Registration” button.
The PayPal website may instruct you to download the apple-developer-merchantid-domain-association file and place it in the .well-known folder on your webserver. This step can be skipped as PayPal Payments automatically presents the file in the right location to simplify the setup for you.
The Domain Validation status will update after the Apple Pay button has been used on the website. You can view the file by clicking the link on “domain assiciation file”. If the Validation displays a failed status despite the domain being registered and the domain association file being presented, you may only need to click the Apple Pay button on your website once to update the status. As soon as the payment sheet from Apple is loaded and awaiting confirmation, the validation is successful.
Apple presents the Apple Pay button only on eligible devices. The Device Eligibility helps you understand if you can expect to see the button on your website with your current device. The button may appear in the Button Styling Previews regardless of your device eligibility so you can style it to your liking.
Apple Pay has a shipping callback that by default returns the buyer’s billing and shipping details back to WooCommerce. If you prefer to use the billing data provided on the WooCommerce classic checkout page for Apple Pay transactions, change the “Send checkout billing and shipping data to Apple Pay” setting.”
Testing instructions for Apple Pay (PayPal Sandbox)
Prerequisites:
- (Sandbox) PayPal business account enabled for Apple Pay
- Apple developer account for PayPal Sandbox testing
- (Sandbox) Apple ID with a configured payment method/details
- registered domain
- the correct domain association file is presented
Steps to test Apple Pay (Sandbox/Live):
- Ensure your testing device is logged into the right Apple ID
- On your website, navigate to any page with the Apple Pay button, e.g. the single product page
- Click on the Apple Pay button
- In the Apple Pay payment sheet, select your payment method and confirm the payment
- The payment should complete and redirect you to the order-received page
Apple Pay FAQ
I cannot enable the Apple Pay Button setting
Please ensure your PayPal account was signed up for Apple Pay (Sandbox Registration / Live Registration). For the most reliable feature availability, you may need to click the Check available features button for Apple Pay to become available. Alternatively, consider disconnecting your PayPal account and reconnecting it with the onboarding wizard.
The Apple Pay payment sheet is automatically closing
Your domain may not be registered for Apple Pay. Please refer to the links above to register your domain.
Can the Apple Pay button be shown in a separate gateway on the Checkout page?
Not yet. For now, the Apple Pay button is only available below the PayPal buttons and within the PayPal gateway. The development team is working to make separating all payment buttons into their gateway possible.
Do I need to manually upload the domain verification file to my server?
No. PayPal Payments automatically ensures that Apple is presented with the domain verification file from https://example.com/.well-known/apple-developer-merchantid-domain-association Please ensure that there is no validation file present from a third-party Apple Pay integration as these could result in Apple Pay payments via PayPal failing.
Google Pay
↑ Back to topGoogle Pay is a digital payment system developed by Google. It allows users to make payments using their smartphones, tablets, or smartwatches. With Google Pay, users can link their credit cards, debit cards, and bank accounts for seamless transactions.
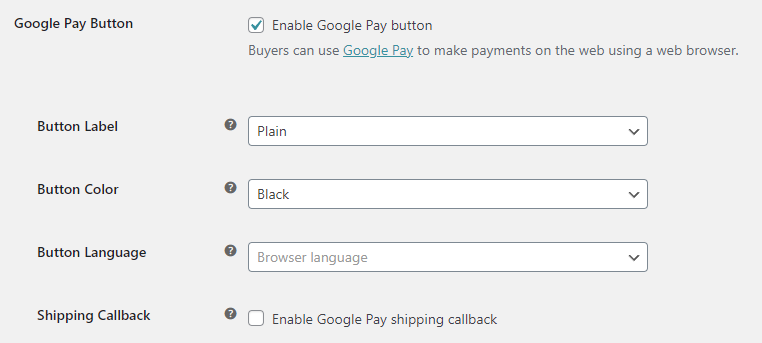
To enable the Google Pay button on your site, check Enable Google Pay button and save the settings. The Google Pay button will automatically appear in all enabled Smart Button Locations below the PayPal button.
Google Pay eligibility
Google Pay via PayPal Payments is available for merchants operating from the regions listed in the PayPal documentation here. PayPal business accounts operating in these countries can sign up for Google Pay from this link.
The same signup link is available on the Connection tab in the PayPal Payments settings when clicking Enable Google Pay:
When signing up for Google Pay after the PayPal account has been connected to PayPal Payments, you may need to click the Check available features button for Google Pay to become available.
Testing instructions for Google Pay (PayPal Sandbox)
Prerequisites:
- (Sandbox) PayPal business account enabled for Google Pay
- Google account with configured payment method/details (join this group to make sandbox test cards available on your Google account)
Steps to test Google Pay (Sandbox/Live):
- Ensure your testing device is logged into the right Google account
- On your website, navigate to any page with the Google Pay button, e.g. the single product page
- Click on the Google Pay button
- In the Google Pay popup, select your payment method
- The buyer is forwarded to the checkout page to confirm the payment
- The payment should complete and redirect you to the order-received page
Google Pay FAQ
Can the Google Pay button be shown in a separate gateway on the Checkout page?
Not yet. For now, the Google Pay button is only available below the PayPal buttons and within the PayPal gateway. The development team is working to make separating all payment buttons into their gateway possible.
Vaulting – Save Payment Methods
↑ Back to topThe Vaulting feature allows you to securely store your customer’s payment methods as a unique, non-sensitive token within your system. Your customer won’t have to enter their payment details the next time they purchase from your site.
If you have been approved for Vaulting (Reference Transactions), you can store the information in the PayPal vault without additional fees.
Here are the benefits of saving your customer’s payment methods:
- Quick checkout experience for returning customers as they won’t have to enter their payment details every time.
- Create subscriptions and recurring billing so you can charge your customers in the future without having them present on your site. (Woo Subscriptions plugin required)
- Use PayPal’s secure vault to store customers’ data, reducing PCI compliance obligations and the risk of data breaches and thefts.
Visit this page or the PayPal Developer Portal to learn more about saving customers’ payment methods.
Which payment methods can customers save?
If your customers complete an initial purchase on your website using any of the following payment methods while the Vaulting feature is enabled, they will be able to save that payment method in the PayPal vault.
- PayPal
- Credit and debit cards
Note: You must use the Advanced Card Processing feature to save credit and debit cards.
Get Vaulting approval
Vaulting requires your PayPal business account to be approved for Reference Transactions to start saving your customer’s payment methods using the PayPal vault
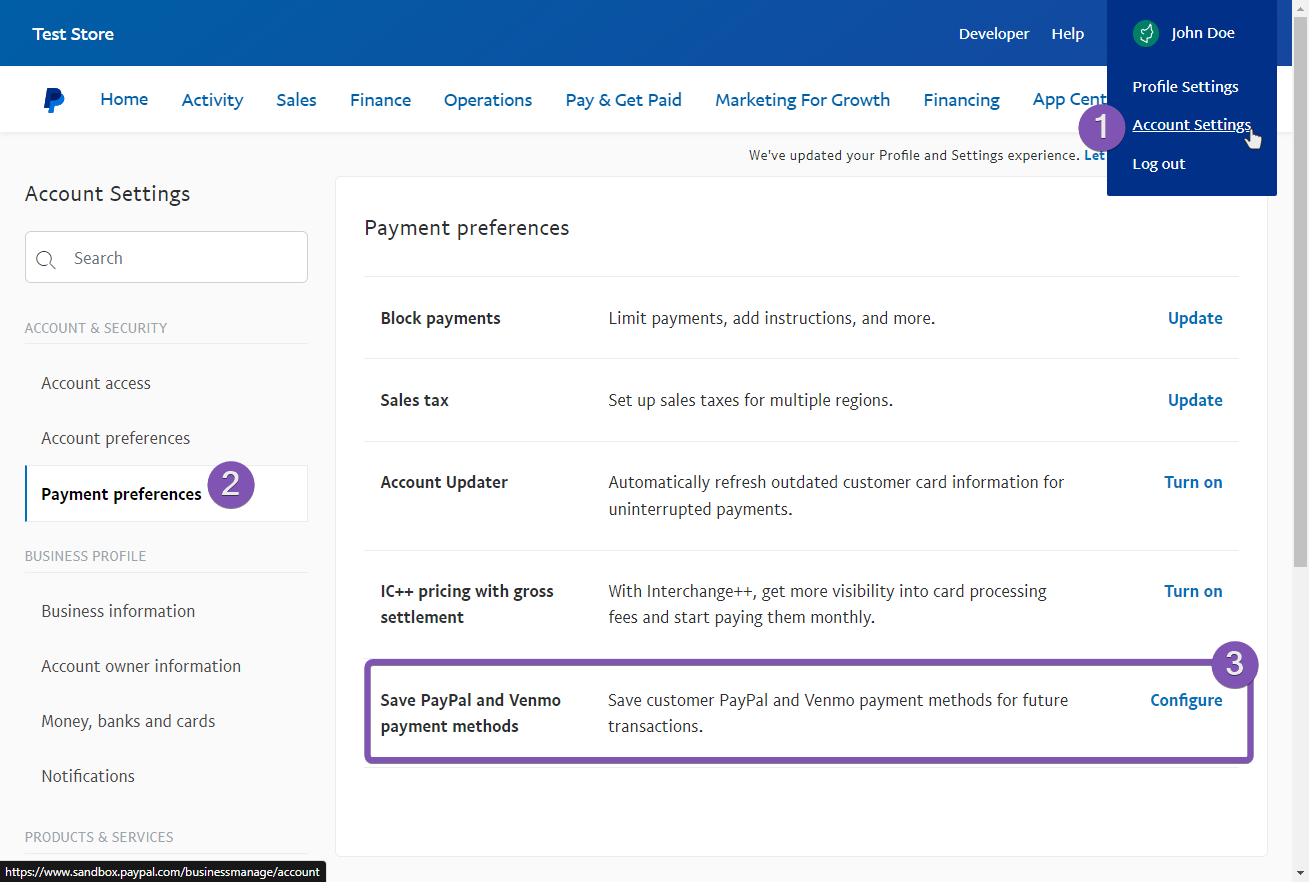
Here’s how to request Vaulting approval from your PayPal account using a web browser:
- Go to Account Settings.
- Click Payment preferences.
- Click Get Started next to “Save PayPal and Venmo payment methods” to start the approval process.
PayPal will send you an email with the next steps or the approval confirmation.
Once you’re approved, go back to Account Settings and click Configure to set up saved payments.
Enable Vaulting in the PayPal REST app and in the plugin settings
Note: The onboarding wizard is the recommended way to connect your account, as it will automatically configure the REST application for use with PayPal Payments, including Vaulting.
For manually created REST applications, you can enable the Vaulting feature from the PayPal developer dashboard. To use Vaulting within the plugin, ensure it’s activated for the REST application. This step is necessary only when integrating existing API credentials manually, rather than using the onboarding wizard for the account connection.
To manually enable vaulting on your Live REST App, follow these steps:
- Connect your account to WooCommerce (see above).
- Visit https://developer.paypal.com.
- Login with the same PayPal account connected to WooCommerce.
- Click Live under My apps & credentials.
- Select the REST App you connected to the plugin.
- Scroll down to Live App Settings.
- Click Advanced options next to Accept Payments.
- Place a checkmark next to Vault.
- Click Save at the bottom of the box.
When Vaulting is enabled in the plugin settings, the Pay Later button & APMs will be hidden, and settings in the Pay Later tab will be disabled.
At this time, Vaulting and Pay Later are mutually exclusive features.
Support for Woo Subscriptions is automatically activated when the Vaulting feature is enabled in the plugin settings.
Required to save payments
Your PayPal account has to be approved for Vaulting (Reference Transactions) to save PayPal accounts in the Vault, e.g. for automatic subscription renewal payments. Credit cards can be saved in the Vault via Advanced Card Processing and used for automatic payments without Reference Transactions.
Vaulting a PayPal account
When the Vaulting setting is enabled, PayPal accounts are saved in the secure Vault after a payment is attempted. Reference Transactions must be enabled to store PayPal accounts in the Vault, for future payments, such as subscription renewals.
With saved payment methods, customers can make PayPal payments with just one click while logged into their WordPress user account, providing a streamlined checkout experience for repeat customers.
Vaulting a credit card
The Advanced Card Processing gateway allows credit cards to be securely stored for future use before confirming the payment. While the standard card button does not support card vaulting, it can display a previously vaulted card in the checkout process as can be seen in the Customer Experience screenshots.
Test card vaulting in the sandbox using the PayPal documentation’s list of Vault-ready test cards. In live mode, all supported credit and debit card types are eligible for card vaulting.
Note
Saving credit cards in the Vault is only possible through the Advanced Card Processing gateway, not through the standard card button. Only the test cards listed in the Vault-ready test cards of PayPal documentation can be vaulted in the sandbox. In live mode, all supported credit/debit cards can be vaulted.
View/delete saved payment methods from the Vault
Payment methods saved in the Vault can be viewed and deleted on the shop website in the My Account > Payment Methods section.
At this time, new payment methods can only be saved in the Vault by completing a payment.
In a future release, PayPal Payments will receive functionality to add a new payment method from this page without completing a purchase.
Vaulting for subscriptions via Woo Subscriptions
PayPal Payments saves a payment method in the secure Vault at PayPal. The vaulted payment method can be used for subsequent checkouts or subscription renewal payments without the buyer being present on the site. Vaulting is a requirement for automatic subscription renewals but not for manual renewals.
Vaulted payment methods allow the buyer to pay for an order or manually confirm a subscription renewal without having to log in to the PayPal account or manually enter the credit or debit card details.
Billing Agreements are required to save a PayPal payment method for automatic subscription renewals in the Vault, so the PayPal merchant account has to be approved for Reference Transactions. Without Reference Transactions, saving a PayPal payment method in the Vault may fail. In that case, buyers can manually confirm renewal payments via PayPal.
Vaulted credit cards via Advanced Card Processing can be saved in the Vault and used for automatic payments without the buyer being present on the site and without being approved for Reference Transactions.
For more details on how PayPal Payments works with Woo Subscriptions, please view the Subscriptions FAQ.
Troubleshooting Vaulting
Saving a payment method in the Vault could potentially fail, but PayPal Payments usually cannot precisely determine the reason for the failure. For example, the lack of Reference Transactions may result in PayPal accounts not being saved in the Vault. Beyond this, unverified PayPal accounts or accounts without a linked payment source may not be eligible to save a payment method in the Vault.
Vaulting-specific limitation
A PayPal buyer account can only be saved in the Vault of the PayPal merchant account for one customer id (unique per WordPress user), not across multiple sites or customer ids. Reusing the same PayPal merchant account on multiple sites with Vaulting is not recommended, as it could lead to potential problems.
Please contact the PayPal Merchant Technical Support with a copy of your plugin log files to request more details about why a payment method could not be saved for a specific case.
Subscriptions FAQ
↑ Back to topRequirements for subscriptions
- The official Woo Subscriptions plugin is supported
- PayPal Subscriptions can be used to enable automatic PayPal renewals with a fixed schedule & amounts without requiring advanced permissions
- PayPal Vaulting allows saving payments for flexible renewal amounts and payment scheduling but requires approval for Vaulting (Reference Transactions)
- Advanced Card Processing Vaulting allows merchants with Advanced Card Payments approval to save cards as payment tokens for flexible renewal amounts and payment scheduling
Supported subscription features
| Basic Features | PayPal Subscriptions | PayPal Vaulting | Advanced Card Processing Vaulting |
|---|---|---|---|
| PayPal seller account type | business accounts only | business accounts only | business accounts only |
| PayPal permission level | available by default | requires Vault approval (Reference Transactions) | must be enabled for Advanced Card Payments |
| Subscription Suspension | ✔ | ✔ | ✔ |
| Subscription Cancellation | ✔ | ✔ | ✔ |
| Subscription Reactivation | ✔ | ✔ | ✔ |
| Advanced Features | |||
| Multiple Subscriptions | ❌ | ✔ | ✔ |
| Recurring total changes | ✔ | ✔ | ✔ |
| Payment date changes | ❌ | ✔ | ✔ |
| Subscription Switching | ❌ | ✔ | ✔ |
| Customer payment method changes | ❌ | ✔ (requires saved payment method) | ✔ (requires saved payment method) |
| Store manager payment method changes | ❌ | ✔ (requires saved payment method) | ✔ (requires saved payment method) |
| Free trial Subscriptions | ✔ | ✔ | ✔ |
| Synchronized or prorated payments | ❌ | ✔ | ✔ |
| Flexible payment amounts (varying shipping, coupons, etc.) | ❌ | ✔ | ✔ |
Subscription flow
Following PayPal Payments version 2.3.0, subscription payments use the configured Intent setting. Subscription products with a free trial period or zero sum have a special checkout flow as the payment method is saved in the Vault without an actual payment.
PayPal Subscriptions
PayPal Payments supports PayPal Subscriptions. This makes subscription functionality accessible to any business seller by letting PayPal manage the renewal payments. Subscription-type products in WooCommerce can be connected to PayPal for recurring payment processing on a fixed schedule with fixed amounts. PayPal sends webhook updates to the store to keep the subscription in PayPal updated with the latest renewal payments or cancellations from the PayPal website.
How to set up PayPal Subscriptions
- Navigate to the Standard Payments tab in the PayPal Payments settings
- Set the
Subscriptions Modesetting toPayPal Subscriptions - Navigate to Products > All Products
- Create a new product or edit an existing one
- Make sure the product type is set to Simple Subscription or Variable Subscription
- The subscription must have a price and a configured billing cycle. The billing cycle cannot be changed after connecting the product to PayPal.
- Make sure the
Connect to PayPalcheckbox is checked and aPlan Nameis specified
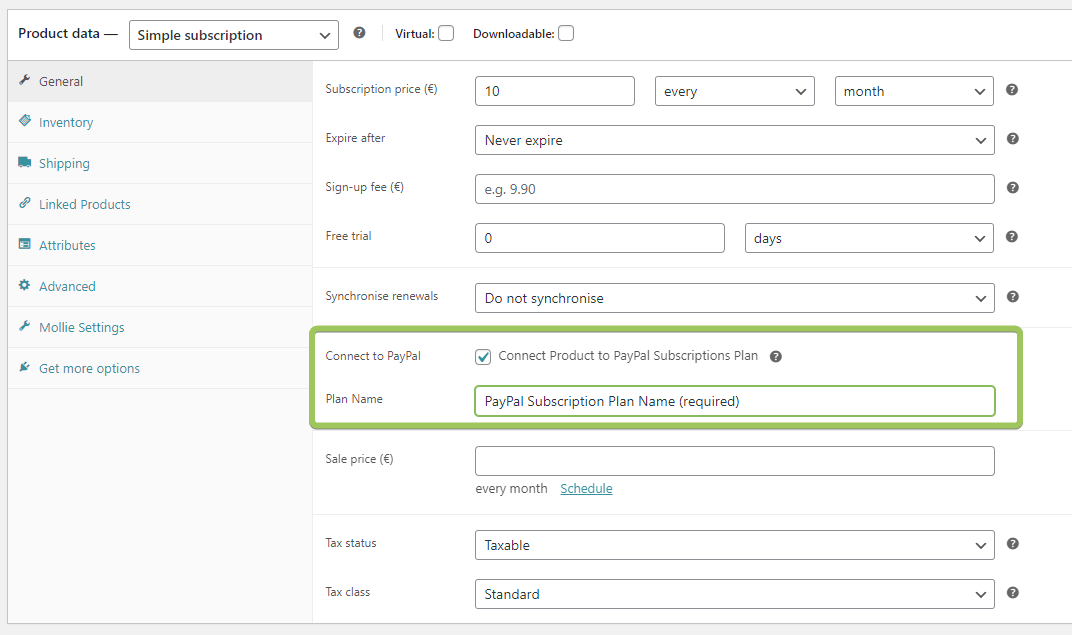
- Click Publish or Update to save the product and create the PayPal Subscription product & plan
- The PayPal Subscription product & plan is linked from the product and can now be purchased via PayPal
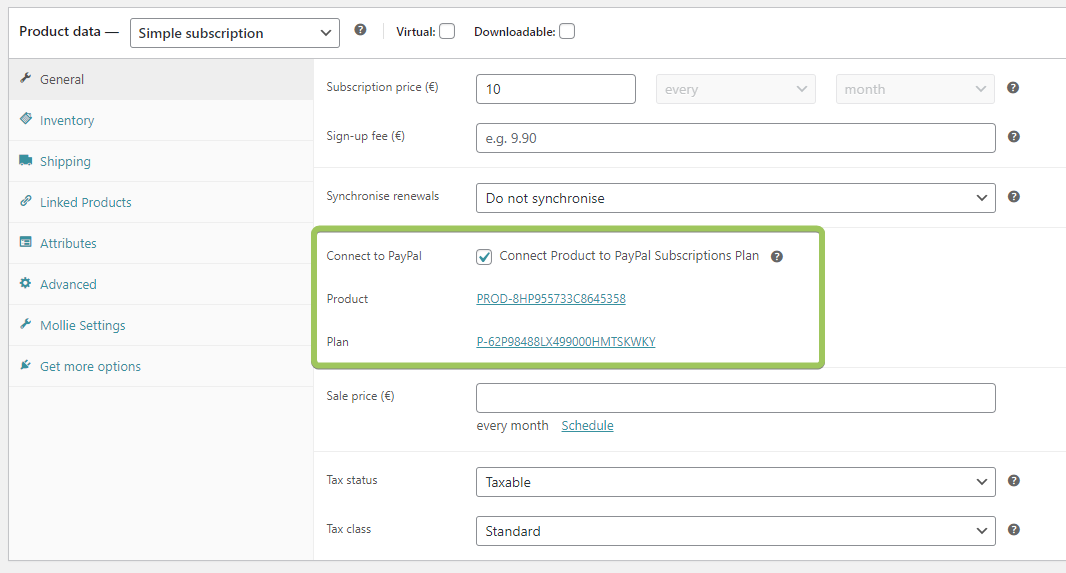
Note: As long as the subscription product is linked to a PayPal product and plan, certain attributes like billing interval cannot be changed.
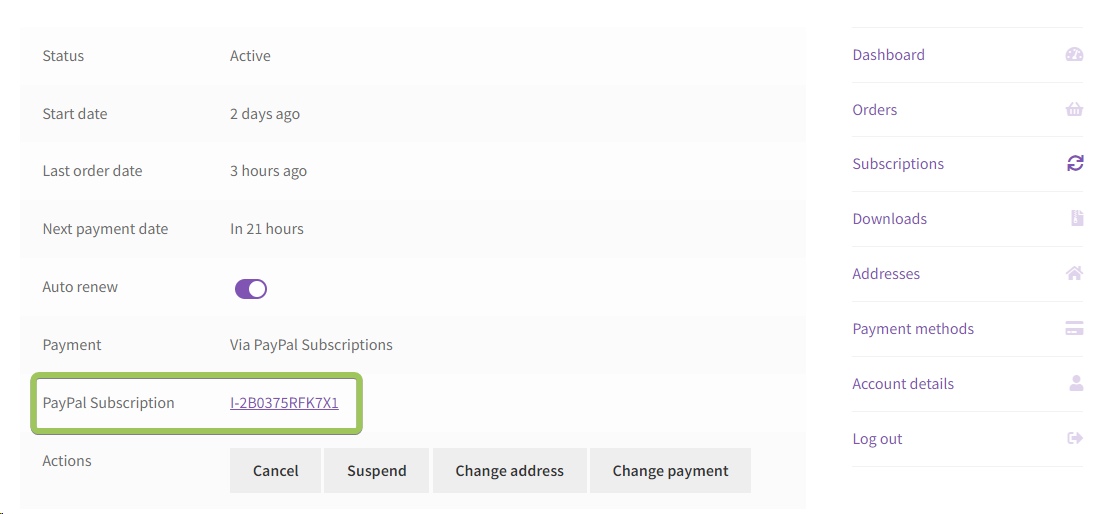
How can a buyer view their subscription at PayPal?
The subscription in the my-account section contains a link to the PayPal dashboard from where the buyer can see the subscription details at PayPal.
Limitations with PayPal Subscriptions
The PayPal Subscriptions feature makes automatic payment processing more broadly accessible but it comes with certain limitations. Please be aware of the following limitations when using PayPal Subscriptions:
- Mixed carts are not supported (no other products can be in the cart)
- Price adjustments (checkout price is fixed, e.g. coupons or shipping costs do not apply to PayPal Subscriptions)
- Synchronized or prorated subscription payments are not supported
- Upgrading/Downgrading (subscription switching) is not supported
- All Products for Subscriptions plugin (or similar third-party subscription plans) are not supported
- The billing cycle is fixed and cannot be changed for an existing not supported subscription plan:
- Existing subscription plans can be unlinked from the product to modify billing cycles and to create a new subscription plan with the updated billing cycle
- PayPal subscription plans have a fixed currency (the primary store currency when linking the product)
These limitations with PayPal Subscriptions mentioned above not apply to PayPal Vaulting.
PayPal Vaulting
PayPal Vaulting stores payment methods securely when Reference Transactions are enabled for the merchant account. This allows for automatic or manual subscription renewals without the customer being present on the site.
Adding or changing a subscription payment method
Subscriptions from different payment gateways using automatic recurring payments can be updated to use PayPal Payments as a payment method instead. But before an existing subscription can be changed to be billed via PayPal Payments, the buyer must save a payment method either from the my-account section or by performing a separate purchase.
Multiple and pre-existing subscriptions
Once a payment method has been saved in the Vault, it can be used for multiple concurrent subscriptions (varying amounts or renewal dates). Subscriptions can be canceled without impacting the saved payment method in the Vault.
The subscription migration layer in PayPal Payments allows automatic renewals of existing PayPal Checkout subscriptions. When a buyer with a pre-existing subscription makes a manual payment, the PayPal account is automatically saved in the Vault. New subscriptions use the payment method saved in the Vault by PayPal Payments, while the migrated subscription renews using the old billing agreement ID (which does not make a difference for the buyer).
Using the same PayPal merchant account on multiple sites for subscriptions is possible but not recommended.
Free trials & synchronized payment dates
Requirements to save a payment method without a payment
When using PayPal Vaulting for subscription products with no sign-up costs, they can only be purchased when the merchant account has Reference Transactions enabled. Without Reference Transactions enabled, buyers attempting to save a payment method for a free trial subscription product may receive an error.
PayPal Payments includes support for subscriptions with a free trial period or prorated & synchronized payment dates.
To purchase a subscription product with no sign-up costs, the buyer must save a payment method in the Vault. While the customer has a free subscription product in the Cart and the Checkout total is zero, the PayPal button on the Checkout page redirects the customer to the PayPal website, where the PayPal account can be authorized for future transactions.
To save the payment method in the Vault without an initial purchase, PayPal Payments authorizes and then voids a $1 payment.
The subscription cannot be purchased if the buyer has no funds available or no payment method connected to authorize this payment with the PayPal account.
After the $1 payment was authorized and voided, the PayPal account will be saved in the Vault for the current user session. The buyer can complete the subscription purchase with the regular Sign up now button after returning to the Checkout page.
Compatibility with third-party subscriptions plugins/addons
PayPal Payments officially supports the official Woo Subscriptions plugin.
Subscription plans from the All Products for Woo Subscriptions are partially supported.
Broader subscription compatibility with third-party plugins and setups relying on manual renewals will be added in a later update.
Pay upon Invoice – Rechnungskauf
↑ Back to topWhat is Pay upon Invoice, and who is it for?
Pay upon Invoice is an invoice payment method in Germany. It’s a local buy now, pay later payment method that allows the buyer to place an order, receive the goods, try them, verify they are in good order, and then pay the invoice within 30 days. No PayPal account is needed for the buyer to use Pay upon Invoice.
PayPal has partnered with Ratepay to provide this service. This payment method is also called Rechnungskauf mit Ratepay in German.
Requirements to use Pay upon Invoice
- The Pay upon Invoice payment method is available only in Germany to eligible merchants.
- You must sell goods in the B2C model only.
- You must ship orders within seven days after the transaction.
- You must be approved to accept transactions using this payment method. PayPal will ask you to enter a valid VAT ID Number as per EU regulations. Without a valid VAT ID for your business, PayPal is required to collect additional VAT as applicable on PayPal fees.
Request approval to enable Pay upon Invoice by disconnecting and reconnecting your account from the PayPal Payments plugin settings with Onboard with Pay upon Invoice selected.
Alternatively, PayPal provides signup links for Sandbox and Live accounts. - Pay upon Invoice does not allow digital or virtual goods, including but not limited to any form of vouchers (gift vouchers, gift cards, and cash codes), and any transactions outside of PayPal’s Acceptable Use Policy.
Onboarding

- To see this checkbox, the WooCommerce store location must be set to Germany and the currency to Euro in the General WooCommerce settings tab.
- Disconnect (if you are already onboarded) and onboard using a German PayPal business account while Onboard with Pay upon Invoice is selected.
- Enable Pay upon Invoice payment gateway.
Pay upon Invoice onboarding video
Taxes
- In the WooCommerce General settings, Tax calculation should be enabled and have at least one tax rate configured for Germany.
- If no tax rate is configured or applied to the product, the integration attempts to send 0% tax for Pay upon Invoice payments.
Product requirements
- Products used for Pay upon Invoice payments should have a tax class assigned, otherwise, they are automatically handled with 0% tax.
- Paying for digital or virtual goods, including, but not limited to any form of vouchers, such as gift vouchers, gift cards, and cash codes, and any transactions outside of PayPal’s Acceptable Use Policy is not allowed with Pay upon Invoice.
- The Pay upon Invoice gateway will be hidden on the Checkout page when the cart contains invalid product types such as virtual or downloadable products.
Checkout flow
- Buyers are automatically requested to provide a birth date to use the Pay upon Invoice payment method.
- The birth date can be entered numerically or with a popup calendar generated by the browser.

- Add (non-virtual & non-downloadable) product(s) to the Cart and navigate to the Checkout page.
- PayPal requires a name, email, phone number, and billing address for Pay upon Invoice payments.
- Ensure the checkout total is between 5€ and 2500€.
- Ensure billing address information is from Germany.
- Ensure filling the Birth date form field.
- Click the “Place order” button.
Email Notification
- After the buyer has placed the order, a webhook with payment instructions will be received from PayPal. This can take a minute or two and the order will remain in the status On-hold in the meantime.
- If this webhook (PAYMENT.CAPTURE.COMPLETED) does not arrive within five minutes, the WooCommerce order will be set to a Failed status and the buyer receives a failed order notification.
- Once the webhook is received, the WooCommerce order moves to the status Processing and a notification email is sent to the customer which automatically includes RatePay payment instructions.
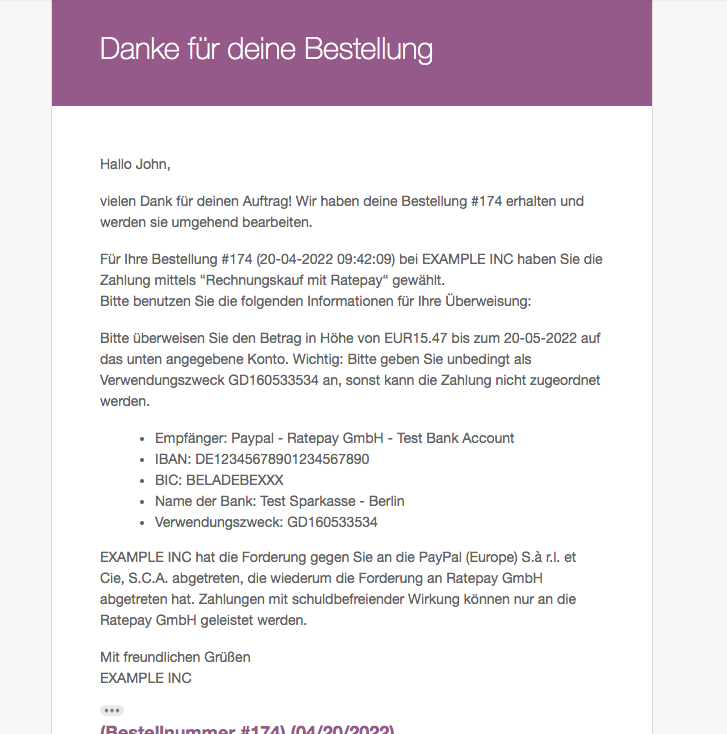
- The same payment instructions will be stored in the WooCommerce order and are accessible to the store owner.
Resending the processing notification mail automatically resends the instructions again.
FraudNet
↑ Back to topFraudNet is a PayPal-developed, JavaScript library embedded into your web page to collect browser-based customer data to help reduce fraud. Upon checkout, data elements are sent to PayPal Risk Services for fraud and risk assessment. FraudNet is for desktop browsers only.
Data collected by FraudNet is used for risk analysis and authentication. PayPal does not share FraudNet data with third parties for their own independent benefit.
When enabled, the FraudNet library is automatically loaded on all pages with enabled PayPal buttons. FraudNet is automatically enabled when Pay upon Invoice is active.
Pay Later
↑ Back to topHelp boost sales and average order values with PayPal Pay Later.
Pay Later is built into PayPal Payments at no additional cost to you and gives your customers flexible payment options, including short-term interest-free payments and longer term monthly installments with no late fees. Your customers can get what they need now and pay later, while you get paid in full – up front. Pay Later availability and terms vary by country. See details below.
What do I need to do to enable PayPal Pay Later?
When you install the WooCommerce PayPal Payments extension and connect to a PayPal account, Pay Later messaging is enabled by default.
Once you have installed WooCommerce PayPal Payments, PayPal Pay Later is available in the following regions:
🇺🇸 – Pay in 4 & Pay Monthly; for full details, check the Pay Later details for the US
🇦🇺 – Pay in 4; for full details, check the Pay Later details for Australia
🇩🇪 – PayPal Ratenzahlung & Pay in 30; for full details, check the Pay Later details for Germany
🇪🇸 – Pay in 3 instalments; for full details, check the Pay Later details for Spain
🇫🇷 – Pay in 4X; for full details, check the Pay Later details for France
🇮🇹 – Pay in 3 instalments; for full details, check the Pay Later details for Italy
🇬🇧 – Pay in 3 & PayPal Credit; for full details, check the Pay Later details for the UK
Pay Later Buttons
Your existing PayPal buttons change to show a new Pay Later button when eligible. When customers select Pay Later, they can pay with flexible, buy now, pay later offers.
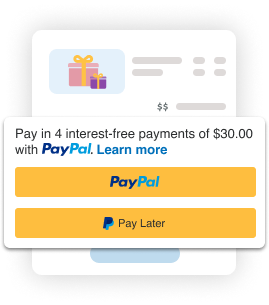
Pay Later messaging
Pay Later messaging can be enabled on the home, single product, shop page, cart, and checkout and helps you get the most out of PayPal’s buy now, pay later offers. You can use this onsite messaging to dynamically promote Pay Later offers, which can help grow your sales, attract new customers, and drive customer loyalty.

Pay Later messaging on your site lets your customers know about flexible payment options while browsing, helping convert more sales. In fact, 80% of buy now pay later (BNPL) users in the US agree that seeing a BNPL message while browsing gives allows them to spend more.
Customize Pay later messaging
The Pay later messaging can be customized with several different styles per Pay Later messaging configuration.
Note: The video below shows the legacy Pay Later messaging configuration which was replaced with a more user-friendly configurator in PayPal Payments version 2.6.0. The behavior on the website remains the same.
More details can be found in the PayPal documentation: Pay Later messaging
How to disable Pay Later features?
The Pay Later messaging can be individually enabled or disabled for the home, single product, shop, cart, and checkout page.
The Pay Later button is loaded independently of the messaging and both can be disabled from the Pay Later settings tab.
All Pay Later features are automatically disabled when the Vaulting feature is active.
Pay with Venmo
↑ Back to topBased on eligibility, PayPal Payments automatically provides buyers with a Venmo button.
Add Venmo as a payment button
Pay with Venmo offers a simplified mobile checkout experience with no additional steps to set up or cost to you. Your buyers get:
- A streamlined checkout process.
- Splitting and sharing of purchases.
All funds will be automatically forwarded to the connected PayPal account.
Venmo checkout flow
When eligible, your buyers can use Venmo on the same pages they can use PayPal, including your product page, Cart page, and Checkout page. When buyers select Venmo, they can pay in their Venmo app.
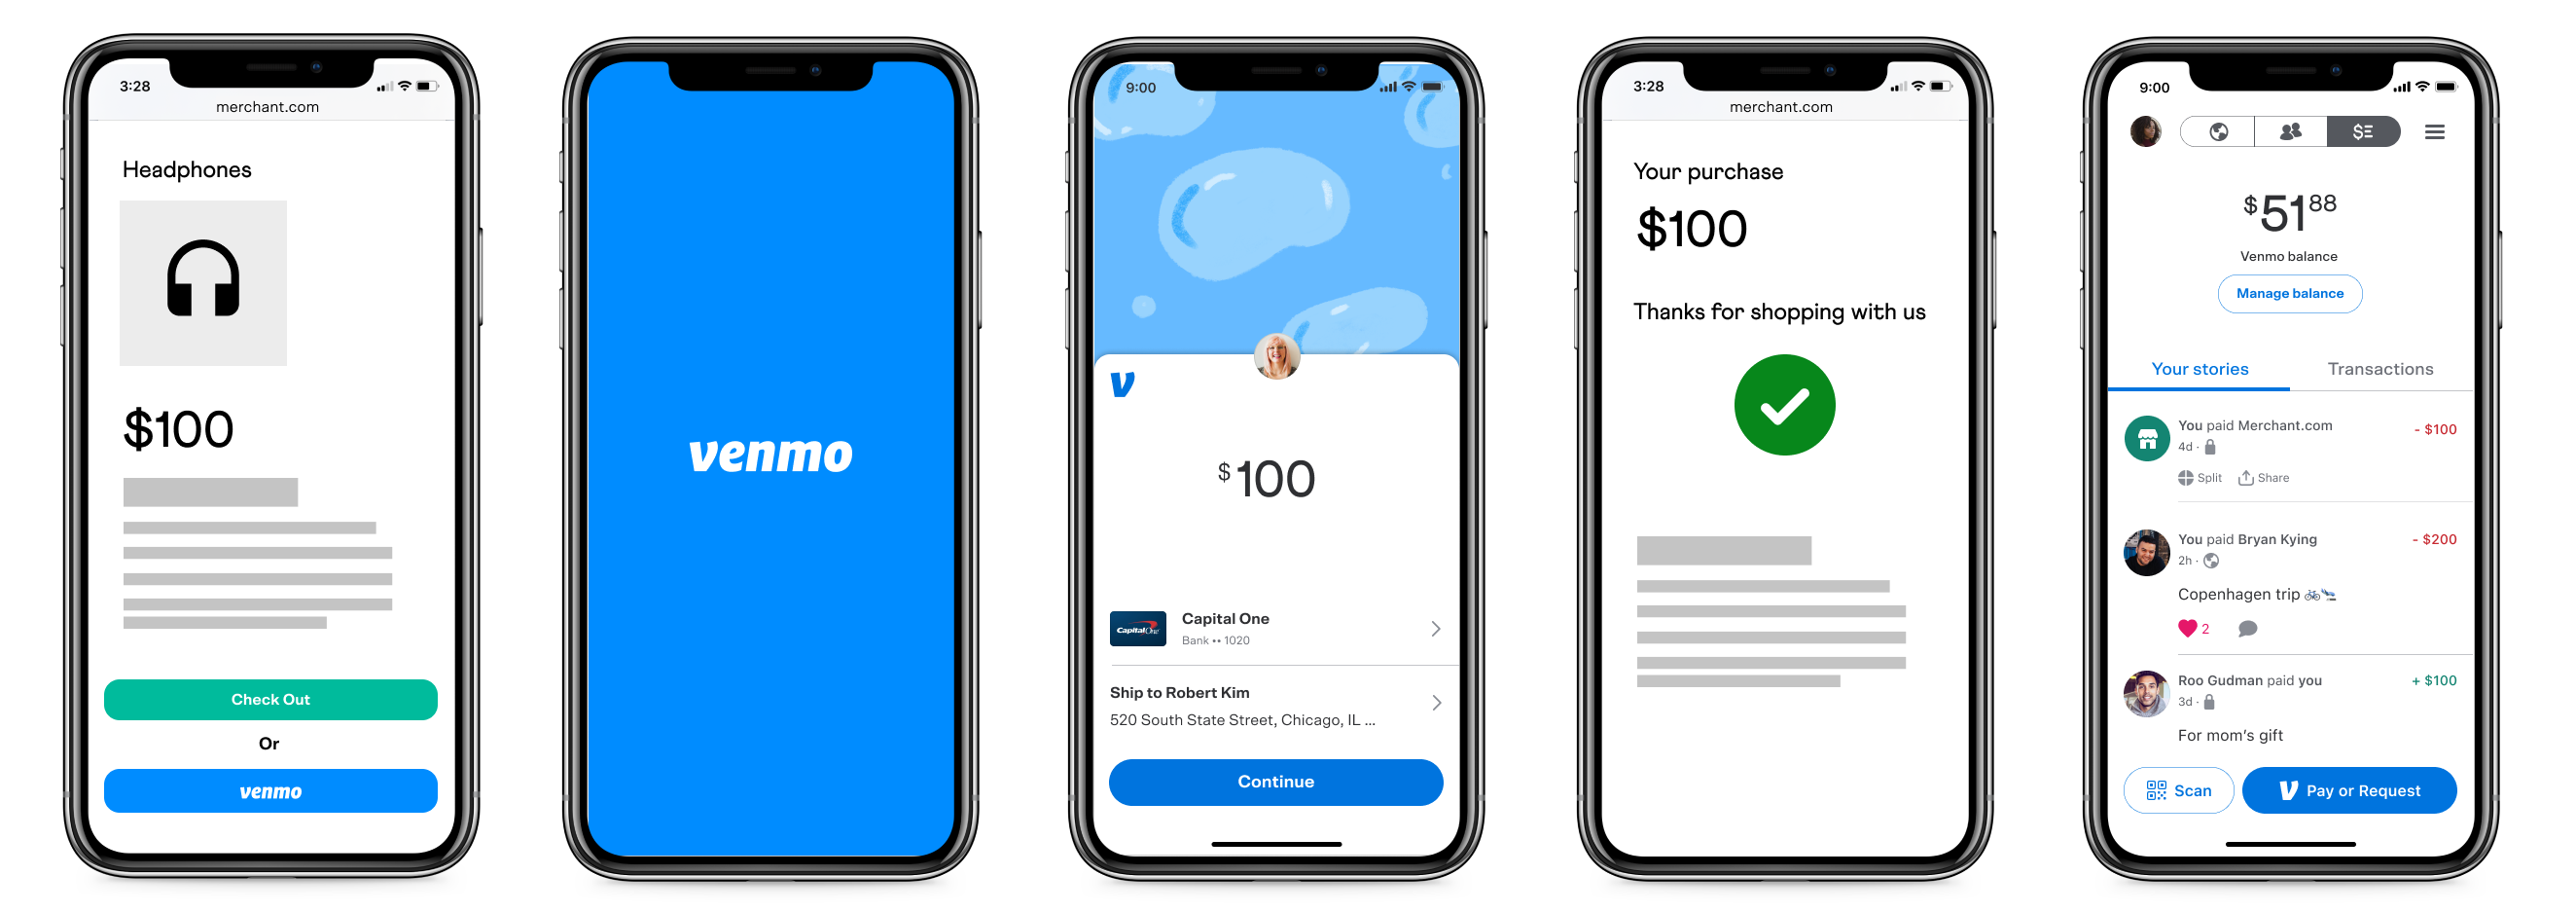
The full Venmo checkout flow is described in the PayPal developer documentation: PayPal documentation: Pay with Venmo – Buyer experience
Eligibility
Alternative Payment Methods, including Venmo, are supported by PayPal business and casual seller accounts.
More information about the eligibility for Venmo is available at the PayPal developer documentation: PayPal documentation: Pay with Venmo eligibility
How to disable the Venmo button?
The Venmo button is automatically displayed for eligible customers by default but can be hidden in different ways:
- The Disable Alternative Payment Methods setting allows disabling individual APMs, including Venmo
- The Vaulting feature will hide all APMs, including Venmo, when enabled
Alternative Payment Methods
↑ Back to topAlternative Payment Methods (APMs) are supported by PayPal business and casual seller accounts.
These payment methods appear automatically for eligible buyers, primarily on the Checkout page. The funds will be received by your connected PayPal merchant account without requiring additional configuration.
What are Alternative Payment Methods
APMs allow you to accept payments from customers around the globe who use their bank accounts, wallets, and local payment methods. When a buyer pays in a currency different than yours, PayPal handles currency conversion for you and presents conversion information to the buyer during checkout.
For example, a customer in the Netherlands might want to pay using iDEAL, which more than half of consumers in the Netherlands used for online purchases. In contrast, a customer in Belgium on the same website might want to pay using Bancontact, a popular payment method there.
PayPal Payments automatically provides payment methods that are relevant to the user.
Which Alternative Payment Methods are supported?
As of the latest version, PayPal Payments supports the following APMs:
- Bancontact
- BLIK
- eps
- giropay
- iDEAL
- Mercado Pago
- MyBank
- Przelewy24 (P24)
- SEPA Direct Debit
- Trustly
- Venmo
The latest list of supported APMs is available in the PayPal documentation – APM Availability.
How to disable Alternative Payment Methods?
Alternative Payment Methods are displayed by default but can be hidden in different ways:
- The Disable Alternative Payment Methods setting allows disabling individual APMs
- A horizontal button layout will only display PayPal, Pay Later, or Venmo buttons, but no other APMs
- The Vaulting feature will hide all APMs, including Pay Later and Venmo, when enabled
Alternative Payment Methods on non-Checkout pages
The credit card smart button renders only on the Checkout page and not on the single product, or Cart page to provide a more consistent user experience.
The following payment methods are available from the non-Checkout pages: PayPal, Pay Later, Venmo, and SEPA Direct Debit.
All remaining funding sources (including credit cards) are only available from the Checkout page.
WooCommerce PayPal Checkout gateway migration layer
Starting with version 1.5.0, PayPal Payments integrates a migration layer to carry over existing configurations from the no longer supported PayPal Checkout gateway plugin.
When upgrading to PayPal Payments, only the PayPal account must be connected once, and most of the settings (button styling, etc.) will be automatically migrated from the old to the new plugin.
The migration layer will also take over subscription renewals from PayPal Checkout when the latter is not active. This allows you to completely disable or remove the PayPal Checkout extension, while subscription renewals continue to be processed as usual.
We recommend disabling the PayPal Standard and PayPal Checkout gateways (under WooCommerce > Payments) to prevent customers from purchasing new subscriptions using those gateways.
The Vaulting section describes how new subscriptions are handled with PayPal Payments.
If you don’t need the migration functionality, it can be disabled with a filter.
WooCommerce Blocks
↑ Back to topThe WooCommerce Cart & Checkout Blocks are a feature to optimize for faster checkout. To make sure this feature is right for your store review the list of compatible extensions from the Cart & Checkout Blocks – Status page.
Pages with the WooCommerce Cart & Checkout Blocks can be set up as new pages, or replace your existing Cart & Checkout pages as explained in this guide.
PayPal Payments comes with an early integration for the Block Cart & Block Express Checkout, with more features being in active development.
Supported Functionalities
- PayPal, Pay Later, & Venmo, Apple Pay, Google Pay buttons on these pages:
- Block Cart
- Block Express Checkout
- Block gateway without smart buttons either
- for already approved express payments
- or to forward buyers to the PayPal website to pay
- The checkout page can be optionally skipped for payments from Block pages:
- Requires Billing Address retrieval to be enabled for PayPal account
- This synchronizes shipping options with the PayPal popup window
Unsupported Functionalities (but in development)
- PayPal Block Checkout gateway with smart buttons
- Advanced Card Processing Block Checkout gateway with hosted fields
- Alternative Payment Methods (incl. OXXO & Pay upon Invoice gateways)
- Pay Later messaging
How does the Block integration look like?
PayPal, Pay Later, & Venmo buttons on Block Cart & Block Express Checkout:

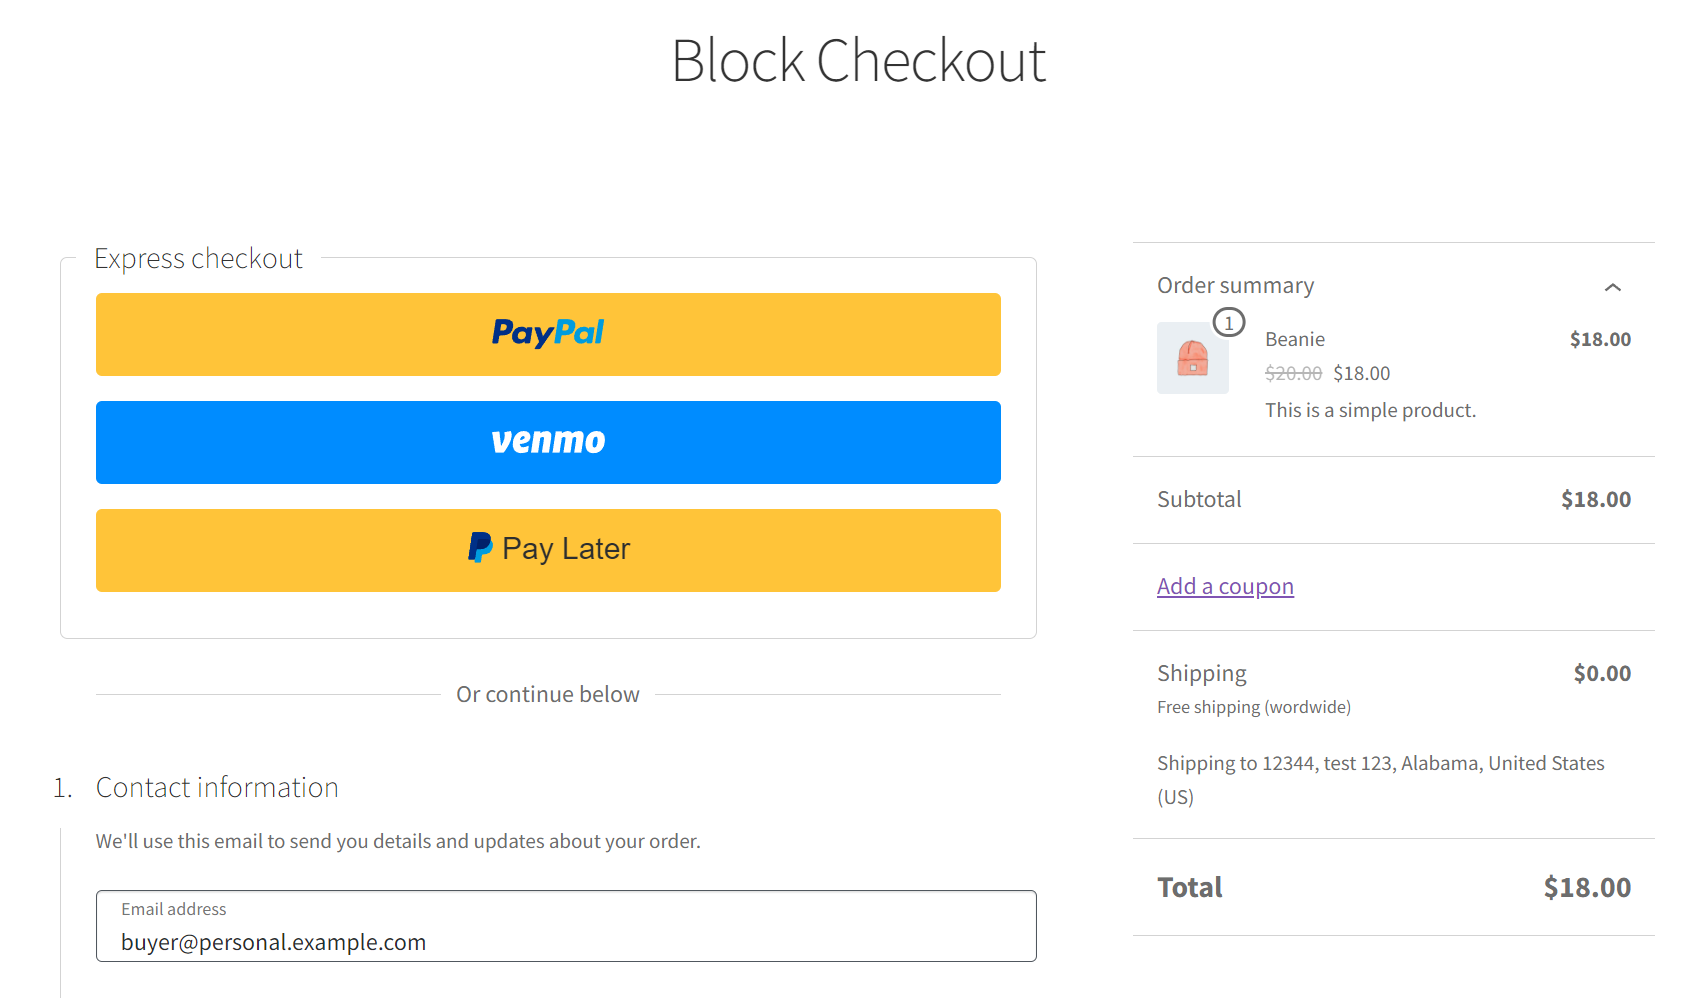
Block gateway without smart buttons to complete previously approved express payments:
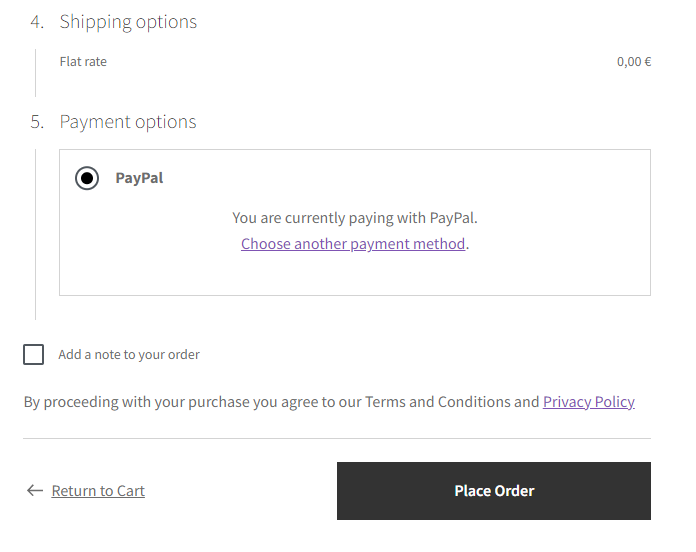
Blocks FAQ
What does the “Require final confirmation on checkout” setting do?
This setting decides if your buyers must confirm the payment from the Block Cart & Block Express Checkout on the Checkout page. It does not affect payments initiated from non-Block pages. This feature is recommended to remain enabled for the best possible compatibility.
If the Require final confirmation on checkout setting is disabled:
- The final confirmation on the Checkout page will be skipped to complete the payment process within the PayPal popup window.
- The Billing Address retrieval must be enabled for your PayPal merchant account to populate the required billing fields successfully.
- If your store provides shipping options, these will be synchronized with PayPal to calculate the correct totals before confirming the payment, as seen below:
Frequently Asked Questions
↑ Back to topCan I connect a personal PayPal account?
↑ Back to topYes! Personal or casual PayPal accounts can be connected using the onboarding wizard with the Standard Card Processing option. Onboarding with Advanced Card Processing will automatically prompt a business signup form as the Advanced Card Processing requires a business account.
Does PayPal Payments support Subscriptions?
↑ Back to topYes, PayPal Payments supports automatic recurring payments with Woo Subscriptions (separate purchase). Accept recurring payments on a fixed billing schedule with PayPal Subscriptions or save your buyers’ payment methods for future payments using the Vaulting feature (business account & approval required). Business accounts enabled for Advanced Card Processing can use the Vaulting feature to save credit and debit cards for automatic subscription payments.
For more details, see: Subscriptions FAQ and Vaulting – Saving a Payment Method
PayPal Payments also comes with a subscription migration layer to renew existing subscriptions created by the previous PayPal Checkout plugin.
Subscriptions created with the old PayPal Standard integration continue to be renewed either by PayPal, or by WooCommerce if Reference Transactions were used.
Does PayPal Payments support WooCommerce Blocks?
↑ Back to topYes, PayPal Payments includes partial Block Cart/Checkout support. Full support for the new WooCommerce Cart & Checkout Blocks is in active development.
Starting with update 2.2.0, an experimental Block Cart & Express Block Checkout integration is available for testing. To enable Block support, see the instructions here and reach out to the support if you have any questions or are interested in providing early feedback.
Beyond the early Block integration, PayPal Payments can only be used with the regular WooCommerce shortcode cart & checkout pages.
PayPal Payments Smart Buttons are not displaying on my Single Product/Cart/Checkout page
↑ Back to topThe regular “Place order” button on the Checkout page is hidden and replaced by a spinner while the PayPal Smart Buttons are loading. It may take a few seconds to load the buttons on the initial page load after connecting a new PayPal account or saving the plugin settings.
Caching or JavaScript minification can impact PayPal Payments and should be disabled on pages where the PayPal scripts are loaded. Otherwise, eventual site optimizations should exclude scripts from the PayPal Payments integration. When using minification features from third-party plugins, make sure to exclude/whitelist at least the JavaScript in this directory:
/woocommerce-paypal-payments/modules/ppcp-button/assets/js/button.jsThese additional directories could be whitelisted as well if any issues persist while using site optimizations:
/woocommerce-paypal-payments/modules/ppcp-vaulting/assets/js/myaccount-payments.js
/woocommerce-paypal-payments/modules/ppcp-wc-gateway/assets/js/oxxo.js
/woocommerce-paypal-payments/modules/ppcp-wc-gateway/assets/js/pay-upon-invoice.js
/woocommerce-paypal-payments/modules/ppcp-wc-gateway/assets/js/gateway-settings.js
Please follow the steps outlined in Troubleshooting if the buttons are still not loading, and get in touch with the support team if any questions remain.
Why are PayPal scripts loading on every page of my site (front end)?
↑ Back to topPayPal Payments loads the PayPal scripts only on pages with enabled smart buttons or Pay Later messaging.
When the Mini Cart button is enabled, the scripts will be loaded on all non-Cart, and non-Checkout pages of the site as the Mini Cart is usually a global feature.
Disabling the Mini Cart button prevents the scripts from loading on the above-mentioned pages.
When performance matters
Unload Event Listener warnings on sites like GTmetrix may be caused by the PayPal scripts loading on your main page, e.g. due to the Mini Cart button being enabled.
Which currencies does PayPal support?
↑ Back to topThe PayPal REST API supports merchants in several countries and currencies depending on the payment type for PayPal payments, or direct credit card payments. For country-specific offerings and limitations, see PayPal Offerings Worldwide and visit your country-specific site.
PayPal supports merchants operating from certain countries without supporting the local currency, for example, India.
The full currency coverage through the PayPal REST API is listed here: PayPal documentation: Currency codes.
The country and currency eligibility page for advanced card payments lists supported countries/currencies for the Advanced Card Processing.
Beyond the customer being from a supported country, Alternative Payment Methods may require specific currencies to appear.
Translating PayPal Payments
↑ Back to topBy default, PayPal Payments automatically displays the PayPal smart buttons and the Pay Later messaging in a language relevant to the buyer.
The automatic language detection is determined by PayPal but the language can be overridden with the Smart Button Language setting in the Standard Payments tab.
The plugin translation files can translate other strings from the settings or certain frontend fields (Advanced Card Payments hosted fields).
The wordpress.org community maintains the plugin translations, and translation contributions are welcome.
Plugin modifications (actions and filters)
↑ Back to topThe PayPal Payments GitHub Wiki lists available actions and filters to extend or modify the plugin. Filters are available for the following use cases, among others:
- Adding modules and accessing the plugin-container
- Change button placement via render hooks
- Add advanced credit and debit card (ACDC) countries
- Modify the order creation request body data
- Disable basic Checkout form field validation before creating the PayPal order
- Disable smart buttons on the single product page for specific products
- Adding a gateway icon
Troubleshooting
↑ Back to topDo you encounter a problem? Follow these steps to make sure everything is set up correctly:
- Please ensure that your site meets the plugin requirements.
- Preferably connect your PayPal account with the onboarding wizard as this automatically configures the most important settings.
- Activating Logging via the plugin settings to collect more information about payments.
- Temporarily activating the default theme Storefront and disabling all other plugins except for WooCommerce and PayPal Payments may help isolate a potential plugin conflict. The article How to test for conflicts contains more guidance and tips regarding conflict testing.
Read more about plugin and theme conflicts in the WooCommerce Self-Service Guide.
Advanced Troubleshooting
↑ Back to topIf you’re facing difficulties, reach out to the support team for assistance or to gain a better understanding of the issue, you may also find these additional suggestions helpful.
Common errors
↑ Back to topFrequently reported errors and potential ways to resolve them are listed here on GitHub.
Get Help
↑ Back to topThe troubleshooting steps provided are intended to assist you in finding a resolution to your problem or an answer to your question. If you have not been able to resolve the issue, please contact the support team.
The support team can be reached via the WooCommerce.com support platform. Please note, in order to receive support for PayPal Payments, it may be necessary to add the extension to your WooCommerce account. When the extension has been added, support can be reached from the Dashboard section, by selecting Get Support, Technical support, and PayPal Payments.

Creating a support request requires an account on WooCommerce.com. Your request must include a link to your site and a copy of your WooCommerce System Status Report.
After submitting your request, the support team will get back to you as soon as possible.
Additionally, assistance can be sought in the official WordPress.org community support forums. These forums are regularly monitored by the support team, who are dedicated to helping users. In certain circumstances, it may be necessary to create a private support request, in order to provide the support team with a more detailed explanation of your issue.
Feedback
↑ Back to topFeedback about your experience with PayPal Payments is welcome.
What do you like or dislike about PayPal Payments, or do you have suggestions on how it could be improved?
Feedback can be shared by reaching out to the support team or by leaving a review on the plugin pages here:
New features can be requested here if you want additional functionality in PayPal Payments.
Popular feature requests may be integrated with future PayPal Payments versions.
Bugs can be reported in the PayPal Payments GitHub repository.
If you are unsure whether or not you found a new bug or encountered a different kind of problem, please contact the support team instead.
Related documents
↑ Back to topPayPal Payments-related documents:
- PayPal Payments Upgrade Guide
- Introduction to Woo Subscriptions
- PayPal Reference Transactions for Subscriptions FAQ
PayPal API-related documents:
Documents relating to previous PayPal integrations:
- PayPal Checkout documentation (no longer supported)
- PayPal Standard documentation (legacy)
- Limitations of PayPal Standard with Subscriptions
Questions
↑ Back to top- Have a question or need some assistance? Get in touch with a Happiness Engineer via the Help Desk.
- If you are not a customer, we recommend finding help on the WooCommerce Support Forum or hiring a WooExpert agency. They are trusted agencies with a proven track record of building highly customized, scalable online stores. Learn more about WooExpert agencies.