PsiGate provides a secure payment system and accept credit cards directly from your WooCommerce checkout page. The PsiGate payment gateway for WooCommerce can process Sale and Authorization type of transactions in Canadian and US dollars. It gives you a real-time processing of the order and updates the order with the payment appropriate references. The credit card information of the customer is never stored in your database. A valid SSL certificate is strongly recommended to protect sensitive customer and billing information. The plugin supports:
- Regular product payments
- Subscription recurring payments
- Pre-Order payments
- Refunds processed directly from the Admin Edit Order page
- Authorized payment captures processed from the Admin Edit Order page
Installation
↑ Back to top- Download the .zip file from your WooCommerce account.
- Go to: WordPress Admin > Plugins > Add New and Upload Plugin with the file you downloaded with Choose File.
- Install Now and Activate the extension.
Setup and Configuration
↑ Back to topGeneral Settings
↑ Back to top- Enable/Disable:
- Enables the Gateway.
- Method Title:
- This controls the title which the user sees during checkout.
- Description:
- This controls the description which the user sees during checkout. Will show above the credit card fields.
XML API Settings
↑ Back to top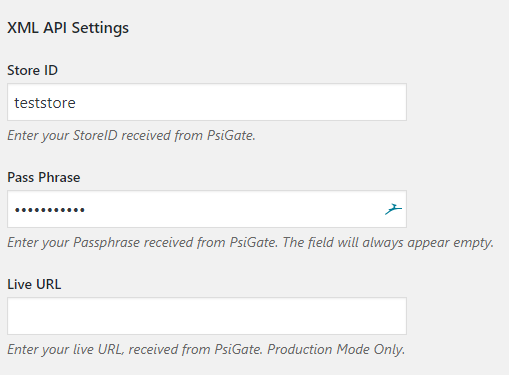
- Store ID:
- PSiGate provides the StoreID within the PSiGate Welcome Email. StoreID is unique and case sensitive.
- Pass Phrase:
- PSiGate provides the Passphrase within the PSiGate Welcome Email. Pass Phrase is case sensitive.
- Live URL:
- Enter your live URL, received from PsiGate. Live Mode Only.
3DSecure Payments Settings
↑ Back to top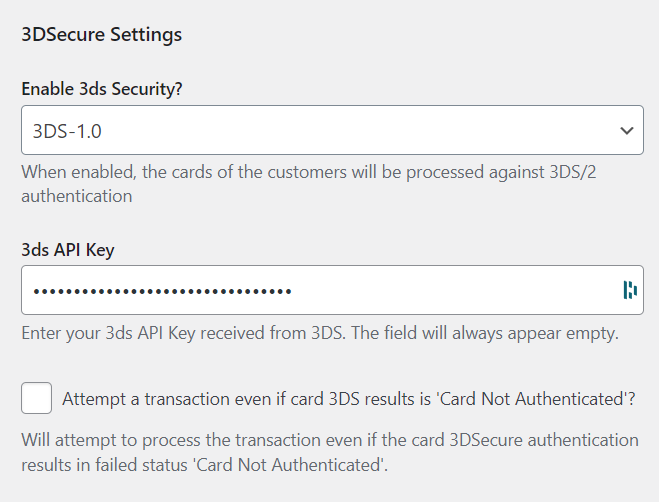
General Transaction Settings
↑ Back to top- Accepted Cards:
- Choose the cards you can and want to accept payments from.
- Payment Action Type:
- Controls the transaction type.
- ‘Sale‘ will authorize and capture the payment right away.
- ‘Authorize‘ will only authorize the payment and you will have up to 5 days to manually capture the payment via your PsiGate admin panel.
- Save Customers:
- Allow customers to pay with saved cards
- Only the last 4 digits of the Credit Card, expiration date and their generated customer ID will be saved in the WooCommerce database. Customer will be able to delete or edit their saved information from their ‘My Account’ Page.
Account Manager API Settings
↑ Back to top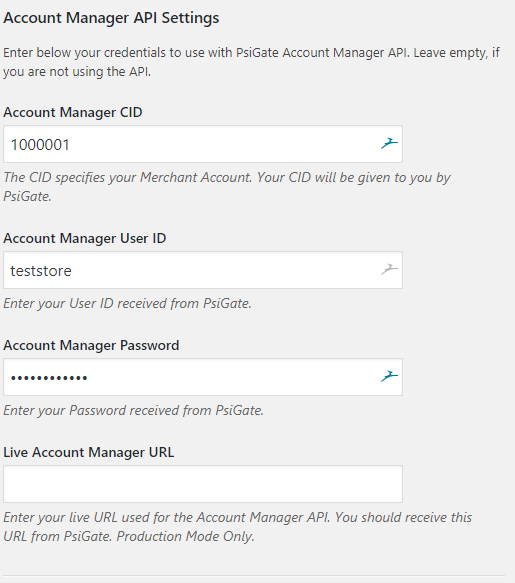
- Account Manager CID:
- The CID specifies your Merchant Account. Your CID will be given to you by PsiGate.
- Account Manager User ID:
- Enter your User ID received from PsiGate.
- Account Manager Password:
- Enter your Password received from PsiGate.
- Live Account Manager URL:
- Enter your live URL used for the Account Manager API. You should receive this URL from PsiGate. Production Mode Only.
Real-time HTML API Settings
↑ Back to top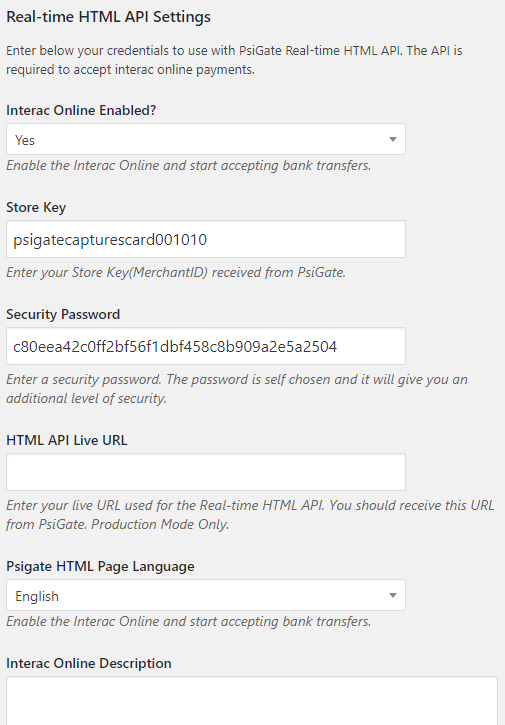
- Interac Online Enabled?
- Enable the Interac Online and start accepting bank transfers.
- Store Key
- Enter your Store Key(MerchantID) received from PsiGate.
- Security Password
- Enter a security password. The password is self-chosen and it will give you an additional level of security.
- HTML API Live URL
- Enter your live URL used for the Real-time HTML API. You should receive this URL from PsiGate. Production Mode Only.
- Psigate HTML Page Language
- The payment page language
- Choose between English and French
- Interac Online Description
- Displayed to the customer, when Interac Online payment option is selected on checkout.
Test/Debug Settings
↑ Back to top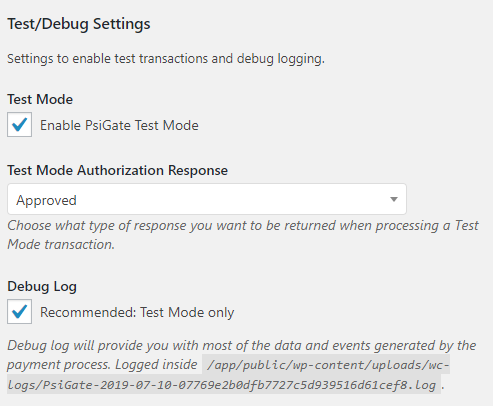
- Test Mode:
- Enable test mode. Use this mode to make test transactions and test the integration before you go live.
- Test Mode Authorization Response:
- When in test mode, choose what type of response you want to be returned when processing a Test Mode transaction.
- Approved – Approved payment
- Declined – Declined payment
- Random – Will return response on a random basis.
- Fraud – Simulates a fraud transaction. Unless your account is set to decline a possible fraud transaction, this option will still Approve the payment.
- Debug Log:
- Debug log will provide you with most of the data and events generated by the payment process.
- Logged inside “woocommerce/logs/PsiGate.txt”.
FAQ
↑ Back to topQuestion 1: When I test the PsiGate gateway, the payments fails with ‘Payment status: 1007’, generated in the debug log. What should I do?
↑ Back to topQuestion 2: I am trying to make a payment, but it fails with error message: error:14077410:SSL routines:SSL23_GET_SERVER_HELLO:sslv3 alert handshake failure. What should I do?
↑ Back to toptheme\functions.php file.
This file contains bidirectional Unicode text that may be interpreted or compiled differently than what appears below. To review, open the file in an editor that reveals hidden Unicode characters.
Learn more about bidirectional Unicode characters
| if ( ! function_exists( 'your_site_curl_ssl_v3' ) ) { | |
| add_action( 'http_api_curl', 'your_site_curl_ssl_v3' ); | |
| function your_site_curl_ssl_v3( $handle ) { | |
| curl_setopt($handle, CURLOPT_SSLVERSION, 1); | |
| } | |
| } |
Question 3: We sell both in Canadian and US dollars and we have Psigate accounts for each currency, can we use your plugin to the corresponding Psigate account based on the order currency?
↑ Back to top- Install and setup the gateway as normal for one of the accounts. Lets say for the example that this is for US dollars.
- Add this snippet to your
theme\functions.phpfile or anywhere where the code will be loaded.
This file contains bidirectional Unicode text that may be interpreted or compiled differently than what appears below. To review, open the file in an editor that reveals hidden Unicode characters.
Learn more about bidirectional Unicode characters
| /** | |
| * The code goes into your "theme\functions.php" file or any php file that is loaded on page load. | |
| */ | |
| // AM API Process Payment | |
| add_filter( 'wc_psigate_process_acc_manager_payment_parameters', 'psigate_modify_account_manager_api_credentials_on_currency', 10, 2 ); | |
| // AM API Register Customer Account | |
| add_filter( 'wc_psigate_register_customer_account_parameters', 'psigate_modify_account_manager_api_credentials_on_currency', 10, 2 ); | |
| /** | |
| * Modifies the Account Manager API credentials, based on currency code | |
| * | |
| * @param array $parameters | |
| * @param WC_Order $order | |
| * | |
| * @return array | |
| */ | |
| function psigate_modify_account_manager_api_credentials_on_currency( $parameters, $order ) { | |
| /** | |
| * IMPORTANT: For the default currency the setting "Store ID" in the plugin settings is used. | |
| * You can still overwrite it here by adding the default currency | |
| */ | |
| /** | |
| * NOTE: Remove the currency you don't need or add StoreID for both. | |
| */ | |
| if ( 'USD' == \WcPsigate\Compatibility::get_order_currency( $order ) ) { | |
| if ( isset( $parameters['Charge'] ) && isset( $parameters['Charge']['StoreID'] ) ) { | |
| $parameters['Charge']['StoreID'] = 'USD StoreID for the currency'; | |
| } | |
| } | |
| if ( 'CAD' == \WcPsigate\Compatibility::get_order_currency( $order ) ) { | |
| if ( isset( $parameters['Charge'] ) && isset( $parameters['Charge']['StoreID'] ) ) { | |
| $parameters['Charge']['StoreID'] = 'CAD StoreID for the currency'; | |
| } | |
| } | |
| return $parameters; | |
| } | |
| // XML API Process Payment | |
| add_filter( 'wc_psigate_process_credit_card_payment_parameters', 'psigate_modify_xml_api_credentials_on_currency', 10, 2 ); | |
| // XML API Process Refund | |
| add_filter( 'wc_psigate_process_refund_parameters', 'psigate_modify_xml_api_credentials_on_currency', 10, 2 ); | |
| /** | |
| * Modifies the XML API credentials, based on currency code | |
| * | |
| * @param array $parameters | |
| * @param WC_Order $order | |
| * | |
| * @return array | |
| */ | |
| function psigate_modify_xml_api_credentials_on_currency( $parameters, $order ) { | |
| // Enter here the currency code you want to have additional account for. | |
| // Currency it is set to CAD or USD or any currency you want | |
| if ( 'CAD' == \WcPsigate\Compatibility::get_order_currency( $order ) ) { | |
| /** | |
| * Important: Credentials for the XML API, based on the currency | |
| */ | |
| if ( isset( $parameters['StoreID'] ) ) { | |
| $parameters['StoreID'] = 'StoreID for the currency'; | |
| } | |
| if ( isset( $parameters['Passphrase'] ) ) { | |
| $parameters['Passphrase'] = 'Passphrase for the currency'; | |
| } | |
| } | |
| return $parameters; | |
| } | |
| // AM Create account from Payment | |
| add_filter( 'wc_psigate_create_am_account_from_payment_parameters', 'psigate_create_account_from_payment_on_currency', 10, 3 ); | |
| /** | |
| * Modifies the AM API parameters for Create account from payment request | |
| * | |
| * @param array $parameters | |
| * @param WC_Order $order | |
| * | |
| * @return array | |
| */ | |
| function psigate_create_account_from_payment_on_currency( $parameters, $order, $payment_response ) { | |
| // Enter here the currency code you want to have additional account for. | |
| // Currency it is set to CAD or USD or any currency you want | |
| if ( 'USD' == \WcPsigate\Compatibility::get_order_currency( $order ) ) { | |
| if ( isset( $parameters['Condition'] ) && isset( $parameters['Condition']['StoreID'] ) ) { | |
| $parameters['Condition']['StoreID'] = 'USD StoreID for the currency'; | |
| } | |
| } | |
| if ( 'CAD' == \WcPsigate\Compatibility::get_order_currency( $order ) ) { | |
| if ( isset( $parameters['Condition'] ) && isset( $parameters['Condition']['StoreID'] ) ) { | |
| $parameters['Condition']['StoreID'] = 'CAD StoreID for the currency'; | |
| } | |
| } | |
| return $parameters; | |
| } |
line 49 through 59, you enter “CAD“(for Canadian Dollars) as currency and the StoreID and Passphrase of the account that will charge the payments. If you want to add even more currencies, just duplicate line 46 through 56 and add another currency.