Installation
↑ Back to top- Download the .zip file from your WooCommerce account.
- Go to: WordPress Admin > Plugins > Add New and Upload Plugin with the file you downloaded with Choose File.
- Install Now and Activate the extension.
General Setup
↑ Back to top- Log into your Pay360 Merchant Account page
- Log in to your store, navigate to “WooCommerce > Settings > Checkout > Pay360 Gateway“
- Choose an “Integration Method” from the settings and Save Changes.
- Enable/Disable
- Method Title:
- Shows on the checkout page and anywhere the payment method is referenced.
- Method Description:
- Shows on the checkout page. Any instructions to the customer should go here.
- Debug Mode:
- Enabled debug logging. It helps there are problems with the plugin, to get more information about what the payment requests and responses are. Location of the debug log file is in the setting description.

- Enabled debug logging. It helps there are problems with the plugin, to get more information about what the payment requests and responses are. Location of the debug log file is in the setting description.

Pay360 Gateway – Hosted Cashier Integration
↑ Back to top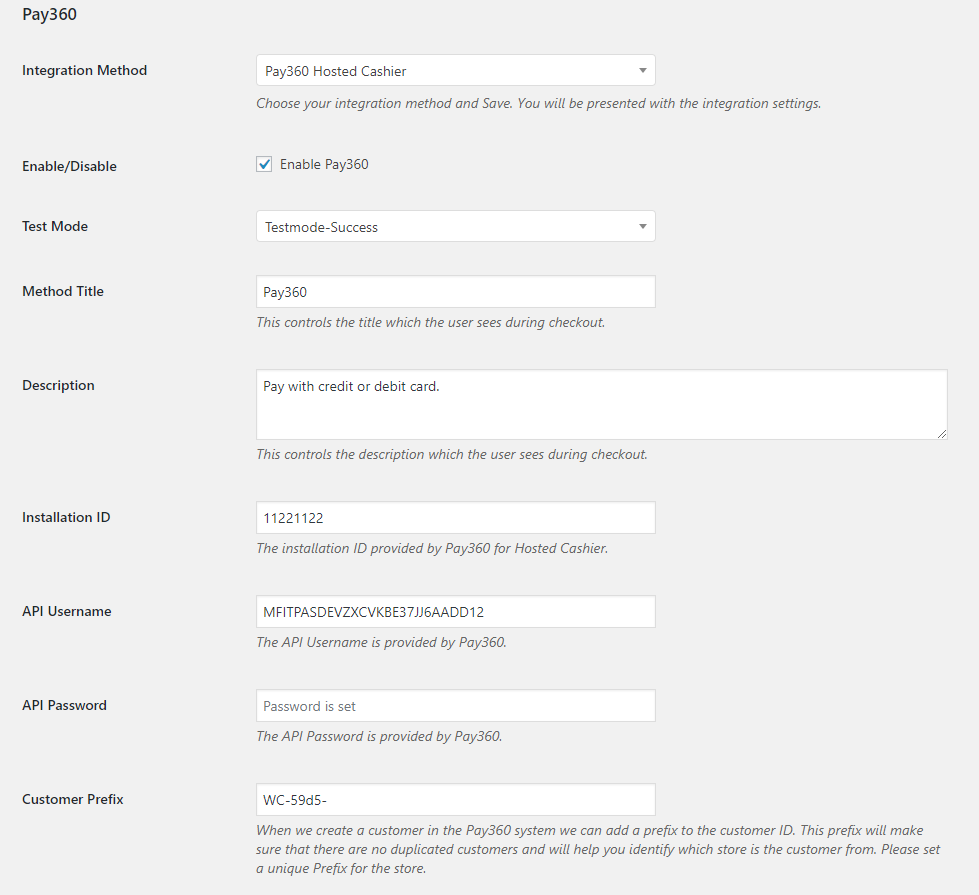
Credentials
↑ Back to top- Installation ID
- API Username
- API Password: Please note: the passwords are not displayed in the password field. You will instead see a placeholder noting, if the password is set or not. To remove an already set password, just save the settings with a ” “(one space inside the password field)
Payment Settings
↑ Back to top- Customer Prefix:
- The prefix ensures that there are no duplicate customers created in the Pay360 system. If you have multiple stores with the same account you can differentiate between store customers.
- Transaction Type:
- You can choose from “Capture” and “Authorization Only“. If you choose “Authorization Only“, it is very important to know that authorizations expire by default after 7 days. After the expire time has passed, you will not be able to capture or cancel the authorization.
- Recurring transaction method: Important note: This setting was introduced because the EU requirements for secure MIT card transactions. Unfortunately, the requirrements break the old more relaxed way of processing those transactions via tokens. This means that the way forward will be repeat payments via initial transaction ID. This also means that most likely after switching to the new process the customers will need to update their payment method via the WC Subscriptions “Change Method” process
- How the plugin will process renewal transactions.
- Tokens: is the old way of processing renewals. It will removed from the API gradually and if your renewals are failing it could be the reason.
- Repeat Transactions (default): is the current way of processing renewals.
3D Secure Settings
↑ Back to top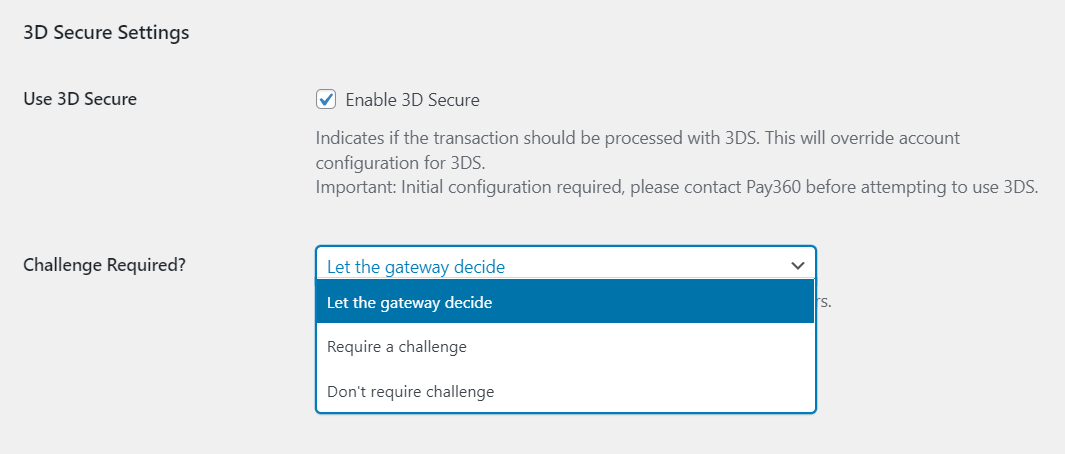
- Use 3D Secure:
- This option will indicate whether to use 3D Secure in the transaction or not. It is important to note that initial configuration is required before you can use this feature. Please contact Pay360 before attempting to use 3DS setting.
- Challenge Required?
- Do you want to require a challenge from the customer, not require one or let the gateway decide whether to show one or not?
Custom template setting
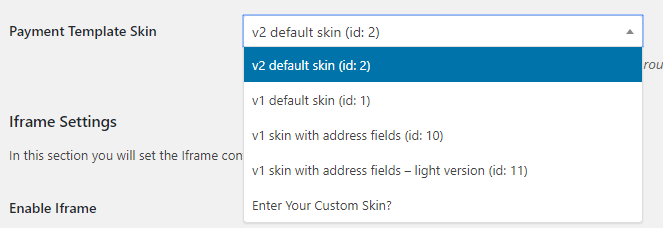
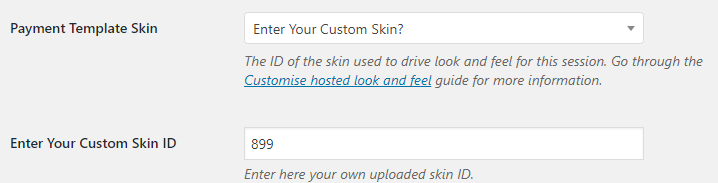
↑ Back to top- Payment Template Skin:
- Here you can choose one of the pre-defined skins or choose “Enter Your Custom Skin?” option, which will add a new field under the setting. The “Enter Your Custom Skin ID” field will allow you to enter your own Skin ID and use that for the Payment page. For more information please go through the Customise hosted look and feel guide.

- Here you can choose one of the pre-defined skins or choose “Enter Your Custom Skin?” option, which will add a new field under the setting. The “Enter Your Custom Skin ID” field will allow you to enter your own Skin ID and use that for the Payment page. For more information please go through the Customise hosted look and feel guide.
- Enter Your Custom Skin ID:
- This field is only displayed if you choose “Enter Your Custom Skin?” option from the “Payment Template Skin” setting. Enter only the ID of the uploaded skin.

- This field is only displayed if you choose “Enter Your Custom Skin?” option from the “Payment Template Skin” setting. Enter only the ID of the uploaded skin.
iFrame settings
↑ Back to top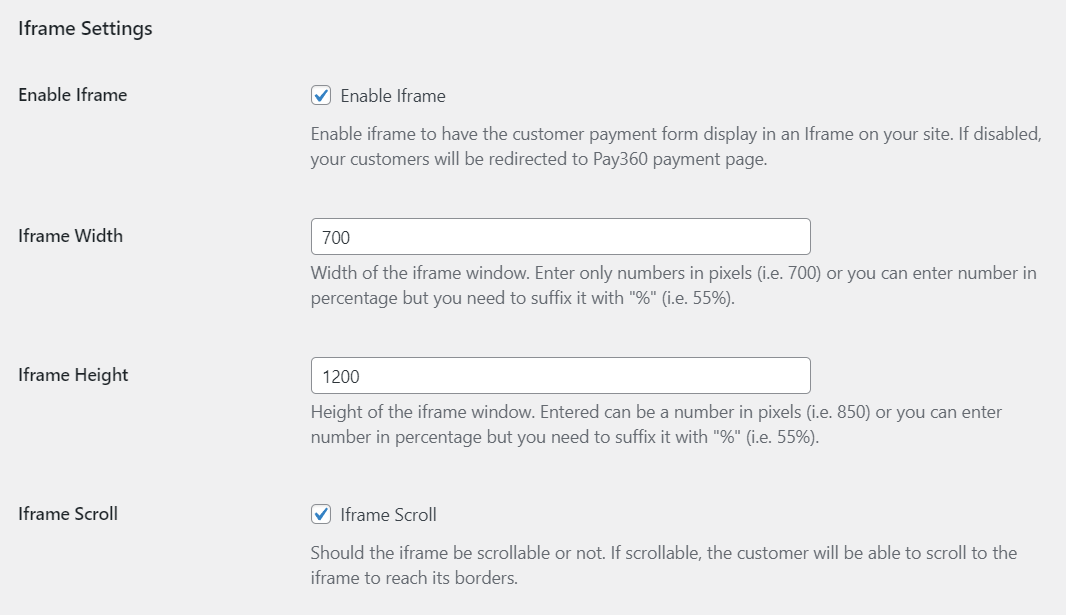
- Enable Iframe
- Iframe Width:
- The width of the iframe window. By default it is 700px, but you can set it as you like. You can also use percentage values, just add % after the number i.e. 50%
- Iframe Height:
- The height of the iframe window. By default, it is 1200px, but you can set it as you like. You can also use percentage values, just add % after the number i.e. 50%
- Iframe Scroll:
- It indicates whether the iframe can be scrolled. Sometimes the iframe content can get out of the iframe window and if it does not scroll the customer will not be able to see the information in the overflow. The scroll fixes this issue by allowing the customer to scroll and view the content.
Capture Payment
↑ Back to top- Go to the Order edit screen of the order the payment was authorized for.
- Go to Actions meta box and select “Capture Payment” from the dropdown field.
- Either click the arrow next to the dropdown field or the “Update” button.
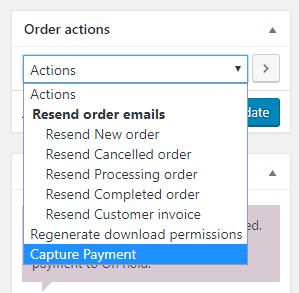
- The capture payment feature is only available for Hosted Cashier integration.
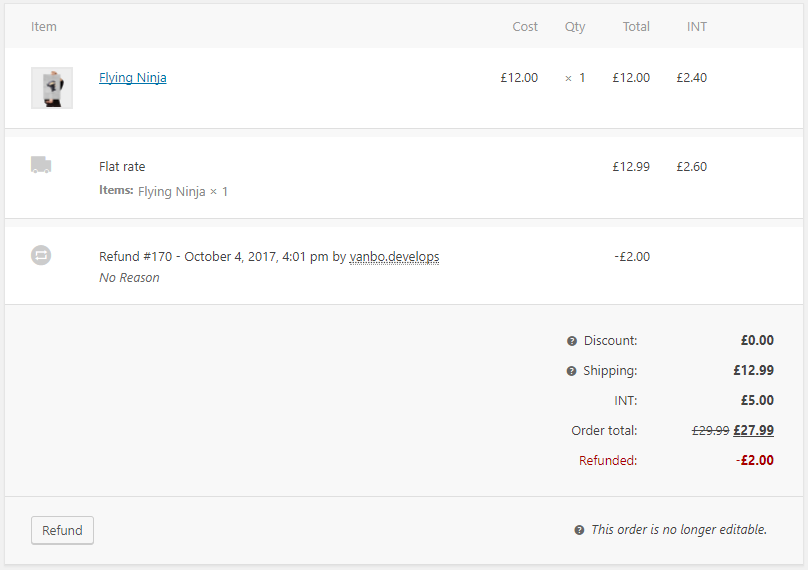
Refund Payment
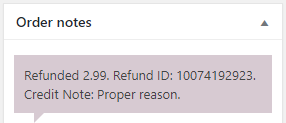
↑ Back to top- Go to the Edit Order screen of the order you want ot refund
- Under “Item” meta box, click the Refund button on the bottom left

- Enter the amount you want to refund. Optionally, you can enter a refund reason, too.
- Click “Refund … via Pay360” button.
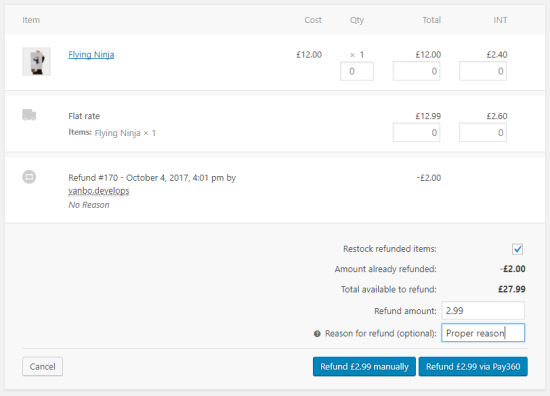
- You refund will be processed and added to the order totals. The refund amount and reason together with the refund transaction ID will also be added to the order notes.
 * Note: Refund feature is only available for Hosted Cashier integration.


Pay360 Gateway – Hosted Integration
↑ Back to topCredentials
↑ Back to top- Merchant ID
- Digest Key:
- Used to authenticate the request from the store to Pay360
- Remote Password:
- Used to validate the Pay360 payment response to the store

Transaction Settings
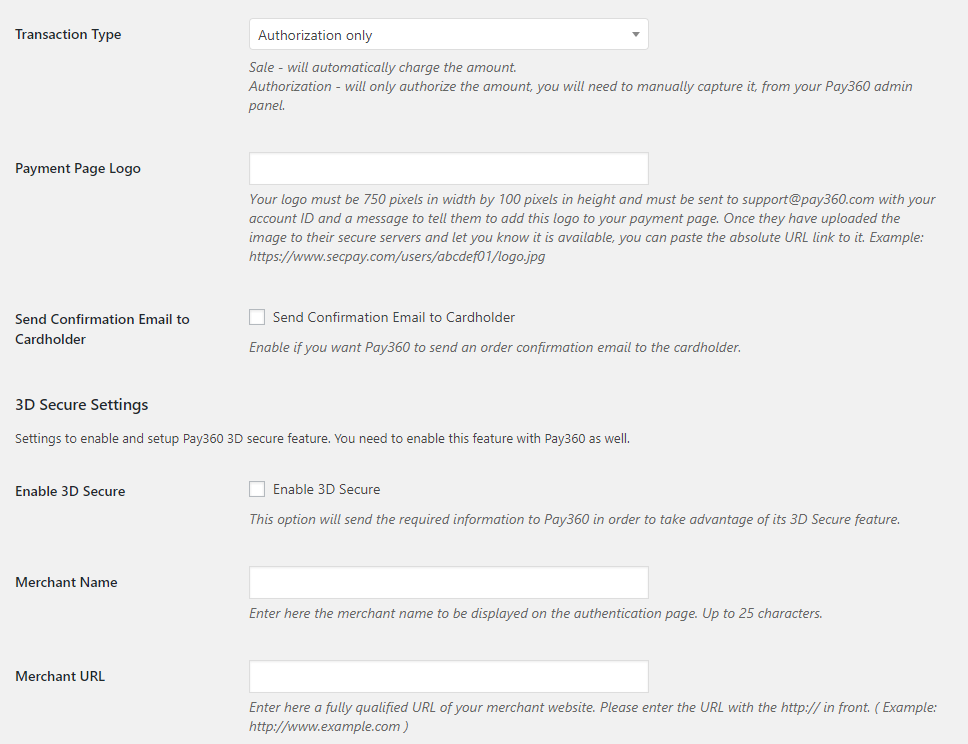
↑ Back to top- Transaction Type:
- You can choose from “Sale” (authorized and captured in the same request) and “Authorization Only“
- Payment Page Logo:
- Your logo must be 750 pixels in width by 100 pixels in height and must be sent to Pay360 with your account ID and a message to tell them to add this logo to your payment page. Once they have uploaded the image to their secure servers and let you know it is available, you can paste the absolute URL link to it. Example: https://www.secpay.com/users/abcdef01/logo.jpg
- Send Confirmation Email to Cardholder:
- The option will indicate whether to send the customer a confirmation email or not. The email is separate from the WooCommerce emails and is sent by Pay360.
3D Secure Settings
↑ Back to top- Enable/Disable
- Merchant Name
- This is the merchant name that will be displayed on the authentication page. Up to 25 characters
- Merchant URL
- URL to the merchant website. Enter here a complete URL with the http:// or https:// in front.
Pay360 Gateway – Hosted+IMA Integration
↑ Back to top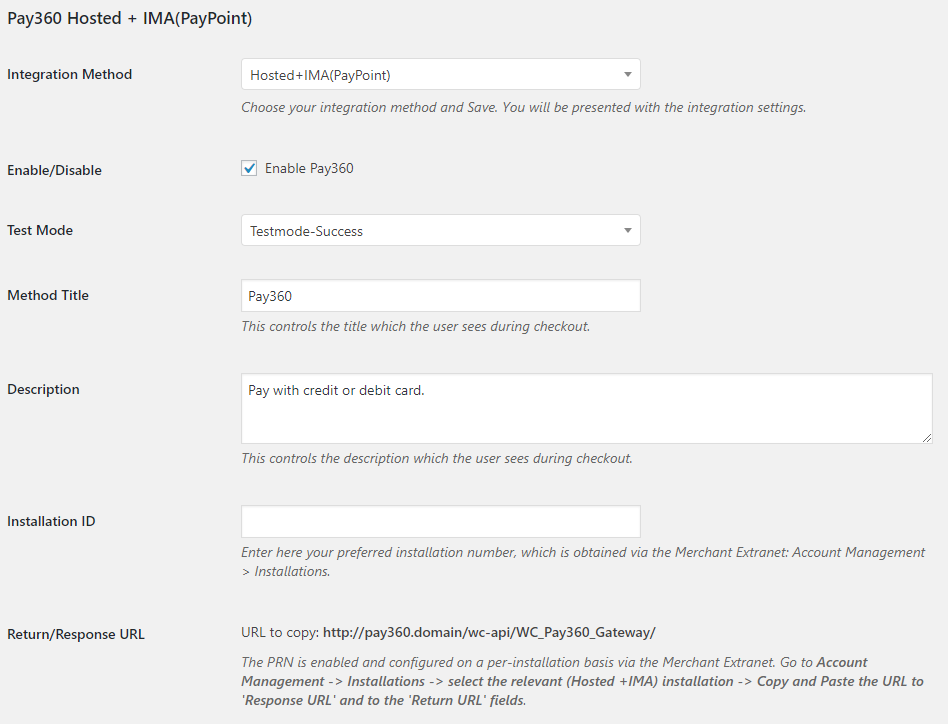 Main steps to configure the Pay360 Hosted + IMA Account type.
- Installation ID
- This is the main setting for the integration. In your Pay360 account, you will have an installation for the merchant account you are using. Just enter here the installation ID. If you are not sure where to find the installation ID, please contact Pay360.
- Return/Response URL:
- This setting is not set in the plugin settings. It is actually set in your Pay360 merchant account installation.
- Copy the URL then go to your Pay360 merchant account page. Go to “Account Management > Installations > Select the installation from the dropdown”, then enter the URL into the “Return URL” and “Response URL” fields of the installation. Don’t forget to save the changes.
FAQ:
↑ Back to topPay360 Hosted Integration: I am trying to use the Payment Page Logo setting to show my custom logo, but the image does not appear on hosted page. What should I do?
Contact Pay360 and ask them to configure your account, so you can render the Merchant logo on the Hosted Payment Page.I received a final notice that TLS 1.0 and 1.1 will no longer be supported as of Wednesday 6th June 2018, is the plugin affected in any way?
No, the plugin will keep working the way it did before. I recommend contacting your hosting provider and make sure that your hosting server does support the TLS 1.2 version.Questions & Support
↑ Back to top
Already purchased and need some assistance? Get in touch the developer via the Help Desk.