Overview
↑ Back to topHeads up! We’re retiring this plugin in favor of the WooCommerce CyberSource plugin with the latest features. Click here to learn more about this plugin.
CyberSource Secure Acceptance – Silent Order Post (SA SOP) is a credit card payment gateway that allows full customization of checkout, receipt and error pages, yet simplifies PCI compliance by posting credit card data directly to secure CyberSource servers. You can even accept eChecks in versions 2.0+.
This gateway uses the new Secure Acceptance Protocol for CyberSource to ensure that it’s updated and fully compliant with CyberSource requirements.
- If you are a new customer, please check out our WooCommerce CyberSource plugin.
- If you are a current CyberSource SA SOP user and want to migrate now, please contact WooCommerce support to request an early migration to the new plugin.
Looking for details on 3D Secure? See this FAQ entry.
Requirements
↑ Back to top- A CyberSource account (fees apply)
- PHP 5.6+ (You can see this under WooCommerce > Status)
- An SSL certificate on your site
Installation
↑ Back to top- Download the extension from your dashboard
- Go to Plugins > Add New > Upload and select the ZIP file you just downloaded
- Click Install Now, and then Activate
- Click the Configure link and read the next section to learn how to setup and configure the plugin.
Setup
↑ Back to topGenerate Access / Secret Key
↑ Back to top- Log in to CyberSource business center with the merchant id provided to you by CyberSource.
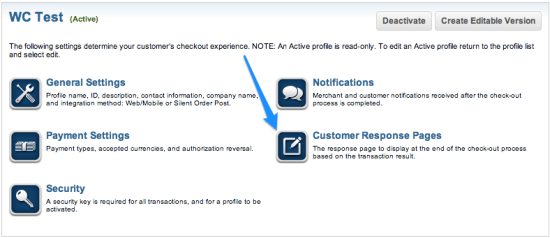
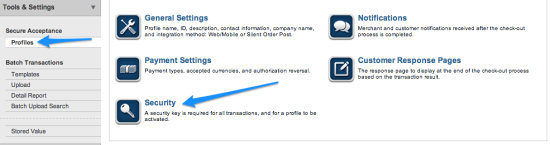
- Go to Tools & Settings > Secure Acceptance > Profiles, and click “Create New Profile” in the bottom right to create a payment profile.
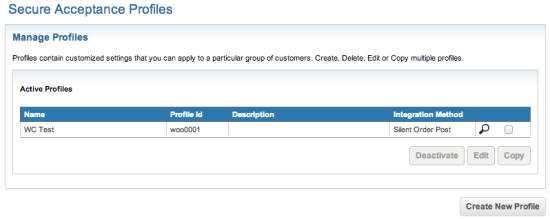
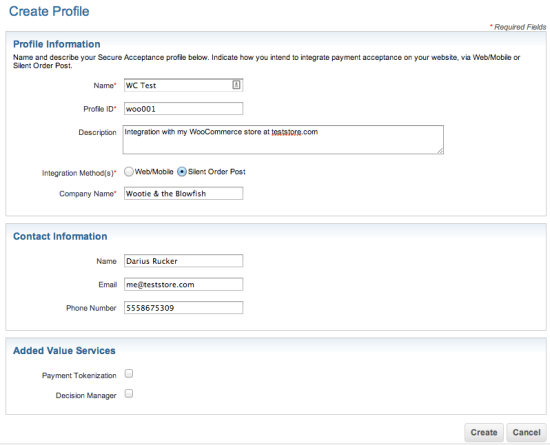
View Profiles - Enter all profile details – Select “Silent Order Post” for the method – and click “Save”. Your profile id can be set to whatever you want (min 7 characters), but will be needed for the plugin settings page. Save this and enter it there.
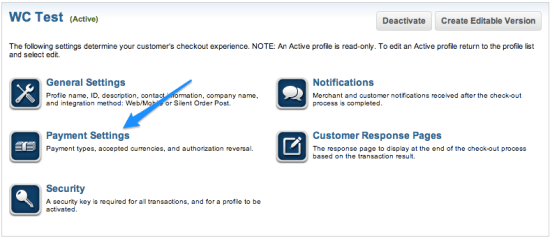
- Now you’ll have to set up your Payment Methods – click on “Payment Settings”:
Payment Settings - Click “Add / Edit Card Types” and select any cards for which you’ll be accepting payments. If you decided to accept eChecks, you should enable these as well.
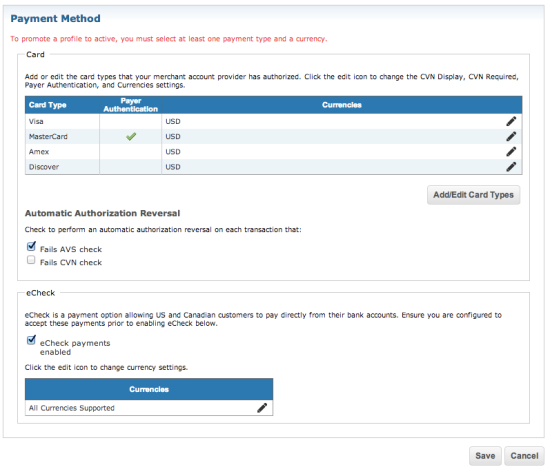
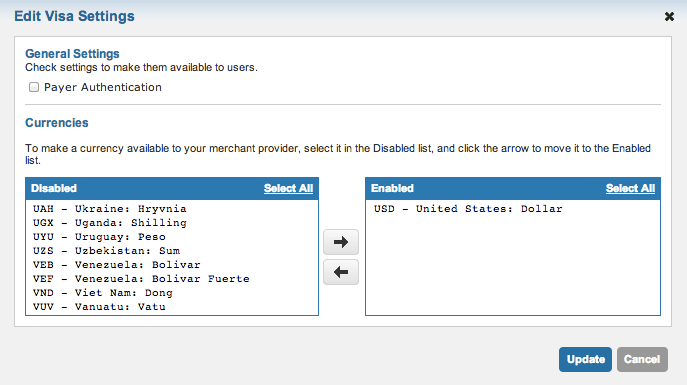
Add Payment Methods - Once you’ve added your card types and enabled eChecks (optional), you’ll need to add currencies you’ll accept. Click the pencil “edit” icon to add these currencies:

Add Currencies - Save your Payment Settings when you’ve added Credit Card and eCheck currencies, then move on to Customer Response Pages.
Customer Response Page - Enter the URL provided in the plugin settings page. This is most likely
https://MYSTORE.com/?wc-api=WC_CyberSource_SA_SOP
but may be different. Please ensure that you usehttps://.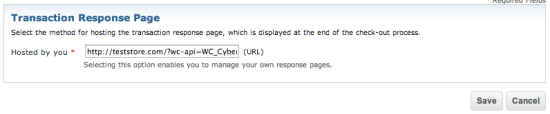
- Save this and you can optionally move on to Customer Notifications and fill out the desired info (not required).
- Finally, move on to “Security”:
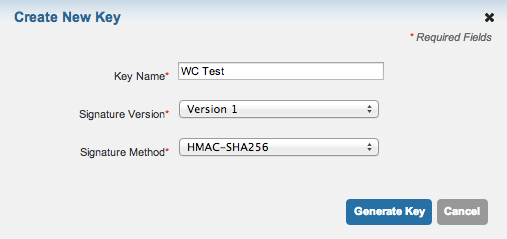
- Click “Create New Key” to generate access / security keys for your profile.
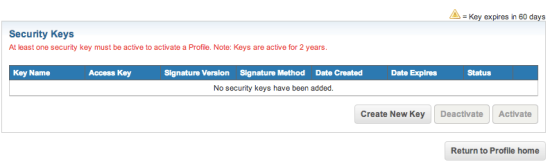
Create New Keys - Enter the name of your store / profile and click “Generate”:
Create a Key - You’ll now be provided with security and access keys. Copy them and save them on the plugin settings page, along iwth the profile id you set when you created your new profile.
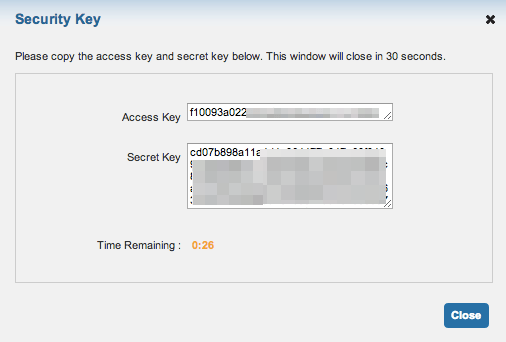
Copy Keys


Extension Settings
↑ Back to topCyberSource SA SOP Settings
- Enable/Disable – Enable or disable the payment method.
- Title – Lets you set the title of the gateway shown on the checkout.
- Description – This is the text shown under the title during checkout. Limited HTML is allowed. If you enable test mode, this section will also display a notice along with test credit card numbers.
- Card Verification – Enable this to display the Card Security Code (CV2) field on checkout.
- Address Verification Service (AVS) – Enable this to perform an AVS check on customers’ billing addresses.
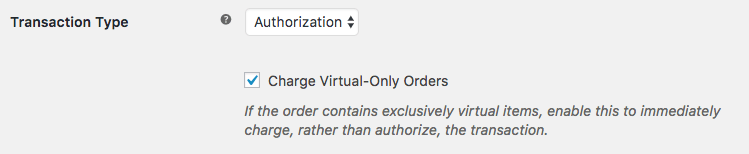
- Transaction Type – This controls how transactions are submitted to CyberSource. You may choose either “Charge” or “Authorization”. If you select “Authorization”, you must manually capture and settle payments in your CyberSource control panel after the transaction has been submitted. This defaults to “Charge”. Not sure what this means? Check out this tutorial on Authorizing vs. Authorizing and Capturing.
- Charge Virtual-Only Orders – (Shown if Transaction Type is set to “Authorization”) Enable this to force charges on order containing only virtual items so they’re captured immediately instead of authorized (for example, to grant download access right away)
- Accepted Card Logos – This controls the card logos that display during checkout. This is purely cosmetic and has no affect on the cards actually accepted by your merchant account. Ensure that you enable these cards in your CyberSource Business Center, under Tools & Settings > Secure Acceptance Profiles > Payment Settings.
- Environment – Switch between “Test” and “Live” credentials. Enable “Test” to send transactions to your CyberSource Test Account. You must create a test account with CyberSource to use this.
- Share connection settings – Enabling this will allow you to use connection/authentication settings between the credit card and eCheck gateways. If this is disabled, you’ll have to enter a new CyberSource Access Key and Secret Key for eCheck transactions.
- Profile ID – This is the profile id you set for your payment profile. It can be found under Tools & Settings > Secure Acceptance Profiles > General Settings.
- Access Key – The Access Key for your CyberSource Account. Follow the steps above to get this.
- Secret Key – The Secret Key for your CyberSource Account. Follow the steps above to get this.
- Transaction Response URL Configured – Check to confirm you’ve correctly entered the Response URL in your CyberSource account (using https://).
- Fail on Review – Marks the order as failed when CyberSource decision is “REVIEW”. With this checked an order will be marked as failed in WooCommerce when the CyberSource decision is “REVIEW” (which can happen for instance with an incorrect CVN), allowing the customer to re-attempt payment. Unchecked, the order will be marked as “ON-HOLD” and may require you to take additional steps to settle the transaction in the CyberSource Business Center and complete the transaction.
- Display SSL Seal – Display the “Digital Security by Entrust SSL” seal image on the Pay page. This is purely for customer information purposes and does not provide any additional security to the gateway.
- Detailed Decline Messages – Enable to display detailed messages to customers to provide reasoning for declines when possible.
- Debug Mode – Enable this to place the gateway in debug mode, which will output the full response from the CyberSource servers on the payment page, for debugging purposes. Be sure to disable this prior to going live. For best performance, please do not enable this unless you are having issues with the plugin.

CyberSource SA SOP eCheck Settings
- Enable/Disable – Enable or disable the payment method.
- Title – Lets you set the title of the gateway shown on the checkout.
- Description – This is the text shown under the title during checkout. Limited HTML is allowed. If you enable test mode, this section will also display a notice along with test credit card numbers.
- Environment – Switch between “Test” and “Live” credentials. Enable “Test” to send transactions to your CyberSource Test Account. You must create a test account with CyberSource to use this.
- Share connection settings – Enabling this will allow you to use connection/authentication settings between the credit card and eCheck gateways. If this is disabled, you’ll have to enter a new CyberSource Access Key and Secret Key for eCheck transactions.
- Profile ID – This is the profile id you set for your payment profile. It can be found under Tools & Settings > Secure Acceptance Profiles > General Settings.
- Access Key – The Access Key for your CyberSource Account. Follow the steps above to get this.
- Secret Key – The Secret Key for your CyberSource Account. Follow the steps above to get this.
- Check Number Field – Select whether the check number field is hidden, shown, or required at checkout.
- Debug Mode – Enable this to place the gateway in debug mode, which will output the full response from the CyberSource servers on the payment page, for debugging purposes. Be sure to disable this prior to going live. For best performance, please do not enable this unless you are having issues with the plugin.
Testing
↑ Back to topCredit Card Testing
↑ Back to top- Card Number – 4111111111111111
- Card Type – VISA
- Expiration Date – any date in the future
- Card Security Code – any string, ie 123
eCheck Testing
↑ Back to top- Account Number – 4100
- Routing Number – 121042882
- Drivers License Number – any string, ie 1234
- Drivers License State – any state
Troubleshooting
↑ Back to topTransaction Errors
↑ Back to topBrowser not Redirecting
↑ Back to top- Log in to your CyberSource Business Center
- Go to Tools & Settings > Secure Acceptance: Profiles
- Find the field named “Customer Response URL” under the title “Customer Response Pages” and set the value to:
https://MYSTORE.com/?wc-api=WC_CyberSource_SA_SOPwhere MYSTORE is your site name - If this doesn’t work, check the plugin settings page to confirm that this is the correct URL.
Pending Orders
↑ Back to top- Log into your WooCommerce admin and check for any order notes attached to the pending order in question
- If there are no notes, log into your CyberSource Business Center and check for completed or failed transactions. If you see records for the pending orders in your Business Center, this probably indicates an issue with the automatic redirection, and you should configure redirects manually as explained above.
- If you see no record of the transactions, ensure that both the WooCommerce CyberSource SOP plugin and CyberSource Business Center are properly configured
- Perform a test live transaction, for instance in authorize-only mode, to verify that the transaction completes and the redirect occurs
Frequently Asked Questions
↑ Back to topQ: Does this plugin support 3D Secure? I need to meet Strong Customer Authentication (SCA) requirements. A: This is coming soon! WooCommerce CyberSource does not yet support 3D Secure at this time, but this is in progress to launch before the PSD2 deadline. (Learn more about PSD2 here.) Migrating from Authorize.Net? The updates to this plugin to support 3DS v2.0 will also support the same features as WooCommerce Authorize.Net, so you won’t lose any features in migrating. Our support team is happy to help with any migration questions you have.